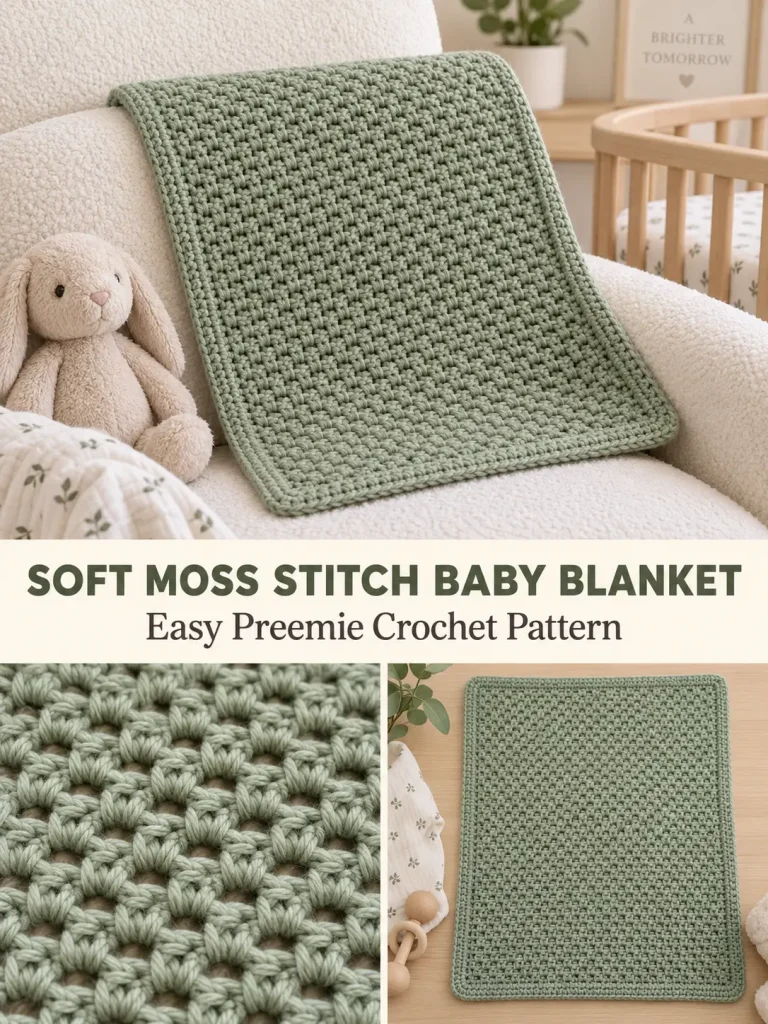
This small crochet baby blanket uses one of the simplest texture stitches in crochet: the moss stitch.
Alternating single crochet stitches and chain spaces create a soft, lightly textured fabric that looks much more interesting than rows of plain single crochet while remaining easy enough for a confident beginner.
The blanket is worked back and forth in one piece, so there are no motifs to join and very little finishing. A simple single crochet border gives the edges a neat frame without making the blanket bulky.
Skill Level
Beginner / Confident Beginner
You should know how to:
- chain
- single crochet
- skip a stitch
- work into a chain space
- turn your work
- fasten off
- weave in ends
The main thing to learn is identifying the chain-1 spaces from the previous row.
Finished Size
Approximately:
20 inches wide × 26 inches long
The exact finished measurement depends on yarn, hook size, and personal tension.
The pattern is easy to resize.
Materials
- Approximately 400–475 yards of soft medium #4 yarn
- 6 mm crochet hook
- Yarn needle
- Scissors
- Stitch markers, optional
- Measuring tape
For a baby blanket, choose yarn that is soft against the skin and practical to wash.
Abbreviations — US Terms
ch – chain
sc – single crochet
sl st – slip stitch
st(s) – stitch(es)
sp – space
ch-1 sp – chain-1 space
sk – skip
Special Stitch
Moss Stitch
The moss stitch alternates:
1 sc, ch 1, skip 1
After the foundation row, the single crochet stitches are worked into the chain-1 spaces, rather than into the tops of the previous single crochet stitches.
This produces the characteristic woven-looking texture.
Gauge
Gauge is not critical if you are making the blanket to your own preferred dimensions.
For the sample size, aim for approximately:
13–14 moss-stitch repeats = 4 inches
Measure after several rows rather than relying only on the foundation-chain measurement, because the fabric can change width once the stitch pattern is established.
Pattern Notes
The blanket is worked in rows.
Do not turn the work until instructed.
The beginning ch 2 represents the height needed to reach the first chain space. It is part of the edge structure rather than an additional regular single crochet.
Keep the ch-1 spaces relaxed. If they are crocheted very tightly, they can become difficult to find on the following row.
The foundation must contain an even number of chains.
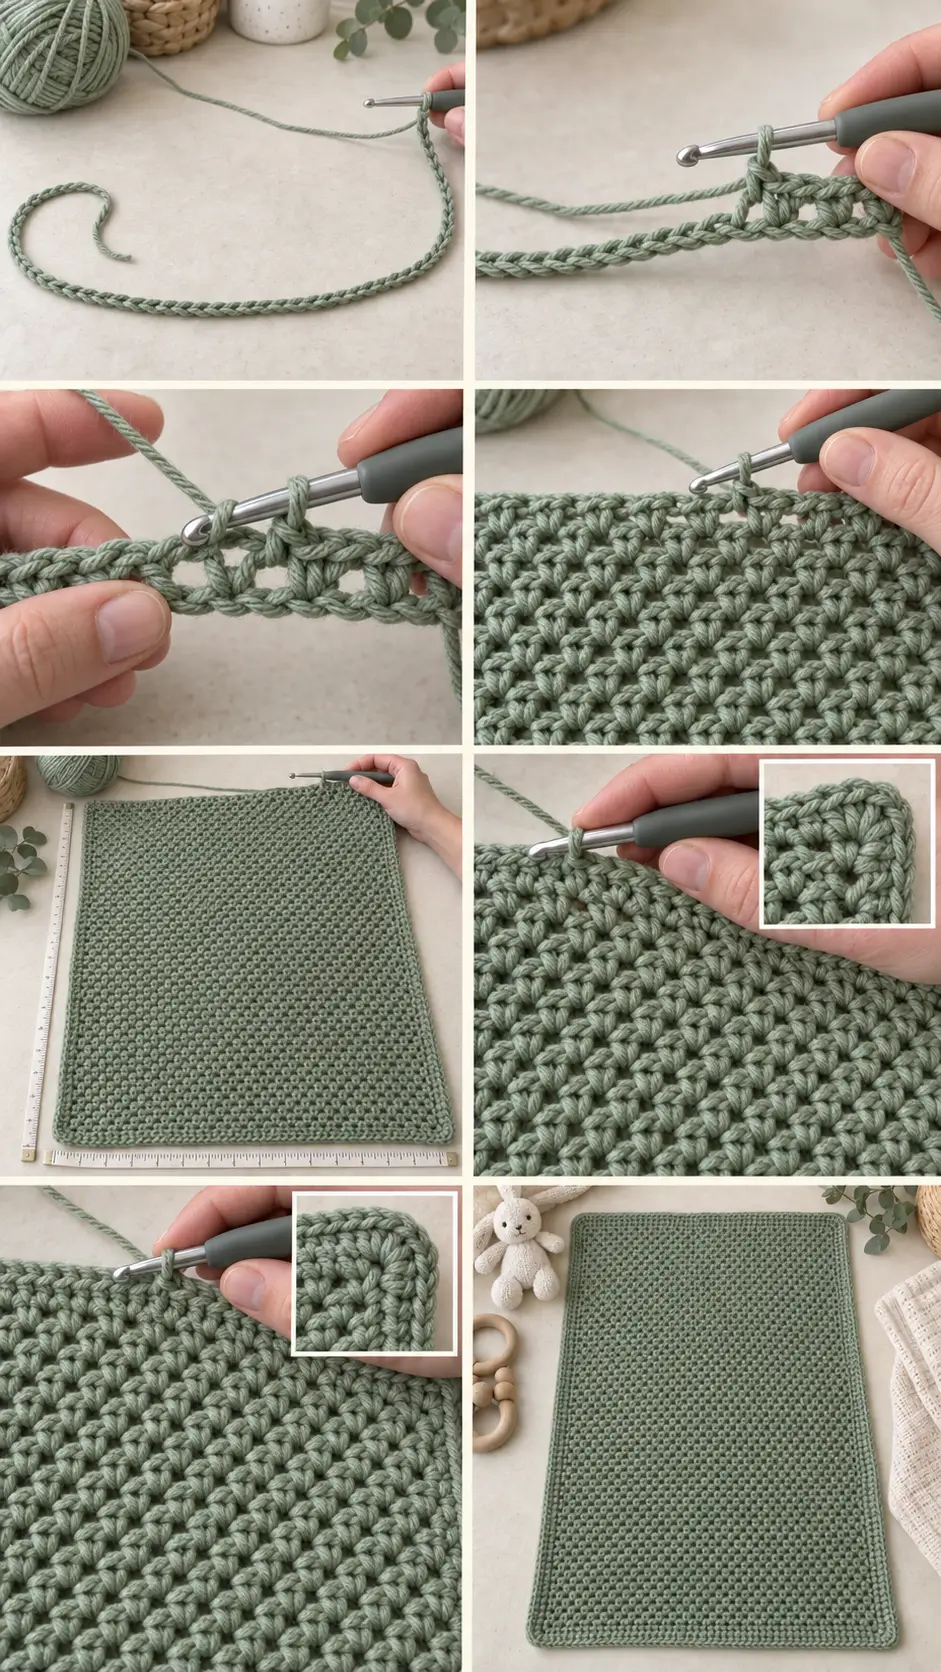
PART 1 — Foundation Chain
Using your main yarn:
Chain 70.
Do not make the foundation chain too tight.
If necessary, use a hook 0.5 mm larger for the foundation chain, then switch back to the 6 mm hook.
Row 1 — Establish the Moss Stitch
Sc in the 4th chain from the hook.
Ch 1.
Skip the next chain.
Sc in the next chain.
Repeat across:
*ch 1, sk 1 ch, sc in next ch*
Continue until the end of the foundation chain.
The final worked stitch should be a single crochet.
Turn.
What You Should See
You should have a row containing alternating:
sc – ch-1 space – sc – ch-1 space
The small chain spaces will become the working spaces for all following rows.
Row 2
Ch 2.
Sc into the first ch-1 space from the previous row.
Ch 1.
Skip the next sc.
Sc into the next ch-1 space.
Repeat:
*ch 1, sc in next ch-1 sp*
across the row.
At the end, work the final sc into the turning-chain space at the edge.
Turn.
Row 3
Ch 2.
Sc into the first ch-1 space.
Repeat across:
*ch 1, sc in next ch-1 sp*
Work the final sc into the turning-chain space.
Turn.
Rows 4 and Beyond
Repeat Row 3.
Continue until the blanket measures approximately:
25 inches long
before adding the border.
Depending on your tension, this may require approximately 85–95 rows.
Do not rely entirely on row count.
Measure the actual blanket.
Understanding Where to Insert the Hook
After the first couple of rows, you should stop thinking in terms of individual stitch tops.
Instead, look for the visible gaps created by each previous:
ch 1
Insert your hook directly into that gap.
Work:
sc, ch 1
Then move to the next chain space.
This makes the pattern very rhythmic once you recognize the structure.
Keeping the Edges Straight
One of the most common problems with moss stitch is accidentally losing the final stitch.
At the end of each row, make sure you work the final single crochet into the turning-chain space from the previous row.
If you skip that space repeatedly, the blanket will gradually become narrower.
Using a stitch marker in the final edge space can help while you are learning.
PART 2 — Simple Border
Once the blanket body reaches the desired length, do not fasten off.
The border is worked around all four sides.
Border Round 1
Ch 1.
Work sc evenly across the top edge.
At the first corner, work:
3 sc
Work sc evenly down the first long side.
Because the sides are made from row ends, distribute the stitches evenly rather than forcing one exact stitch into every visible loop.
At the second corner:
3 sc
Work across the foundation edge.
At the third corner:
3 sc
Work evenly up the second long side.
At the final corner:
3 sc
Join with a sl st to the first sc.
Check the Blanket
Lay the blanket flat.
The border should not:
- ruffle
- buckle
- pull inward
If it ruffles significantly, you have too many side stitches.
If it pulls inward, add a few more stitches along the sides.
Border Round 2
Ch 1.
Sc in every stitch around.
At each corner, locate the center stitch of the previous 3-sc corner.
Work:
3 sc in that center stitch
Continue around.
Join with a sl st.
Fasten off.
Optional Third Border Round
For a slightly more substantial frame, repeat Border Round 2 once more.
This is especially useful if the blanket body feels very soft and you want a more defined edge.
Finishing
Cut the yarn, leaving a tail approximately 6 inches long.
Pull the tail through the final loop.
Thread it onto a yarn needle.
Weave the end through several stitches on the wrong side.
Change direction and weave through another section before trimming.
Repeat for the starting tail.
Blocking
A light blocking can make the moss-stitch texture look much more even.
Follow the care instructions for your yarn.
Lay the blanket flat and gently shape it into a rectangle.
Straighten:
- top edge
- bottom edge
- both sides
- four corners
Allow it to dry completely.
Avoid aggressively stretching a baby blanket.
How to Make the Blanket Wider
Moss stitch is easy to resize.
The foundation chain simply needs to remain an:
even number
To make the blanket wider, add chains in increments of:
2
For example:
- Chain 62 for a smaller blanket
- Chain 70 for this version
- Chain 78 for a wider blanket
- Chain 86 for a larger blanket
Because yarn and tension vary, crochet several rows and measure before committing to a very large project.
How to Make the Blanket Longer
No calculation is required.
Simply continue repeating the moss-stitch row until the blanket reaches your desired length.
Then add the border.
Small Preemie Version
For a more compact blanket:
Start with approximately:
Chain 62
Work the moss stitch until the piece measures approximately:
22–24 inches long
Add the same border.
Larger Baby Blanket
For a larger everyday baby blanket:
Start with:
Chain 94
Work until the blanket measures approximately:
34–36 inches long
Then add the border.
Always measure your own fabric because hook size and yarn thickness can change the finished dimensions considerably.
Two-Color Moss Stitch Variation
The moss stitch is especially attractive with color changes.
Try alternating:
2 rows cream
2 rows sage
or:
2 rows white
2 rows dusty rose
Because the single crochet stitches are worked into chain spaces, alternating colors creates a woven or pixel-like appearance.
One-Row Stripe Variation
For finer stripes, change color after every row.
This creates a more blended texture.
Be aware that frequent color changes also create more yarn ends unless you carry the unused yarn neatly along the side.
Color Ideas
Soft Sage
Sage green throughout for a calm neutral nursery look.
Cream
Warm ivory or cream creates a timeless blanket.
Baby Blue
Soft blue works beautifully with the subtle texture.
Blush
Dusty pink or pale rose gives the blanket a gentle color without overwhelming the stitch.
Neutral
Oatmeal, beige, greige, or light taupe.
Modern Two-Tone
Cream + sage
Cream + camel
White + dusty blue
Ivory + muted terracotta
Choosing Yarn for a Baby Blanket
For a blanket intended for a baby, prioritize:
- softness
- easy washing
- smooth yarn texture
- consistent thickness
- comfortable drape
A smooth yarn also makes the moss stitch easier to see and work into.
Very fuzzy yarn can make the chain spaces harder to identify.
Why Use a Larger Hook?
A medium #4 yarn can often be crocheted with a smaller hook, but using a slightly larger hook helps the moss stitch stay soft.
If your blanket feels:
too stiff: move up one hook size.
If it feels:
too loose or open: move down one hook size.
The goal is a soft fabric with small, consistent openings.
Tips for a Consistent Moss Stitch
Do Not Crochet Into the Single Crochets
After Row 1, most stitches are worked into the chain-1 spaces.
This is the key to the moss-stitch texture.
Keep the Chains Relaxed
Tight ch-1 stitches make the following row frustrating.
Mark the Last Space
Beginners often miss the final turning-chain space.
A stitch marker can prevent the blanket from narrowing.
Count Occasionally
Check the number of chain spaces every few rows.
Catching a mistake early is much easier than unraveling many inches of crochet.
Measure the Width Early
After approximately 6–8 rows, stop and measure.
This gives a more accurate width than measuring only the starting chain.
Common Problems
Blanket Becomes Narrower
The final edge stitch is probably being missed.
Make sure you work the last sc into the turning-chain space.
Blanket Becomes Wider
You may be accidentally working an extra sc into the edge.
Each row should preserve the same number of moss-stitch spaces.
Fabric Feels Stiff
Use a larger hook or loosen your tension.
Chain Spaces Are Hard to Find
Your chains are probably too tight.
Make the ch-1 slightly taller and more relaxed.
Sides Look Uneven
Use stitch markers at both edges until the pattern becomes familiar.
The border will also help tidy minor irregularities.
Border Ruffles
Too many stitches were worked along the side edges.
Undo that section and reduce the stitch count slightly.
Border Pulls Inward
Add several more evenly spaced sc stitches along the sides.
Donation Considerations
If you plan to donate a handmade blanket to a hospital, NICU, or charity, check that organization’s current requirements before beginning.
Different organizations may have specific rules about:
- blanket dimensions
- yarn fiber
- laundering
- smoke- and pet-free storage
- stitch openness
- packaging
Making the blanket to the receiving organization’s specifications is more useful than assuming one universal preemie-blanket size.
Why Moss Stitch Works So Well for Small Blankets
Moss stitch uses only chains and single crochet, but the alternating placement creates considerably more texture than ordinary single crochet.
It also has a pleasant rhythm:
single crochet → chain → single crochet → chain
Once the first rows are established, there is very little counting.
That makes it a good project for beginners who want something more interesting than a completely plain blanket without moving into complicated stitch combinations.
Soft Moss Stitch Baby Blanket
This blanket is intentionally simple: one repeating stitch, one rectangular piece, and a clean border.
The small chain spaces create subtle texture while the larger hook helps the fabric stay soft and flexible. It can be worked in one calm solid shade or turned into a striped blanket simply by changing colors between rows.
The result is a practical, easily resized crochet blanket that works particularly well when you want a straightforward project with a polished finished texture.