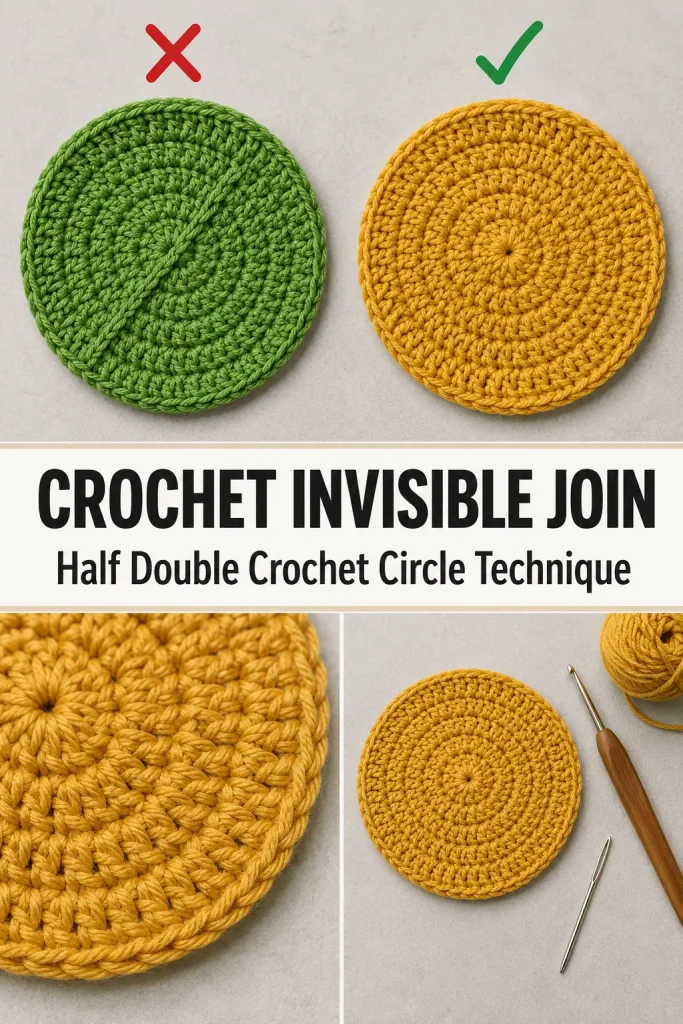
A smooth crochet circle can completely change the finished look of coasters, placemats, bag bases, baskets, hats, and round crochet motifs. Traditional slip-stitch joins often create a visible diagonal seam or a small raised bump where each round begins and ends.
This easy crochet technique uses a sewn invisible join at the end of every half double crochet round. Each new round begins in a different area with a standing half double crochet, helping the joins disappear into the surrounding stitches. The included practice pattern creates a flat, neat circle that can be used as a coaster or expanded into a larger crochet project.
Description
The finished piece is a smooth, flat crochet circle worked entirely in half double crochet. Ten evenly spaced increases are added during every round to maintain the circular shape. Instead of joining with a slip stitch, each round is fastened off and closed with a yarn needle, creating a false stitch that closely resembles the top loops of a regular half double crochet. The starting point is moved between rounds, preventing a visible seam from developing in one location.
Materials
- Worsted-weight cotton or acrylic yarn
- 4.5 mm crochet hook
- Yarn needle
- Scissors
- Stitch markers
- Blocking mat and pins, optional
Abbreviations
- hdc: half double crochet
- inc: work 2 half double crochet stitches in the same stitch
- MR: magic ring
- Rnd: round
- st: stitch
- sts: stitches
- yo: yarn over
Pattern Notes
- This pattern uses US crochet terminology.
- The circle is worked in completed rounds rather than in a continuous spiral.
- Do not join rounds with a slip stitch.
- Each round is closed with a sewn invisible join.
- Begin every new round with a standing half double crochet.
- The standing half double crochet counts as the first stitch of the round.
- Move the starting point of each new round several stitches away from the previous join.
- Use a stitch marker to identify the first stitch of each round.
- Ten increases are added in every increase round.
- The written pattern creates a circle approximately 6 inches across, depending on yarn, hook size, and tension.
- Additional rounds may be added using the established increase sequence.
- Difficulty level: confident beginner.
Why Regular Joins Create a Visible Seam
A traditional joined round often begins with one or two chains and ends with a slip stitch. The turning chain may be shorter or narrower than the surrounding half double crochet stitches, while the slip stitch adds extra thickness at the join.
When these joins are stacked above one another, they can form:
- A visible diagonal line
- A raised ridge
- A small gap beside the starting chain
- An uneven outer edge
- A noticeable bump at the end of each round
The invisible join replaces the slip stitch with a false stitch formed using the yarn tail. Moving the beginning of each new round prevents the joins from stacking in the same place.
Step-by-Step Instructions
How to Make a Standing Half Double Crochet
A standing half double crochet replaces the beginning chain and looks more like a regular stitch.
- Make a slip knot and place it on the hook.
- Hold the slip knot firmly against the hook.
- Yo.
- Insert the hook into the selected stitch.
- Yo and pull up a loop. You should have three loops on the hook.
- Yo and pull through all three loops.
The completed standing hdc counts as the first stitch of the round.
Place a stitch marker in its top loops.
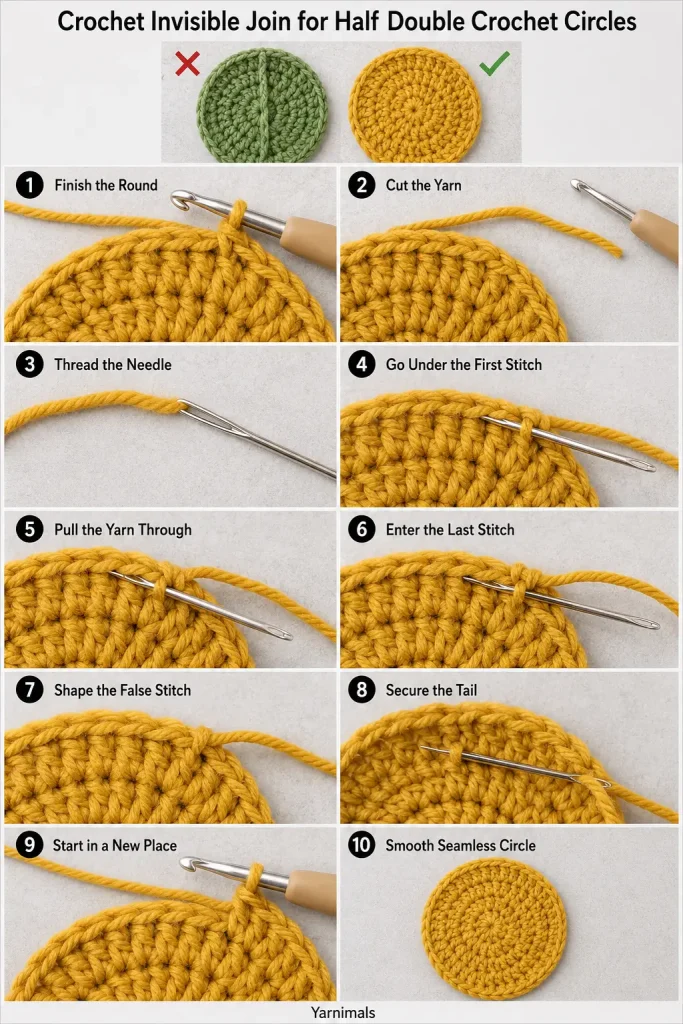
How to Make the Invisible Join
After completing the final hdc of a round:
- Cut the yarn, leaving a tail approximately 6 inches long.
- Pull the yarn tail completely through the loop on the hook.
- Thread the tail onto a yarn needle.
- Insert the needle from front to back under both top loops of the first hdc of the round.
- Pull the yarn through gently.
- Insert the needle from front to back through the back loop of the final hdc.
- Pull gently until the new loop matches the size of the surrounding stitch loops.
- Weave the tail securely into the wrong side.
Do not pull the join too tightly. It should resemble the top V of a normal crochet stitch.
Crochet the Flat Circle
Round 1
Using your chosen yarn, make a MR.
Ch 1 to secure the ring. This chain does not count as a stitch.
Work 10 hdc into the MR.
Pull the ring closed carefully.
Finish with the invisible join.
10 sts
Weave the beginning tail through the center stitches to secure the magic ring.
Round 2
Choose a stitch approximately three stitches away from the previous join.
Join the yarn with a standing hdc in that stitch.
Work 1 additional hdc in the same stitch.
Work 2 hdc in every remaining stitch around.
Finish with the invisible join.
20 sts
Round 3
Begin several stitches away from the previous join with a standing hdc.
Work 1 additional hdc in the next stitch.
Repeat around:
- 1 hdc in the next st
- 2 hdc in the next st
Finish with the invisible join.
30 sts
Round 4
This round uses staggered increases to help prevent the circle from becoming angular.
Begin in a new location with a standing hdc.
Work:
- 1 hdc in the next st
- 2 hdc in the next st
Repeat the following sequence nine times:
- 1 hdc in each of the next 2 sts
- 2 hdc in the next st
Work 1 hdc in the final st.
Finish with the invisible join.
40 sts
Round 5
Begin in a different location with a standing hdc.
Repeat around:
- 1 hdc in each of the next 3 sts
- 2 hdc in the next st
Finish with the invisible join.
50 sts
Round 6
Begin in a new location with a standing hdc.
Work:
- 1 hdc in each of the next 2 sts
- 2 hdc in the next st
Repeat the following sequence nine times:
- 1 hdc in each of the next 4 sts
- 2 hdc in the next st
Work 1 hdc in each of the final 2 sts.
Finish with the invisible join.
60 sts
The circle should now lie flat with a smooth outer edge and no obvious joining seam.
Optional Round 7
To make a larger circle, continue increasing.
Begin in a new location with a standing hdc.
Repeat around:
- 1 hdc in each of the next 5 sts
- 2 hdc in the next st
Finish with the invisible join.
70 sts
Continue Making the Circle Larger
Continue adding one more regular hdc between increases during every new round.
- Round 8: 6 hdc, inc
- Round 9: 7 hdc, inc
- Round 10: 8 hdc, inc
- Round 11: 9 hdc, inc
Stagger the increases in every second round to keep the piece circular.
For example, instead of placing all increases directly above the previous increases, begin with half of the regular stitches before the first increase. Finish the remaining half at the end of the round.
How to Stagger the Increases
If the round requires four regular hdc between increases, divide that number in half.
Begin the round with:
- 2 hdc
- 1 increase
Continue with:
- 4 hdc
- 1 increase
At the end of the round, work the remaining 2 hdc.
This moves the increase points away from one another and prevents the circle from developing obvious corners.
Fixing Common Circle Problems
The Circle Is Curling Into a Bowl
Curling usually means the round does not contain enough increases.
Check that:
- Every increase contains two stitches in one stitch.
- Ten increases were completed.
- No stitches were accidentally skipped.
- The invisible join was not pulled too tightly.
If the stitch count is correct but the circle still curls, your tension may be very tight. Use a slightly larger hook.
The Circle Is Rippling
Rippling usually means there are too many increases or the stitches are too loose.
Check the stitch count carefully.
If the count is correct, try:
- Using a smaller hook
- Working with firmer tension
- Replacing one or two increases with regular hdc stitches
- Blocking the finished circle
A small amount of waviness may flatten after blocking.
The Join Looks Like a Large Loop
The invisible join was probably left too loose.
Pull the yarn tail gently until the false loop matches the size of the top loops beside it. Do not tighten it until the fabric puckers.
The Join Creates a Small Dip
The false loop may be too tight.
Use the yarn needle to loosen it slightly and reshape it so it matches the surrounding stitches.
A Seam Is Still Visible
Make sure you are not starting every round in the same stitch.
Move the beginning of each round several stitches away from the previous join. Weave the yarn tails in different directions so they do not create extra thickness in one area.
Weaving in the Ends
This method creates two tails for every round, so secure them carefully.
Thread the tail onto a yarn needle.
Weave through the back loops and horizontal bars of several nearby stitches.
Change direction and weave through another group of stitches.
Avoid pulling the tail across an open area because it may become visible from the front.
Trim the yarn only after confirming that the join remains secure.
For projects that will receive frequent washing, weave each tail in at least two directions.
Blocking the Circle
Lightly dampen the finished circle.
Place it on a blocking mat with the right side facing upward.
Smooth the center and outer edge with your fingers.
Pin evenly around the perimeter without overstretching the fabric.
Allow the circle to dry completely before removing the pins.
Cotton circles may benefit from wet blocking, while acrylic yarn should be blocked according to the yarn manufacturer’s care instructions.
Ways to Use the Finished Circle
This invisible-join technique works well for many crochet projects, including:
- Drink coasters
- Trivets
- Placemats
- Basket bases
- Round bag bases
- Beret and hat crowns
- Round cushions
- Mandala motifs
- Rug centers
- Amigurumi bases
- Circular blanket centers
For a coaster, stop after Round 5 or 6.
For a placemat, continue until the circle measures approximately 12–14 inches across.
For a basket base, stop increasing when the base reaches the required diameter, then work the next round without increases to begin forming the sides.
Tips and Variations
Cotton yarn is an excellent choice for coasters, placemats, and kitchen projects because it creates firm stitches and handles moisture well.
Use a stitch marker in the standing hdc so you can identify the first stitch when closing the round.
Do not count the false loop created by the invisible join as an extra stitch. It replaces the visible joining space rather than adding another working stitch.
Move the new starting point around the circle rather than following a predictable line.
Use contrasting yarn for the first practice circle. The joins will be easier to inspect while learning the technique.
For a striped circle, change colors at the beginning of any round. The sewn join creates a cleaner color transition than a traditional slip-stitch join.
A slightly loose standing hdc usually blends better than one worked too tightly.
Count every round before cutting the yarn. Correcting a missed increase is easier before the invisible join has been completed.
Frequently Asked Questions
Do I have to cut the yarn after every round?
For the cleanest invisible result, yes. Cutting the yarn allows you to create a sewn false stitch and begin the next round in a different location. A nearly invisible join can be made without cutting, but it may still create a slight seam.
Does the invisible join count as a stitch?
No additional stitch is created. The sewn loop finishes the round by imitating the top loops between the final and first stitches.
Why use ten half double crochet stitches in the first round?
Ten starting stitches generally provide enough space for half double crochet increases to create a flat circle. Fewer stitches may cause cupping, while too many may create rippling.
Conclusion
The crochet invisible join is a small finishing technique that makes a noticeable difference in half double crochet circles. By replacing the slip stitch with a sewn false stitch, beginning each round with a standing hdc, and moving the starting point around the work, you can create a smooth circle without a distracting diagonal seam. Practice the method on a simple coaster, then use it for polished hats, bags, baskets, placemats, and other round crochet projects.



