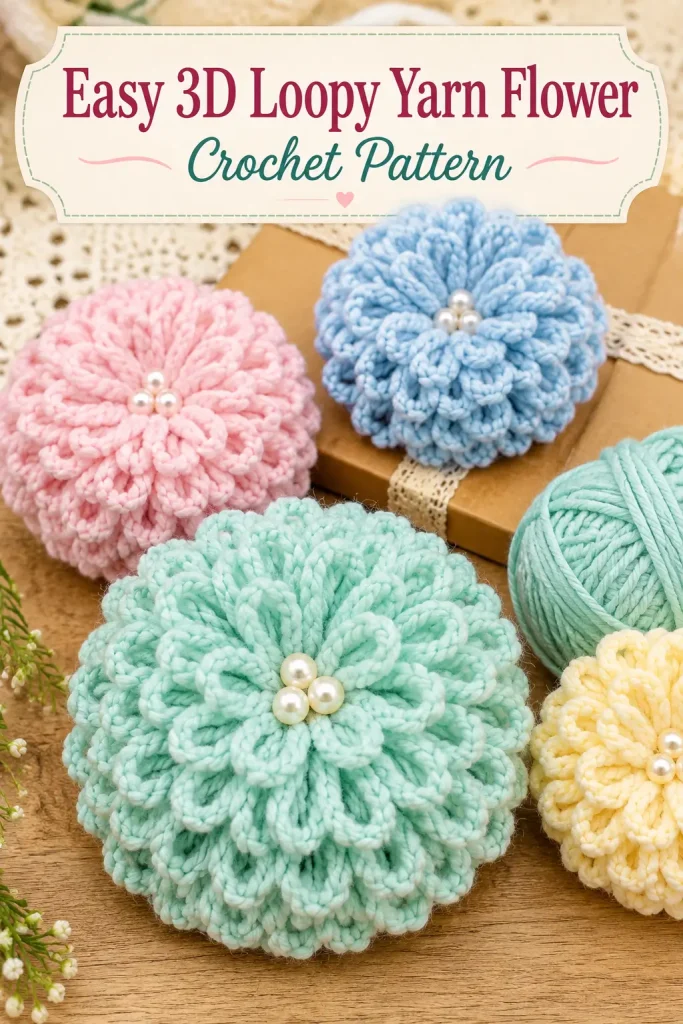
This sweet 3D loopy yarn flower is one of those small handmade projects that looks fancy but is surprisingly simple to make. The finished flower has soft looped petals, a full fluffy shape, and a pretty center that can be decorated with pearls, beads, buttons, or a small crocheted circle.
It is a lovely handmade crochet accessory for hair clips, brooches, bags, hats, baby headbands, gift wrapping, keychains, or craft fair items. The flower is made with repeated yarn loops, then secured at the center so the petals spread out into a round blooming shape.
This is an original flower pattern inspired by the visible yarn-loop flower design. It does not copy any paid or copyrighted pattern. The method below gives you a clear, complete way to make the same style of soft, layered, 3D loopy flower.
Description
This crochet-style loopy flower is made from soft acrylic or cotton yarn wrapped into even loops, stitched firmly through the center, and shaped into a full round flower. The petals are long yarn loops arranged in layers, giving the flower a chrysanthemum or dahlia-inspired look. You can make it in pastel blue, mint, pink, yellow, peach, lavender, or any color you like. The center can be finished with pearl beads like the light blue flower in the image, or left plain for a softer pom-pom style finish.
Materials
- Medium weight yarn in your chosen flower color
- Small piece of cardboard, plastic card, or ruler for wrapping
- 3.0 mm or 3.5 mm crochet hook, optional for the backing circle
- Yarn needle
- Sewing needle
- Strong matching thread or yarn
- Scissors
- 3 small pearl beads, button, or small center decoration
- Felt circle or crocheted circle for the back
- Hair clip, brooch pin, headband, bag charm ring, or keychain hardware, optional
- Hot glue or strong fabric glue, optional
Abbreviations
- ch = chain
- sl st = slip stitch
- sc = single crochet
- inc = increase
- st = stitch
Pattern Notes
This project is made in two main parts: the loopy flower top and the backing circle.
The flower itself is created by wrapping yarn around a flat card to make many even loops. The loops are tied and stitched at the center so they open into a flower shape.
Use a wider card for longer petals and a narrower card for smaller flowers. For a flower around 3 to 3.5 inches wide, use a card about 2 to 2.5 inches wide.
Keep your wrapping tension even. If the loops are too tight, they will be hard to remove from the card. If they are too loose, the flower may look uneven.
Step-by-Step Instructions
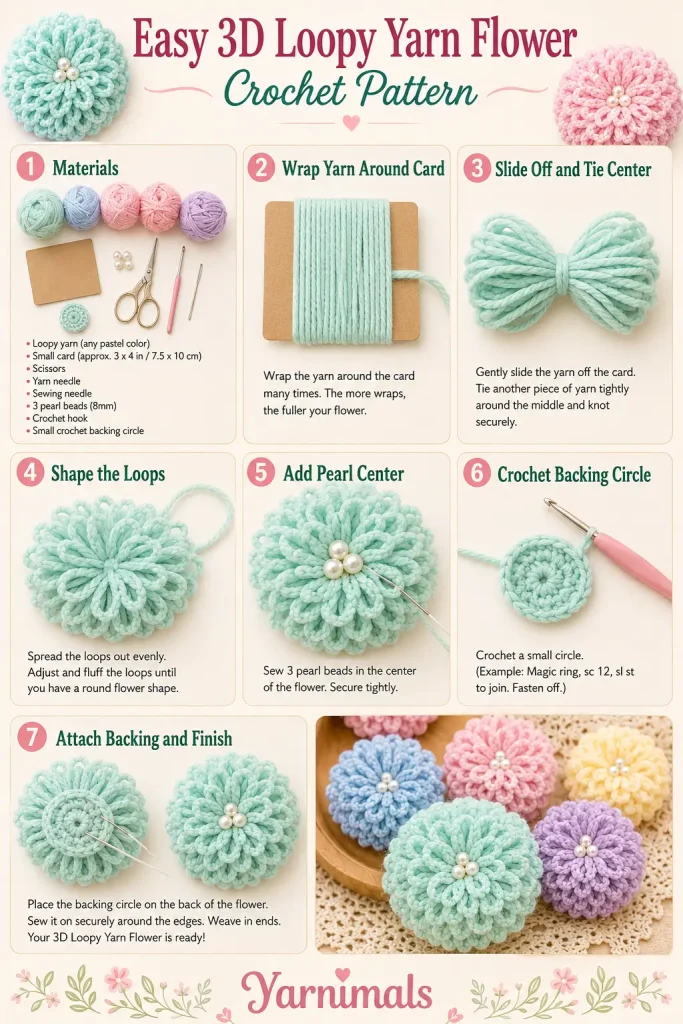
1. Prepare the Wrapping Card
Cut a piece of cardboard or use a plastic card.
For a small flower, use a card about 2 inches wide.
For a fuller flower, use a card about 2.5 inches wide.
The width of the card controls the petal length. The yarn will be wrapped around this card to create the loops.
2. Wrap the Yarn
Hold the yarn tail at the back of the card.
Wrap the yarn around the card 40 to 60 times.
For a softer, lighter flower, wrap about 40 times.
For a full fluffy flower like the image, wrap about 55 to 60 times.
Keep each wrap straight and close to the previous wrap. Do not pull too tightly.
Cut the yarn, leaving a tail about 8 inches long.
3. Remove the Yarn Bundle
Slide the wrapped yarn carefully off the card.
Hold the bundle firmly in the middle so the loops do not shift.
Do not cut the loops. The petals must stay as loops.
4. Tie the Center
Cut a separate piece of yarn or strong thread about 16 inches long.
Wrap it tightly around the center of the yarn bundle.
Tie a strong double knot.
Wrap around the center again 2 or 3 times and tie another knot.
This center tie is important because it holds all the looped petals together.
5. Shape the First Flower Layer
Spread the loops outward with your fingers.
Open the bundle into a round flower shape.
Move the loops evenly around the center so they form a full circle.
At this stage, the flower will look like a loose loopy pom-pom with a tied center.
6. Secure the Flower Shape
Thread a yarn needle with matching yarn or strong thread.
Stitch through the center several times from front to back.
Pull gently but firmly to tighten the center.
Make 5 to 8 small securing stitches across the middle.
This keeps the loops from sliding and helps the flower stay flat on the back while staying puffy on the front.
7. Create a Fuller Layered Look
To make the flower look like the image, gently separate the loops into layers.
Pull some loops forward.
Push some loops slightly backward.
Arrange the loops so they look like rounded petals all around the flower.
Do not cut the loops. The closed loop shape is what gives this flower its soft petal look.
If any loops are much longer than the others, adjust them by gently pulling from the opposite side before the center is fully tightened.
8. Add the Center Beads
Place 3 small pearl beads in the center of the flower.
Use a sewing needle and strong thread to sew each bead securely through the center.
Arrange the beads in a small triangle cluster.
Stitch through each bead at least twice so they do not loosen.
Knot the thread firmly at the back.
You can also use one small button, one large pearl, a crocheted center, or a small rhinestone button.
9. Crochet the Backing Circle
Using matching or neutral yarn, make a small flat crochet circle.
Round 1: Make a magic ring, ch 1, work 6 sc into the ring. Pull tight. Join with sl st.
Round 2: Ch 1, inc in each st around. Join with sl st. 12 sc.
Round 3: Ch 1, sc in first st, inc in next st. Repeat around. Join with sl st. 18 sc.
Fasten off and leave a long tail for sewing.
The backing circle should be slightly smaller than the flower so it does not show from the front.
10. Attach the Backing
Place the crochet circle on the back center of the flower.
Use the long tail to sew the backing circle to the flower.
Stitch around the circle several times, catching the tied center and some of the back loops.
Do not sew through the front beads too much.
Fasten off securely and weave in the end.
11. Add a Clip, Pin, or Headband
For a hair clip, sew or glue the clip to the crochet backing circle.
For a brooch, sew a pin back to the circle.
For a headband, sew the flower directly onto the band.
For a bag charm or keychain, sew a small loop of yarn or attach a jump ring to the backing.
Make sure the flower is fully secure before using or selling.
12. Final Shaping
Fluff the yarn loops with your fingers.
Spread the petals into a round flower.
Check that the center beads sit neatly.
Trim only loose yarn tails, not the petal loops.
The finished flower should look full, soft, round, and dimensional.
Optional Crocheted Center Instead of Beads
If you do not want to use pearls, you can make a small crochet center.
Round 1: Make a magic ring, ch 1, work 6 sc into the ring. Pull tight. Join with sl st.
Fasten off, leaving a long tail.
Sew this small circle to the front center of the flower.
This gives the flower a fully yarn-made finish.
Tips & Variations
Use pastel yarn colors for a soft baby accessory style. Light blue, mint, peach, pink, yellow, and lavender work beautifully.
Use cotton yarn for a neat, crisp flower. Use acrylic yarn for a softer, fluffier flower.
For a larger flower, use a wider card and wrap more times.
For a smaller flower, use a narrow card and wrap fewer times.
To make craft fair sets, create several flowers in matching colors and attach them to hair clips, headbands, or brooch pins.
If the flower feels loose, add more stitches through the center before attaching the backing.
For a very full flower, make two separate loop bundles and sew them together at the center before adding beads.
FAQ
Is this a crochet flower or a yarn craft flower?
This is a crochet-style yarn flower with a crocheted backing. The main flower is made from yarn loops, then secured and finished like a crochet accessory.
Can I make this flower without beads?
Yes. You can use a button, a crocheted center, a felt circle, or leave the center plain.
Can I sell finished flowers made from this pattern?
Yes, you can sell finished handmade flowers made from these instructions. Make them in your own colors and finishes for hair clips, brooches, bags, or headbands.
Conclusion
This easy 3D loopy yarn flower is a lovely beginner-friendly handmade project that looks soft, colorful, and full of texture. It is quick to make, easy to customize, and perfect for turning leftover yarn into pretty crochet accessories.
Make a few in pastel colors, add pearl centers, and use them for hair clips, hats, bags, baby headbands, or handmade gifts.



