Introduction
A ribbed baby beanie is one of those simple handmade pieces that never goes out of style. It is soft, stretchy, warm, and easy to pair with almost any baby outfit, which makes it a beautiful choice for newborn gifts, baby shower baskets, winter photos, and everyday cozy wear.
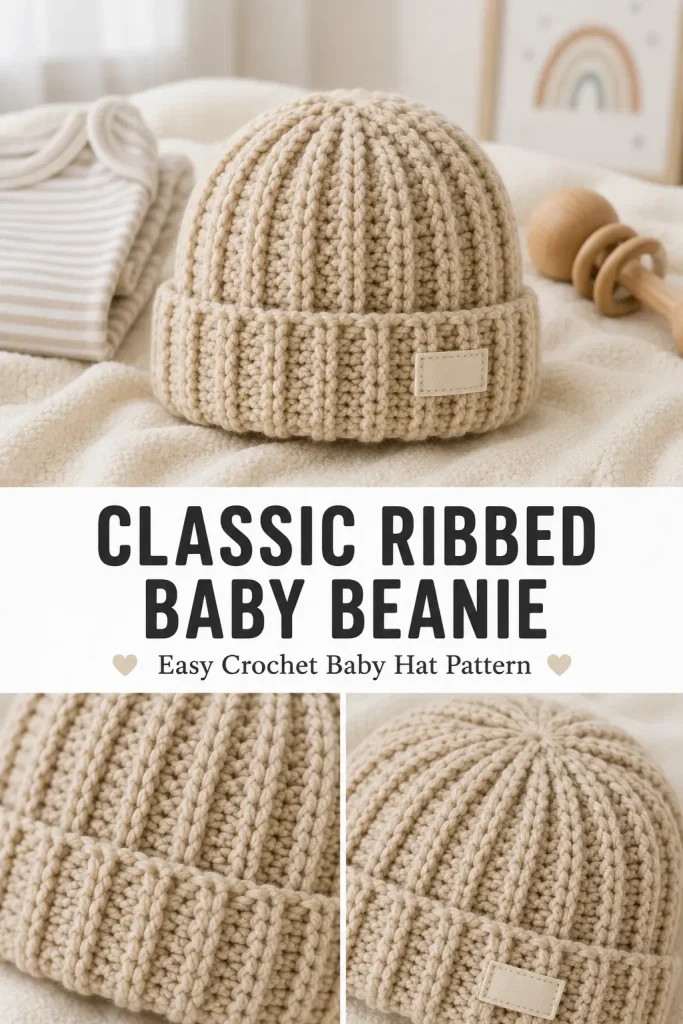
This Classic Ribbed Baby Beanie is an original crochet pattern inspired by clean, modern baby hats with a folded brim and vertical ribbed texture. The design is simple, practical, and realistic to make, with a polished boutique-style finish.
The hat is worked flat as a ribbed rectangle, then seamed into a tube and gathered at the top. This method creates a naturally stretchy beanie that fits comfortably and looks neat without complicated shaping.
Description
This crochet baby beanie has a soft oatmeal beige color, a deep folded brim, and vertical ribbing from top to bottom. The texture looks clean and modern, similar to a knit-style ribbed hat, but it is made entirely with crochet stitches.
The folded brim gives extra warmth around the ears and creates a classic baby beanie shape. You can leave the hat plain for a minimal look or add a small handmade faux leather tag, crochet label, or tiny embroidered initials for a gift-style finish.
This easy crochet pattern is perfect for beginners who want a useful baby project. It works beautifully in soft neutral colors like oatmeal, cream, beige, taupe, gray, ivory, sage, or baby blue.
Materials
- Worsted weight baby yarn in oatmeal beige or your chosen color
- 5 mm crochet hook
- Yarn needle
- Stitch markers
- Scissors
- Measuring tape
- Optional: small handmade tag or crochet label
Finished Size
This pattern is written for approximately 0–3 months.
Approximate finished measurements:
- Hat circumference: 13.5–15 inches with stretch
- Hat height with folded brim: about 5.5 inches
- Brim height when folded: about 1.5 inches
Baby sizes vary, so measure when possible.
Gauge
Using 5 mm hook in half double crochet back loop only:
- 13 hdc stitches = 4 inches
- 10 rows = 4 inches
The ribbed fabric should stretch gently. If your fabric feels too tight, go up half a hook size. If it feels too loose, go down half a hook size.
Abbreviations
- ch: chain
- hdc: half double crochet
- sl st: slip stitch
- st: stitch
- sts: stitches
- BLO: back loop only
- FO: fasten off
Pattern Notes
The hat is worked flat in rows.
Each row is worked in the back loop only to create the ribbed texture.
The rectangle is seamed along the short edge to form a tube.
The top edge is gathered closed with a yarn needle.
The bottom edge is folded upward to create the brim.
Ch 1 at the beginning of each row does not count as a stitch.
Step-by-Step Instructions
Ribbed Hat Panel
Use oatmeal beige yarn and a 5 mm hook.
Foundation Chain
Ch 31.
This chain creates the full height of the hat before the brim is folded.
Row 1
Hdc in the 2nd ch from hook and in each ch across. (30)
Ch 1, turn.
Row 2
Hdc in BLO of each st across. (30)
Ch 1, turn.
Rows 3–40
Repeat Row 2.
After Row 40, the panel should measure about 13.5–14 inches wide without stretching.
The panel should stretch comfortably to about 15 inches.
Do not fasten off yet.
Check the Fit
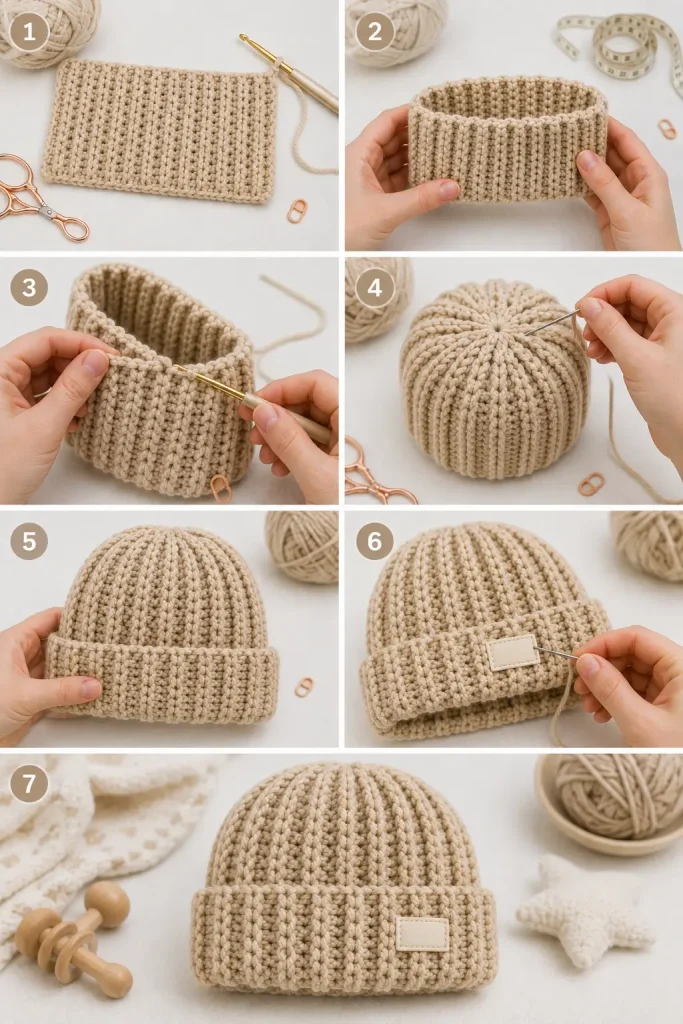
Lay the rectangle flat.
The ribbed lines should run vertically from the top of the hat to the brim.
Wrap the panel gently into a tube and check the circumference.
If you need a smaller hat, remove 2–4 rows.
If you need a larger hat, add 2–4 rows.
Make sure the number of rows gives a snug but stretchy fit.
Seaming the Beanie
Fold the ribbed rectangle so the first row and last row meet.
Insert your hook through both layers.
Sl st evenly through both layers across the short edge to join the rectangle into a tube.
FO, leaving a long tail, about 16–18 inches, for closing the crown.
Turn the seam to the inside of the hat.
Closing the Crown
Thread the long yarn tail onto a yarn needle.
Weave the needle in and out around the top edge of the tube.
Pull tightly to gather the crown closed.
Sew across the gathered top several times to secure it.
Weave the yarn end inside the hat.
If there is a tiny opening at the crown, use the tail to stitch it closed neatly.
Folded Brim
Turn the bottom edge of the hat upward about 1.5 inches.
Adjust the fold so it sits evenly all the way around.
The ribbed texture should continue neatly through the brim.
You can leave the brim loose and adjustable, or tack it in place with a few hidden stitches at the back seam and side edges.
Optional Tag
If using a small handmade tag, place it at the front center of the folded brim.
Use matching yarn or sewing thread to attach it through the tag holes.
Do not use a tag with sharp edges or loose parts for baby items.
For a fully soft baby-safe version, skip the tag or crochet a tiny rectangle label instead.
Finishing
Weave in all remaining ends.
Shape the crown gently with your hands.
Fold the brim evenly.
Check the inside seam to make sure there are no loose yarn tails.
The beanie is now ready to wear or gift.
Size Adjustments
Newborn Size
Ch 29.
Work 36–38 rows.
Finished circumference should stretch to about 13–14 inches.
0–3 Months
Ch 31.
Work 40 rows.
Finished circumference should stretch to about 14–15 inches.
3–6 Months
Ch 33.
Work 44 rows.
Finished circumference should stretch to about 15–16 inches.
6–12 Months
Ch 35.
Work 48 rows.
Finished circumference should stretch to about 16–17 inches.
Always check measurements because yarn tension can change the final size.
Tips & Variations
Use soft baby yarn for the most comfortable result.
Choose neutral colors like oatmeal, ivory, beige, taupe, or gray for a modern baby gift.
Use dusty blue, sage green, blush pink, or mustard for a more colorful nursery style.
For a thicker winter hat, use a warm wool-blend yarn.
For sensitive skin, choose a soft acrylic or cotton-blend baby yarn.
If you want a taller slouchy baby beanie, add 3–4 extra chains to the foundation chain.
If you want a shorter beanie, remove 2–3 chains from the foundation chain.
For a cleaner crown closure, gather the top slowly and stitch across the hole several times.
For a gift set, make matching baby mittens or a small ribbed scarf in the same yarn.
FAQ
Is this crochet baby beanie beginner-friendly?
Yes. This is a beginner-friendly crochet pattern because it uses one main stitch, half double crochet in the back loop only, and simple seaming.
Why is the hat made as a rectangle?
The rectangle method creates a stretchy ribbed texture and avoids complicated crown shaping. It is one of the easiest ways to make a clean ribbed crochet beanie.
What yarn works best for a baby beanie?
Soft worsted weight baby yarn, acrylic yarn, or cotton-blend yarn works well. Choose yarn that is washable and gentle against baby skin.
Can I make this hat without a tag?
Yes. The tag is completely optional. The hat looks beautiful plain, and skipping the tag makes it softer for babies.
How do I make the hat bigger?
Add more rows to increase the circumference. Add more foundation chains if you want the hat taller.
Conclusion
The Classic Ribbed Baby Beanie is a simple, cozy, and timeless crochet baby hat pattern. The ribbed texture gives it stretch, the folded brim adds warmth, and the clean neutral style makes it perfect for gifting.
Make it in oatmeal beige for a modern handmade look, or try soft nursery colors for a sweet personalized baby accessory. This easy crochet pattern is practical, beginner-friendly, and lovely enough to become a go-to baby gift project.



