Citrus Slice Crochet Tote Bag Pattern
Introduction
A crochet tote bag with citrus slices has such a fresh, cheerful look. It feels bright, handmade, and perfect for spring and summer outings, market trips, beach days, craft fairs, or gifting to someone who loves playful accessories.
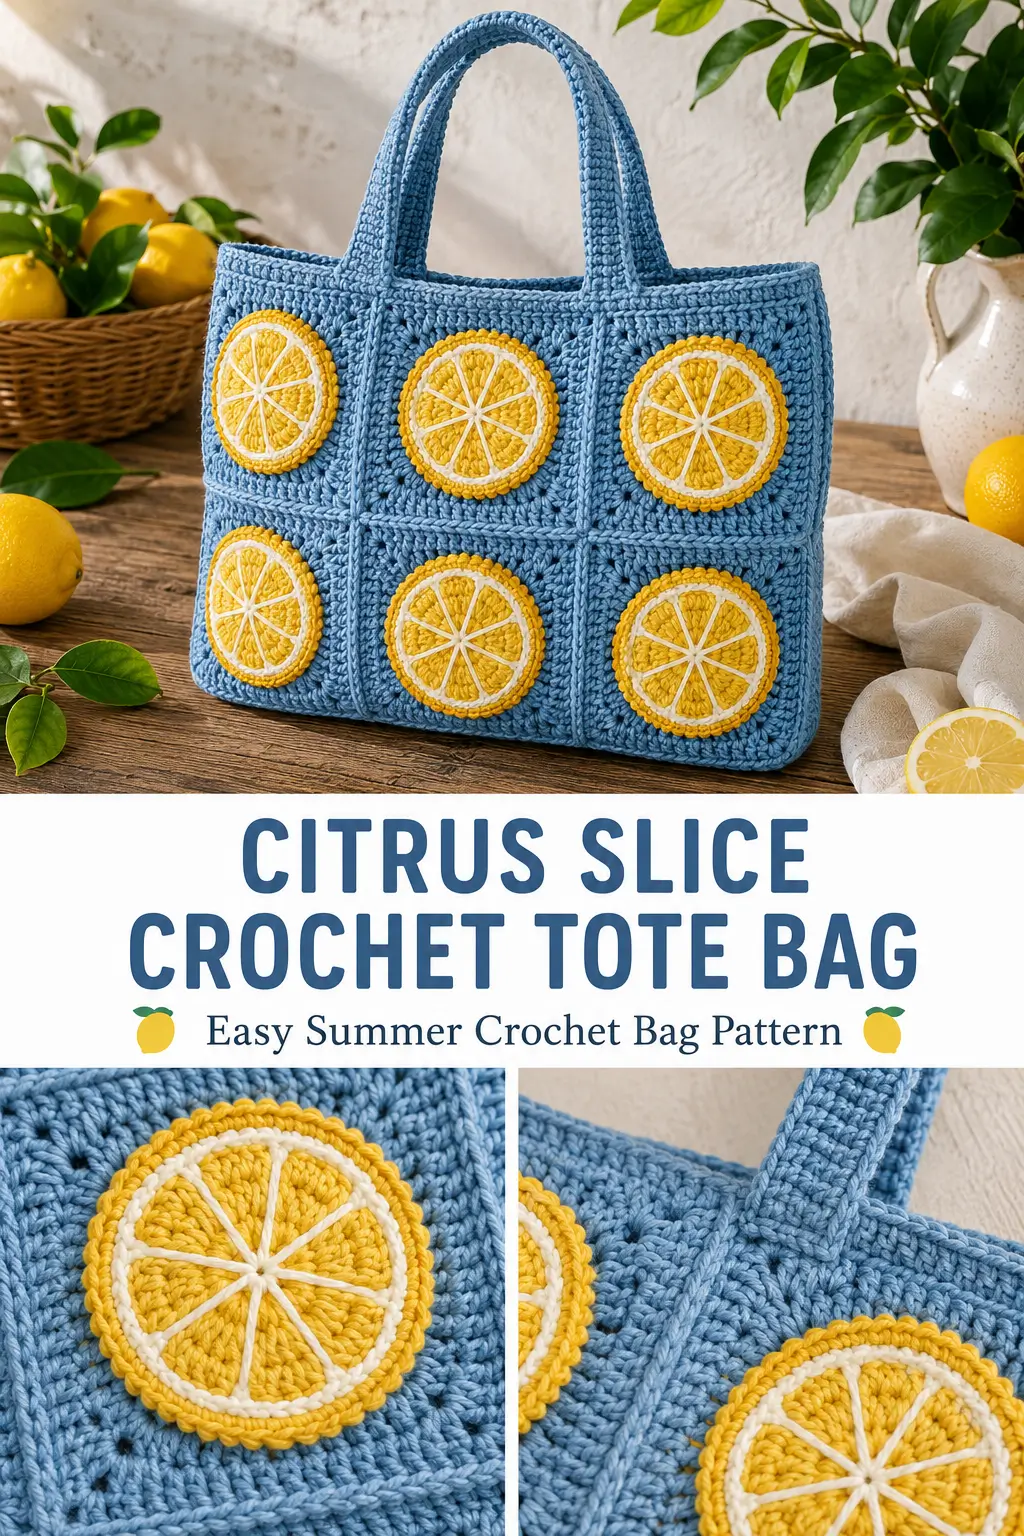
This Citrus Slice Crochet Tote Bag is an original pattern inspired by lemon and orange slice motifs, but it is designed in a simple, buildable way. Instead of trying to copy an unavailable pattern, this version uses a practical modular construction: crochet square panels, make citrus appliqués, sew them on, then join the squares into a sturdy tote.
The result is a colorful crochet bag that looks detailed and eye-catching without becoming confusing. It is a great beginner crochet project for makers who are comfortable with basic stitches, simple joining, and sewing on appliqués.
Description
This crochet tote bag is made from soft blue cotton squares decorated with bright yellow citrus slices. Each citrus motif has a yellow fruit center, a golden peel border, and white embroidered segment lines to create the look of lemon slices. The squares are joined together to form the front and back panels of the bag, then finished with a sturdy top edge and two long crochet handles.
The bag has a clean handmade texture with a fresh summer color palette. The blue background gives it a cool market-bag style, while the yellow citrus appliqués make it feel fun, sunny, and unique.
This easy crochet pattern works beautifully as a handmade summer tote, farmers market bag, beach accessory, gift bag, or colorful everyday crochet purse.
Materials
- Worsted weight cotton yarn in soft blue for the bag squares and handles
- Worsted weight cotton yarn in lemon yellow for the citrus centers
- Worsted weight cotton yarn in golden yellow or orange for the peel border
- Small amount of white cotton yarn for citrus segment embroidery
- 4.5 mm crochet hook
- Yarn needle
- Stitch markers
- Scissors
- Measuring tape
- Optional: cotton fabric lining
- Optional: magnetic snap or button closure
Finished Size
Approximate finished size:
- Width: 13–14 inches
- Height without handles: 10–11 inches
- Handle drop: 9–10 inches
- Square size: about 4.25–4.75 inches each
Finished size may vary depending on yarn, hook size, and tension.
Gauge
Gauge is not critical, but all squares should be the same size.
Make one square first and measure it. If your square is too small, use a larger hook. If it is too large or loose, use a smaller hook.
Abbreviations
- MR: magic ring
- ch: chain
- sc: single crochet
- hdc: half double crochet
- dc: double crochet
- sl st: slip stitch
- st: stitch
- sts: stitches
- sp: space
- FO: fasten off
Pattern Notes
This tote is made from 12 crochet squares.
You will make 6 squares for the front panel and 6 squares for the back panel.
Each square is decorated with one citrus slice appliqué.
The citrus slices are sewn to the squares before the bag is assembled.
The squares are joined in a 3 by 2 layout for each side of the bag.
The bag is joined around the sides and bottom, leaving the top open.
Use cotton yarn for the best structure and durability.
Step-by-Step Instructions
Crochet Bag Squares
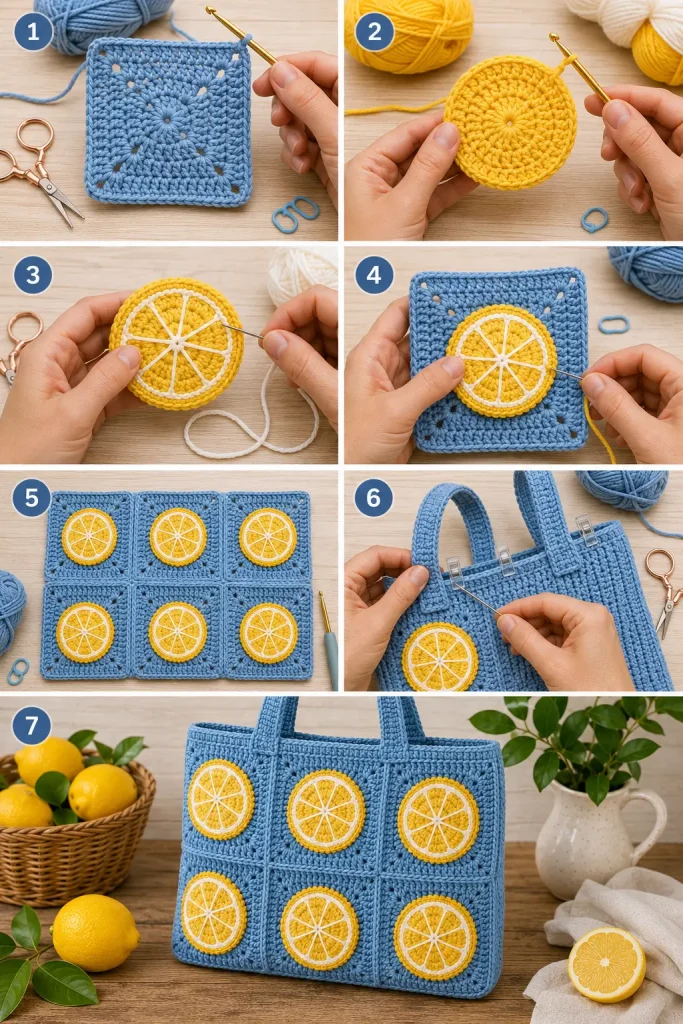
Make 12 using soft blue yarn and a 4.5 mm hook.
Round 1
Make a MR.
Ch 3, work 11 dc into the ring.
Pull ring closed.
Join with sl st to top of beginning ch 3. (12 dc)
Round 2
Ch 3.
Work 1 dc in the same st.
Work 2 dc in each st around.
Join with sl st to top of beginning ch 3. (24 dc)
Round 3
Ch 3.
Dc in next st.
Repeat around: 2 dc in next st, dc in next st.
Join with sl st to top of beginning ch 3. (36 dc)
Round 4: Square Shape
Ch 3.
Dc in next 7 sts.
In next st, work: 2 dc, ch 2, 2 dc.
Repeat 3 times: dc in next 8 sts, in next st work 2 dc, ch 2, 2 dc.
Join with sl st to top of beginning ch 3.
You should now have a rounded square shape with 4 corner spaces.
Round 5: Neat Edge
Ch 1.
Sc in each st around.
In each corner ch-2 sp, work: sc, ch 2, sc.
Join with sl st to first sc.
FO and weave in ends.
Block the squares lightly if needed so they are all the same size.
Citrus Slice Appliqués
Make 12.
Use lemon yellow yarn and a 4.5 mm hook.
Round 1
Make a MR.
Ch 1, work 10 hdc into the ring.
Pull ring closed.
Join with sl st to first hdc. (10)
Round 2
Ch 1.
Work 2 hdc in each st around.
Join with sl st. (20)
Round 3
Ch 1.
Repeat around: hdc in next st, 2 hdc in next st.
Join with sl st. (30)
Switch to golden yellow or orange yarn.
Round 4: Peel Border
Ch 1.
Sc in each st around.
Join with sl st to first sc. (30)
FO, leaving a long tail for sewing.
Citrus Segment Embroidery
Use white yarn and a yarn needle.
On each citrus slice, stitch 6 straight lines from the center of the circle toward the outer peel.
Space the lines evenly like lemon segments.
Do not pull too tightly, or the citrus slice may pucker.
Optional: Add one small white circle or star stitch in the center where the segment lines meet.
Attaching Citrus Slices to Squares
Place one citrus slice in the center of each blue square.
Pin it in place.
Using the long yarn tail from the peel border, sew around the outer edge of the citrus slice.
Keep the stitches neat and secure.
Weave in all ends on the back of the square.
Repeat for all 12 squares.
Front Panel
Arrange 6 finished squares into a rectangle:
- 3 squares across
- 2 squares down
Place the squares with the right sides facing up.
Using soft blue yarn, join the squares together with a neat whip stitch or slip stitch seam.
First join the squares into rows of 3.
Then join the 2 rows together.
Weave in the ends.
Back Panel
Repeat the same process with the remaining 6 squares.
Arrange them 3 across and 2 down.
Join them into one back panel.
Weave in the ends.
Joining the Bag
Place the front and back panels together with wrong sides facing each other.
Make sure the citrus slices face outward.
Join soft blue yarn at the top corner of one side.
Sc evenly down the side, across the bottom, and up the other side, working through both layers.
Do not crochet across the top opening.
FO and weave in ends.
Turn the bag right side out if needed and shape the corners gently.
Top Edge
Join soft blue yarn at one side seam near the top opening.
Round 1
Ch 1.
Sc evenly around the entire top opening of the bag.
Join with sl st to first sc.
Round 2
Ch 1.
Sc in each st around.
Join with sl st.
Round 3
Ch 1.
Sc in each st around.
Join with sl st.
FO and weave in ends.
The top edge should feel neat and sturdy.
Handles
Make 2 using soft blue yarn.
Handle
Ch 75.
Sc in the 2nd ch from hook and in each ch across.
Ch 1, turn.
Sc in each st across.
Ch 1, turn.
Sc in each st across.
FO, leaving a long tail for sewing.
Each handle should be about 18–20 inches long before attaching.
Attaching the Handles
Lay the bag flat.
Place one handle on the front panel.
Position each handle end about 3 inches in from the side edges.
Pin the handle ends in place.
Sew each handle end securely to the inside top edge of the bag.
Use a square sewing shape or several strong stitches so the handles can hold light items.
Repeat with the second handle on the back panel.
Weave in all ends securely.
Optional Lining
For a stronger tote, add a fabric lining.
Cut two rectangles of cotton fabric slightly smaller than the bag panels.
Sew the fabric pieces together along the sides and bottom.
Place the lining inside the bag with the wrong side facing the crochet fabric.
Fold the top edge of the fabric under and hand stitch it to the inside top edge of the bag.
A lining helps the bag hold its shape and keeps small items from slipping through any crochet spaces.
Finishing
Check all seams and handle attachments.
Weave in any loose ends.
Lightly block the bag if needed.
Shape the squares and citrus slices with your hands.
If using the bag for heavier items, add lining and reinforce the handle sewing.
Tips & Variations
Use cotton yarn for the best tote bag structure.
Use blue for the background and yellow citrus slices for a fresh lemon style.
Use cream squares with orange slices for a softer vintage citrus look.
Use mint green squares with pink grapefruit slices for a fun summer version.
Make all citrus slices the same color for a clean design.
Mix lemon, orange, lime, and grapefruit colors for a fruit market look.
For a smaller bag, use 8 squares total, 4 for the front and 4 for the back.
For a larger tote, make 18 squares total, 9 for the front and 9 for the back.
For stronger handles, make the handles wider by adding one or two more rows of sc.
Do not carry very heavy items unless the bag is lined and reinforced.
FAQ
Is this citrus crochet tote beginner-friendly?
Yes. The bag uses simple squares, basic citrus circle appliqués, and easy joining. The most important part is keeping the squares the same size.
What yarn works best for this crochet tote bag?
Cotton yarn is best because it gives the bag structure and durability. Acrylic yarn can work, but the bag may stretch more.
Can I make the bag bigger?
Yes. Add more squares to each panel. A 3 by 3 square layout on each side will make a larger tote.
Can I skip the lining?
Yes. You can skip the lining for a light market-style bag, but lining is helpful if you want to carry small or heavier items.
Can I use different fruit colors?
Absolutely. Try green lime slices, orange slices, pink grapefruit slices, or a mix of citrus colors for a playful summer bag.
Conclusion
The Citrus Slice Crochet Tote Bag is a bright and cheerful handmade accessory with a fresh summer feel. The soft blue squares, sunny citrus appliqués, and sturdy cotton texture make it useful, giftable, and eye-catching.
This easy crochet pattern is a lovely project for market bags, beach days, handmade gifts, or colorful everyday style. Make it in lemons, oranges, limes, or grapefruit shades and enjoy creating a tote that feels fresh, fun, and completely handmade.