Intro
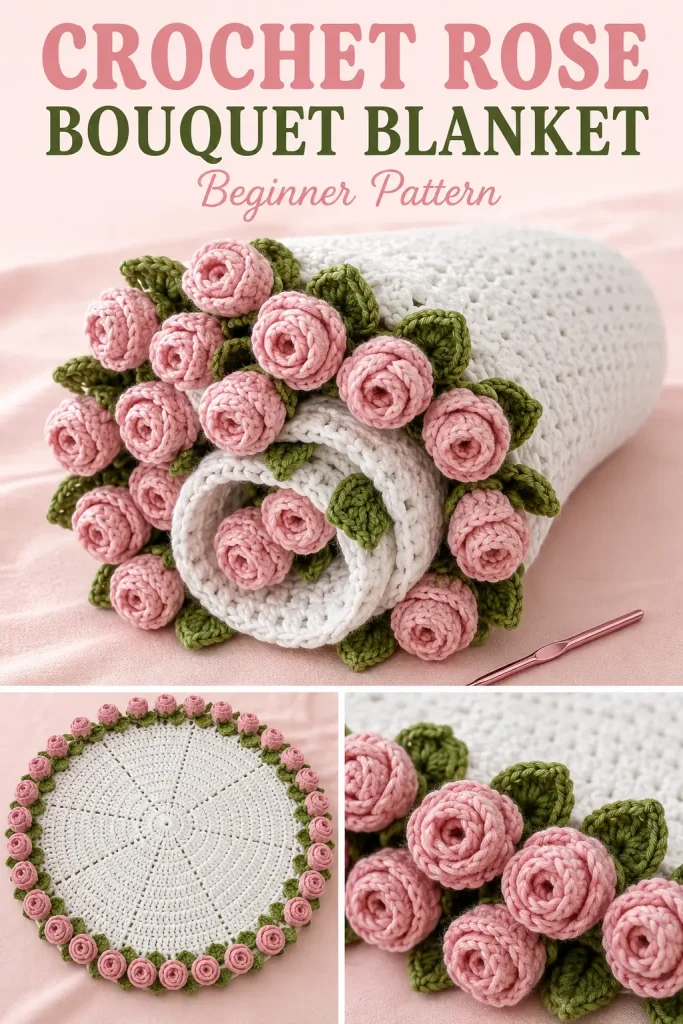
This crochet rose bouquet blanket is a beautiful project that feels both cozy and decorative. When it is spread out, it looks like a soft round blanket with a delicate leafy edge. When it is rolled up, the pink crochet roses gather together and create the look of a sweet flower bouquet.
This beginner-friendly crochet blanket is made with a simple round center, a green leaf border, and small pink roses attached around the outside. It is a lovely handmade gift, a pretty nursery blanket, a romantic home decor piece, or a special project for anyone who loves floral crochet designs.
Description
This crochet rose bouquet blanket has a large round white blanket center worked in double crochet sections. The center grows outward in a soft circular shape with gentle spoke-like spaces created by chain gaps. Around the outer edge, green crochet leaves are added one by one to create a floral border. Pink crochet roses are then made around the edge, rolled into little rosebuds, and secured so the outside of the blanket looks full of flowers. The finished blanket can be used flat as a round throw, or rolled into a bouquet shape with the pink roses showing at the top.
Materials
- Worsted weight acrylic yarn in white for the blanket center
- Worsted weight acrylic yarn in green for the leaves
- Worsted weight acrylic yarn in pink for the roses
- 5.5 mm crochet hook
- Scissors
- Tapestry needle
- Stitch marker if needed
Abbreviations
- ch = chain
- sl st = slip stitch
- sc = single crochet
- hdc = half double crochet
- dc = double crochet
- st = stitch
- sts = stitches
- sp = space
- rep = repeat
Pattern Notes
- This pattern uses US crochet terms.
- The blanket center is worked in joined rounds.
- The beginning ch 2 counts as 1 dc.
- Chain spaces are skipped when working the next round.
- The blanket can be made larger or smaller by adding or removing center rounds.
- The green leaves are worked into chain spaces around the outer edge.
- The pink roses are made as small curled strips, then rolled and secured.
- The rose border works best when the roses are placed evenly between the leaves.
Step-by-Step Instructions
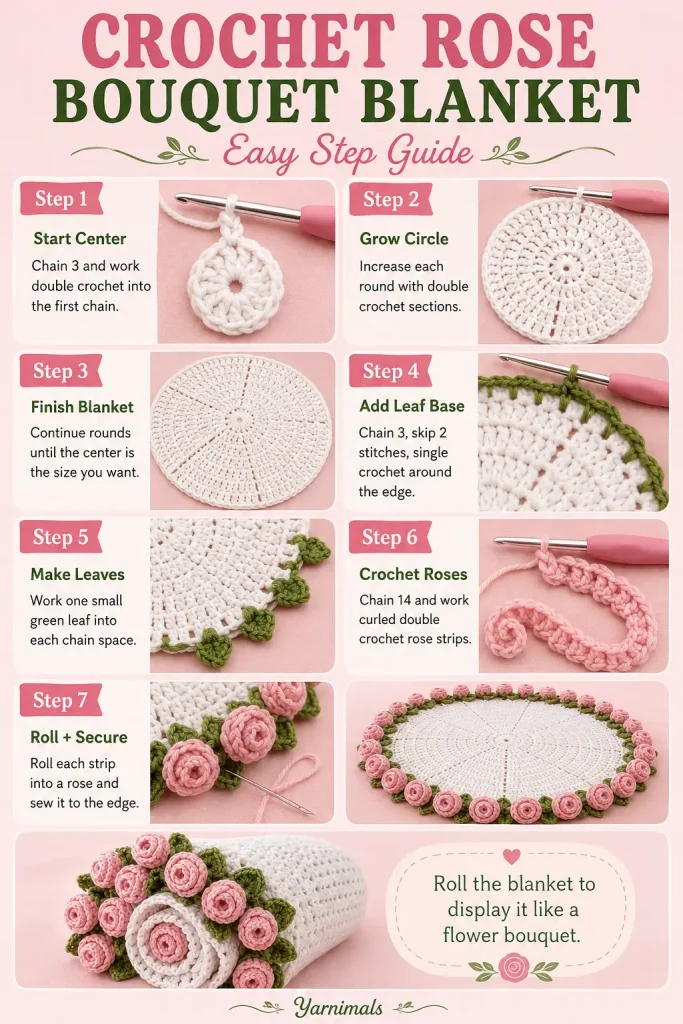
Blanket Center
With white yarn, make a slip knot.
Ch 3.
Round 1
Work 11 dc into the first chain you made.
The beginning chain counts as 1 dc, so you should have 12 dc total.
Pull the starting tail to close the center hole as much as possible.
Sl st into the top of the beginning ch to join.
Round 2
Ch 2. This counts as 1 dc.
Dc in the same space.
Ch 1.
Work 2 dc in the next st, ch 1.
Repeat around, working 2 dc in each stitch with ch 1 between each pair.
Sl st into the top of the beginning ch to join.
You should have 24 dc total.
Round 3
Ch 2. This counts as 1 dc.
Dc in the same space.
Dc in the next st.
Ch 1.
Skip the ch-1 space.
Work 2 dc in the next st.
Dc in the next st.
Ch 1.
Repeat around.
Sl st into the top of the beginning ch to join.
You should have 36 dc total.
Round 4
Ch 2. This counts as 1 dc.
Dc in the same space.
Dc in each of the next 2 sts.
Ch 1.
Skip the ch-1 space.
Work 2 dc in the next st.
Dc in each of the next 2 sts.
Ch 1.
Repeat around.
Sl st into the top of the beginning ch to join.
Continue the Blanket Center
Continue working in the same pattern.
For each new round:
- Start with ch 2 and 1 dc in the same space.
- Add 1 more dc between each increase section than the previous round.
- Ch 1 at the end of each section.
- Skip the ch-1 spaces from the previous round.
- Join with a sl st at the end of each round.
Keep adding rounds until the blanket reaches your desired size.
For a small lap blanket, work fewer rounds.
For a larger round throw, continue adding rounds until the blanket is wide enough.
Fasten off white yarn when the blanket center is complete.
Green Leaf Base Round
Join green yarn to any stitch on the outer edge of the blanket.
Ch 3.
Skip the next 2 sts.
Sc in the next st.
Ch 3.
Skip the next 2 sts.
Sc in the next st.
Repeat around the entire blanket edge.
When you reach the beginning, sl st into the first chain to join.
This creates chain spaces for the leaves.
Leaf Round
Sc into the first ch-3 space.
Ch 5.
Into the 2nd ch from hook, work 1 sl st.
In the next ch, work 1 sc.
In the next ch, work 1 hdc.
In the last ch, work 1 dc.
Sl st back into the same last chain where the dc was made.
Sc back into the same ch-3 space.
This completes one leaf.
Move to the next ch-3 space.
Sc into the ch-3 space.
Ch 5.
Into the 2nd ch from hook, work 1 sl st.
In the next ch, work 1 sc.
In the next ch, work 1 hdc.
In the last ch, work 1 dc.
Sl st back into the same last chain where the dc was made.
Sc back into the same ch-3 space.
Repeat around the entire blanket, making one leaf in each ch-3 space.
At the end, sl st near the base of the first leaf.
Ch 1 and fasten off.
Weave in the green yarn ends.
Pink Roses
The roses are worked around the outer edge, placed between the green leaves.
Join pink yarn to the front loops of a stitch post between two leaves.
Ch 14.
Dc in the 3rd ch from hook.
Work 2 dc in the next ch.
Work 3 dc in each remaining ch across.
Sl st back into the stitch where the pink yarn was joined.
Ch 1 and cut the yarn, leaving a tail for sewing.
Do not roll the rose yet if you want to make all roses first.
Repeat this rose strip around the blanket edge, placing one rose between each leaf section or evenly around the border.
Roll and Secure Each Rose
Take one pink rose strip.
Starting from the beginning of the curled strip, roll it tightly into a rosebud shape.
Adjust the curl so the petals sit neatly.
Thread the long pink tail onto a tapestry needle.
Sew through the base of the rose, passing through all layers.
Tie the yarn tails securely at the back of the rose.
Hide the yarn tails inside the rose or weave them into the back of the blanket.
Repeat for every rose around the blanket.
Finishing
Weave in all remaining yarn ends.
Shape the green leaves gently with your fingers.
Fluff and arrange the pink roses so they sit evenly around the blanket edge.
Lay the blanket flat and smooth the center.
To display it as a bouquet, fold or roll the blanket inward so the roses gather together at the top like a flower bouquet.
Tips & Variations
For the classic bouquet look, use white for the blanket center, leafy green for the border, and soft pink for the roses.
You can make the roses in different colors for a mixed bouquet effect. Try blush pink, dusty rose, lavender, peach, cream, or red.
Acrylic yarn makes the blanket soft and washable, while cotton yarn gives the stitches a cleaner, more structured look.
If you want a fuller rose border, place roses closer together. If you want a lighter floral edge, leave more space between the roses.
To make a baby blanket, stop the center rounds earlier and keep the roses secure and soft. Avoid adding beads, buttons, or hard decorations.
For a larger blanket, continue the center pattern until it reaches your desired diameter before adding the leaf and rose border.
FAQ
Is this rose bouquet blanket beginner-friendly?
Yes. The center uses basic double crochet rounds, and the roses are made from simple chains and double crochet stitches. The project is large, but the stitches are beginner-friendly.
Can I make the blanket smaller?
Yes. Stop the white center rounds earlier, then add the green leaf border and pink roses when the blanket is the size you want.
Can I use different rose colors?
Yes. You can make all the roses one color or use several flower colors for a mixed bouquet blanket.
Conclusion
This crochet rose bouquet blanket is a beautiful handmade project with a sweet floral finish. The round white center, leafy green border, and pink rose edge make it useful as a blanket and pretty enough to display as a bouquet. Save this beginner-friendly crochet pattern and make it in your favorite flower colors.




This is such a sweet rose blanket! You are so generous to share it with us! Thank yu so much.