Intro
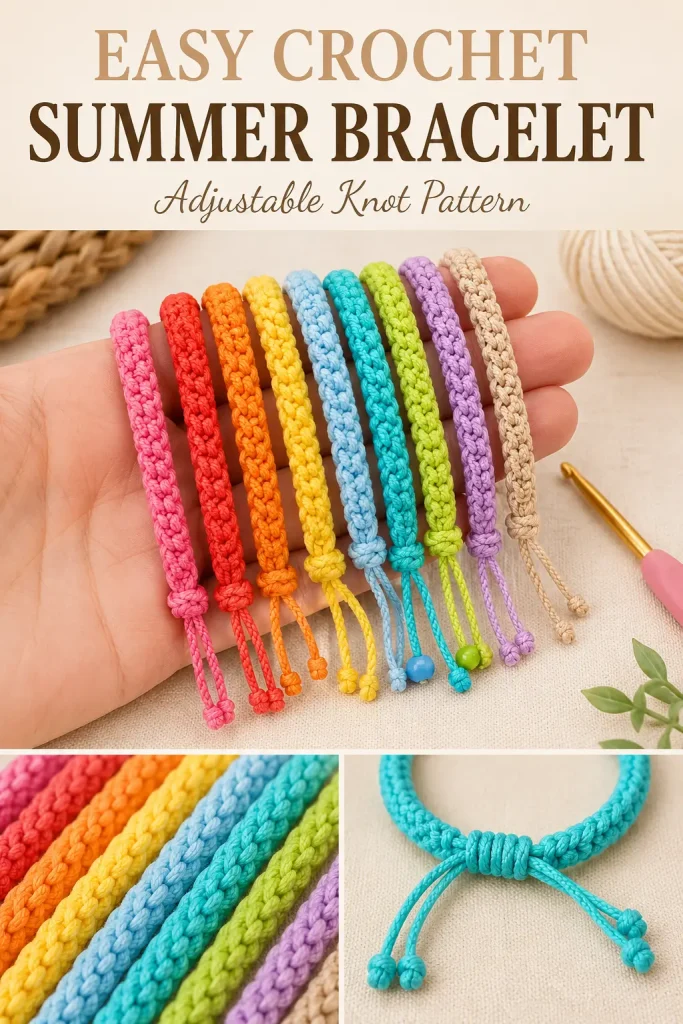
This easy crochet bracelet is one of those quick little projects that is almost impossible to make just once. It is colorful, simple, and perfect for using small amounts of yarn from your stash.
The bracelet is made with a three-dimensional Romanian braid style, which gives it a rounded cord-like texture instead of a flat crochet strip. It feels sturdy, flexible, and comfortable on the wrist, and the adjustable sliding knot makes it easy to wear or gift.
Description
This crochet summer bracelet is a slim, textured bracelet made from one continuous crochet braid. The stitch creates a raised, rounded, rope-like look that works beautifully in bright cotton colors, soft neutrals, metallic yarn, or smooth mercerized cotton. Each bracelet has two yarn tails that overlap at the back and slide through a wrapped adjustable knot. You can finish the tails with small knots, beads, or simple trimmed ends for a clean handmade bracelet.
Materials
- Cotton yarn, mercerized cotton, embroidery cotton, or smooth yarn of choice
- Crochet hook suitable for your yarn
- Scissors
- Yarn needle
- Measuring tape
- Optional small straw or tube for the sliding knot
- Optional small beads for the bracelet ends
Abbreviations
- ch = chain
- sc = single crochet
- sl st = slip stitch
- st = stitch
Pattern Notes
- This pattern uses US crochet terms.
- The bracelet is made with a Romanian braid-style crochet cord.
- The thicker the yarn, the thicker the bracelet will be.
- Leave long tails at both ends for the adjustable closure.
- Try the bracelet around your wrist as you work so you can stop at the right length.
- The sliding knot is made separately around the two bracelet tails.
Step-by-Step Instructions
Bracelet Cord
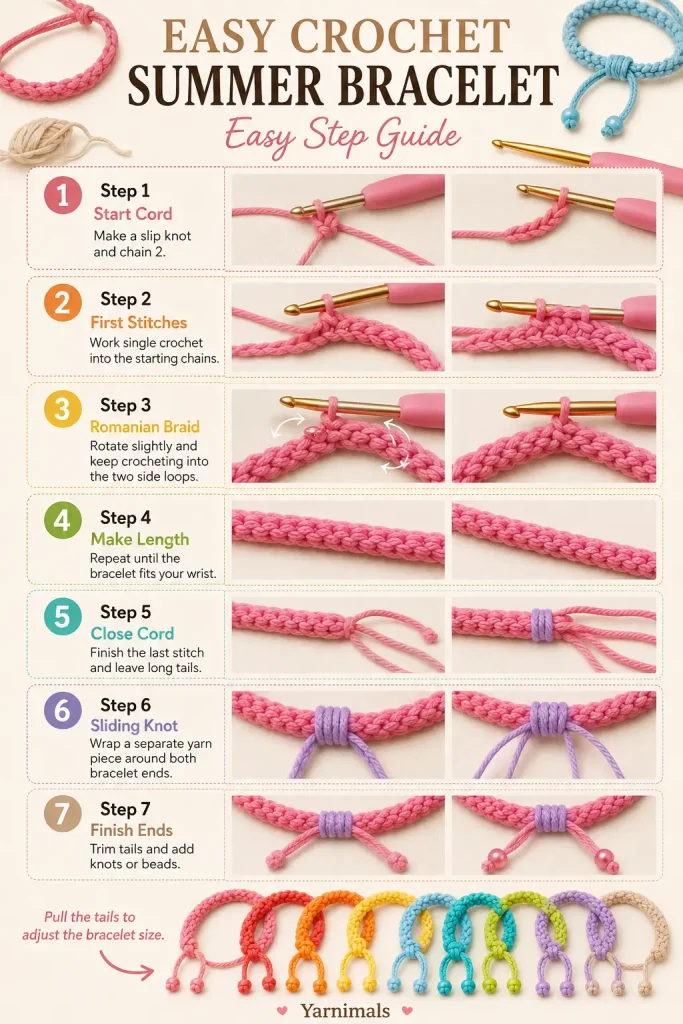
Make a slip knot, leaving a starting tail about 6 inches long.
Do not tighten the slip knot too much.
Ch 2.
Insert your hook into the first chain, working under the lower strand of the chain.
Work 1 sc.
Now work 1 sc into the next chain stitch.
Look at the stitch you just worked. Find the side strand beside it and the lower strand underneath it.
Insert your hook under both strands.
Work 1 sc.
Slightly rotate the work.
You will see two side strands next to the stitch you just made.
Insert your hook under those two strands.
Work 1 sc.
Repeat this same movement:
- Rotate the work slightly
- Find the two side strands just after the stitch you worked
- Insert your hook under both strands
- Work 1 sc
Continue until the cord is long enough to wrap around your wrist.
The texture should look rounded, firm, and three-dimensional.
Check the Bracelet Length
Wrap the cord around your wrist.
Stop when the braided part fits comfortably around the wrist, leaving both yarn tails free for the adjustable closure.
Do not make the crocheted cord too tight. The bracelet should sit comfortably and still have room to slide slightly.
Close the Crochet Cord
When the bracelet is the right length, insert your hook into the next visible stitch.
Pull up a loop.
Insert your hook into the following stitch.
Pull up another loop.
Yarn over and pull through all loops on the hook to close the end neatly.
Ch 1.
Cut the yarn, leaving a tail about 6 inches long.
Pull the yarn through and tighten.
You now have one crocheted bracelet cord with a tail at each end.
Adjustable Sliding Knot
Cut a separate piece of yarn about 12 inches long.
Lay the two bracelet ends so they overlap each other in opposite directions.
Fold the separate knot yarn in half, leaving one side much longer than the other.
Place the folded knot yarn over the two bracelet ends.
If using a small straw or tube, place the straw on top of the bracelet ends next to the folded knot yarn.
Take the long end of the knot yarn and wrap it around the straw and all bracelet strands.
Make 4 or 5 neat wraps.
Keep the wraps side by side and do not let them overlap.
Pass the long end through the straw or through the center of the wrapped section.
Hold the wraps gently and remove the straw.
Pull both ends of the knot yarn slowly, one side at a time, until the sliding knot tightens neatly around the bracelet ends.
The bracelet tails should still slide through the knot so the bracelet can open and close.
Finish the Knot
Trim the two ends of the knot yarn close to the wrapped knot.
If you prefer extra security, tie tiny knots with the knot yarn ends before trimming.
Test the bracelet by pulling the main bracelet tails.
The sliding knot should move but stay firm.
Finish the Bracelet Ends
Open the bracelet wide enough to slip over your hand.
Decide how long you want the two bracelet tails to hang.
Trim both tails evenly.
Finish each tail with one of these options:
- Tie a simple knot at the end of each tail
- Add one small bead to each tail and knot below it
- Make a tiny double knot and trim the ends short
Make sure the tail ends cannot slip back through the sliding knot.
Finishing
Shape the bracelet gently with your fingers.
Check that the sliding knot moves smoothly.
Pull each tail to open and close the bracelet.
Trim any uneven fibers.
Your crochet summer bracelet is ready to wear.
Tips & Variations
Use cotton yarn for a casual everyday bracelet. Mercerized cotton gives a smoother and slightly shiny finish, while thin cord yarn creates a cleaner jewelry-style look.
For a bright summer set, make several bracelets in red, yellow, green, turquoise, orange, lavender, and pink. For a more neutral style, try beige, cream, brown, black, or soft gray.
If you want a thicker bracelet, use thicker yarn and a larger hook. For a delicate bracelet, use thinner yarn and a smaller hook.
Add small beads to the two sliding ends for a pretty finish. Wooden beads give the bracelet a natural look, while metallic beads make it feel more like jewelry.
Keep your tension even while working the Romanian braid. If the cord twists too much, pause and smooth it with your fingers before continuing.
FAQ
Is this crochet bracelet beginner-friendly?
Yes. This is an easy crochet pattern once you understand where to place the hook. The bracelet uses single crochet and a repeated braid movement.
Can I make this bracelet with any yarn?
Yes. You can use cotton, acrylic, cord yarn, or smooth decorative yarn. Thinner yarn makes a delicate bracelet, and thicker yarn makes a chunkier bracelet.
How does the bracelet adjust?
The bracelet ends overlap and pass through a wrapped sliding knot. Pull the tails to make the bracelet smaller, and slide the knot to open it wider.
Conclusion
This crochet summer bracelet is a quick, colorful, and giftable project that you can make again and again in different shades. The rounded braided texture, adjustable closure, and simple finish make it a beautiful handmade accessory for summer markets, friendship gifts, or your own crochet jewelry collection.




I have been crocheting for over 40 years, this is the worst instructions I have ever tried!
ich bekomme nach dieser Anleitung leider überhaupt nichts gehäkelt, vielleicht würde ein Video helfen, sie sind so schön…
Sorry, these instructions are not clear or accurate. Pictures don’t match instructions either.
Please rewrite the instructions!!!!!