
These chunky crochet winter slippers are designed to match the finished pair shown in the reference: a sturdy oval base, softly raised sides, a rounded closed toe, a low open heel, a thick braided-looking border, and one crochet cord threaded across the front and tied into a centered bow.
The slippers are worked from the sole upward, so there are no separate side panels to align. A shaped toe panel closes the front, while small eyelets near the top allow the decorative cord to sit neatly across the vamp. The finished slippers are warm, soft, and practical for relaxing at home during colder months.
Description
The finished crochet slippers have an elongated oval shape with a rounded toe and gently curved heel. Thick dusty-rose yarn creates a dense, cushioned sole and visible chunky stitch texture. The sides rise low around the foot, leaving a comfortable open ankle. A shaped crochet upper covers the toes and ends just before the main opening. The entire opening is finished with a raised braided-style border, and a narrow crochet cord passes through four front eyelets before being tied into a centered bow.
Materials
- 250–320 yards bulky weight category 5 yarn in dusty rose
- 6 mm crochet hook
- 5 mm crochet hook for the tie cords, optional
- Yarn needle
- Scissors
- Stitch markers
- Measuring tape
- Non-slip fabric paint, optional
- Thin felt, suede, or non-slip sole inserts, optional
Abbreviations
- BLO: back loop only
- ch: chain
- hdc: half double crochet
- hdc2tog: half double crochet two together
- inc: two stitches in the same stitch
- sc: single crochet
- sc2tog: single crochet two together
- sl st: slip stitch
- st: stitch
- sts: stitches
Pattern Notes
- This pattern uses US crochet terminology.
- Make two identical slippers.
- The sole is worked in joined rounds around both sides of a foundation chain.
- The slipper walls are worked directly from the sole.
- The front upper is worked in turning rows across the toe section.
- The side edges of the upper are sewn to the slipper walls after shaping.
- The bow is made from one separate crochet cord threaded through four eyelets.
- Ch 1 does not count as a stitch.
- The instructions below make an adult women’s medium slipper measuring approximately 9½ inches long.
- For the best fit, make the sole approximately ¼ inch longer than the wearer’s foot.
- Keep the tension firm so the slipper holds its shape.
Finished Size
Approximate adult women’s medium:
- Sole length: 9½ inches
- Sole width: 3¾ inches
- Side height: 1½ inches
- Toe upper length: approximately 3½ inches
Simple Size Adjustments
For a smaller slipper, begin with ch 15.
For the medium size, begin with ch 17.
For a larger slipper, begin with ch 19.
When changing the starting chain, keep the rounded-end increases the same and work the additional stitches along the straight sides.
Step-by-Step Instructions
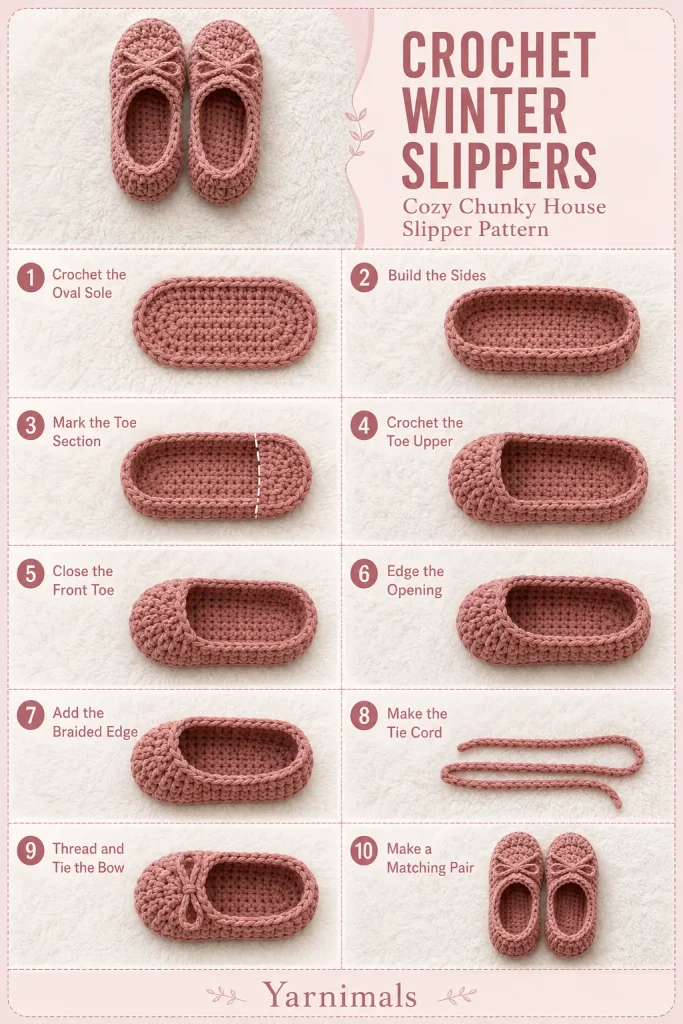
Crochet the Oval Sole
Using the 6 mm hook and dusty-rose yarn:
Foundation: Ch 17.
Round 1
Work 2 sc in the second ch from the hook.
Sc in each of the next 14 ch.
Work 5 sc in the final ch.
Rotate the chain and work along the unused loops on the opposite side.
Sc in each of the next 14 ch.
Work 3 sc in the same chain where the first 2 sc were made.
Join with a sl st to the first sc.
38 sts
Round 2
Ch 1.
Work 2 sc in each of the first 2 sts.
Sc in each of the next 14 sts.
Work 2 sc in each of the next 5 sts around the toe.
Sc in each of the next 14 sts.
Work 2 sc in each of the final 3 sts around the heel.
Join with a sl st.
48 sts
Round 3
Ch 1.
Work 1 sc in the next st, then 2 sc in the next st. Repeat once more around the first heel curve.
Sc in each of the next 14 sts.
Repeat 1 sc, 2 sc in the next st five times around the toe curve.
Sc in each of the next 14 sts.
Repeat 1 sc, 2 sc in the next st three times around the remaining heel curve.
Join with a sl st.
58 sts
Lay the sole flat.
It should form a smooth oval without curling or rippling.
Optional Double Sole
For a warmer and more cushioned slipper, make a second identical sole.
Place the two soles together with the wrong sides facing inward.
Join yarn at the center heel.
Work 1 sc through both layers in each stitch around.
Join with a sl st.
Continue with the slipper sides.
A double sole is recommended when the slippers will be worn regularly on hard floors.
Build the Slipper Sides
Join yarn at the center heel if necessary.
Side Round 1
Ch 1.
Working in BLO, sc in each st around.
Join with a sl st.
58 sts
The unused front loops create a visible ridge around the sole.
Side Round 2
Ch 1.
Hdc in each st around.
Join with a sl st.
58 sts
Side Round 3
Ch 1.
Hdc in each st around.
Join with a sl st.
58 sts
Side Round 4
Ch 1.
Sc in each st around.
Join with a sl st.
58 sts
The slipper base should now resemble a shallow open shoe.
Do not fasten off.
Mark the Toe Section
Place the slipper flat with the heel join centered at the back.
Count 22 stitches centered across the front toe.
Place one marker at the first stitch and another marker after the twenty-second stitch.
Make sure the unmarked stitches are divided evenly between both sides and the heel.
The toe upper will be worked across these 22 stitches.
Crochet the Toe Upper
Move to the first toe marker with slip stitches if necessary.
The toe panel is worked back and forth in rows.
Row 1
Ch 1.
Hdc across the 22 marked toe stitches.
Turn.
22 sts
Row 2
Ch 1.
Hdc2tog.
Hdc in each stitch until 2 sts remain.
Hdc2tog.
Turn.
20 sts
Row 3
Ch 1.
Hdc in each st across.
Turn.
20 sts
Row 4
Ch 1.
Hdc2tog.
Hdc across until 2 sts remain.
Hdc2tog.
Turn.
18 sts
Row 5
Ch 1.
Hdc in each st across.
Turn.
18 sts
Row 6
Ch 1.
Hdc2tog.
Hdc across until 2 sts remain.
Hdc2tog.
Turn.
16 sts
Row 7
Ch 1.
Hdc in each st across.
Turn.
16 sts
Row 8
Ch 1.
Hdc2tog.
Hdc across until 2 sts remain.
Hdc2tog.
Turn.
14 sts
Row 9
Ch 1.
Hdc in each st across.
Fasten off, leaving a long sewing tail.
The upper should cover the toes and end near the front edge of the foot opening.
Attach the Toe Upper
Place the shaped panel over the front of the slipper.
Pin the left row edge to the left side wall.
Pin the right row edge to the right side wall.
The upper should curve smoothly without folding or twisting.
Using the long yarn tail, sew the first side edge to the slipper wall with small whip stitches.
Secure the top corner.
Join a separate length of yarn and sew the opposite side in the same way.
Hide both yarn ends inside the slipper.
The toe should now be fully enclosed, while the heel and center foot opening remain open.
Shape the Rounded Front
Join yarn at one lower corner of the toe upper.
Work sc evenly around the seam where the upper meets the slipper walls.
At the rounded front, keep the stitches close together so the toe retains its dense gathered texture.
Join with a sl st and fasten off.
Gently shape the front with your hands.
Crochet the Opening Edge
Join yarn at the center back heel.
Opening Round 1
Ch 1.
Sc evenly around the complete opening.
Work through:
- The heel stitches
- The first side edge
- The top edge of the toe upper
- The second side edge
Join with a sl st.
Count the stitches and adjust any crowded areas before continuing.
Opening Round 2 With Front Eyelets
Ch 1.
Sc around until you reach the left front side of the upper.
Create the first eyelet:
Ch 1, skip 1 st.
Sc in the next 2 sts.
Create the second eyelet:
Ch 1, skip 1 st.
Sc across the center top of the upper until you reach the matching position on the right side.
Create the third eyelet:
Ch 1, skip 1 st.
Sc in the next 2 sts.
Create the fourth eyelet:
Ch 1, skip 1 st.
Continue sc around the remaining opening.
Join with a sl st.
The four eyelets should appear as two evenly spaced openings on each side of the front upper.
Add the Braided-Looking Border
The raised edge shown in the finished design can be created with reverse single crochet.
Do not turn the work.
Ch 1.
Working from left to right, insert the hook into the previous stitch.
Yarn over and pull up a loop.
Yarn over and pull through both loops.
Continue working reverse sc evenly around the complete opening.
Keep the stitches loose enough that the opening remains flexible.
Join carefully and fasten off.
This creates the thick twisted or braided-looking rim around the slipper opening.
Alternative Surface Border
For an even more pronounced braided appearance, work loose surface slip stitches directly below the opening edge after completing the reverse-sc round.
Make the Tie Cord
Using the 5 mm hook:
Ch 75.
Beginning in the second chain from the hook, sl st loosely in each chain across.
Fasten off.
The finished cord should measure approximately 20–22 inches.
Make sure it is long enough to pass through all four eyelets and form a centered bow.
Thread the Front Cord
Place the slipper with the toe facing you.
Thread one end of the cord from the outside through the lower-left eyelet.
Bring it back out through the upper-left eyelet.
Pass the cord horizontally across the top center of the upper.
Insert it through the upper-right eyelet.
Bring it back out through the lower-right eyelet.
Pull both ends gently until they are equal in length.
Tie the cord into a centered bow.
The bow should sit directly across the top front of the slipper, not at the outer side.
Adjust the loops until they are even.
For a permanent decorative bow, sew through the center knot once or twice with matching yarn.
Make the Second Slipper
Repeat the entire pattern to make the second slipper.
Before attaching the cords, place the slippers side by side and check that:
- The soles are the same length.
- Both toe panels contain the same number of rows.
- The openings are equal.
- The eyelets are positioned symmetrically.
- The bows sit at the same height.
- The toe shaping matches.
Optional Non-Slip Soles
Turn the slippers upside down.
Apply small dots or short lines of non-slip fabric paint across the bottom of each sole.
Leave space between the dots so the crochet fabric remains flexible.
Allow the paint to dry completely before wearing.
You can also sew felt, suede, or non-slip fabric pieces to the underside.
Cut each insert slightly smaller than the crochet sole and attach it with strong thread around the outside edge.
Final Finishing
Weave in every yarn end securely.
Shape the toe and heel with your fingers.
Lightly mist the slippers with water.
Place them flat and reshape them so:
- The soles lie evenly.
- The heels remain rounded.
- The toe uppers are centered.
- The braided borders sit flat.
- The bows are centered and equal.
Allow the slippers to dry completely before wearing.
Tips and Variations
Use a tightly spun bulky cotton or cotton-blend yarn for the crisp stitch definition shown in the design.
A soft acrylic or wool-blend yarn will create warmer, more flexible slippers.
For a firmer shoe, use a smaller hook or add a second sole.
For wider feet, add one extra side round or work one additional increase round around the sole.
For narrow feet, use a slightly smaller hook and reduce two stitches at the heel during the final side round.
To make the toe upper longer, add one or two even hdc rows before Row 8.
To make the opening smaller, work one decrease at each side of the heel during Opening Round 1.
Keep the tie cord narrow. A thick cord can overpower the small centered bow.
The slippers may be made in cream, taupe, gray, sage, or burgundy, but use one consistent color throughout for the same soft finished look.
Frequently Asked Questions
Why is the toe upper worked separately in rows?
Working the upper in decreasing rows creates the rounded closed front visible in the finished design. It also makes the depth easy to adjust before the sides are sewn into place.
How do I keep the bow centered?
Create four symmetrical eyelets, with two on each side of the toe upper. Thread the cord evenly through all four openings and pull both ends to the same length before tying the bow.
What should I do if the slipper feels loose?
Use a smaller hook, shorten the sole slightly, or decrease two stitches near the heel during the final side round. You can also weave a hidden strand through the back half of the opening and tighten it gently.
Conclusion
This crochet winter slippers pattern creates the same cozy style shown in the finished design: chunky dusty-rose yarn, an oval base, raised sides, a rounded closed toe, a braided opening edge, and a centered crochet bow. The construction is easy to customize for different foot lengths, making the slippers a practical winter project and a thoughtful handmade gift. Save the pattern and make a matching pair in your favorite cozy color.



