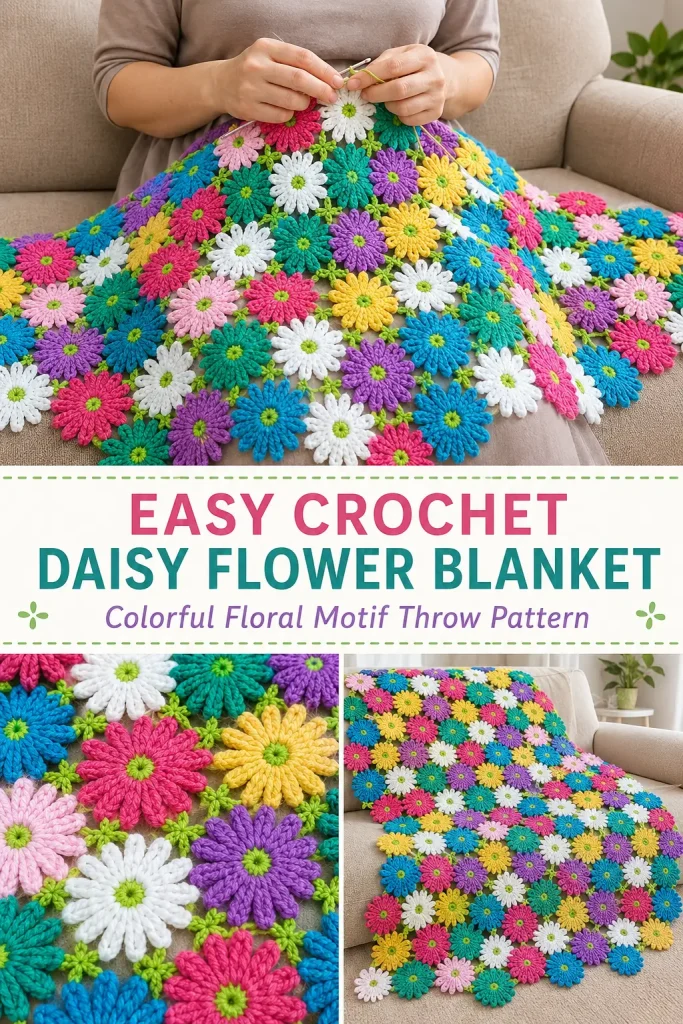
This colorful crochet daisy blanket turns simple flower motifs into a cheerful field of blooms. Each daisy has a bright green center, long looped petals, and small green joins that create the open lace spaces visible between the flowers.
The modular construction makes this an enjoyable crochet project because you can work on one flower at a time. Use the finished motifs for a full throw, a lightweight floral shawl, a table covering, or a smaller decorative panel.
This is an original, image-inspired construction designed to create the same visible style without reproducing another designer’s written pattern.
Description
The finished crochet flower blanket is made from dozens of large daisy motifs arranged in a rectangular grid. Each flower has a round lime-green center surrounded by 12 narrow, raised loop petals. The petals are worked in white, yellow, turquoise, teal, purple, hot pink, or pale pink for a bright garden-inspired effect. Small lime-green crochet bridges connect neighboring flowers, while four-armed green motifs fill the open spaces where four daisies meet. The exposed outer petals create a naturally scalloped border without requiring a heavy finishing round.
Materials
- DK or light worsted-weight yarn in:
- Lime green
- White
- Sunshine yellow
- Turquoise blue
- Teal
- Purple
- Hot pink
- Pale pink
- 4 mm crochet hook
- Yarn needle
- Scissors
- Stitch markers
- Blocking mats
- Rustproof pins
- Measuring tape
For an 8-by-10-flower throw, allow approximately:
- 1,500–1,800 yards of assorted petal colors
- 500–650 yards of lime-green yarn
Abbreviations
- ch: chain
- hdc: half double crochet
- MR: magic ring
- Rnd: round
- sc: single crochet
- sl st: slip stitch
- st: stitch
- sts: stitches
Pattern Notes
- This pattern uses US crochet terminology.
- Each flower is worked separately and joined after blocking.
- The sample layout uses 80 daisies arranged in 8 columns and 10 rows.
- Each flower has 12 petals.
- The petal technique uses a chain loop covered with half double crochet stitches.
- Keep the green center stitches firm so the petals remain evenly spaced.
- Gauge is not critical, but all flowers should be approximately the same size.
- One completed motif measures approximately 4–4½ inches across.
- The sample throw measures approximately 34 by 43 inches after joining.
- Increase or reduce the number of motifs to change the finished size.
- Difficulty level: confident beginner.
Color Plan
The blanket in the reference uses a lively mix rather than a strict repeating color sequence.
Make approximately 80 flowers divided among:
- White
- Yellow
- Turquoise
- Teal
- Purple
- Hot pink
- Pale pink
Make a similar number in each color, or use more of your favorite shades.
Use lime green for every flower center, joining bridge, and connector motif. Keeping all structural sections green creates the small leafy details between the colorful flowers.
Step-by-Step Instructions
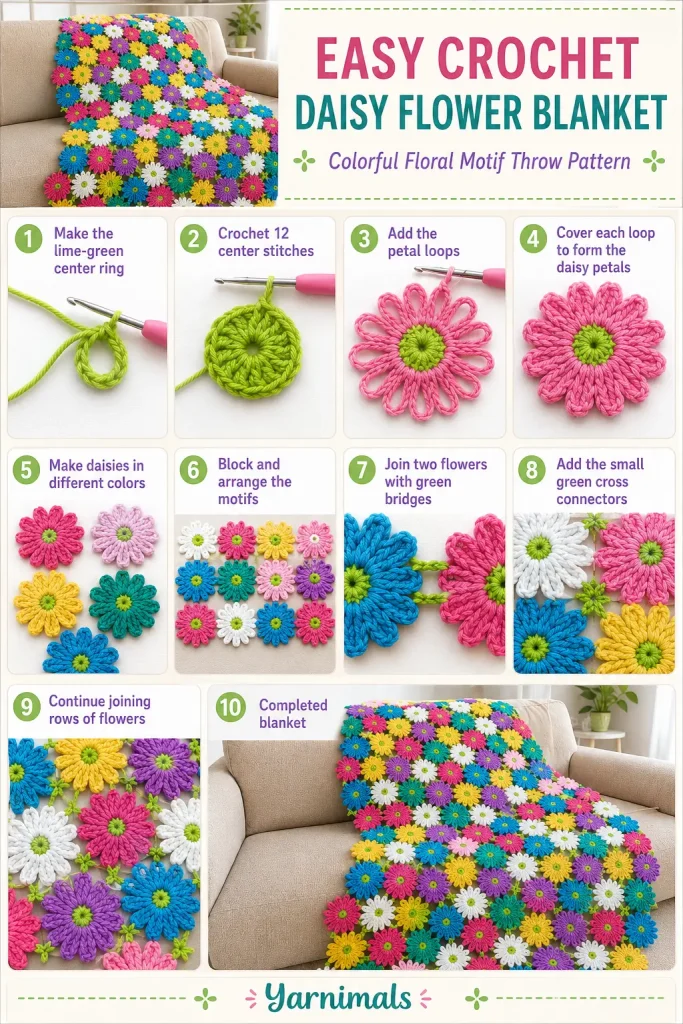
Crochet the Green Daisy Center
Using lime-green yarn:
Round 1
Make a MR.
Ch 1.
Work 12 sc into the ring.
Pull the ring closed.
Join with a sl st to the first sc.
12 sts
Round 2
Ch 1.
Work 2 sc in each st around.
Join with a sl st to the first sc.
24 sts
Fasten off the green yarn and weave the ends securely into the back of the center.
The 24 stitches will support 12 petals, with each petal using two center stitches.
Crochet the Loop Petals
Choose one petal color and join it to any stitch of Round 2.
Repeat the following sequence 12 times:
- Sl st in the next st.
- Ch 9.
- Sl st back into the same center st to form a long loop.
- Ch 1.
- Work 12 hdc around the entire chain loop.
- Push the hdc stitches together so they cover the chain evenly.
- Sl st in the next center st.
After completing the twelfth petal, join neatly and fasten off.
Weave the yarn ends into the back of the flower.
You should have 12 long rounded petals evenly spaced around the green center.
Shape the Petals
Lay the flower flat.
Gently pull each petal outward from the center.
Arrange the 12 petals so they are evenly spaced and approximately the same length.
The petals may curl slightly when first crocheted. Blocking will flatten and define them.
Make All the Daisy Motifs
Repeat the flower instructions until you have the desired number of motifs.
For the sample throw, make 80 daisies.
Spread the colors across the blanket rather than placing several identical flowers together. This creates the mixed flower-garden appearance shown in the design.
Block the Flowers
Blocking the motifs before joining is important because the long petals may otherwise twist or curl.
Lightly dampen each flower.
Place it on a blocking mat with the wrong side facing down.
Pin the green center flat.
Stretch each petal gently outward and pin the rounded tip.
Make sure the flower remains circular and that all 12 petals are evenly arranged.
Allow the motifs to dry completely before removing the pins.
Arrange the Blanket
Place the blocked flowers on a large flat surface.
For the sample size, arrange:
- 8 flowers across
- 10 flowers down
Leave approximately ¼ inch between neighboring motifs.
Rotate the flowers so one petal points directly toward each neighboring flower.
Distribute the colors evenly until the arrangement looks balanced.
Take a photograph of the final layout before beginning the joining process. This will help you keep the color order consistent.
Green Joining Bridge
Use this small bridge to connect every pair of neighboring flowers.
Place two flowers side by side with one petal tip from each flower facing the other.
Using lime-green yarn:
- Join the yarn with a sl st through the two or three center hdc stitches at the tip of the first petal.
- Ch 2.
- Sl st through the corresponding center hdc stitches at the tip of the second petal.
- Ch 1 and turn.
- Work 3 sc around the ch-2 bridge.
- Sl st back into the first petal.
- Fasten off securely.
Weave both green yarn ends into the back of the flower petals.
The finished bridge should look like a short green bar between the two flowers.
Do not pull the bridge too tightly. The motifs should remain flat without overlapping.
Join the Flowers Into Rows
Begin with the first row of eight flowers.
Use one green joining bridge between every neighboring pair.
Check that the centers remain aligned and the flowers lie flat.
Repeat for all 10 rows.
You will now have 10 separate strips containing eight joined flowers each.
Join the Rows
Place the first two flower strips together.
Align the petals of each flower with the flower directly above or below it.
Add one green joining bridge between every vertically aligned pair.
Continue attaching the remaining rows in the same way.
Spread the blanket flat after completing each row and check that it is not pulling inward.
Green Four-Arm Connector
The small green cross motifs fill the open spaces where four flowers meet.
Make one connector for each interior four-flower gap.
For an 8-by-10 layout, you will need approximately 63 connectors.
Using lime-green yarn:
Connector Center
Make a MR.
Ch 1.
Work 8 sc into the ring.
Pull the ring closed.
Join with a sl st to the first sc.
8 sts
Connector Arms
Repeat the following sequence four times:
- Sl st in the next center st.
- Ch 5.
- Beginning in the second ch from the hook, sl st in each of the next 4 ch.
- Sl st again into the same center st.
- Sl st in the next center st.
Fasten off, leaving a long sewing tail.
The finished piece should have a small round center with four narrow arms.
Attach the Four-Arm Connectors
Place one connector in the open space between four joined flowers.
Position one green arm toward each flower.
Using the long sewing tail and a yarn needle, sew the tip of each arm to the nearest inward-facing petal.
Pass the needle through the center stitches at the rounded petal tip.
Make two or three small stitches at every attachment point.
Keep the connector centered so all four arms have equal tension.
Secure and weave the yarn tail into the back.
Repeat in every interior four-flower gap.
These green connectors strengthen the blanket and create the small leaf-like crosses visible between the daisies.
Fill Any Loose Gaps
Lay the complete blanket flat.
Check every space between the motifs.
Add another short green bridge wherever:
- Two petals separate too widely
- An edge feels loose
- A flower turns out of position
- A section stretches more than the surrounding area
Keep additional joins small and hidden among the petals.
Finish the Outer Edge
The outside petals naturally form a floral scalloped border, so a separate edging is not required.
For a cleaner and slightly stronger edge, use the following optional finish.
Join lime-green yarn to the tip of any outer petal.
Repeat around the perimeter:
- Ch 3
- Sl st into the tip of the next exposed outer petal
At corners, ch 4 instead of ch 3 to prevent pulling.
Join to the beginning stitch and fasten off.
Keep this edging loose enough that the outer flowers remain flat.
Final Blocking
Place the completed blanket on a large blocking surface.
Shape the sides into straight lines while allowing the outer petals to form a soft scalloped edge.
Pin the green joins and connector centers first.
Arrange and pin any petals that have folded underneath neighboring flowers.
Lightly mist the blanket or block it according to the yarn label.
Allow it to dry completely before moving it.
Tips and Variations
Cotton yarn creates crisp petals and excellent stitch definition. Acrylic yarn produces a softer, lighter blanket that is easier to wash.
Use the same yarn weight for every color. Mixing yarn thicknesses can create uneven flower sizes.
When working the 12 hdc around each loop, keep the stitches close together. Loose spacing can leave the foundation chain visible.
For a softer flower, work 10 hdc around each loop. For fuller and thicker petals, work 14 hdc.
Make a floral scarf using two or three flowers across and as many rows as needed for the desired length.
For a triangular shawl, begin with one flower, then increase each row by one or two motifs.
A smaller arrangement of four or nine flowers makes a pretty table mat or cushion front.
Use white petals with yellow centers for traditional daisies. The multicolored petals and lime centers create the bright retro garden look shown in the reference.
For a baby blanket, use soft pastel shades and check every join carefully before use.
Frequently Asked Questions
Why are my petals curling?
The hdc stitches may be packed too tightly around the chain loop, or the flowers may simply need blocking. Gently stretch each petal and pin it flat while damp.
Can I join the flowers as I crochet them?
They can be joined during the final petal round, but separate green bridges create the visible green details shown in this design. Making and blocking the flowers first also gives you more control over the color placement.
How many flowers do I need for a larger blanket?
Measure one blocked flower and multiply that measurement by the desired number of motifs. A throw may use 80 flowers, while a full-size blanket could require 120–160 flowers depending on yarn, hook size, and finished dimensions.
Conclusion
This easy crochet daisy flower blanket pattern creates a bright field of raised loop-petal flowers joined with small green bridges and leafy cross connectors. The individual motifs are portable, repetitive, and easy to customize with leftover yarn. Make a colorful throw like the one shown, or resize the layout into a shawl, cushion, table covering, or lightweight summer crochet project using your favorite flower colors.



