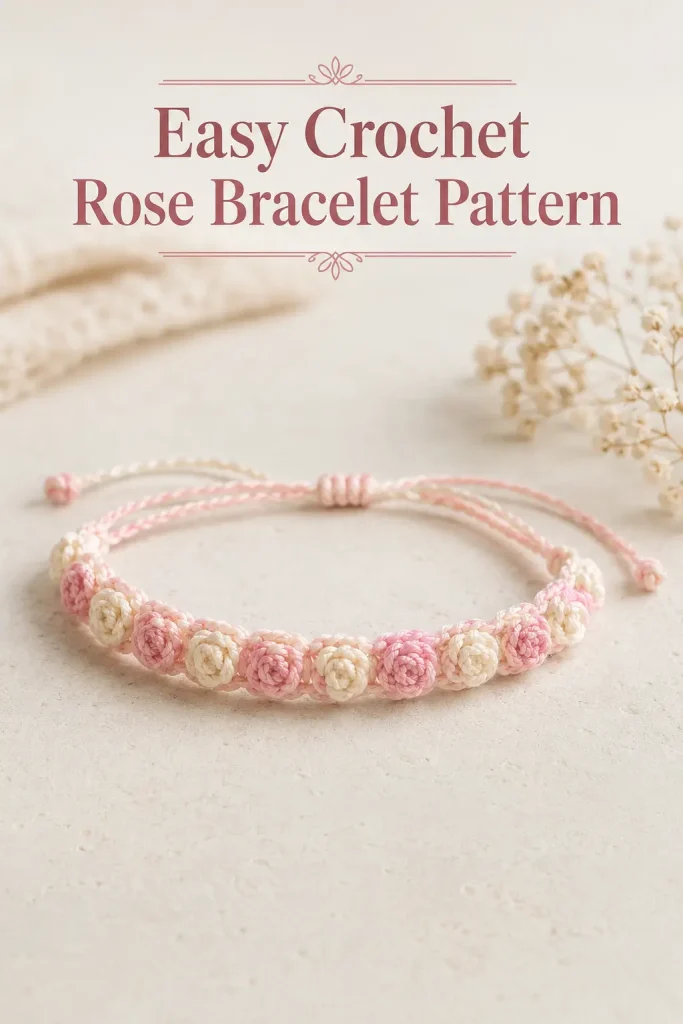
This delicate crochet rose bracelet is a sweet handmade accessory that uses tiny two-color flower knots along a slim crochet cord. The alternating pink and cream roses create a soft, romantic look while keeping the bracelet lightweight and comfortable to wear.
This easy crochet bracelet pattern is ideal for using small yarn scraps and makes a lovely friendship bracelet, party favor, spring accessory, or handmade gift. The adjustable braided ties allow it to fit different wrist sizes without buttons, clasps, or metal findings.
Description
The finished bracelet features a narrow row of tiny raised crochet roses worked in alternating pink and cream. Each miniature rose is formed from a compact spiral cluster that wraps around the bracelet cord, creating a textured flower-like shape on both sides. A slim two-color foundation cord runs through the center of the roses, while braided or chained ties extend from both ends for an adjustable fit. The bracelet is soft, flexible, and approximately 6½ inches long across the decorated section, not including the ties.
Materials
- Size 10 crochet thread or fine cotton yarn in pale pink
- Size 10 crochet thread or fine cotton yarn in cream
- 1.5 mm crochet hook
- Yarn needle
- Small scissors
- Measuring tape
- Sewing pin or safety pin for holding the bracelet while braiding
- Fabric glue, optional for securing final knots
Abbreviations
- ch: chain
- dc: double crochet
- hdc: half double crochet
- sc: single crochet
- sl st: slip stitch
- st: stitch
- sts: stitches
Pattern Notes
- This pattern uses US crochet terminology.
- The bracelet is made from one central two-color cord with small rose clusters added at regular intervals.
- The roses alternate between pink and cream.
- Each rose is made separately around the central cord, then tightened into a small spiral.
- Keep the thread tension firm and consistent so the flowers remain compact.
- The decorated section should be approximately ½–1 inch shorter than the wearer’s wrist circumference.
- The adjustable ties add extra length and allow the bracelet to open and close easily.
- This is an original image-inspired construction designed to create the same general style of alternating miniature crochet roses.
Finished Size
The sample bracelet is designed for an average adult wrist.
- Decorated rose section: approximately 6½ inches
- Tie length: approximately 3½ inches at each end
- Total open length: approximately 13½ inches
- Width: approximately ¼ inch
Measure the wearer’s wrist before beginning and adjust the number of roses as needed.
Step-by-Step Instructions
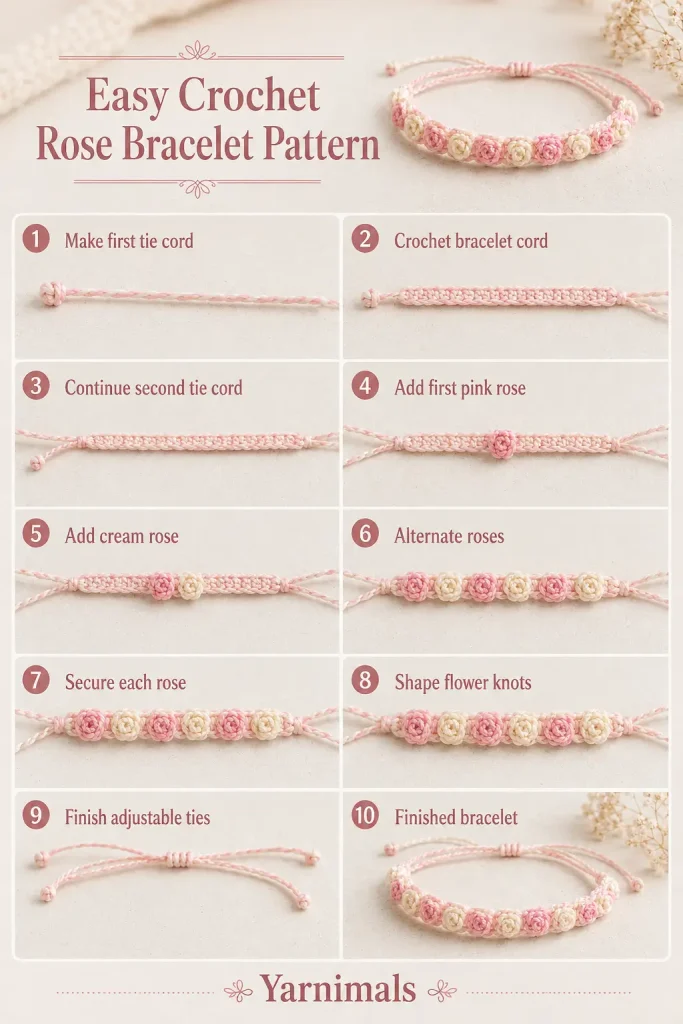
Make the First Adjustable Tie
Hold one strand of pink thread and one strand of cream thread together.
Leave a 5-inch beginning tail in both colors.
Using both strands as though they were one, make a slip knot and place it on the hook.
Ch 25 with both colors held together.
The chain should measure approximately 3½ inches. Add or remove chains if a different tie length is preferred.
Fasten off the cream thread only, leaving the pink thread attached.
Do not cut the beginning tails. They will later be twisted or braided to make the end tie thicker and more decorative.
Make the Central Bracelet Cord
Using the attached pink thread:
Ch 2.
Change to cream by completing the final loop of the second chain with the cream thread.
Do not cut the pink thread. Carry it loosely along the back of the cord.
With cream, ch 2.
Change back to pink in the final loop.
Continue alternating two pink chains and two cream chains until the central cord measures approximately 6½ inches.
Keep the unused color close to the back of the chain without pulling it tightly. The carried thread will strengthen the cord and help support the roses.
For a smaller bracelet, stop when the central section measures approximately 5½–6 inches.
For a larger bracelet, continue until it measures approximately 7–7½ inches.
Do not fasten off.
Make the Second Tie
When the central cord reaches the required length, bring both colors together again.
Hold the pink and cream threads as one strand.
Ch 25 using both colors together.
Fasten off, leaving 5-inch tails in both colors.
You should now have one long bracelet base with a two-color center and a tie at each end.
Prepare the Bracelet Base
Lay the bracelet flat with the central colored cord facing upward.
Use a safety pin to mark the point where the first rose should begin, approximately ¼ inch from the first tie.
Mark the opposite end in the same way.
The roses will be worked between these two points.
For the neatest result, leave approximately ⅛–¼ inch between the roses. The flowers should sit close together without overlapping heavily.
Crochet the First Pink Rose
Join pink thread around the central cord approximately ¼ inch from the first tie.
To join around the cord:
Insert the hook underneath the bracelet cord.
Pull up a loop of pink thread.
Ch 1 to secure the thread around the cord.
Work the following stitches around the cord rather than into the chain stitches:
- 1 sc
- 1 hdc
- 3 dc
- 1 hdc
- 1 sc
Slide the stitches close together.
Fasten off, leaving a 3-inch sewing tail.
The stitches will naturally form a small curved shell.
Thread the tail onto a yarn needle.
Roll the shell tightly from one end to the other to create a miniature rose spiral.
Pass the needle through the center of the rolled rose and through the central bracelet cord.
Make two or three small securing stitches through the bottom of the rose.
Fasten securely and weave the tail beneath the flower.
The rose should measure approximately ¼ inch wide.
Crochet the First Cream Rose
Move approximately ⅛ inch along the central cord.
Join cream thread around the cord.
Work:
- 1 sc
- 1 hdc
- 3 dc
- 1 hdc
- 1 sc
Fasten off, leaving a sewing tail.
Roll the stitch group into a compact spiral.
Sew through the center of the rose and around the bracelet cord several times.
Secure the thread underneath the flower and trim the excess.
Continue the Alternating Roses
Continue adding small roses along the entire central section.
Alternate the colors in this order:
- Pink rose
- Cream rose
- Pink rose
- Cream rose
Keep each flower close to the previous flower.
For an average adult bracelet, make approximately 18–22 roses.
The exact number will depend on:
- Thread thickness
- Hook size
- Tension
- Rose width
- Desired bracelet length
Stop when the decorated section reaches the marker near the second tie.
Do not place roses directly over the adjustable ties.
Alternative Rose Method for Firmer Flowers
For slightly rounder and more raised roses, work the following around the central cord:
- 1 sc
- 2 hdc
- 3 dc
- 2 hdc
- 1 sc
Fasten off and roll the stitches tightly.
This version produces a fuller flower and may require fewer roses to cover the bracelet.
Use the same rose formula throughout the project so all flowers remain consistent.
Secure the Rose Row
After all the roses have been added, turn the bracelet over.
Thread a yarn needle with a matching pink or cream strand.
Pass the needle carefully through the bottom of each rose and the central cord.
Make one small hidden stitch beneath each flower.
This reinforcement strand helps prevent the roses from twisting around the bracelet cord.
Do not pull the thread too tightly. The bracelet should remain flexible and lie comfortably around the wrist.
Secure the thread near the final rose and weave in the end.
Shape the Roses
Place the bracelet on a flat surface.
Use your fingers or the tip of the yarn needle to open the outer stitches of each flower slightly.
Keep the center tightly rolled while allowing the outer stitches to curve outward.
Check that all the roses face the same direction.
Adjust any flower that appears loose or twisted.
Finish the Adjustable Ties
At one end of the bracelet, separate the four loose strands:
- Pink beginning tail
- Cream beginning tail
- Pink chain strand
- Cream chain strand
Gently twist the loose tails together.
Wrap them once around the end of the chained tie.
Tie a secure overhand knot near the end.
Trim the tails evenly, leaving approximately ¼ inch beyond the knot.
Repeat at the other end.
For a more finished appearance, divide the strands into three sections and braid them before tying the final knot.
A tiny amount of fabric glue may be placed inside each final knot, but allow it to dry completely before wearing.
Make the Sliding Closure
Cross the bracelet ties so they overlap by approximately 2 inches.
Cut a separate 12-inch strand of cream thread.
Place it underneath both overlapping ties.
Tie the thread around both ties with a secure double knot, keeping the knot loose enough for the ties to slide.
Using the cream thread, ch 6.
Wrap the chain around both overlapping ties.
Sl st into the first chain to create a small closure ring.
Work 8–10 sc around the ring and both bracelet ties.
Join with a sl st.
Fasten off and weave in the ends carefully.
Test the closure by pulling the two bracelet ends apart and then sliding them inward.
The closure should move smoothly but remain firm enough to hold the bracelet in place.
Simpler Tie Closure
The bracelet can also be worn without a sliding closure.
Wrap it around the wrist and tie the two ends together in a small bow or double knot.
This method is especially useful when making matching friendship bracelets or party favors.
Final Finishing
Check the entire bracelet carefully.
Make sure:
- Every rose is sewn securely to the cord.
- The flower colors alternate consistently.
- The central cord remains flexible.
- The ties are equal in length.
- All thread ends are hidden.
- The adjustable closure slides correctly.
- No loose knots remain underneath the roses.
Lightly mist the bracelet with water and shape it flat.
Allow it to dry completely before wearing.
Do not press the roses with a hot iron, as this can flatten the textured flower shapes.
Tips and Variations
Use mercerized cotton thread for crisp, clearly defined roses. Embroidery floss can also be used, but divide it into fewer strands if the bracelet becomes too thick.
Choose two closely related shades for a soft look, such as blush pink and ivory, lavender and white, or pale blue and cream.
For a brighter friendship bracelet, alternate several colors instead of only two.
To make a child-size bracelet, shorten the central rose section and use slightly shorter ties.
A larger hook creates softer and wider roses. A smaller hook produces compact, firm flowers.
For a necklace or anklet, extend the central cord and add more roses using the same method.
Small seed beads can be sewn into the center of each rose, although the visible design in the reference image uses plain crochet flower centers.
Keep the flower stitches tight. Loose double crochets create large petals that may lose the delicate bracelet appearance.
When making a matching set, count and record the number of roses used in the first bracelet so the remaining pieces have equal lengths.
Frequently Asked Questions
Are the roses crocheted directly into the foundation chain?
The roses are worked around the central cord rather than into individual chain loops. This allows each flower to slide into position before it is sewn securely.
How many roses do I need for one bracelet?
Most adult bracelets require approximately 18–22 miniature roses. The number may change depending on the yarn thickness, hook size, and wrist measurement.
Can I make the bracelet without a sliding closure?
Yes. Leave the ties long enough to form a bow or double knot around the wrist. This is the simplest finishing method for a beginner crochet project.
Conclusion
This easy crochet rose bracelet pattern turns small amounts of thread into a delicate handmade accessory filled with tiny textured flowers. The alternating colors, flexible cord, and adjustable ties make it simple to customize for friends, gifts, or everyday wear. Save the pattern and try it with your favorite color combination to create a personal collection of crochet flower bracelets.




Is there a video to go with the tiny rose bracelet please
Unable to print because my email ends in .net
Unable to download to my @hotmail.co.UK email address!