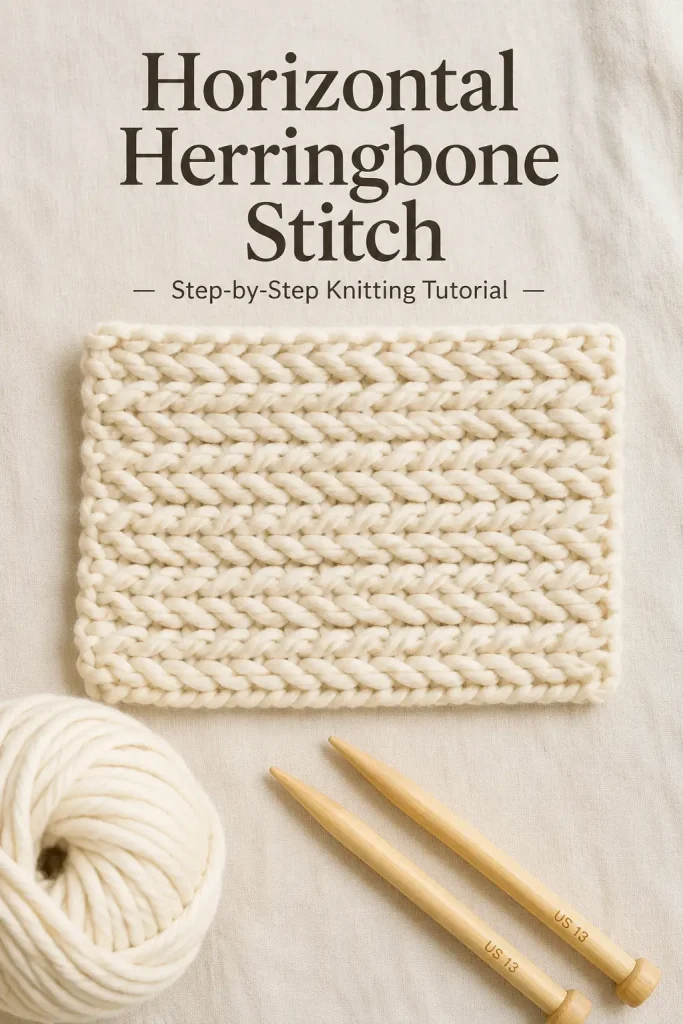
The horizontal herringbone stitch creates a beautifully dense knitted fabric filled with neat rows of interlocking diagonal stitches. Its woven appearance makes it look complicated, but the pattern is formed with a simple two-row repeat.
Instead of completing ordinary decreases, you work through two stitches and slide only one of the original stitches off the needle. The remaining stitch is then paired with the next stitch. This special technique keeps the stitch count unchanged while pulling the yarn into the distinctive herringbone texture.
This tutorial explains how to work the horizontal herringbone stitch flat, control the tension, avoid common mistakes, and finish a neat practice swatch.
About the Horizontal Herringbone Stitch
The horizontal herringbone stitch produces a thick, structured fabric with limited stretch. Rows of overlapping diagonal strands form a repeating chevron pattern across the right side of the work.
It is especially suitable for projects that benefit from a firm and decorative texture, including:
- Scarves and cowls
- Pillow covers
- Handbags and clutches
- Table mats
- Headbands
- Blanket panels
- Decorative pockets
- Structured accessories
The stitch is worked flat using an even number of stitches. It consists of one modified decrease row on the right side and one modified purl decrease row on the wrong side.
Skill Level
Confident beginner to intermediate.
You should be comfortable with:
- Casting on
- Knitting
- Purling
- Slipping stitches
- Working an SSK decrease
- Purling two stitches together
- Binding off
The most important skill is learning to slide only one original stitch off the left needle after each modified decrease.
Finished Swatch Size
The instructions create an approximately 8-inch-wide by 6-inch-tall practice swatch.
The exact finished measurements will depend on your yarn, needle size, tension, and blocking method.
You can make the swatch wider or narrower by casting on any even number of stitches.
Gauge
Approximately 10 stitches and 12 rows equal 4 inches in the horizontal herringbone pattern after light blocking.
Gauge is not essential for a practice swatch. However, you should always knit and block a gauge swatch before using this stitch in a fitted garment or precisely sized project.
The herringbone fabric is denser than ordinary stockinette and may pull inward after several rows.
Materials
- 55 to 70 yards of super-bulky weight yarn
- US size 13 or 9 mm straight knitting needles
- Scissors
- Tapestry needle
- Measuring tape
- Blocking mat and rustproof pins, optional
Choosing Yarn
A smooth, well-plied yarn is the easiest choice for learning this stitch. Clear stitch definition will help you see which loop should remain on the needle after each decrease.
Wool, acrylic, or a springy wool-blend yarn works well. Avoid fuzzy, eyelash, loosely spun, or heavily textured yarn until you are comfortable with the technique.
Super-bulky yarn makes the stitch movements easy to see, but the pattern can also be worked with bulky, worsted, or lighter yarn.
Choosing Needles
The horizontal herringbone stitch naturally creates tight fabric. Use needles one or two sizes larger than the size normally recommended for your yarn.
Larger needles provide enough room to insert the needle through two stitches and complete the modified decreases comfortably.
Pointed needle tips are helpful. Wooden needles offer control, while smooth metal needles may be easier for knitters with naturally tight tension.
Abbreviations
BO: Bind off
CO: Cast on
HSSK: Modified herringbone slip-slip-knit
HP2tog: Modified herringbone purl two together
K: Knit
P: Purl
P2tog: Purl two stitches together
Rep: Repeat
RS: Right side
Sl: Slip
St or sts: Stitch or stitches
WS: Wrong side
Stitch Multiple
The horizontal herringbone stitch is worked over an even number of stitches.
For the practice swatch, cast on 20 stitches.
Special Stitch: Beginning Herringbone SSK
The beginning herringbone SSK is worked over the first two stitches of every right-side row.
- Slip the first stitch knitwise from the left needle to the right needle.
- Slip the second stitch knitwise in the same way.
- Insert the left needle into the fronts of both slipped stitches.
- Knit the two stitches together through the back.
- Form the new stitch on the right needle.
- Slide only the first original stitch off the left needle.
- Keep the second original stitch on the left needle.
You have formed one new stitch while keeping one original stitch available for the next repeat.
Special Stitch: Herringbone SSK Repeat
After the first modified SSK, one stitch remains on the left needle.
- Slip the retained stitch purlwise to the right needle.
- Slip the next unworked stitch knitwise to the right needle.
- Insert the left needle into both slipped stitches.
- Knit the two stitches together.
- Slide only the first original stitch off the left needle.
- Keep the second original stitch on the left needle.
Continue pairing the retained stitch with the next unworked stitch.
Slipping the retained stitch purlwise prevents it from being twisted a second time.
Special Stitch: Herringbone Purl Two Together
The modified purl-two-together movement is worked across every wrong-side row.
- Bring the working yarn to the front.
- Insert the right needle purlwise through the first two stitches.
- Purl the two stitches together.
- Form the new stitch on the right needle.
- Slide only the first original stitch off the left needle.
- Keep the second original stitch on the left needle.
Pair the retained stitch with the next unworked stitch and repeat.
Important Pattern Notes
Work with relaxed tension. The stitch becomes difficult if the loops are pulled tightly around the needles.
Each repeat works through two stitches but releases only one old loop. The remaining loop is reused in the next repeat.
Your total stitch count should remain unchanged after every row.
The herringbone texture may not look clear after the first two rows. The diagonal strands become more visible after four to six rows.
The right side has the strongest horizontal chevron pattern. The wrong side is also textured, but it has a different appearance.
This fabric has less stretch than ribbing, garter stitch, or stockinette.
The pattern below is worked flat. Knitting horizontal herringbone in the round requires a different row sequence.
Horizontal Herringbone Stitch Pattern
Cast on an even number of stitches.
For the sample swatch, cast on 20 stitches using the long-tail cast-on or another comfortable cast-on method.
Row 1: Right Side
Work one beginning herringbone SSK over the first two stitches, sliding only the first original stitch off the left needle.
Continue as follows:
Slip the retained stitch purlwise. Slip the next unworked stitch knitwise. Knit the two slipped stitches together, sliding only the first original stitch off the left needle.
Repeat across until one stitch remains.
Knit the final stitch normally.
Row 2: Wrong Side
Purl two stitches together, sliding only the first original stitch off the left needle and keeping the second stitch on the left needle.
Continue pairing the retained stitch with the next unworked stitch.
Repeat across until one stitch remains.
Purl the final stitch normally.
Pattern Repeat
Repeat Rows 1 and 2 until the swatch reaches your desired length.
For an approximately 6-inch-long swatch, work about 18 rows or nine complete two-row repeats.
Step-by-Step Horizontal Herringbone Tutorial
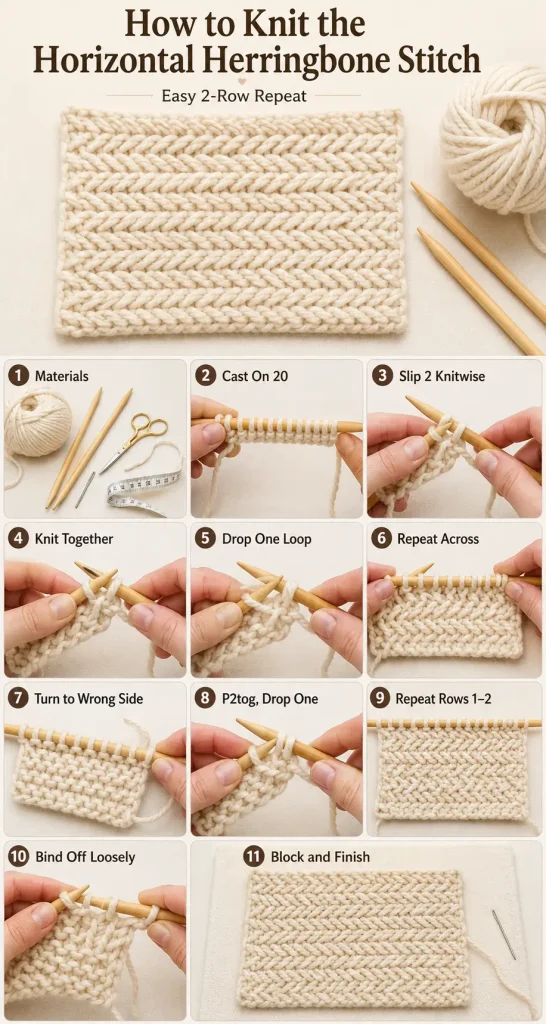
Step 1: Cast On
Cast on 20 stitches for the practice swatch.
Keep the cast-on edge relaxed and evenly spaced. A very tight cast-on will make the first row difficult to work.
Turn the needle so you are ready to begin the right-side row.
Step 2: Slip the First Two Stitches
Slip the first stitch knitwise from the left needle to the right needle.
Slip the second stitch knitwise in the same way.
The stitches should now be positioned on the right needle as they would be before completing an ordinary SSK decrease.
Step 3: Knit the Two Stitches Together
Insert the left needle into the fronts of the two slipped stitches.
Wrap the working yarn and knit the two stitches together through the back.
Draw the new loop completely onto the right needle.
Step 4: Drop Only One Original Stitch
This is the most important part of the technique.
Allow only the first original stitch to slide off the left needle. Keep the second original stitch on the left needle.
Do not slide both stitches off as you would when completing a normal decrease.
Step 5: Continue Across the Right-Side Row
Slip the retained stitch purlwise onto the right needle.
Slip the next unworked stitch knitwise.
Knit the two slipped stitches together, then slide only the first original stitch off the left needle.
Continue repeating this movement across the row.
When only one stitch remains, knit it normally.
Step 6: Count the Stitches
Count the stitches before turning the work.
You should still have 20 stitches. If the stitch count has decreased, you probably allowed both old loops to leave the left needle during one or more repeats.
Step 7: Turn the Work
Turn the swatch to begin the wrong-side row.
Bring the working yarn to the front of the needles.
Step 8: Purl Two Together
Insert the right needle purlwise through the first two stitches.
Purl the two stitches together, but slide only the first original stitch off the left needle.
Keep the second stitch on the left needle.
Step 9: Continue Across the Wrong-Side Row
Purl the retained stitch together with the next unworked stitch.
After forming each new stitch, release only the first original loop.
Continue until one stitch remains, then purl the final stitch normally.
Step 10: Repeat the Two Rows
Continue alternating the right-side modified SSK row and the wrong-side modified purl-two-together row.
The horizontal chevron pattern should begin appearing after several rows.
How to Maintain Comfortable Tension
Horizontal herringbone becomes difficult to work when the stitches are too tight. The needle must repeatedly enter two loops, so each stitch needs enough room to move along the needle.
Keep the working yarn relaxed after forming each new stitch. Do not pull the yarn tightly to close the space between stitches.
Move the stitches close to the tapered needle tips before inserting the needle.
You can also try:
- Using a larger needle size
- Changing from wooden to metal needles
- Choosing smoother yarn
- Loosening the cast-on
- Pausing after each repeat to relax the working yarn
The fabric should feel firm, but the knitting process should not hurt your hands.
Checking the Stitch Count
Count your stitches after every row while learning the pattern.
The stitch count should never change.
Each repeat creates one new stitch and releases one old stitch. The second old stitch stays on the needle and becomes part of the next repeat.
If you begin with 20 stitches, you should have 20 stitches after every completed row.
Binding Off
Finish after completing a wrong-side row.
Bind off knitwise across the next right-side row using relaxed tension.
The herringbone fabric is dense, so a tight bind-off may cause the top edge to pull inward. Consider using a needle one size larger for the bind-off.
After the final stitch, cut the yarn and leave a tail approximately 6 inches long.
Pull the tail through the final loop and tighten gently.
Weaving In the Ends
Thread the yarn tail onto a tapestry needle.
Weave the tail through several stitches on the wrong side of the fabric. Follow the direction of the existing stitches so the tail remains hidden.
Change direction once to secure the yarn.
Avoid pulling the tail tightly because this can gather or distort the edge.
Trim the remaining yarn after blocking.
Blocking the Herringbone Swatch
Always follow the care instructions provided for your yarn.
For washable wool, acrylic, or wool-blend yarn:
- Fill a basin with lukewarm water.
- Add a small amount of gentle wool wash if desired.
- Place the swatch in the water.
- Allow it to soak for 10 to 15 minutes.
- Lift the swatch without twisting or wringing.
- Press out excess water inside a clean towel.
- Lay the swatch flat on a blocking mat or dry towel.
- Gently straighten the edges.
- Adjust the horizontal chevrons so they lie evenly.
- Leave the swatch flat until completely dry.
Do not stretch the fabric aggressively. Strong blocking can flatten the raised texture and distort the diagonal strands.
Troubleshooting Common Problems
The Stitch Count Keeps Decreasing
Both original stitches are probably being dropped from the left needle.
After forming each modified decrease, slide only the first old loop off the needle. The second loop must remain on the left needle.
The Stitch Count Is Increasing
The first original loop may still be sitting on the left needle after the new stitch is formed.
Each repeat must create one new stitch and release one old stitch.
The Stitches Are Too Tight to Work
Relax the working yarn and keep the stitches near the tapered needle tips.
Try using needles one or two sizes larger. Smooth metal needles can also make the stitches easier to move.
The Pattern Looks Twisted
Check how you are slipping the stitches on the right-side row.
For the beginning movement, slip both stitches knitwise. During the remaining repeats, slip the retained stitch purlwise and the next unworked stitch knitwise.
The Herringbone Texture Is Not Visible
Continue working until you have completed at least four to six rows.
The texture often looks uneven during the first two rows because the diagonal strands have not yet formed complete horizontal ridges.
Light blocking will help the pattern settle.
The Fabric Is Narrower Than Expected
Horizontal herringbone naturally pulls inward because the stitches overlap.
Make a blocked gauge swatch before beginning a precisely sized project. You may need to cast on more stitches than you would for stockinette.
The Cast-On Edge Is Too Tight
Use a relaxed long-tail cast-on or cast on with a needle one size larger.
Do not leave extremely loose loops, but make sure each stitch can move freely along the needle.
The Edges Look Uneven
The modified decreases can create slightly irregular side edges while you are learning.
Keep the first and last stitches relaxed and consistent. For a larger project, consider adding a garter-stitch or seed-stitch border.
A Retained Stitch Slipped Off the Needle
Secure the loose loop immediately with a locking stitch marker, crochet hook, or spare needle.
Because the fabric is dense and the stitches overlap, carefully undoing the row is often easier than trying to repair a deeply dropped stitch.
Adding a Border
A border is not necessary for a practice swatch, but it may improve the edges of a scarf, blanket, or pillow panel.
Suitable borders include:
- Garter stitch
- Seed stitch
- Moss stitch
- Double seed stitch
- Knitted i-cord edging
Remember that the border and herringbone section may have different gauges. Measure the fabric regularly to prevent puckering.
Adjusting the Size
To make the project wider, cast on additional stitches while keeping the total number even.
To make it longer, continue repeating Rows 1 and 2.
For example:
- A narrow headband may use 12 to 18 stitches.
- A scarf may use 20 to 30 stitches with bulky yarn.
- A pillow panel may require 40 or more stitches.
- A blanket section may require a much larger even cast-on.
These are starting suggestions only. The correct stitch count depends on your yarn, needles, gauge, and desired finished width.
Yarn Weight Variations
Super-Bulky Yarn
Super-bulky yarn produces a dramatic, thick texture and is excellent for practice swatches, cowls, pillow covers, and quick accessories.
Bulky Yarn
Bulky yarn creates a slightly lighter fabric while preserving the strong woven appearance.
Worsted-Weight Yarn
Worsted-weight yarn gives the stitch a finer texture. Use larger needles than you normally would for the yarn to keep the modified decreases manageable.
Lightweight Yarn
The technique can be worked with lighter yarn, but the small stitches may be more difficult to manipulate. Choose sharp needle tips and work with especially relaxed tension.
Project Ideas
Textured Scarf
Work a long rectangular panel using bulky or super-bulky yarn. Add a stable border if you prefer straighter edges.
Herringbone Cowl
Create a flat rectangle and seam the short ends together. The dense texture makes a warm, structured neck accessory.
Pillow Cover
Use the herringbone pattern for the front panel and a simpler stitch for the back. Join the pieces with mattress stitch or a neat visible seam.
Handbag Panel
The limited stretch makes this stitch suitable for structured bags and clutches. Add a fabric lining to protect the knitted interior.
Table Mat
Work the pattern in firm cotton-blend yarn for a decorative mat. Test the yarn carefully because stiff cotton may make the decreases harder to work.
Blanket Accent
Use horizontal herringbone for a textured central panel or decorative stripe. Check that the surrounding stitch patterns have a compatible gauge.
Frequently Asked Questions
Is the horizontal herringbone stitch difficult?
The pattern uses familiar knit and purl techniques, but releasing only one loop after each decrease takes practice. Most knitters become comfortable with the movement after completing a small swatch.
How many stitches should I cast on?
Cast on any even number of stitches. Twenty stitches make a convenient practice swatch with super-bulky yarn.
Why does the stitch count stay the same?
Each repeat works through two stitches but drops only one original stitch from the left needle. The second original stitch remains and is used again in the next repeat.
Is horizontal herringbone reversible?
Both sides are textured and attractive, but they are not identical. The right side displays the clearest horizontal chevron pattern.
Does this stitch curl?
The dense structure reduces some curling, but the edges may still move depending on the yarn and tension. A non-curling border can help stabilize larger projects.
Is the stitch stretchy?
Horizontal herringbone has limited stretch. It is more structured than stockinette and much less elastic than ribbing.
What type of yarn is easiest for beginners?
Choose smooth, light-colored, well-plied yarn. Light yarn makes the stitch movements easier to see, while smooth fibers prevent the needle from splitting the strands.
Why are larger needles recommended?
The overlapping loops create tight fabric. Larger needles leave enough space to enter two stitches and complete the modified decreases.
Can I knit this pattern in the round?
The flat version cannot be transferred directly to circular knitting because the wrong-side purl row is not worked when knitting continuously in the round. A separate in-the-round variation is required.
Can I use circular needles for flat knitting?
Yes. You can use circular needles to work back and forth without joining in the round. Turn the work after every row exactly as you would with straight needles.
Should I block the finished fabric?
Light blocking helps straighten the edges and define the horizontal chevrons. Avoid stretching aggressively because it can flatten the texture.
Why does my fabric look different from ordinary knit stitches?
The modified decreases cause the stitches to overlap and lean diagonally. This creates the woven herringbone appearance and makes the fabric thicker than ordinary knitting.
Final Tips for Success
Begin with smooth, light-colored yarn so you can see every loop clearly.
Use larger needles and keep your tension relaxed.
Work slowly during the first few rows and check that only one old stitch leaves the left needle after each modified decrease.
Count the stitches at the end of every row.
Allow the pattern to develop for several rows before deciding whether the texture looks correct.
With a little practice, the two-row repeat becomes rhythmic and produces a beautifully structured fabric filled with elegant horizontal chevrons.
The horizontal herringbone stitch is an excellent technique for adding rich, woven texture to scarves, bags, pillows, blankets, and other knitted accessories.



