
Introduction
A chunky crochet chicken is such a sweet little handmade project for farmhouse decor, Easter baskets, market tables, nursery shelves, or cozy kitchen styling. It has that soft, round, huggable look that makes people smile right away.
This pattern is an original beginner-friendly chicken design inspired by the cozy plush chicken style, but it uses fresh stitch counts, construction, and details so it is not a copy of another designer’s pattern. The body is simple and round, the comb and beak are small, and the face is embroidered for a soft handmade finish.
It is a lovely beginner crochet project because the main chicken body is made as one simple amigurumi shape, then the small pieces are sewn on at the end.
Description
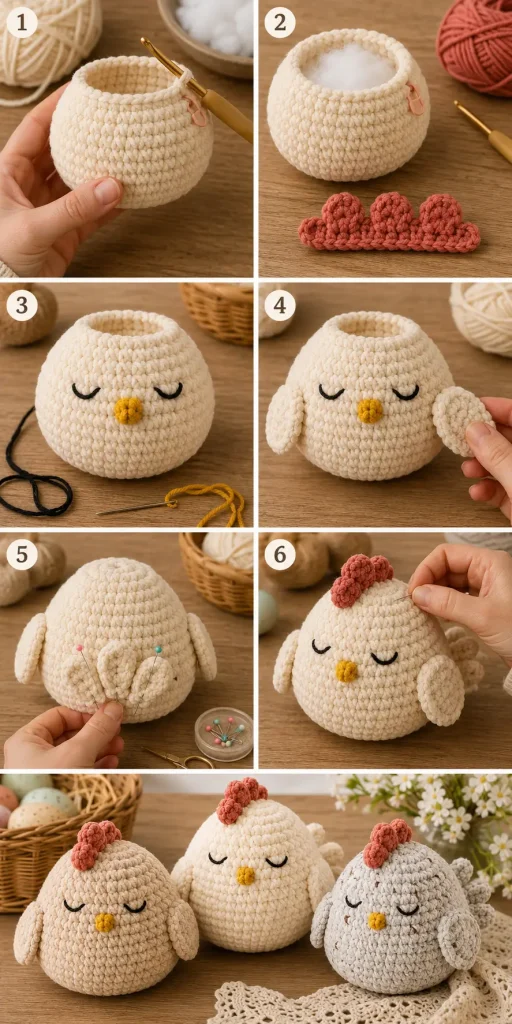
This chunky chicken has a round, squat body with soft plush texture, a tiny beak, sleepy stitched eyes, and a small red comb on top. The shape is intentionally simple: chubby, rounded, and slightly flat on the bottom so the chicken can sit nicely on a shelf or in your hands.
You can make it in cream, oatmeal, gray, speckled yarn, warm beige, or soft brown. The cozy textured yarn gives the chicken a fluffy farmhouse look, while the small red comb and golden beak add just enough color.
This plush crochet toy works beautifully as a handmade gift, spring decor, chicken-lover present, beginner amigurumi pattern, or cute market make.
Materials
- Super bulky chenille or blanket yarn in cream, oatmeal, gray, or speckled neutral
- Small amount of red or dusty coral yarn for the comb
- Small amount of golden yellow or tan yarn for the beak
- Small amount of black yarn or embroidery thread for the eyes
- 6 mm crochet hook
- Yarn needle
- Stitch marker
- Scissors
- Polyester fiberfill
- Pins for assembly
Finished Size
Approximate finished size using super bulky chenille yarn:
- Height: 5–6 inches
- Width: 5–6 inches
- Depth: 4–5 inches
Finished size may vary depending on yarn, hook size, stuffing, and tension.
Gauge
Gauge is not critical for this plush, but your stitches should be tight enough to hold stuffing securely.
If stuffing shows through, use a smaller hook.
Abbreviations
- MR: magic ring
- ch: chain
- sc: single crochet
- hdc: half double crochet
- inc: increase, 2 sc in the same stitch
- dec: invisible decrease
- sl st: slip stitch
- st: stitch
- sts: stitches
- FO: fasten off
Pattern Notes
The body is worked in continuous rounds.
Use a stitch marker to mark the first stitch of each round.
The comb, beak, wings, and tail feathers are made separately and sewn on after the body is finished.
Stuff the body firmly, but do not overstuff. The chicken should stay soft and round while still holding its shape.
Gently flatten the bottom after stuffing so the chicken sits upright.
Sample shown: The chickens in the photos were made using Super Bulky (#6) chenille or blanket yarn with a 6 mm hook. If you make the pattern using #4 worsted weight yarn, the finished chicken will be much smaller while keeping the same proportions.
For a child-safe version, embroider the eyes instead of using plastic safety eyes.
Step-by-Step Instructions
Chicken Body
Use your main chicken color and a 6 mm hook.
Round 1
Make a MR and work 6 sc into the ring. (6)
Round 2
Inc in each st around. (12)
Round 3
Repeat around: sc in next st, inc in next st. (18)
Round 4
Repeat around: sc in next 2 sts, inc in next st. (24)
Round 5
Repeat around: sc in next 3 sts, inc in next st. (30)
Round 6
Repeat around: sc in next 4 sts, inc in next st. (36)
Round 7
Repeat around: sc in next 5 sts, inc in next st. (42)
Rounds 8–14
Sc in each st around. (42)
Round 15
Repeat around: sc in next 5 sts, dec. (36)
Round 16
Sc in each st around. (36)
Round 17
Repeat around: sc in next 4 sts, dec. (30)
Begin stuffing the body. Shape it into a round squat chicken body.
Round 18
Repeat around: sc in next 3 sts, dec. (24)
Round 19
Repeat around: sc in next 2 sts, dec. (18)
Add more stuffing if needed.
Round 20
Repeat around: sc in next st, dec. (12)
Round 21
Dec around. (6)
FO and close the opening.
Gently press the bottom so the chicken can sit upright.
Comb
Use red or dusty coral yarn.
The comb is made as a small textured strip and sewn to the top of the chicken.
Row 1
Ch 9.
Sc in the 2nd ch from hook and in each ch across. (8)
Ch 1, turn.
Row 2
Sl st in first st.
In next st, work: sc, hdc, sc.
Sl st in next st.
In next st, work: sc, hdc, sc.
Sl st in next st.
In next st, work: sc, hdc, sc.
Sl st in last st.
FO, leaving a long tail for sewing.
This creates three soft bumps for the comb.
Beak
Use golden yellow or tan yarn.
Row 1
Ch 4.
Sc in 2nd ch from hook.
Hdc in next ch.
Sc in last ch.
FO, leaving a long tail for sewing.
Fold the small piece slightly into a tiny beak shape before sewing.
Wings
Make 2 using the main chicken color.
Round 1
Make a MR and work 6 sc into the ring. (6)
Round 2
Inc in each st around. (12)
Round 3
Repeat around: sc in next st, inc in next st. (18)
Round 4
Sc in each st around. (18)
Do not stuff the wings.
Fold the wing in half so the opening lines up evenly. The folded wing now has two layers of stitches (a front layer and a back layer).
Working through one stitch from the front layer and the matching stitch from the back layer at the same time, crochet:
Sc through both layers across the opening. (9)
This closes the wing and creates its finished shape.
Fasten off, leaving a long tail for sewing.
Tail Feathers
Make 3 using the main chicken color.
Small Tail Feather
Ch 7.
Sc in the 2nd ch from hook.
Hdc in next 3 ch.
Sc in next ch.
Sl st in last ch.
Fasten off, leaving a long tail for sewing.
Repeat until you have 3 separate tail feathers.
Do not double the tail feathers. They are single pieces. When sewn close together with their bases slightly overlapping, the plush yarn naturally creates a full, fluffy tail that may appear doubled in the photos.
Face
Place the front of the chicken so the closed bottom is underneath and the smooth rounded side faces forward.
Use black yarn or embroidery thread.
Embroider two small sleepy eyes between Rounds 10 and 11, about 5–6 stitches apart.
Each eye can be a short curved stitch or a tiny vertical stitch.
Place the beak centered between the eyes, slightly lower.
Sew the beak securely in place.
Assembly
Pin the comb to the top center of the chicken body, around Rounds 2–5.
Sew the comb securely along the bottom edge.
Pin one wing to each side of the body around Rounds 11–15.
Position each wing with the crocheted closed edge facing downward. Sew only along the upper curved edge of the wing, leaving the lower edge loose so it sits naturally against the body.
Arrange the three tail feathers side by side at the back of the chicken around Rounds 13–16. Slightly overlap the bases of the feathers before sewing them securely in place. The overlapping placement creates a fuller tail without needing additional layers.
Pin the three tail feathers to the back of the chicken around Rounds 13–16.
Sew each tail feather securely at the base.
Check that the chicken sits evenly.
Weave in all ends.
Shape the body, comb, wings, and tail gently with your hands.
Finishing
Check all sewn pieces to make sure they are secure.
Trim any visible yarn tails.
Fluff the body gently with your fingers.
Do not brush chenille yarn too hard, as it can shed.
For a cleaner display finish, gently flatten the bottom again so the chicken sits without tipping.
Tips & Variations
Use cream yarn for a soft classic farmhouse chicken.
Use oatmeal beige for a rustic neutral look.
Use gray or speckled yarn for a cozy country-style chicken.
Use warm brown for a hen-inspired version.
For a fluffier chicken, use blanket yarn with a soft texture.
For a smaller chicken, use worsted weight yarn with a 3.5 mm or 4 mm hook.
For a no-fuss beginner version, skip the wings and tail feathers and keep only the body, comb, beak, and embroidered eyes.
For a cute spring set, make three chickens in cream, gray, and oatmeal.
For young children, keep all details embroidered or securely sewn, and avoid plastic eyes.
FAQ
Is this chunky chicken pattern beginner-friendly?
Yes. The body is a simple round amigurumi shape, and the small details are easy pieces sewn on at the end. It is a good beginner crochet project if you know single crochet, increases, and decreases.
What yarn works best for this chicken?
Super bulky chenille or blanket yarn gives the softest chunky plush result. You can also use worsted weight yarn for a smaller amigurumi chicken.
Can I make this chicken without wings?
Yes. The chicken still looks cute with only the round body, comb, beak, and sleepy eyes. Wings and tail feathers add detail but are optional.
Can I use safety eyes?
You can use safety eyes for display pieces, but embroidered eyes are better for young children and soft plush gifts.
How do I make the chicken sit flat?
Do not overstuff the bottom. After closing the body, press the base gently with your hands to create a flat sitting surface.
Are the chickens in the photos made with #4 yarn?
No. The sample chickens shown throughout the pattern were made using Super Bulky (#6) chenille or blanket yarn. If you use #4 worsted weight yarn, your chicken will be noticeably smaller.
What does “crochet through both layers” mean?
After folding the wing in half, the opening has two matching layers of stitches. Insert your hook through one stitch from each layer at the same time and work a single crochet through both layers. This closes the wing neatly—you do not make four wing pieces or sew two wings together.
Conclusion
This chunky crochet chicken is soft, simple, and full of farmhouse charm. The round body, tiny beak, red comb, sleepy eyes, and little wings make it cute without making the pattern difficult.
Make one in cream, gray, oatmeal, or speckled yarn for a cozy handmade chicken that works beautifully as spring decor, a plush crochet toy, a market make, or a thoughtful gift for anyone who loves chickens.




Thank you for the adorable chicken pattern. I am trying to make them now, and I have a few questions. The picture attached of the chickens, are those crocheted \with #4 yarn? The article talks about #6, but the chickens look too small.
Concerning the wings, it says 2; however, the directions are confusing.
Wings
Make 2 using the main chicken color.
Round 1, Make a MR and work 6 sc into the ring. (6)
Round 2, Inc in each st around. (12)
Round 3, Repeat around: sc in next st, inc in next st. (18)
Round 4, Sc in each st around. (18)
Flatten the wing.
Sc through both layers across the opening. (9) – what does this mean? Both layers? I only have one layer on each side, or are we supposed to make 4 of these pieces, crocheting 2 of them together for each wing? Also, the tail feathers, you say to crochet 3 of them; however, they look doubled up in the photo. are they doubled or not? Thank you.
FO, leaving a long tail for sewing.Fiber & Textile Arts
Do not stuff the wings.
Thank you so much for making the pattern and for taking the time to point these out! ❤️
You’re absolutely right that a few parts of the instructions need to be clearer.
* The chickens shown in the photos were made with **super bulky (#6) plush yarn**, which is why they have that chunky look. If you make them with **worsted (#4) yarn**, they’ll turn out noticeably smaller unless you also adjust your hook size.
* For the **wings**, you only make **2 total** (one for each side). When the pattern says **”Flatten the wing. Sc through both layers across the opening (9),”** it means to fold the crocheted circle in half so the opening forms two layers. Then insert your hook through **both thicknesses** at the same time and single crochet across to close the opening. You are **not** making four pieces or sewing two wings together.
* For the **tail feathers**, they are **not doubled**. Crochet **3 separate tail feathers**, then sew them together side by side at the back of the chicken. The plush yarn and the way they’re attached can make them appear thicker in the photos.
Thank you again for letting us know! We’ll update the wording in the pattern to make these steps much clearer for future crocheters. Happy crocheting! 🐔🧶
I totally love this pattern however every time I make it on round where we are supposed to decrease I end up with extra for stitches the end of the road 42/36 it is only one decrease ? It does not work out right or not counted and recounted over is it supposed to be two decreases