Introduction
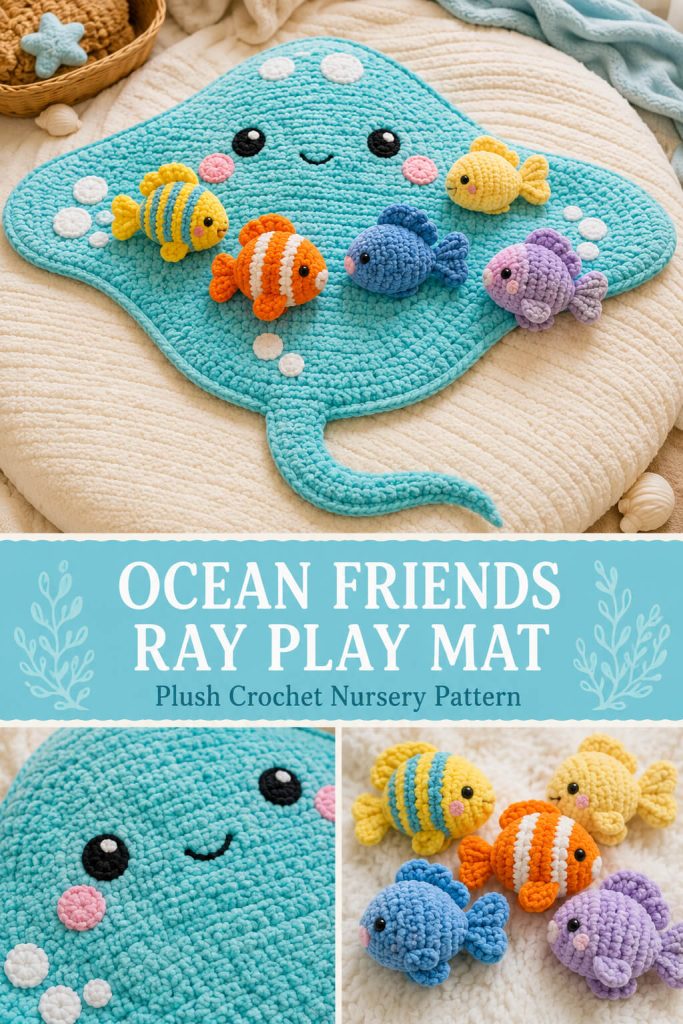
This crochet ocean play mat is the kind of handmade project that instantly feels special. It is soft, playful, and full of little details that make it perfect for nursery decor, baby gifts, ocean-themed rooms, and imaginative play.
The design is inspired by the idea in the image: a large plush sea creature mat with small crochet fish friends sitting on top. To keep it unique and safe, this version is created as an original Ocean Friends Ray Play Mat with its own construction, stitch counts, shaping, fish designs, face details, and finishing steps.
The main mat is a soft turquoise ray-shaped blanket with a curved body, side wings, tail, eyes, cheeks, and small white bubble details. The fish are optional but included so the finished project feels complete and close to the playful ocean concept.
Description
This crochet project includes a large plush ray-style play mat and several small ocean fish appliqué toys. The ray mat is worked in soft chunky yarn, using simple rows and shaping to create a wide body with wing-like sides. A long tail is added separately, and the face is sewn near the front edge with large eyes and pink cheeks.
The small fish are made separately in bright colors and can be used as decorations, soft toys, or removable play pieces. The fish include a yellow striped fish, orange clown-style fish, blue fish, pastel purple fish, and pale yellow fish.
The finished design is cozy, colorful, and nursery-friendly. It works beautifully as a handmade play mat, crib-side decor, floor blanket, photo prop, or ocean-themed crochet gift.
Materials
- Super bulky chenille yarn in turquoise for the ray mat
- Super bulky chenille yarn in white for bubbles
- Small amount of black yarn or large black safety eyes for ray face
- Small amount of pink yarn for cheeks
- Super bulky or worsted yarn in yellow, orange, blue, purple, white, black, and cream for fish
- 6.5 mm crochet hook for the mat
- 4 mm or 5 mm crochet hook for fish, depending on yarn weight
- Yarn needle
- Scissors
- Stitch markers
- Polyester fiberfill for fish
- Pins for assembly
Finished Size
Approximate finished size:
- Ray mat width: 34–38 inches
- Ray mat length without tail: 24–26 inches
- Tail length: 14–18 inches
- Small fish length: 4–6 inches each
Size may vary depending on yarn, hook, and tension.
Gauge
Gauge is not strict for the play mat, but the fabric should feel soft and firm.
For the ray mat:
- 7 hdc stitches = about 4 inches
- 6 hdc rows = about 4 inches
If your stitches feel too loose, use a smaller hook. If the mat feels stiff, use a larger hook.
Abbreviations
- MR: magic ring
- ch: chain
- sc: single crochet
- hdc: half double crochet
- dc: double crochet
- sl st: slip stitch
- inc: increase, 2 stitches in same stitch
- dec: decrease
- st: stitch
- sts: stitches
- FO: fasten off
Pattern Notes
The ray mat is worked flat in rows.
The body starts wide, grows slightly through the center, then narrows toward the back.
The side wing shape is created by increasing and decreasing at the row ends.
The tail is made separately and sewn to the back center.
The face details are sewn on after the body is complete.
The fish are optional, but they complete the ocean play mat look.
For baby use, embroider eyes instead of using safety eyes.
Step-by-Step Instructions
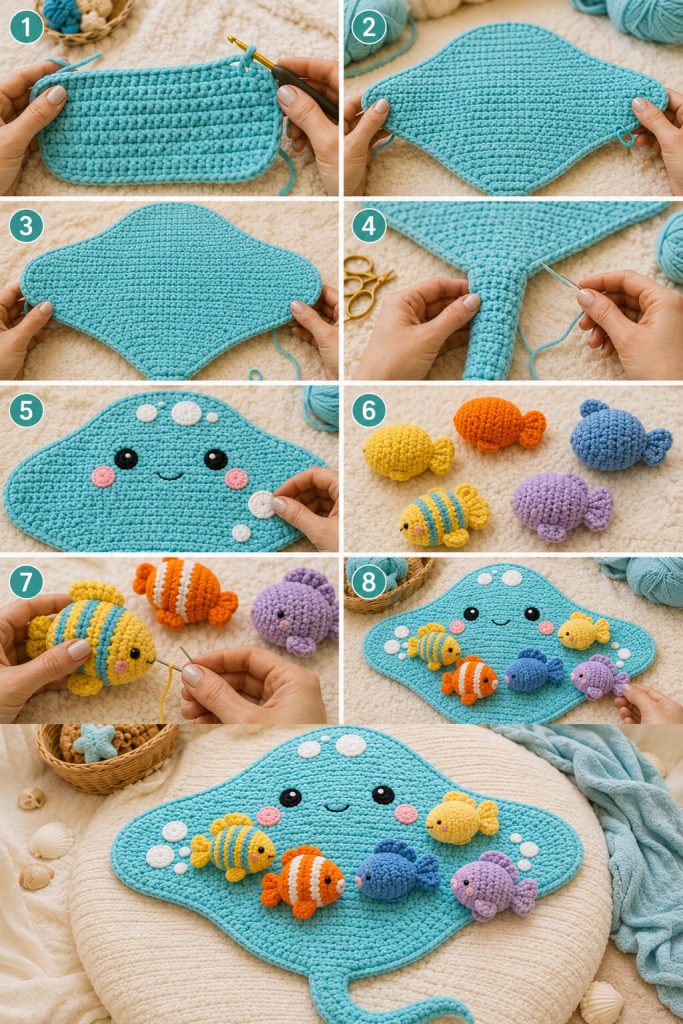
Ray Body Mat
Use turquoise chenille yarn and a 6.5 mm hook.
Foundation Chain
Ch 28.
Row 1
Hdc in the 2nd ch from hook and in each ch across. (27)
Ch 1, turn.
Row 2
Work 2 hdc in first st.
Hdc in each st across until last st.
Work 2 hdc in last st. (29)
Ch 1, turn.
Row 3
Hdc in each st across. (29)
Ch 1, turn.
Row 4
Work 2 hdc in first st.
Hdc in each st across until last st.
Work 2 hdc in last st. (31)
Ch 1, turn.
Row 5
Hdc in each st across. (31)
Ch 1, turn.
Rows 6–13
Repeat Row 4 on even rows and Row 5 on odd rows.
You should end with 39 sts.
This creates the front body widening into soft side wings.
Rows 14–22
Hdc in each st across. (39)
Ch 1, turn after each row.
This section creates the wide center of the ray mat.
Row 23
Dec over first 2 sts.
Hdc in each st across until last 2 sts.
Dec over last 2 sts. (37)
Ch 1, turn.
Row 24
Hdc in each st across. (37)
Ch 1, turn.
Rows 25–34
Repeat Row 23 on odd rows and Row 24 on even rows.
You should end with 27 sts.
This narrows the back of the ray body.
Row 35
Dec over first 2 sts.
Hdc in each st across until last 2 sts.
Dec over last 2 sts. (25)
Ch 1, turn.
Row 36
Hdc in each st across. (25)
FO, leaving a long tail for weaving.
The body should now look like a wide soft ray shape with rounded front and tapered back.
Ray Body Border
Use turquoise yarn.
Join yarn at the back center.
Ch 1.
Sc evenly around the entire ray body.
Work 2 sc into row-end spaces around the curved wing sections where needed so the edge stays smooth.
At the front corners, work 3 sc to soften the curve.
At the back center, work 2 sc.
Join with sl st to first sc.
FO and weave in ends.
Soft Wing Shaping
Lay the ray body flat.
Gently pull the side edges outward to shape the wings.
If one side looks tighter, add a few extra sc stitches during the border on that side.
The ray should look wide and rounded, not like a rectangle.
Ray Tail
Use turquoise yarn.
Row 1
Ch 7.
Hdc in 2nd ch from hook and in each ch across. (6)
Ch 1, turn.
Rows 2–18
Hdc in each st across. (6)
Ch 1, turn.
Row 19
Dec, hdc in next 2 sts, dec. (4)
Ch 1, turn.
Row 20
Hdc in each st across. (4)
Row 21
Dec twice. (2)
FO, leaving a long tail for sewing.
Fold the tail slightly lengthwise and sew the long edges together loosely if you want a thicker tail.
Sew the wider end of the tail to the back center of the ray body.
Ray Face
Place the face near the front right area of the mat, similar to a cute plush character.
Eyes
Use two large embroidered black circles or safety eyes.
Place them about 4–5 inches apart on the front section.
If making for a baby, embroider the eyes with black yarn.
Cheeks
Use pink yarn.
Make 2 small cheek circles.
Cheek Round 1
Make a MR.
Work 6 sc into the ring.
Join with sl st.
FO, leaving a tail for sewing.
Sew one cheek below each eye.
Smile
Use black yarn.
Embroider a small curved smile between the eyes.
Keep the smile simple and soft.
White Bubble Details
Make 8–12 small bubbles using white yarn.
Small Bubble
Make a MR.
Work 6 sc into the ring.
Join with sl st.
FO, leaving a tail for sewing.
Medium Bubble
Make a MR.
Work 6 sc into the ring.
Round 2: inc in each st around. (12)
Join with sl st.
FO, leaving a tail for sewing.
Sew the bubbles randomly across the ray mat, especially near the fish placement areas.
Small Fish Base Pattern
Use this base for each fish and change colors for different styles.
Use worsted weight yarn and a 4 mm hook, or chenille yarn with a 5 mm hook.
Fish Body
Round 1
Make a MR.
Work 6 sc into the ring. (6)
Round 2
Inc in each st around. (12)
Round 3
Repeat around: sc in next st, inc in next st. (18)
Rounds 4–8
Sc in each st around. (18)
Round 9
Repeat around: sc in next st, dec. (12)
Stuff lightly.
Round 10
Dec around. (6)
FO and close the opening.
This creates a small oval fish body.
Fish Tail
Make one tail per fish.
Row 1
Ch 6.
Sc in 2nd ch from hook.
Hdc in next ch.
Dc in next ch.
Hdc in next ch.
Sc in last ch.
FO, leaving a tail for sewing.
Make 2 tail pieces for a fuller tail and sew them together at the base, or make one piece for a flatter fish.
Sew the tail to the back of the fish body.
Fish Side Fins
Make 2 fins per fish.
Fin
Ch 4.
Sc in 2nd ch from hook.
Hdc in next ch.
Dc in last ch.
FO, leaving a tail for sewing.
Sew one fin on each side of the fish body.
Fish Eyes
Use black yarn to embroider one eye on each side, or use small safety eyes if the fish is for display only.
For baby-safe toys, embroider the eyes.
Yellow Striped Fish
Use yellow yarn for the body.
Add white stripes by surface stitching around the body after stuffing.
Make fins and tail in yellow.
Add 2–3 white stripes across the body.
Orange Clown-Style Fish
Use orange yarn for the body.
Add white and black stripes with surface stitching.
Make fins and tail in orange.
Place one white stripe behind the face and one white stripe near the back.
Outline the white stripes with thin black stitches.
Blue Fish
Use bright blue yarn for the body.
Use black yarn to add curved stripe lines on the side.
Use pale yellow for fins and tail.
Pastel Purple Fish
Use lavender or pale purple yarn for the body.
Add cream stripes.
Use small cream fins and a purple tail.
Pale Yellow Fish
Use pale yellow yarn for the body.
Keep the design simple.
Use matching fins and tail.
Add one tiny embroidered smile if desired.
Optional Angler Fish
For the fish with a curved antenna-like detail, use teal yarn.
Make the fish body as above.
For the top lure:
Join yarn at the top of the fish head.
Ch 10.
Sc in each ch back toward the head.
FO and secure.
Curve the chain gently forward and sew the tip down slightly if needed.
Attaching Fish to the Mat
You have two options.
Removable Fish
Leave the fish separate so children can move them around the mat.
This is best for play.
Sewn-On Fish
Pin the fish onto the ray mat.
Sew each fish securely to the mat using matching yarn.
Sew through the underside of the fish only so the top still looks plush.
This is best for nursery decor.
Finishing
Weave in all ends.
Check every sewn detail.
Make sure the tail is firmly attached.
Make sure the face details are secure.
If using fish as toys, check all fins and tails.
Gently shake the mat to make sure nothing is loose.
Size Adjustments
Smaller Baby Mat
Start with ch 22.
Work fewer increase and center rows.
Make 3–4 fish.
Larger Floor Mat
Start with ch 36.
Add more widening rows and center rows.
Make 6–8 fish.
Wider Ray Wings
Add more increase rows before the straight center section.
Longer Tail
Add more tail rows before decreasing.
Tips & Variations
Use turquoise for the ray body for a bright ocean look.
Use seafoam green for a softer nursery version.
Use blue-gray for a calmer coastal style.
Use chenille yarn for the softest plush mat.
Use cotton yarn only if you want a thinner decorative mat.
Make the fish in different colors so the mat feels playful.
For baby-safe use, embroider all eyes and avoid small plastic parts.
For decor only, safety eyes can be used if attached securely.
Use white bubble appliqués to make the mat feel more ocean-themed.
FAQ
Is this ocean play mat beginner-friendly?
This pattern is best for confident beginners. The ray mat uses simple rows, but the shaping, fish pieces, and assembly require careful placement.
Is this the exact pattern from the screenshot?
No. This is a new original crochet pattern based on the visible design idea: a plush ray-style ocean mat with small fish decorations. The stitch counts, construction, fish shapes, and details are original.
Can I make the fish removable?
Yes. Keeping the fish separate makes the project more playful and easier to wash.
What yarn works best?
Super bulky chenille yarn works best for a soft plush mat. Worsted yarn works well for smaller fish details.
Is this safe for babies?
Use embroidered eyes, secure every piece firmly, and supervise use. Do not leave small loose fish pieces with babies unattended.
Conclusion
The Ocean Friends Ray Play Mat is soft, colorful, and full of handmade charm. The turquoise ray body creates a cozy ocean base, while the small fish, bubbles, face details, and long tail bring the whole design to life.
Make it as a nursery mat, baby photo prop, soft play blanket, or ocean-themed handmade gift. This crochet project is detailed but buildable, and every part of the design works together to create a playful underwater scene.




Your work is so beautiful awesome job your r blessed with your hands