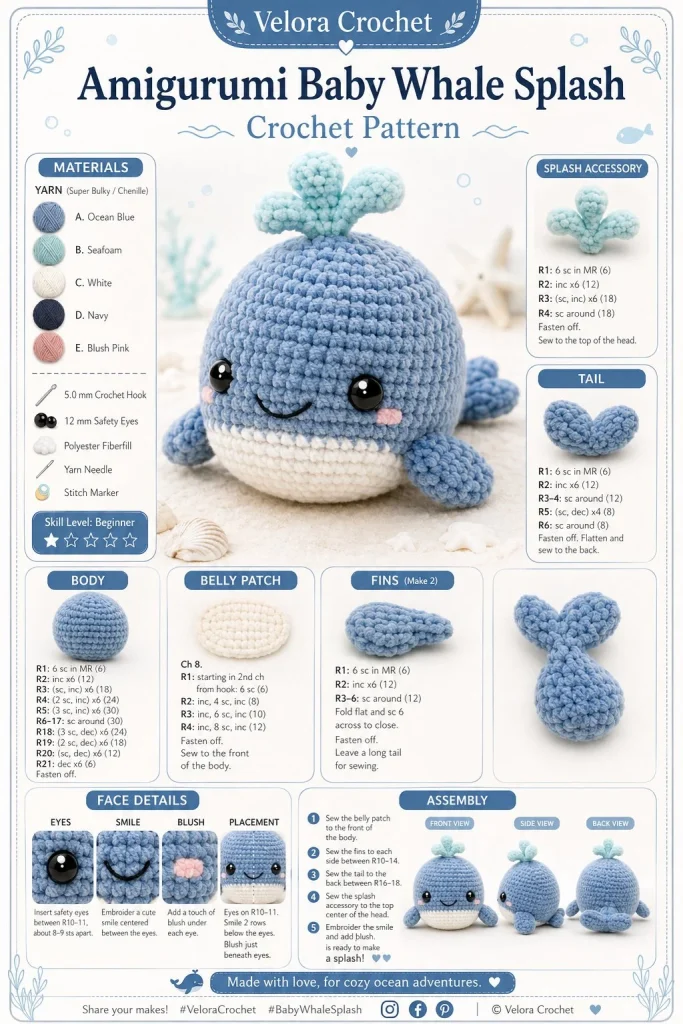
There’s something endlessly charming about creating your own amigurumi, and this baby whale pattern is no exception! Perfect for beginners or anyone looking for a delightful mini crochet project, this cuddly little creature not only brings a touch of ocean magic to your home but also makes for a memorable gift. The added tiny water splash is an adorable detail that enhances the whale’s playful nature without introducing complexity in your crafting journey. Let’s dive into this easy crochet tutorial!
Materials
- Medium weight yarn (about 100g each in blue and white)
- Crochet hook size G (4.0 mm)
- Fiber-fill stuffing
- Tapestry needle for weaving ends and embroidery
- Stitch markers (handy for keeping track of rounds)
Abbreviations
- ch: chain
- sc: single crochet
- inc: increase (2 sc in the same stitch)
- dec: decrease (sc two stitches together)
- sl st: slip stitch
- rnd: round
Pattern Instructions
Head
- With blue yarn, create a magic ring.
- Round 1: 6 sc in ring (6).
- Round 2: inc in each stitch around (12).
- Round 3: (sc in next stitch, inc) around (18).
- Rounds 4-7: sc around (18).
- Round 8: (sc in next stitch, dec) around (12).
- Stuff the head gently with fiber-fill.
- Round 9: dec around (6). Fasten off, leaving a long tail for sewing.
Body
- Join blue yarn to the back of the head.
- Round 1: 6 sc in magic ring (6).
- Round 2: inc in each stitch around (12).
- Round 3: (sc in next stitch, inc) around (18).
- Round 4: (sc in next 2 stitches, inc) around (24).
- Rounds 5-10: sc around (24).
- Round 11: (sc in next 2 stitches, dec) around (18).
- Round 12: (sc in next stitch, dec) around (12).
- Stuff the body, ensuring your whale keeps its soft, rounded shape.
- Round 13: dec around (6). Fasten off, leaving a long end for sewing.
Arms
- With blue yarn, make a magic ring.
- Round 1: 6 sc in ring (6).
- Round 2: (sc in next stitch, inc) around (9).
- Rounds 3-4: sc around (9).
- Fasten off, leaving a tail for sewing. Make two.
Tail
- With blue yarn, create a magic ring.
- Round 1: 6 sc in ring (6).
- Round 2: inc in each stitch around (12).
- Round 3: (sc in next stitch, inc) around (18).
- Round 4: (sc in next 2 stitches, inc) around (24).
- Rounds 5-6: sc around (24).
- Round 7: (sc in next 2 stitches, dec) around (18).
- Round 8: dec around (9). Fasten off, leaving a long tail for sewing.
Ears / Details
- For the white belly patch, create a simple oval shape using white yarn, slightly larger than necessary, then sew it onto the belly of the whale.
- Embroider a small smile on the head using black yarn or embroidery thread.
Accessories
- For the tiny water splash, make a small circle of blue yarn and add a few stitches to form splashes at the top of the whale’s head.
Assembly & Finishing
- Start by positioning and sewing on the arms to either side of the whale’s body.
- Next, sew the tail fluke to the back of the body, ensuring it sits securely.
- Attach the belly patch carefully to maintain the stuffed shape.
- Finally, secure the water splash detail atop the head, adjusting as needed for a playful look.
- Weave in any loose ends and ensure all parts are firmly attached.
{image_template}
Tips for Best Results
- Keep your tension consistent to avoid irregularities in appearance. If your stitches feel too tight, take a moment to relax your grip.
- For the stuffing, don’t overfill; you want your whale to stay soft and cuddly, rather than firm.
- Using stitch markers can help you remember the beginning of each round, especially as your project grows.
- Take the time to shape the whale’s body gently as you go along; it helps in creating a beautifully rounded finished piece.
- If you’re new to embroidery, practicing the smile on a scrap piece first can build your confidence!
Conclusion
Creating this charming baby whale amigurumi is not just a great way to enhance your crochet skills; it’s also a wonderful project to enjoy. Whether you’re planning to gift this adorable handmade toy, sell it at a market, or make it a delightful addition to your own collection, this pattern will surely bring smiles. So grab your yarn and crochet hook, and enjoy crafting your unique little ocean friend!



