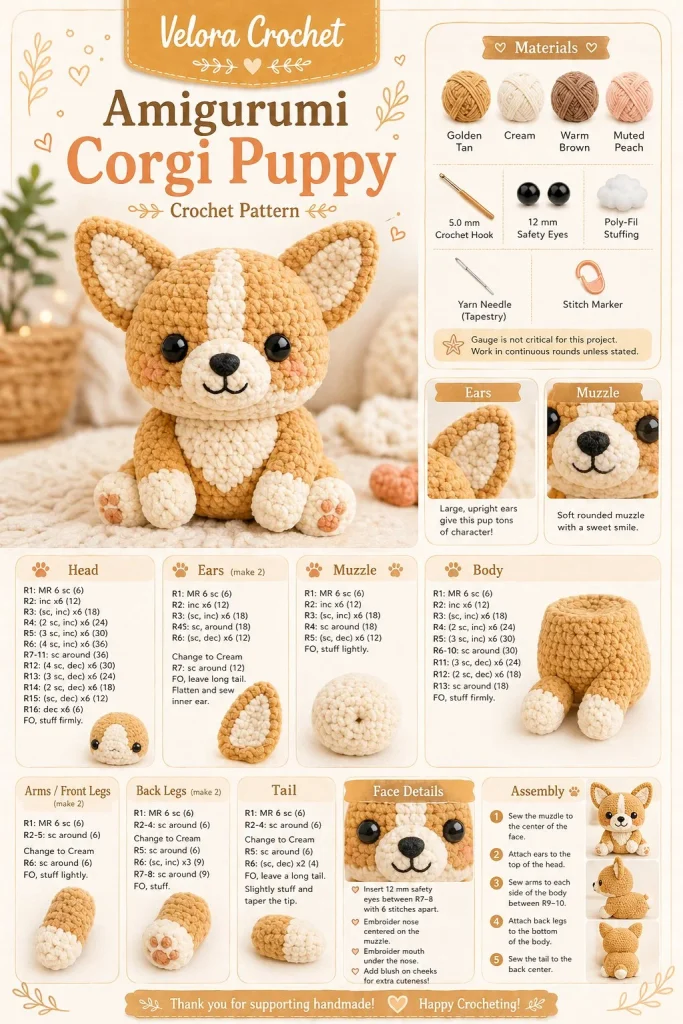
Creating your very own chunky corgi puppy amigurumi is a delightful project that’s perfect for both beginners and seasoned crocheters alike. Not only does this pattern yield an adorable handmade toy, but it’s also a lovely way to wind down with some yarn and hooks. The simplicity of the design, combined with its charming color patches, ensures that your little corgi will have a personality all its own, without requiring intricate shaping techniques.
Materials
- Yarn: Medium weight (worsted) yarn in tan and cream
- Hook: 4.0 mm (G) crochet hook
- Fiberfill stuffing
- Yarn needle for weaving ends
- Safety eyes (12 mm)
- Black embroidery thread for eyebrows
- Stitch markers (optional but helpful)
Abbreviations
- Ch: chain
- Sc: single crochet
- Sl st: slip stitch
- Inc: increase (2 sc in the same stitch)
- Dec: decrease (crochet 2 stitches together)
Pattern Instructions
Head
- With tan yarn, make a magic ring.
- Round 1: 6 sc in magic ring (6)
- Round 2: Inc in each stitch (12)
- Round 3: (Sc in next stitch, inc) around (18)
- Rounds 4-7: Sc in each stitch (18)
- Attach safety eyes.
- Round 8: (Sc in next 4, dec) around (15)
- Round 9: (Sc in next 3, dec) around (12)
- Begin stuffing the head.
- Round 10: (Sc in next 2, dec) around (9)
- Finish stuffing and round 11: (Sc in next, dec) around (6)
- Fasten off and weave in ends.
Body
- With tan yarn, make a magic ring.
- Round 1: 6 sc in magic ring (6)
- Round 2: Inc in each stitch (12)
- Round 3: (Sc in next stitch, inc) around (18)
- Rounds 4-9: Sc in each stitch (18)
- Round 10: (Sc in next 2, dec) around (12)
- Round 11: (Sc in next, dec) around (8)
- Fasten off, leave a long tail for sewing.
Arms
- With cream yarn, make a magic ring.
- Round 1: 6 sc in magic ring (6)
- Round 2: Inc in each stitch (12)
- Rounds 3-4: Sc in each stitch (12)
- Round 5: (Sc in next stitch, dec) around (8)
- Fasten off and leave a long tail. Make 2.
Legs
- With tan yarn, make a magic ring.
- Round 1: 6 sc in magic ring (6)
- Round 2: Inc in each stitch (12)
- Rounds 3-6: Sc in each stitch (12)
- Round 7: (Sc in next, dec) around (8)
- Fasten off, leave a long tail. Make 4.
Ears / Details
- With tan yarn, ch 4.
- Row 1: Sc in second ch from hook and across (3).
- Row 2: Ch 1, turn, dec, sc in last stitch (2).
- Row 3: Ch 1, turn, dec (1).
- Fasten off. Make 2.
- Sew ears onto the head; I like to position them high for that classic corgi look.
Assembly & Finishing
- Attach the head to the body using the long tail from the body.
- Sew on the arms and legs securely.
- Position the tail at the back of the body and sew it on.
- Use black embroidery thread to add expressive eyebrows just above the eyes.
- Block your crochet pieces lightly if needed, to help shape them.
{image_template}
Tips for Best Results
- Consistent tension is key for a tidy finish; don’t be afraid to adjust your hold on the yarn as you work.
- When stuffing, use small amounts to avoid overstuffing, which can cause odd shapes.
- Employ stitch markers on each round to keep track of your starting point; this will help maintain even rounds, especially in the body.
- Shaping is important; for the head and body, keep the rounds smooth, as the rounded corgi shape depends on it.
Conclusion
Crocheting a chunky corgi puppy amigurumi is sure to become one of your favorite projects, especially with its playful design and chunky body. Whether you’re making this cute creation as a gift or a cozy addition to your own collection, each stitch brings joy. Consider personalizing your corgi with different colors or adding accessories like a tiny scarf or collar to make it truly unique!



