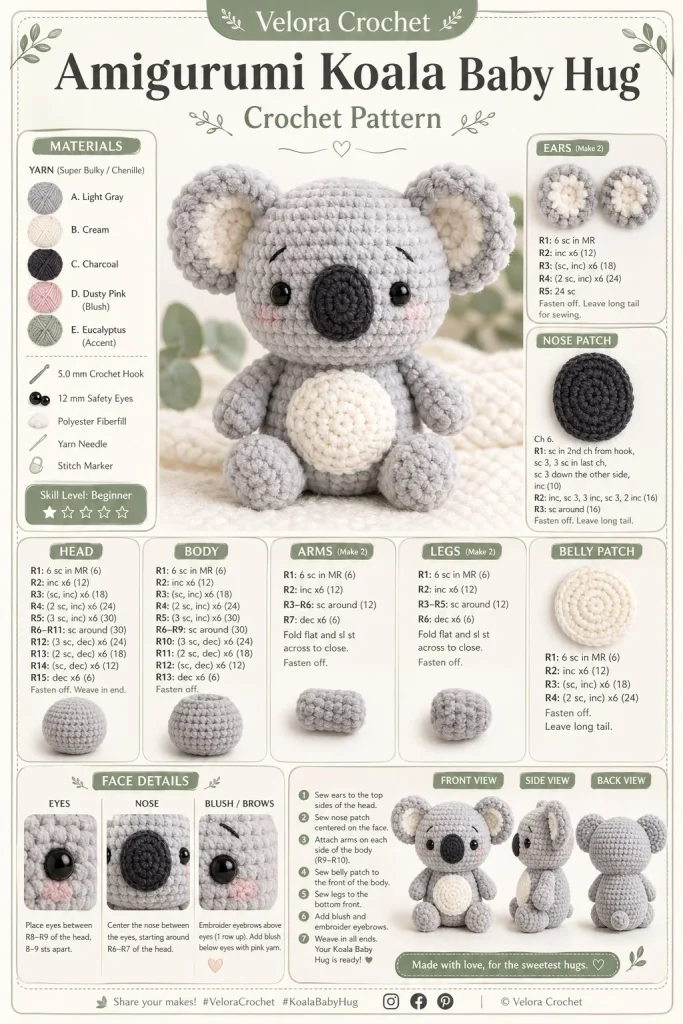
Creating your very own baby koala amigurumi can be such a delightful project, especially for those looking to add a little charm to their handmade collection. This pattern is perfect for beginners and makes for an adorable gift or a cozy addition to any nursery. The calm and cuddly appearance of the koala is sure to bring smiles to anyone who receives this plush toy. Let’s dive into the details of this easy crochet project that’s both enjoyable and rewarding!
Materials
- Yarn: Gray plush yarn for the body (I recommend a soft acrylic for squishiness)
- Yarn: Cream yarn for the belly
- Yarn: Black yarn for the nose patch
- Yarn: Optional green yarn for eucalyptus accents
- Hook: 4.0 mm (G/6) crochet hook
- Stuffing: Polyester fiberfill
- Safety Eyes: Two 10mm black safety eyes
- Yarn Needle: For sewing and embroidery
- Stitch Markers: Helpful for keeping track of your rounds
Abbreviations
- ch – chain
- sc – single crochet
- inc – increase
- dec – decrease
- st(s) – stitch(es)
- sl st – slip stitch
- Rnd – round
Pattern Instructions
Head
- Create a magic ring.
- Rnd 1: 6 sc in magic ring (6)
- Rnd 2: inc in each st around (12)
- Rnd 3: (sc in next st, inc) repeat around (18)
- Rnd 4: (sc in next 2 sts, inc) repeat around (24)
- Rnd 5-8: sc in each st around (24)
- Add safety eyes between Rnd 6 and Rnd 7, about 6 sts apart.
- Rnd 9: (sc in next 2 sts, dec) repeat around (18)
- Rnd 10: (sc in next st, dec) repeat around (12)
- Rnd 11: dec around (6)
- Fasten off and weave in ends, leaving a small opening for stuffing. Gently stuff the head before closing completely.
Body
- Create a magic ring.
- Rnd 1: 6 sc in magic ring (6)
- Rnd 2: inc in each st around (12)
- Rnd 3: (sc in next st, inc) repeat around (18)
- Rnd 4: (sc in next 2 sts, inc) repeat around (24)
- Rnd 5-10: sc in each st around (24)
- Rnd 11: (sc in next 2 sts, dec) repeat around (18)
- Rnd 12: (sc in next st, dec) repeat around (12)
- Rnd 13: dec around (6)
- Fasten off, leaving a long tail for assembly. Stuff the body well.
Arms
- Create a magic ring.
- Rnd 1: 6 sc in magic ring (6)
- Rnd 2-6: sc in each st around (6)
- Fasten off, leaving a long tail for sewing.
Legs
- Create a magic ring.
- Rnd 1: 6 sc in magic ring (6)
- Rnd 2-5: sc in each st around (6)
- Fasten off, leaving a long tail for sewing.
Ears / Details
- For each ear, create a magic ring.
- Rnd 1: 6 sc in magic ring (6)
- Rnd 2: inc in each st around (12)
- Rnd 3: (sc in next st, inc) repeat around (18)
- Fasten off, leaving a long tail for sewing.
- For the nose patch, create an oval shape measuring approximately 2.5 cm.
Accessories (if any)
- Optional: Use green yarn to create small eucalyptus leaves as accents to style your baby koala.
Assembly & Finishing
- Attach the head to the body using the long tail left during the assembly.
- Position the arms and legs symmetrically and stitch them on securely.
- Attach the ears on top of the head, spacing them apart adequately for that typical koala look.
- Sew on the nose patch and embroider the mouth if desired.
- Add any additional details such as the leaves around the koala for a decorative finish.
{image_template}
Tips for Best Results
- Maintain consistent tension. This is especially important for the head and body to ensure a smooth appearance.
- When stuffing, be mindful not to overstuff; a soft touch will make your koala cuddle-ready.
- Use stitch markers to keep track of your rounds, especially in the body where stitch counts remain consistent for a while.
- If your stitches feel tight, consider using a larger hook to see what gives you the best result.
- This step makes shaping much easier, so take your time while stitching the limbs; they can make all the difference in the final appearance!
Conclusion
You’ve now crafted a delightful baby koala amigurumi! This cuddly companion is perfect for gifting or could be a wonderful addition to your own collection of handmade toys. Feel free to play around with different colors or make a set of eucalyptus leaves to style your handmade toy even more. I hope this pattern inspires creativity and enjoyment in your crochet journey. Happy crocheting!



