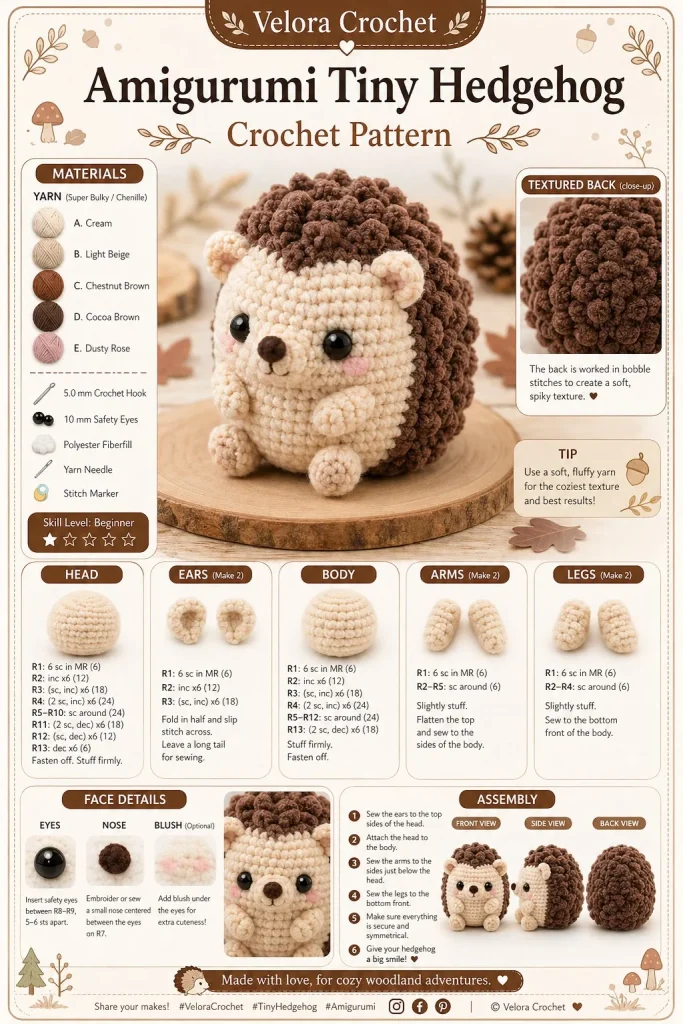
Creating a tiny hedgehog amigurumi is a delightful crochet project that’s perfect for both beginners and seasoned crafters alike. Whether you’re looking to make a charming gift or add to your collection of handmade toys, this pattern offers a compact and enjoyable crafting experience. The adorable hedgehog features a cream-colored face, a beautifully rounded brown back with textured surfaces, and tiny details that bring it to life. Let’s dive into this easy crochet tutorial!
Materials
- Worsted weight yarn in cream (for the face)
- Worsted weight yarn in brown (for the back)
- A pair of safety eyes (or you can embroider)
- Crochet hook (size H/8 or 5 mm recommended)
- Yarn needle for weaving in ends
- Stitch marker (optional, but helpful for tracking rounds)
- Polyester fiberfill for stuffing
Abbreviations
- ch = chain
- sc = single crochet
- inc = increase (two single crochets in the same stitch)
- dec = decrease (single crochet two together)
- sl st = slip stitch
- st = stitch
- Rnd = round
Pattern Instructions
Head
- With cream yarn, make a magic ring and sc 6 into the ring (6 st).
- Rnd 1: Inc in each st around (12 st).
- Rnd 2: Sc 1, inc around (18 st).
- Rnd 3: Sc 2, inc around (24 st).
- Rounds 4-6: Sc in each st around (24 st).
- Finish off, leaving a long tail for sewing later.
Body
- With brown yarn, make a magic ring and sc 6 into the ring (6 st).
- Rnd 1: Inc in each st around (12 st).
- Rnd 2: Sc 1, inc around (18 st).
- Rnd 3: Sc 2, inc around (24 st).
- Rounds 4-8: Sc in each st around (24 st).
- Rnd 9: Sc 2, dec around (18 st).
- Rnd 10: Sc 1, dec around (12 st).
- Stuff firmly with fiberfill before closing.
- Rnd 11: Dec around (6 st). Fasten off, leaving a long tail for sewing.
Arms
- With cream yarn, make a magic ring and sc 6 into the ring (6 st).
- Rnd 1: Inc in each st around (12 st).
- Rounds 2-3: Sc in each st around (12 st).
- Rnd 4: Dec around (6 st).
- Fasten off and leave a tail for sewing. Make 2.
Legs
- Using brown yarn, make a magic ring and sc 6 into it (6 st).
- Rnd 1: Inc in each st around (12 st).
- Rounds 2-3: Sc in each st around (12 st).
- Rnd 4: Dec around (6 st).
- Fasten off and leave a tail for sewing. Make 2.
Ears / Details
- With cream yarn, ch 4 and join with a sl st to form a ring.
- Rnd 1: Sc 4 in the ring (4 st).
- Rnd 2: Inc in each st around (8 st).
- Rnd 3: Sc in each st around (8 st).
- Fasten off and weave in ends. Make 2.
Assembly & Finishing
- Attach the head to the body using the long tail.
- Position and sew on the arms and legs securely.
- Attach the ears to the top of the head.
- Embroider a small nose in the center of the face and add a soft blush on the cheeks.
- For the back, you can choose to use a loop-stitch style or a textured plush yarn to add visual interest.
{image_template}
Tips for Best Results
- Maintain consistent tension throughout your stitches, which will ensure your hedgehog looks neat.
- Use a stuffing tool to help fill the arms and legs to give them good shape while keeping them soft.
- I recommend marking the beginning of rounds with a stitch marker, especially if you’re new to working in the round.
- If you encounter any tight stitches, don’t hesitate to loosen your grip—this will make it easier as you finish off the body.
- When shaping your face, take time to place the eye and nose details so they’re symmetrical; it adds to the overall cuteness!
Conclusion
This tiny hedgehog amigurumi is sure to be a hit, whether you keep it for yourself, gift it to friends, or sell it at a market. It’s a satisfying project that brings joy and a sense of accomplishment. Don’t hesitate to experiment with different colors and textures to make each hedgehog unique. Happy crocheting!



