Aqua and White Crochet Makeup Bag With Zipper

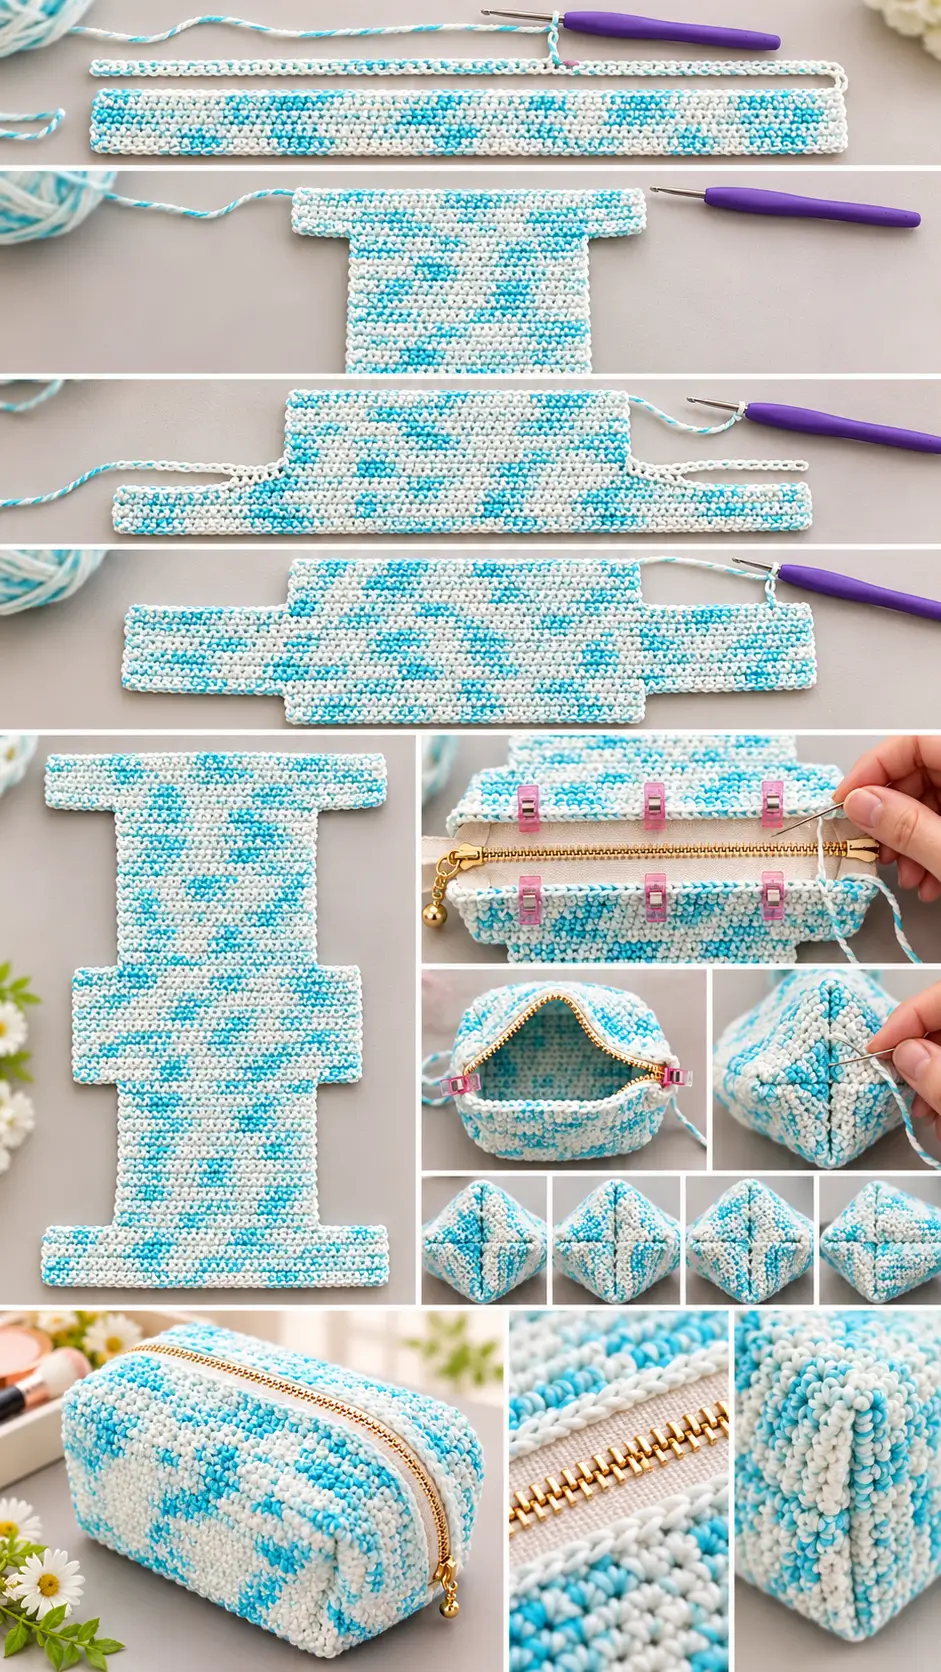
This structured crochet makeup bag is made from one shaped piece of dense single crochet fabric, then folded around a zipper and seamed into a neat rectangular box pouch.
The unusual flat piece is intentional. Before assembly it looks like a long capital I, with narrower sections forming the two large faces of the bag and wider sections creating the zipper area, bottom depth, side gussets, and boxed corners.
For the closest match to the reference, keep the colors exactly the same:
- white and bright aqua/turquoise variegated cotton yarn
- cream/off-white zipper tape
- gold metal zipper teeth and gold zipper pull
There are no separate color changes in the crochet. The aqua-and-white effect comes from using one variegated yarn throughout.
Finished Size
Approximately:
8½–9 inches / 21.5–23 cm wide
5 inches / 12.5 cm high
2¼–2½ inches / 5.5–6.5 cm deep
The exact size depends on your yarn and tension.
Materials
- DK or light worsted cotton yarn in white/aqua variegated
- Approximately 220–250 yards / 200–230 m
- 3.0 mm crochet hook
- 9-inch / 23 cm cream zipper with gold teeth
- Matching sewing thread
- Sharp sewing needle
- Yarn needle
- Scissors
- Measuring tape
- Stitch markers
- Sewing clips or pins
Optional:
- cotton fabric for lining
Skill Level
Confident beginner
You need to know:
- chain
- single crochet
- slip stitch
- working flat in rows
- joining yarn
- crocheting through two layers
- basic hand sewing
The crochet itself is simple. The important part is understanding how the flat piece folds into the box-shaped pouch.
Abbreviations
US crochet terminology:
ch — chain
sc — single crochet
sl st — slip stitch
st / sts — stitch / stitches
RS — right side
WS — wrong side
Important Construction Numbers
There are two main widths in this pattern.
Full Width
40 stitches
Narrow Main Panel
28 stitches
This leaves:
6 stitches on each side
because:
6 + 28 + 6 = 40
Those six-stitch sections are essential. They help create the pouch depth and boxed corners.
Do not remove them.
Turning Chain
At the beginning of ordinary rows:
ch 1 and turn
The ch-1 does not count as a stitch.
Work the first sc directly into the first actual stitch.
Gauge and Sizing Check
Rather than forcing an exact traditional gauge, check the width after crocheting the first few rows.
Your:
40 sc
should measure approximately:
8½–9 inches / 21.5–23 cm
This should correspond closely to your zipper length.
If 40 stitches are dramatically wider than the zipper, use a smaller hook or finer yarn.
If they are much narrower, use a slightly larger hook.
The fabric should be:
- firm
- dense
- flexible
- not stiff
- without large holes
A makeup pouch needs tighter fabric than a blanket.
PART 1 — FIRST FULL-WIDTH ZIPPER FLANGE
Using the white-and-aqua variegated yarn and 3 mm hook:
Ch:
41
Row 1
Beginning in the:
2nd chain from the hook
work:
1 sc in every chain across
You should have:
40 sc
Ch 1.
Turn.
Rows 2–5
Sc in every stitch across.
40 sc
Ch 1 and turn after each row.
After Row 5, fasten off.
You now have a short:
40-stitch × 5-row strip
This will eventually sit beside one side of the zipper.
PART 2 — FIRST NARROW MAIN PANEL
Lay the piece flat.
Count:
6 stitches from the right edge
and mark the boundary.
Count:
6 stitches from the left edge
and mark the other boundary.
You should have:
28 center stitches
between the two markers.
The arrangement is:
6 unworked + 28 working stitches + 6 unworked
Do not crochet into either six-stitch side section during this part.
Row 6
With the right side facing you, join yarn in the:
7th stitch
which is the first stitch of the 28-stitch center.
Ch 1.
Sc in the same stitch.
Sc across the center until you have:
28 sc
Leave the final:
6 stitches unworked
Ch 1.
Turn.
Rows 7–29
Sc across all:
28 stitches
Ch 1.
Turn.
Continue until Row 29 is complete.
The first narrow panel contains:
24 rows total
from Row 6 through Row 29.
This section becomes one broad face of the finished makeup bag.
Keep the stitch count at:
28
throughout.
Check the First Main Panel
The piece should now look like:
- a wider five-row strip at one end
- a much longer narrower rectangle extending from its center
- six-stitch shoulders protruding at both sides of the wide strip
The narrow section should be approximately:
4¾–5 inches / 12–12.5 cm long
depending on tension.
PART 3 — RESTORE THE FULL WIDTH
The pouch must now widen from:
28 stitches
back to:
40 stitches
To do this, add:
6 new chains at each side
of the narrow panel.
First Side Extension
At the end of Row 29, leave the working yarn attached.
Pull the working loop larger so it cannot accidentally unravel.
Take a separate short strand of the same aqua-and-white yarn.
Join this strand to the opposite upper corner of the 28-stitch panel.
Ch:
6
Fasten off that short strand.
You now have one six-chain extension.
Second Side Extension
Return to the original working yarn.
Ch:
7
Turn.
The first chain is the turning chain.
Beginning in the:
2nd chain from the hook
sc in each of the next:
6 chains
Now sc across the:
28 existing panel stitches
Then sc once into each of the:
6 chains
made with the separate strand.
Your stitch count has returned to:
40 sc
This is:
Row 30
Important Extension Check
The row must contain exactly:
6 + 28 + 6 = 40 stitches
Both chain extensions must be the same length.
Make the chains slightly relaxed.
Very tight extension chains can pull the corners inward.
PART 4 — CENTER GUSSET
The wider section in the middle helps create the bottom depth and side structure of the finished box pouch.
Rows 31–41
Ch 1.
Turn.
Sc in every stitch across.
40 sc
Repeat until Row 41 is complete.
Including Row 30, you now have:
12 full-width rows
in this center section.
The section should measure approximately:
2¼–2½ inches / 5.5–6.5 cm
from top to bottom.
That measurement becomes approximately the depth of the finished pouch.
PART 5 — SECOND NARROW MAIN PANEL
The second main face must match the first exactly.
After Row 41:
Fasten off.
Lay the piece flat.
Leave:
6 stitches unworked
at the first side.
Join yarn in:
stitch 7
Work:
28 sc
Leave the final:
6 stitches unworked
This is:
Row 42
Rows 43–65
Ch 1.
Turn.
Sc in all:
28 stitches
Continue through:
Row 65
The second narrow panel should contain the same:
24 rows
as the first.
Compare Both Main Panels
Before continuing, fold the crochet gently around the center gusset.
The two narrow panels should:
- be the same width
- have the same number of rows
- reach the same height
- align evenly
If one panel is noticeably longer, correct it now.
Do not compensate during zipper installation.
PART 6 — FINAL WIDTH EXTENSIONS
Now widen the second panel back to:
40 stitches
exactly as before.
First Extension
Use a separate strand.
Join at one upper corner of the narrow section.
Ch:
6
Fasten off.
Second Extension
With your working yarn:
Ch:
7
Turn.
Sc in the second chain from the hook and in the next:
5 chains
You have:
6 new sc
Sc in each of the:
28 main-panel stitches
Then sc across the:
6 chains
at the opposite side.
Total:
40 sc
This is:
Row 66
Rows 67–70
Ch 1.
Turn.
Sc across.
40 sc
After Row 70:
Fasten off.
Weave in the extension tails carefully.
YOUR FLAT PIECE IS NOW COMPLETE
Lay it flat.
It should look like a long capital:
I
From one end to the other, the sections are:
40-stitch zipper flange
↓
28-stitch front panel
↓
40-stitch center gusset
↓
28-stitch back panel
↓
40-stitch zipper flange
The wider sections protrude:
6 stitches on each side
beyond the narrow panels.
Do not trim, fold off, or remove these extensions.
They are part of the box construction.
PART 7 — PREPARE THE ZIPPER
Use:
cream/off-white zipper tape
with:
gold teeth and gold pull
for the same appearance as the reference.
A:
9-inch / 23 cm zipper
works well.
Close the zipper.
Find the center of the zipper and mark it lightly.
Now find the center of both outer 40-stitch crochet flanges.
Mark those too.
PART 8 — FOLD THE BAG AROUND THE ZIPPER
Place the crochet piece:
wrong side facing upward
Bring the two long narrow body sections toward each other.
The two outer 40-stitch flanges will meet at the top.
The center 40-stitch section remains at the opposite side and eventually forms the lower depth area.
Place the zipper between the two outer flange edges.
The zipper teeth should remain fully visible.
Do not cover the teeth with crochet.
Leave approximately:
⅛ inch / 3 mm
of zipper tape showing between the crochet and the zipper teeth.
Center the Zipper
Align:
- zipper center
- center of first crochet edge
- center of second crochet edge
Clip the first crochet edge to one side of the zipper tape.
Start with clips at:
- center
- first end
- second end
Then fill the spaces between.
Repeat with the opposite crochet edge.
Very Important
Do not stretch the crochet while attaching the zipper.
If you stretch the crochet and then sew it:
the zipper will ripple when released.
Allow the fabric to lie naturally.
PART 9 — HAND-SEW THE ZIPPER
Thread a hand-sewing needle with strong matching thread.
Knot securely.
Begin at one zipper end from the inside.
Use small:
backstitches
or firm:
running stitches
along the zipper tape.
With each stitch:
- pass through zipper tape
- catch the upper portion of one crochet edge stitch
- return through zipper tape
- move to the next stitch
Keep your sewing line parallel to the zipper teeth.
Do not sew through the teeth.
Do not wrap sewing thread completely around the crochet edge.
Sew the First Side
Work slowly from end to end.
Check that the crochet remains straight.
Test the zipper.
It should move without touching the yarn.
Sew the Second Side
Repeat the same process on the opposite zipper tape.
Both crochet edges should sit at equal distances from the teeth.
The zipper should be centered.
TEST THE ZIPPER NOW
Open and close it several times.
Correct any area where:
- crochet catches the slider
- zipper tape ripples
- one side sits closer to the teeth
- the ends are uneven
Do this before closing the pouch.
PART 10 — OPEN THE ZIPPER HALFWAY
This step is essential.
Before sewing the sides:
open the zipper at least halfway
Once the side seams and corners are closed, you need the open zipper to turn the pouch right side out.
Do not forget this step.
PART 11 — TURN THE BAG WRONG SIDE OUT
With the zipper partly open:
turn the developing pouch so the:
wrong side is facing outward
Align all edges.
The center gusset should naturally settle toward the bottom.
The two narrow sections become:
- front
- back
The outer extensions begin forming:
- side depth
- top corners
- bottom corners
PART 12 — CLOSE THE FIRST SIDE SEAM
Match the layers at one side.
The zipper end should sit centrally at the top.
Align the crochet edges carefully.
Place stitch markers or clips through both layers.
Join yarn at one end.
Work:
single crochet through both layers
along the straight side opening.
Distribute the stitches evenly.
Do not force extra stitches into every strand if the row ends are difficult to see.
The seam should be:
- straight
- firm
- not puckered
Fasten off.
PART 13 — CLOSE THE SECOND SIDE
Repeat exactly on the opposite side.
Before completely finishing this seam:
check again that the zipper is still partly open.
Fasten off.
You should now have an inside-out pouch with:
four remaining corner openings
These openings are intentional.
Do not sew them randomly closed.
They create the box shape.
PART 14 — SHAPE THE FOUR BOXED CORNERS
Work one corner at a time.
Place your fingers inside one corner opening.
Pull the two opposite points apart.
Flatten the opening.
It should change from a diamond-like opening into a:
straight horizontal line
Make sure the side seam is centered.
Clip both ends of the flattened corner.
Compare All Four Corners
Flatten:
- first upper corner
- second upper corner
- first lower corner
- second lower corner
All four flattened lines should be approximately the same width.
This is very important.
Different-sized corner seams create a crooked bag.
PART 15 — SEAM THE BOXED CORNERS
Take the first flattened corner.
Join yarn at one end.
Slip stitch:
through both layers
across the complete opening.
Fasten off securely.
Repeat on:
all four corners
Slip stitch creates a flatter seam than single crochet and reduces bulk inside the pouch.
Before Turning the Bag
Inspect all four corner seams.
There should be:
- no openings
- no missed stitches
- no twisted corners
- no loose yarn tails
The side seam should remain centered through each boxed corner.
PART 16 — SECURE THE ZIPPER ENDS
If the zipper extends beyond the crochet opening:
fold the excess zipper tape neatly toward the inside side seams.
Use strong sewing thread to tack it securely.
If necessary, sew several tight stitches immediately beyond the usable opening to create a new zipper stop.
Never cut a zipper before creating a secure stop.
Be especially careful with metal zipper teeth.
For the neatest result, using a zipper close to the correct finished width avoids major shortening.
PART 17 — TURN THE BAG RIGHT SIDE OUT
Reach through the open zipper.
Slowly pull the pouch right side out.
Use your fingers to push out:
- all four box corners
- side panels
- bottom edges
Do not use scissors or another sharp tool.
Sharp objects can split the yarn.
Shape the Bag
Massage each seam gently between your fingers.
Push the lower corners outward.
Straighten the zipper.
The finished pouch should now have:
- flat rectangular front
- flat rectangular back
- broad boxy bottom
- short structured side panels
- rounded rectangular top
- gold zipper centered across the top
FINAL APPEARANCE
Your completed makeup bag should look like the reference:
Color:
white-and-aqua/turquoise variegated crochet
Zipper:
cream tape with gold metal teeth
Shape:
compact rectangular box pouch
Texture:
dense small single crochet
Top:
rounded slightly around zipper
Bottom:
flat enough for the pouch to sit upright
Sides:
approximately 2¼–2½ inches deep
Do not add:
- another crochet color
- stripes
- handles
- tassels
- pom-poms
- granny squares
- decorative stitches
The visual interest comes entirely from the white-and-aqua variegated yarn.
OPTIONAL FABRIC LINING
The reference does not require a visible lining, but a makeup bag benefits from one because cosmetics can leak.
Use lightweight cotton fabric.
After the crochet pouch is assembled, measure the inside:
- width
- height
- depth
Create a simple box-shaped fabric lining slightly smaller than the crochet pouch.
Use approximately:
½-inch / 1.25 cm seam allowance
Sew the lining.
Fold the upper raw edge to the wrong side.
Place the lining inside the finished pouch.
Hand-sew the upper lining edge to:
the inside zipper tape
Do not sew through:
- zipper teeth
- visible outer crochet
If the Bag Is Too Soft
Cotton should create a fairly firm fabric with a 3 mm hook.
If yours feels floppy:
- use a slightly smaller hook
- tighten your sc tension
- add a fabric lining
Do not use extremely loose stitches.
If the Bag Is Too Stiff
Your hook may be too small for your yarn.
Increase by:
0.25–0.5 mm
The fabric should bend comfortably around the boxed corners.
If the First and Second Main Panels Do Not Match
Each narrow panel must have:
28 stitches
and:
24 rows
The two sections need to be identical.
Unequal panels can make the zipper twist.
If the Piece Does Not Look Like the Reference Before Assembly
Check the stitch counts.
You should see:
First Outer Section
40 stitches wide
First Main Panel
28 stitches wide
Center Section
40 stitches wide
Second Main Panel
28 stitches wide
Final Outer Section
40 stitches wide
The difference must always be:
6 stitches on each side
If the Chain Extensions Curl
The 6-chain extensions were probably made too tightly.
Redo them with:
- relaxed chains
- or a hook one size larger for the chains only
Then return to the 3 mm hook.
If the Zipper Ripples
You probably stretched the crochet while pinning.
Remove the zipper stitches.
Lay the crochet flat without tension.
Mark:
- zipper center
- crochet center
Attach the center first, then the ends, then fill between.
If the Zipper Catches the Crochet
The crochet is too close to the teeth.
Maintain approximately:
⅛ inch / 3 mm
between the crochet edge and zipper coil.
If the Bag Leans to One Side
Check the boxed corners.
All four corner seams need to be equal.
Even a small difference in corner depth can make a structured pouch lean.
If the Side Seams Pucker
Your joining stitches may be too tight.
Use relaxed single crochet.
The seam should hold the layers together without shortening them.
If You Want a Wider Bag
Increase both widths by the same amount while keeping the side extensions at:
6 stitches each
For example:
Full width:
44 stitches
Narrow panel:
32 stitches
because:
6 + 32 + 6 = 44
Use a longer zipper to match.
If You Want a Taller Bag
Add the same number of rows to:
both 28-stitch main panels
For example, add:
4 rows to the first panel
and:
4 rows to the second panel
Never lengthen only one.
If You Want a Deeper Bag
Add rows to the:
40-stitch center gusset
The original version uses:
12 rows
A deeper pouch could use:
14–16 rows
but remember that increasing the depth changes the finished proportions.
Quick Pattern Summary
Foundation
Ch 41
Rows 1–5
40 sc
Rows 6–29
Leave 6 sts unworked on each side.
Work center:
28 sc
for:
24 rows
Row 30
Add:
6 chains to each side
Return to:
40 sc
Rows 31–41
40 sc
Center gusset.
Rows 42–65
Leave 6 sts unworked on each side.
Work:
28 sc
for:
24 rows
Row 66
Add:
6 chains to each side
Return to:
40 sc
Rows 67–70
40 sc
Fasten off.
Assembly Summary
- Lay the capital-I-shaped crochet piece flat.
- Bring the two outer 40-stitch flange edges together.
- Center the cream-and-gold zipper between them.
- Hand-sew both crochet edges to the zipper tape.
- Test the zipper.
- Leave zipper halfway open.
- Turn pouch wrong side out.
- Close both side seams through both layers.
- Flatten the four remaining corner openings.
- Make all four corner widths identical.
- Slip stitch each boxed corner closed.
- Secure the zipper ends.
- Turn right side out.
- Push out all four corners.
- Shape the bottom and sides.
- Add optional lining if desired.
The finished project should be a compact, structured white-and-aqua crochet makeup bag with dense single-crochet texture, a flat boxy base, softly rounded rectangular sides, and a cream zipper with gold hardware across the top.