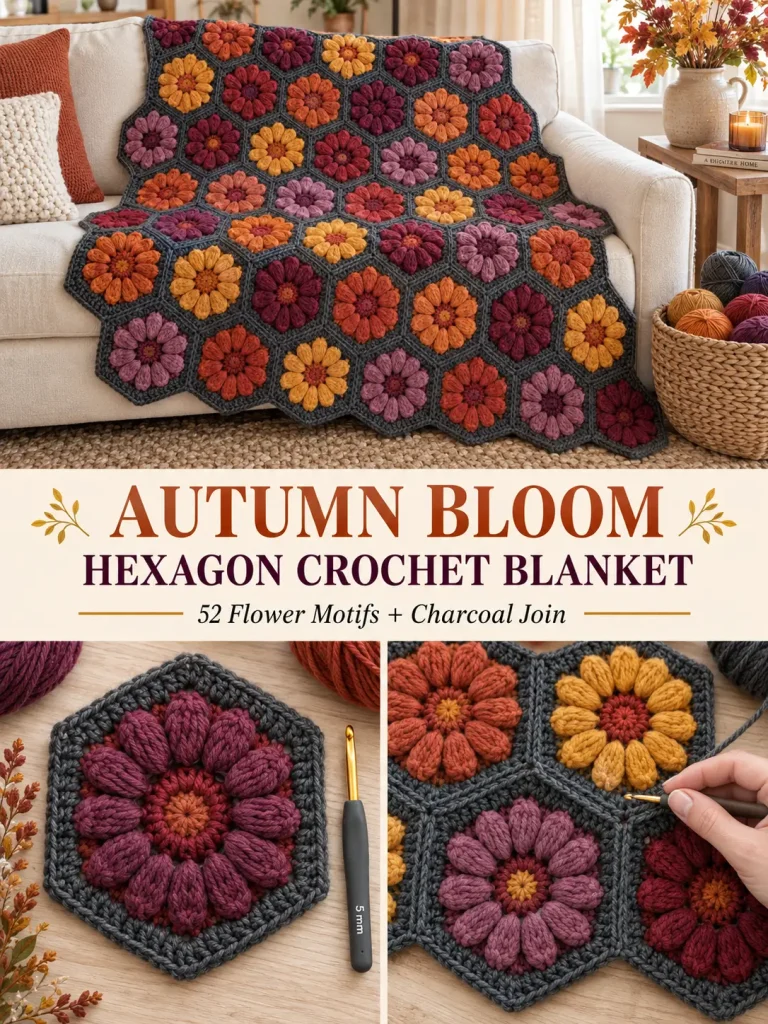
If you love the look of rich fall colors surrounded by a dark neutral border, this flower-hexagon blanket is a beautiful way to use them.
The design is built from individual 12-petal crochet flower hexagons in shades of pumpkin, rust, marigold, burgundy, berry, and plum. Every motif is finished with the same charcoal-gray border, then the hexagons are joined together with charcoal yarn to create the strong honeycomb effect.
The construction is much easier than the finished blanket suggests:
crochet flower → shape into hexagon → add charcoal border → join motifs → add outer border
This version uses an original flower-hexagon construction designed to create the same broad autumn floral-mosaic feeling while giving you complete written instructions from start to finish.
Pattern at a Glance
Skill level: Advanced beginner / intermediate
Terminology: US crochet terms
Construction: Individual hexagon motifs joined into a blanket
Finished size: Approximately 43 × 50 inches
Motifs: 52
Motif size: Approximately 6½ inches point-to-point after blocking
Yarn weight: Worsted / Category 4
Main hook: 5 mm
Border hook: 5 mm
Flower petals per motif: 12
Layout: Alternating rows of 7 and 6 hexagons
Materials
You will need:
Flower Colors
Approximately 1,500–1,700 yards total of worsted-weight yarn divided among autumn shades.
A good palette includes:
- burnt orange
- pumpkin
- terracotta
- copper
- marigold
- golden yellow
- brick red
- burgundy
- berry
- plum
- aubergine
- muted mauve
Tonal or gently variegated yarn works especially well because it adds depth to the flower centers without requiring complicated color changes.
Joining and Border Color
Approximately 900–1,050 yards charcoal-gray worsted-weight yarn
You will also need:
- 5 mm crochet hook
- yarn needle
- scissors
- locking stitch markers
- blocking mats and pins, optional but recommended
Suggested Yarn
A smooth worsted-weight wool, superwash wool, acrylic, or wool/acrylic blend will show the flower texture clearly.
Avoid extremely fuzzy yarn because it can hide the petal definition.
For a washable family blanket, choose a machine-washable yarn with good stitch definition.
Color Distribution for 52 Motifs
For a balanced autumn mix, make:
- 9 rust / brick motifs
- 9 burnt-orange motifs
- 8 marigold / golden motifs
- 9 burgundy motifs
- 9 plum motifs
- 8 berry / mauve motifs
You do not have to follow an exact order when arranging them.
In fact, the blanket looks best when neighboring motifs are deliberately different.
Abbreviations
- ch = chain
- sc = single crochet
- hdc = half double crochet
- dc = double crochet
- sl st = slip stitch
- st = stitch
- sts = stitches
- sp = space
- rnd = round
- rep = repeat
- MR = magic ring
- 4-dc-cl = 4-double-crochet cluster
- sc2tog = single crochet 2 together
- hdc2tog = half double crochet 2 together
Special Stitch — 4-Double-Crochet Cluster
The cluster creates the raised flower petals.
Yarn over.
Insert hook into indicated stitch.
Yarn over and pull up a loop.
Yarn over and pull through 2 loops.
You now have the unfinished portion of one double crochet on the hook.
Repeat this process 3 more times in the same stitch.
You should have:
5 loops on the hook
Yarn over and pull through all 5 loops.
Your cluster is complete.
Do not make the cluster overly tight. A slightly relaxed tension creates fuller petals.
Gauge
Exact gauge is not essential because this blanket is assembled from motifs.
One completed and lightly blocked hexagon should measure approximately:
6½ inches from one point to the opposite point
Your most important gauge rule is:
Make every hexagon the same size.
If your motifs are consistently larger or smaller, your finished blanket size will change, but the construction will still work.
FLOWER HEXAGON MOTIF
Make:
52 motifs
Use one autumn color for Rounds 1–4.
Use charcoal gray for Rounds 5–7.
Round 1 — Flower Center
Using your chosen flower color:
Make a magic ring.
Ch 1.
Work:
12 sc into the ring
Pull the ring closed.
Join with sl st to the first sc.
12 sts
Round 2 — Raised Petals
Ch 2.
The ch-2 does not count as a stitch.
In the first stitch work:
4-dc-cl, ch 1
Repeat in every stitch around:
4-dc-cl, ch 1
Join with sl st to the top of the first cluster.
You should have:
- 12 raised clusters
- 12 ch-1 spaces
These are the 12 flower petals.
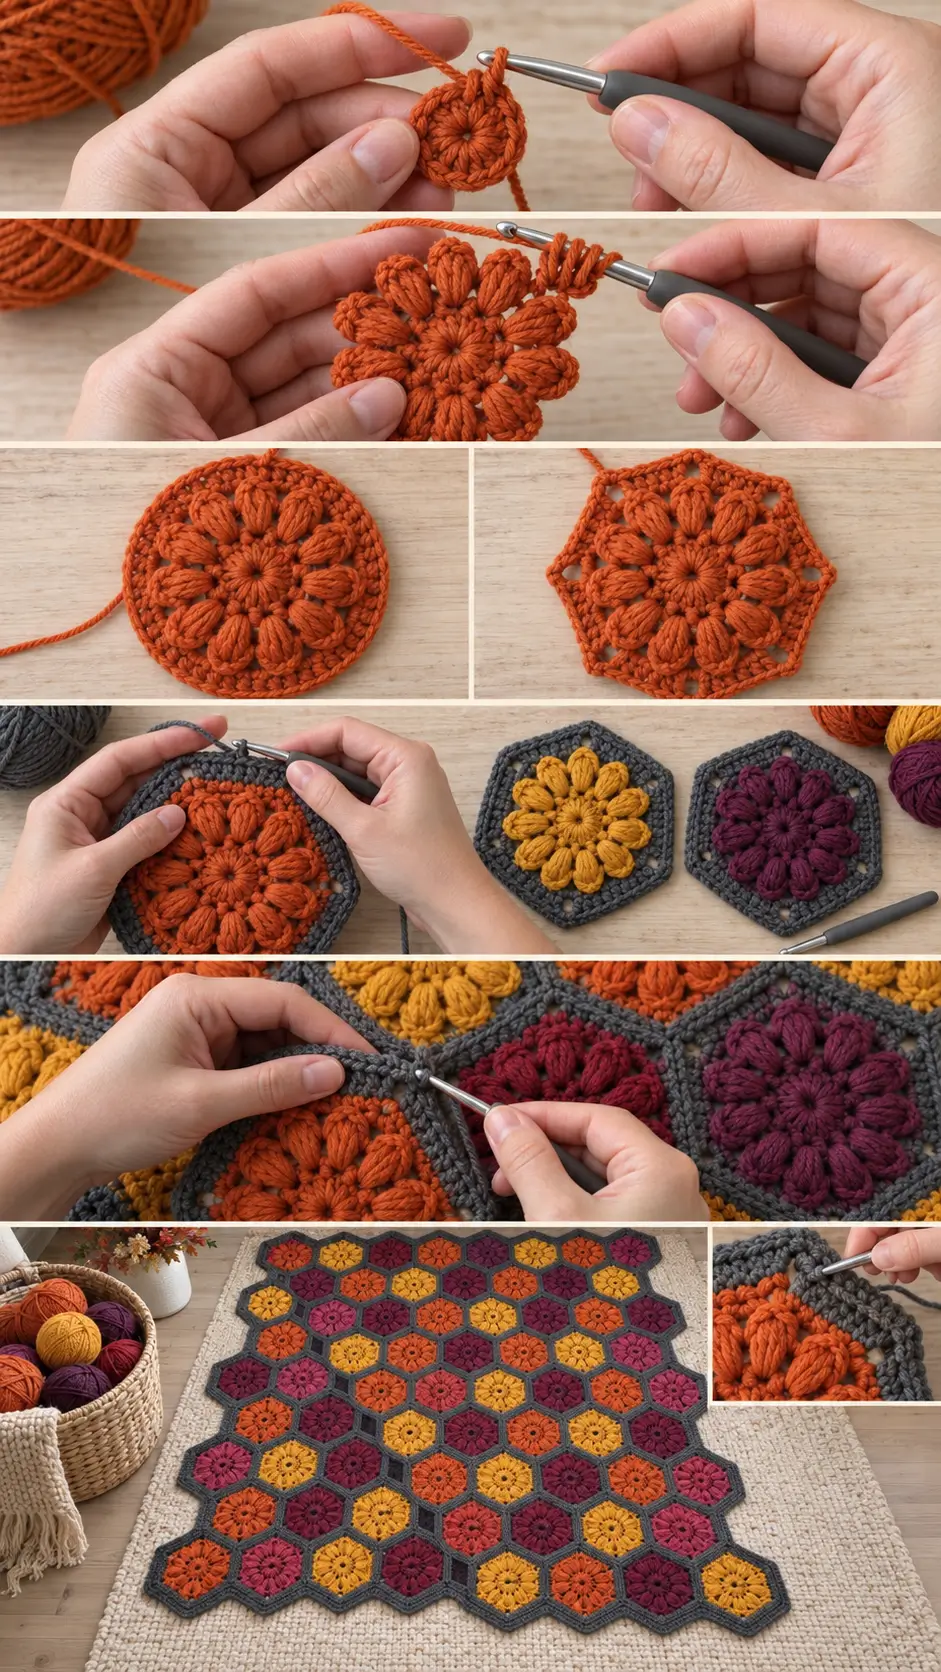
Round 3 — Fill Between the Petals
Sl st into the next ch-1 space.
Ch 2.
Work:
2 dc in the same ch-1 space
Work:
2 dc in every remaining ch-1 space
around.
Join with sl st to the first dc.
You should have:
24 dc
This round fills the spaces between the raised petals and creates a stable circular flower.
Round 4 — Turn the Flower Into a Hexagon
Ch 1.
Hdc in each of the next:
3 sts
In the next stitch work:
hdc, ch 2, hdc
This creates the first hexagon corner.
Repeat around:
hdc in next 3 sts, (hdc, ch 2, hdc) in next st
Repeat the sequence 6 times total.
Join with sl st.
You should now clearly see:
6 corners
Fasten off the flower color.
Round 5 — First Charcoal Round
Join charcoal yarn in any ch-2 corner space.
Ch 1.
In the same corner work:
sc, ch 2, sc
Sc in every stitch across the first side.
In the next corner work:
sc, ch 2, sc
Continue around.
At every corner:
sc, ch 2, sc
Join with sl st.
Round 6 — Build the Gray Frame
Sl st into the first corner space.
Ch 1.
In the same corner work:
hdc, ch 2, hdc
Hdc in every stitch across the side.
In the next corner:
hdc, ch 2, hdc
Repeat around.
Join.
Round 7 — Final Hexagon Border
Sl st into the corner.
Ch 1.
Work:
sc, ch 2, sc
in the same corner.
Sc in every stitch across the side.
At each corner work:
sc, ch 2, sc
Continue around.
Join.
Fasten off.
Finished Motif
Your completed hexagon should have:
- one small center
- 12 raised flower petals
- a filled circular flower section
- six clearly defined sides
- six ch-2 corner spaces
- a substantial charcoal-gray outer frame
Lightly stretch it into a symmetrical hexagon.
Blocking the Motifs
Blocking before joining makes assembly much easier.
Place each motif on a blocking mat.
Measure approximately:
6½ inches point-to-point
Pin all 6 corners.
Make sure:
- opposite sides match
- the flower remains centered
- the charcoal border lies flat
Lightly wet or steam according to your yarn’s care instructions.
Allow motifs to dry completely.
Why Blocking Matters
Even small differences become noticeable when dozens of motifs are joined.
Blocking helps:
- match motif size
- straighten side edges
- open the flower texture
- make joining easier
- prevent a wavy finished blanket
BLANKET LAYOUT
The sample blanket uses:
52 hexagons
Arrange them in 8 staggered rows.
Row 1
7 motifs
Row 2
6 motifs
Row 3
7 motifs
Row 4
6 motifs
Row 5
7 motifs
Row 6
6 motifs
Row 7
7 motifs
Row 8
6 motifs
Total:
7 + 6 + 7 + 6 + 7 + 6 + 7 + 6 = 52 motifs
Center each 6-motif row between the 7-motif rows so the hexagons interlock naturally.
Arrange the Colors Before Joining
Lay all 52 motifs on the floor or a large table before sewing anything.
Try to avoid placing:
- two mustard motifs beside each other
- two burgundy motifs beside each other
- several very dark motifs in one corner
- all yellow motifs in one area
Instead, distribute warm and dark colors throughout the blanket.
A good visual rhythm alternates:
bright → dark → medium → bright
rather than creating obvious color stripes.
Take a photograph of the final arrangement before you begin joining.
That photograph will help you keep the rows in the correct order.
JOINING THE HEXAGONS
The charcoal border makes a visible join especially attractive.
Use charcoal yarn.
A slip-stitch join creates the raised honeycomb lines seen between the motifs.
Visible Slip-Stitch Join
Place two neighboring hexagons with their wrong sides together and right sides facing outward.
Align one complete side.
Join charcoal yarn at the first corner.
Insert the hook through the corresponding edge loops of both motifs.
Work:
sl st through both motifs
Continue matching stitch to stitch across the entire side.
Finish at the opposite corner.
Fasten off.
Keep the Seam Relaxed
Do not pull the slip stitches tight.
A tight seam can cause the blanket to:
- pucker
- curl
- lose its hexagon shape
The seam should sit gently on the surface.
Best Joining Order
For the neatest assembly:
First
Join all motifs within each horizontal row.
You will have:
- four 7-motif strips
- four 6-motif strips
Next
Join Row 1 to Row 2.
Then:
Row 2 to Row 3.
Continue until all 8 rows are connected.
This is easier than trying to join random motifs one at a time.
Joining at Three-Way Intersections
Where three hexagons meet, keep the corner spaces aligned.
When you arrive at the intersection:
Work the final slip stitch into the corner space.
Fasten off if necessary.
Start the next seam cleanly from the same meeting point.
Avoid stacking several bulky knots directly on top of one another.
Weave the seam ends into different directions.
Check the Blanket During Assembly
Every few joins, spread the blanket flat.
Make sure:
- motifs remain flat
- corners align
- seams are not pulling
- hexagons stay symmetrical
It is much easier to fix one tight seam than to discover the problem after all 52 motifs are joined.
OUTER BORDER
The natural outer edge of a hexagon blanket has gentle points and inward valleys.
The border should follow that shape rather than forcing the blanket into a perfect rectangle.
Use charcoal yarn.
Border Round 1
Join charcoal at any outer corner.
Ch 1.
Sc evenly around the complete blanket.
Along straight motif edges:
1 sc in each stitch
At every outward-facing hexagon point:
3 sc in the ch-2 corner space
At each inward valley where two motifs meet:
Work:
sc2tog
using one stitch from each side of the valley.
Continue around.
Join with sl st to the first sc.
Why Use sc2tog at the Valleys?
The inward valleys naturally contain extra fabric.
Decreasing slightly prevents the border from ruffling.
If your blanket already lies perfectly flat, you may use one sc in each valley instead.
Always judge the actual fabric.
Border Round 2
Ch 1.
Hdc in every stitch around.
At every outward point:
3 hdc in the center corner stitch
At each inward valley:
hdc2tog
Join.
Border Round 3
Ch 1.
Sc in each stitch around.
At outward points:
3 sc
At inward valleys:
sc2tog
Join.
Optional Final Border Round
For a stronger finished edge, work one final round of:
reverse single crochet / crab stitch
around the entire blanket.
Keep the tension relaxed.
Fasten off.
Weaving in Ends
Because this blanket contains many motifs, weave ends securely as you work instead of waiting until the end.
For each yarn tail:
- Thread onto a yarn needle.
- Weave through several stitches.
- Change direction.
- Weave through several more stitches.
- Trim close to the fabric.
Do not rely on knots alone.
Final Blocking
After joining and bordering, lightly block the entire blanket.
Lay it flat.
Straighten:
- outer points
- inward valleys
- joining lines
- individual flowers
Do not overstretch the motifs.
Allow it to dry completely.
Finished Measurements
Using worsted-weight yarn and a 5 mm hook, the sample blanket measures approximately:
43 inches wide × 50 inches long
Your finished measurements may vary depending on:
- yarn thickness
- tension
- blocking
- motif size
How to Make a Smaller Lap Blanket
Use:
30 motifs
Arrange:
- 6 motifs
- 5 motifs
- 6 motifs
- 5 motifs
- 4 motifs
- 4 motifs
or create another balanced staggered arrangement that suits your space.
An even easier option is to lay the motifs out physically until you like the proportions before joining.
How to Make a Baby Blanket
Make approximately:
30–36 motifs
Use softer colors such as:
- cream
- dusty peach
- muted mustard
- sage
- mauve
- warm gray
For baby use, avoid:
- fringe
- beads
- buttons
- detachable embellishments
A simple flat border is best.
How to Make a Larger Throw
Continue adding alternating rows of:
7 and 6 motifs
or increase to:
8 and 7 motifs
for a wider blanket.
Because the design is modular, there is no fixed maximum size.
How to Make a Bed Blanket
The easiest method is to make one complete motif first.
Block it.
Measure it accurately.
Then arrange paper circles or use the actual motif measurement to estimate how many you need across your bed.
Remember that hexagon layouts are staggered, so the finished outline will not behave exactly like square motifs.
Can I Use Scrap Yarn?
Yes.
This design is excellent for scraps.
The charcoal border visually unifies different colors, which means the flower centers do not need to match perfectly.
You can use:
- leftovers from other projects
- mini skeins
- hand-dyed scraps
- tonal yarn
- coordinating variegated yarn
For the cleanest result, use approximately the same yarn weight for every motif.
Why the Charcoal Border Works
A strong neutral border gives each flower its own frame.
Without it, orange, red, yellow, and purple motifs can visually blend together.
Charcoal creates:
- contrast
- visible honeycomb geometry
- consistent joining lines
- a more modern finished appearance
Other dark neutrals also work.
Try:
- espresso brown
- deep navy
- dark olive
- black
- deep chocolate
Alternative Color Palette — Woodland Autumn
Flower Colors
- rust
- moss
- ochre
- copper
- burgundy
- oatmeal
Border
Deep espresso
Alternative Color Palette — Vintage Jewel
Flower Colors
- plum
- aubergine
- wine
- dusty rose
- antique gold
- burnt orange
Border
Charcoal
Alternative Color Palette — Soft Harvest
Flower Colors
- pumpkin
- peach
- muted mustard
- cream
- dusty terracotta
- sage
Border
Warm taupe
What If My Flower Center Has a Hole?
Pull the magic ring firmly closed after Round 1.
Before weaving in the beginning tail, pass it around the center stitches once more and tighten gently.
Then weave it securely.
What If My Petals Are Too Flat?
Make sure the 4-dc clusters are not being pulled too tightly.
When pulling up the loops for each partial double crochet, bring them to a consistent height.
A relaxed cluster produces the fuller petal texture.
What If My Motif Cups?
Cupping usually means:
- hook is too small
- tension is too tight
- clusters are too tight
Try going up to a:
5.5 mm hook
for the flower section.
You can return to 5 mm for the charcoal border if necessary.
What If My Motif Ruffles?
Ruffling usually means:
- tension is too loose
- hook is too large
- corner increases are being worked incorrectly
Check that Round 4 contains exactly:
6 corners
and that you are working the correct number of stitches between them.
What If My Hexagon Does Not Have Six Equal Sides?
Count the stitches between every pair of corner spaces.
Every side in the same round should contain the same number of stitches.
If one side has more or fewer stitches, correct that motif before adding the next round.
What If My Motifs Are Different Sizes?
Small differences can usually be corrected during blocking.
If one motif is dramatically larger, check:
- hook size
- yarn weight
- stitch count
- tension
Do not force a significantly oversized motif into the blanket because it can distort the surrounding joins.
Can I Use Different Yarn Weights?
Yes, but do not mix substantially different weights within the same blanket.
DK Yarn
Try a 4–4.5 mm hook.
Your motifs will be smaller and lighter.
Worsted Yarn
Use approximately 5 mm.
Bulky Yarn
Try a 6–6.5 mm hook.
The motifs will become considerably larger.
Always make and measure one complete test motif before calculating how many you need.
Can I Make Every Flower a Different Color?
Absolutely.
That is one of the best ways to use this pattern.
The charcoal border keeps even a highly varied palette looking intentional.
For a scrappy version, you could make all 52 flower centers different.
Can I Change Colors Within One Flower?
Yes.
One attractive option is:
Round 1
gold or pale orange
Round 2
rust or burgundy
Rounds 3–4
a deeper version of the same color
Then add charcoal.
This creates more pronounced floral depth.
Can I Join the Motifs With a Yarn Needle Instead?
Yes.
A mattress-stitch or whip-stitch join will produce a flatter result.
For a nearly invisible seam:
Place motifs right sides together.
Whip stitch corresponding edge stitches using charcoal.
Open the motifs afterward.
For the stronger honeycomb appearance shown in this version, the visible slip-stitch join is recommended.
Can I Use Join-As-You-Go?
Yes, but completing and blocking all motifs first gives you more control over color placement.
It also makes it much easier to rearrange motifs until the blanket looks balanced.
For a multicolor blanket like this one, I prefer:
make → block → arrange → join
How Many Petals Are in the Blanket?
Each motif contains:
12 raised petals
With:
52 motifs
the complete blanket contains:
624 crochet flower petals
That repeated texture is what creates the dense floral appearance across the finished blanket.
How to Keep the Color Layout From Looking Random
Random color placement works best when it is controlled slightly.
Before joining, check that each area contains a mix of:
- light
- medium
- dark
For example, if one corner contains plum, burgundy, berry, and dark rust, introduce a mustard or bright orange motif nearby.
The eye naturally moves toward the brightest colors, so spreading the yellows and oranges throughout the blanket helps balance the whole design.
Care Instructions
Always follow the washing instructions for your chosen yarn.
For machine-washable yarn:
- use a gentle cycle
- use cool water
- avoid harsh agitation
- reshape while damp
- lay flat to dry when possible
Motif blankets can become heavy when wet, so support the entire blanket when moving it.
Do not lift a soaking-wet blanket by one corner.
Final Thoughts
The most satisfying part of this blanket is how one small motif grows into something completely different once dozens of them are joined together.
Each hexagon begins with a simple ring.
Twelve clusters create the flower.
A few shaping stitches turn the circle into a hexagon.
Then the charcoal border changes everything.
Once those dark edges are joined together, the individual flowers become a continuous honeycomb of autumn color.
And because every motif is a separate little project, you can build the blanket gradually:
one flower tonight, another tomorrow, another from the leftover yarn in your basket.
Eventually those small pieces become a rich, textured crochet blanket filled with rust, pumpkin, marigold, burgundy, berry, and plum—the colors that make fall crochet so hard to resist.




So, quite confusing why the pictures show various numbers of petals? The design notes say the flower should have 12 petals, but the photos show them with 10, 11 or 12 petals depending on what picture it is?
I have attempted to make one motif for hours now. The directions dont give you what the photos show. Bought all the colors for nothing. Fix the pattern or the photos.