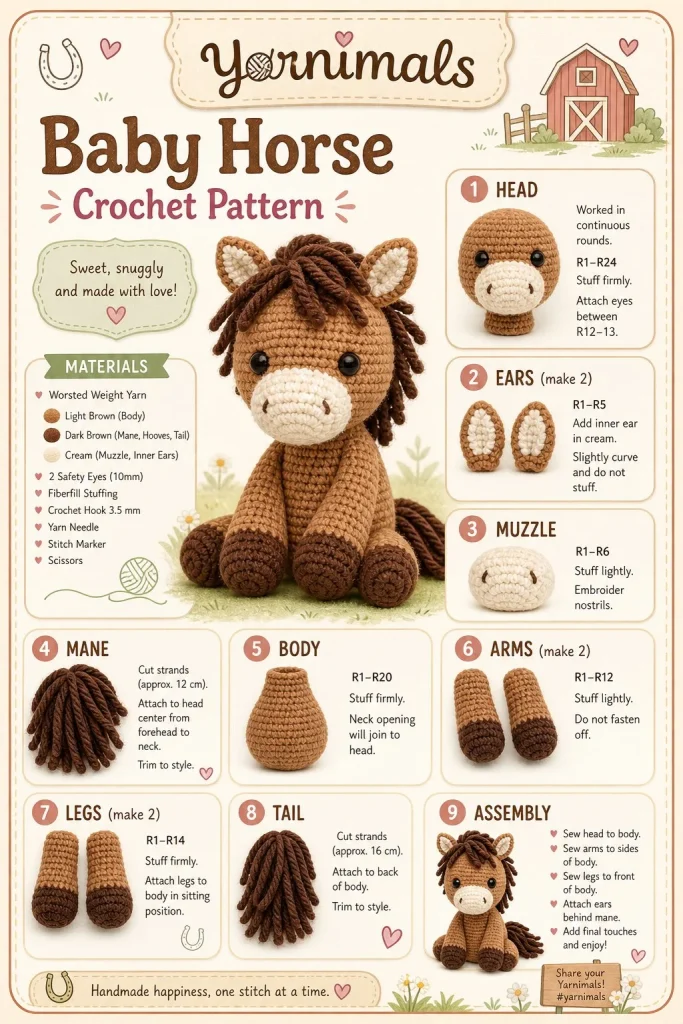
Creating a charming handmade plush toy is a delightful project that anyone can enjoy, especially with this easy and beginner-friendly crochet pattern! This cute character, inspired by the adorable designs of Yarnimals, will surely bring smiles to both young and old. With soft textures and an inviting kawaii aesthetic, this crochet pattern is perfect for creating a cheerful companion or a lovely gift. Let’s dive into the materials and step-by-step instructions to bring this delightful plushie to life!
Materials
- Yarn in your choice of colors (suggested: soft pastel shades)
- Crochet hook (recommended size: 3.5 mm)
- Fiberfill stuffing
- Safety eyes (optional, or you can embroider eyes)
- Yarn needle
- Scissors
Abbreviations
- MR: magic ring
- ch: chain
- sc: single crochet
- hdc: half double crochet
- dc: double crochet
- inc: increase
- dec: decrease
- sl st: slip stitch
Head
- Start with a MR and work 6 sc in the ring. (6)
- Round 2: Inc in each stitch around. (12)
- Round 3: [1 sc, inc] repeat around. (18)
- Round 4: [2 sc, inc] repeat around. (24)
- Rounds 5-8: Sc in each stitch around. (24)
- Round 9: [2 sc, dec] repeat around. (18)
- Round 10: [1 sc, dec] repeat around. (12)
- Stuff the head firmly before finishing the last round.
- Round 11: Dec around to close up. (6)
- Fasten off and weave in ends.
Body
- Start with a MR and work 6 sc in the ring. (6)
- Round 2: Inc in each stitch around. (12)
- Round 3: [1 sc, inc] repeat around. (18)
- Rounds 4-7: Sc in each stitch around. (18)
- Round 8: [1 sc, dec] repeat around. (12)
- Round 9: Dec around to close up. (6)
- Fasten off and leave a long tail for sewing.
Arms (Make 2)
- Start with a MR and work 6 sc in the ring. (6)
- Round 2: Inc in each stitch around. (12)
- Rounds 3-5: Sc in each stitch around. (12)
- Stuff lightly but keep them firm.
- Fasten off, leaving a long tail for sewing.
Legs (Make 2)
- Follow the same instructions as the arms but continue for 6 rounds before fastening off for a longer leg.
- Remember to stuff lightly.
Ears (Make 2)
- Ch 5 and turn, sc in 2nd ch from hook, hdc in next, dc in last ch.
- Ch 1 and turn. Work 2 sc in same stitch, inc in next, hdc in last.
- Fasten off, leaving a long tail.
Assembly and Finishing
- Sew the head to the body securely.
- Attach the arms on either side at your desired position, ensuring they are evenly placed.
- Sew the legs to the bottom of the body.
- Attach the ears to the top of the head, adjusting their position for a cute look.
- Add safety eyes or embroider eyes with black yarn.
- You can also embellish with a small bow or scarf made from a separate color of yarn.
Tips for the Best Result
- When stuffing the head, make sure to fill it firmly for a good shape, but avoid overstuffing to keep it soft and cuddly.
- Use a stitch marker to keep track of your rounds, especially in the initial rounds of your pattern.
- Take your time sewing the parts together; this ensures a more polished finish and helps maintain symmetry.
In conclusion, this handmade plush toy not only makes for a wonderful project but also serves as an excellent gift idea for family and friends. Feel free to experiment with different yarn colors to create unique variations, and enjoy the process of making your very own cuddly companion! If you’re interested in more beginner-friendly patterns, check out this easy tutorial for another adorable crochet project. Happy crocheting!



