Introduction
Tiny crochet sneakers are one of the sweetest baby projects to make. They have that handmade charm of soft baby booties, but with the playful look of little slip-on shoes. They are cute for baby photos, shower gifts, nursery keepsakes, and handmade market tables.
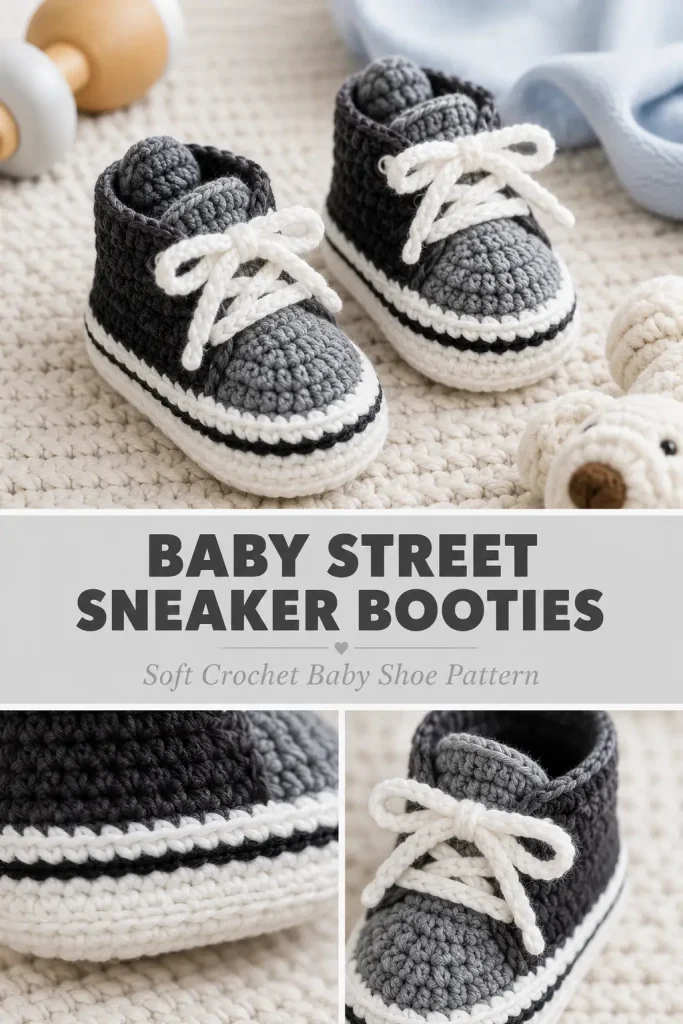
This Baby Street Sneaker Crochet Booties Pattern is an original design inspired by the classic baby sneaker look, but the construction, stitch counts, shaping, and details are newly created so the pattern is safe and unique. The booties have a soft white sole, black inner heel, colored toe panel, simple side opening, thin contrast stripe, and crochet laces.
The pattern is written for a soft baby bootie style, not a hard walking shoe. It is best for pre-walkers, photo outfits, baby gifts, and cozy handmade accessories.
Description
These baby crochet booties look like tiny casual sneakers with a thick white sole, colored upper, soft toe cap, black ankle section, and little crochet laces. The shape is rounded at the toe, low around the ankle, and slightly structured so the bootie keeps its shoe-like look.
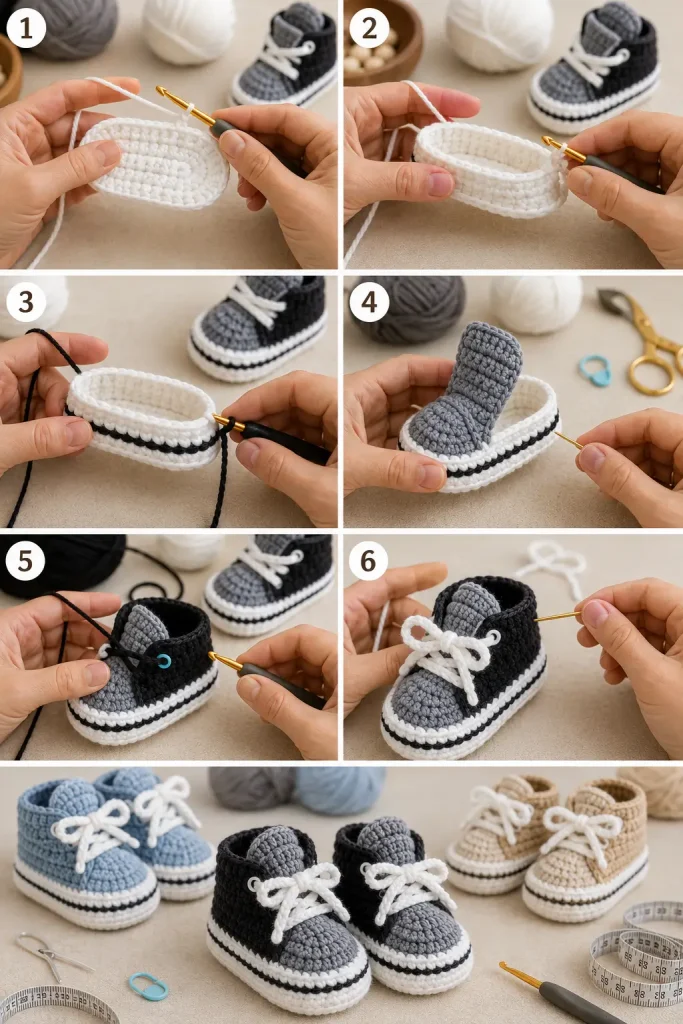
The design uses simple stitches and clear sections. You will make the sole first, build the side wall, shape the toe panel, add the heel section, crochet a tongue, then finish with edging, a contrast stripe, and laces.
You can make them in gray, soft blue, beige, blush, navy, mint, or rust. The white sole and black stripe give the booties a classic sneaker look, while the colored toe panel makes each pair feel personal.
Materials
- Worsted weight yarn in white for the sole
- Worsted weight yarn in black for the heel/inside ankle section
- Worsted weight yarn in your main shoe color, such as gray, blue, beige, or blush
- Small amount of black yarn for the thin sole stripe
- 4 mm crochet hook
- Yarn needle
- Scissors
- Stitch markers
- Measuring tape
Finished Size
This pattern is written for 0–3 months.
Approximate finished sole length:
- 3.75 inches / 9.5 cm
For a larger baby size, use a 4.5 mm hook or add one extra chain to the starting sole chain.
Gauge
Approximate gauge:
- 16 sc stitches = 4 inches
- 18 sc rows = 4 inches
Gauge matters for baby booties. Measure the sole after Round 3. If it is too small, use a larger hook. If it is too large, use a smaller hook.
Abbreviations
- ch: chain
- sc: single crochet
- hdc: half double crochet
- dc: double crochet
- sl st: slip stitch
- BLO: back loop only
- FLO: front loop only
- inc: increase, 2 stitches in the same stitch
- dec: single crochet 2 stitches together
- st: stitch
- sts: stitches
- FO: fasten off
Pattern Notes
Make 2 booties.
The sole is worked in oval rounds.
The side wall is worked upward from the sole.
The toe panel is worked over the front stitches.
The heel and side section is worked around the back of the bootie.
The tongue is made separately and sewn inside the front opening.
The laces are crochet chains threaded through the side openings.
Ch 1 does not count as a stitch.
Join rounds with a slip stitch unless stated otherwise.
Step-by-Step Instructions
Sole
Use white yarn.
Round 1
Ch 12.
Sc in the 2nd ch from hook.
Sc in next 8 ch.
Work 3 sc in last ch.
Now work along the opposite side of the chain.
Sc in next 8 ch.
Work 2 sc in last ch.
Join with sl st to first sc. (22)
Round 2
Ch 1.
Work 2 sc in first st.
Sc in next 8 sts.
Work 2 sc in each of next 3 sts.
Sc in next 8 sts.
Work 2 sc in each of last 2 sts.
Join with sl st. (28)
Round 3
Ch 1.
Sc in next st, 2 sc in next st.
Sc in next 8 sts.
Repeat 3 times: sc in next st, 2 sc in next st.
Sc in next 8 sts.
Repeat 2 times: sc in next st, 2 sc in next st.
Join with sl st. (34)
Round 4
Ch 1.
Sc in each st around.
Join with sl st. (34)
The sole should now be a smooth oval.
Sole Wall
This section creates the raised sneaker sole.
Round 5
Ch 1.
Working in BLO, sc in each st around.
Join with sl st. (34)
Round 6
Ch 1.
Sc in each st around.
Join with sl st. (34)
Round 7
Ch 1.
Sc in each st around.
Join with sl st. (34)
FO white.
The sole should now look thick and slightly raised.
Thin Black Sole Stripe
Use black yarn.
Join black yarn at the back center of the sole wall.
Sl st loosely around the bootie between Rounds 6 and 7, following the side of the white sole.
Keep the slip stitches even and relaxed.
Join with sl st.
FO and weave in ends.
This creates the thin sneaker-style stripe.
Upper Base
Use black yarn.
Join yarn at the back center of the bootie.
Round 1
Ch 1.
Sc in each st around, working into the top edge of the white sole wall.
Join with sl st. (34)
Round 2
Ch 1.
Sc in each st around.
Join with sl st. (34)
FO black.
This creates the dark ankle base around the top of the sole.
Toe Placement
Place a stitch marker at the center front of the bootie.
Count 12 stitches across the front toe area, with 6 stitches on each side of the center marker.
The front 12 stitches will be used for the toe cap.
The remaining stitches are for the side and heel area.
Toe Cap
Use your main shoe color, such as gray, soft blue, or beige.
Join yarn at the first marked toe stitch.
You will work back and forth across the front 12 stitches.
Row 1
Ch 1.
Sc across the 12 front toe stitches.
Ch 1, turn. (12)
Row 2
Sc in each st across.
Ch 1, turn. (12)
Row 3
Dec, sc in next 8 sts, dec.
Ch 1, turn. (10)
Row 4
Sc in each st across.
Ch 1, turn. (10)
Row 5
Dec, sc in next 6 sts, dec.
Ch 1, turn. (8)
Row 6
Sc in each st across.
FO, leaving a long tail for sewing.
Fold the top edge slightly inward and sew it neatly to create a rounded toe shape.
The toe cap should cover the front of the foot opening.
Tongue
Use the same main shoe color.
Row 1
Ch 8.
Sc in the 2nd ch from hook and in each ch across. (7)
Ch 1, turn.
Rows 2–6
Sc in each st across.
Ch 1, turn after each row. (7)
Row 7
Dec, sc in next 3 sts, dec. (5)
FO, leaving a long tail for sewing.
Place the tongue behind the toe cap, centered inside the front opening.
Sew the bottom of the tongue securely to the inside of the toe area.
Do not sew the top of the tongue down. It should stand slightly upward like a sneaker tongue.
Heel and Side Panels
Use black yarn.
Join black yarn at the back center of the bootie.
You will work around the back and sides, skipping the front toe cap opening.
Row 1
Ch 1.
Sc around the back and side stitches until you reach the toe cap edge.
Do not work across the front toe cap.
Ch 1, turn.
You should have about 22 stitches across the heel and sides.
Row 2
Sc in each st across.
Ch 1, turn.
Row 3
Sc in each st across.
Ch 1, turn.
Row 4
Sc in each st across.
FO and weave in ends.
This forms the black heel and ankle section.
Side Edging
Use white yarn.
Join white yarn at one side of the toe opening.
Sc evenly around the shoe opening, working around the black heel section, the sides, and around the tongue opening.
Join with sl st.
FO and weave in ends.
This gives the bootie a clean sneaker-style rim.
Lace Holes
Use a yarn needle or crochet hook to gently open two small spaces on each side of the tongue.
You do not need metal eyelets.
The lace holes should be placed through the side panel near the front opening:
- One hole near the base of the tongue
- One hole slightly higher near the top of the side panel
Repeat on both sides.
Crochet Laces
Use white yarn.
Lace
Ch 55.
Sl st in 2nd ch from hook and in each ch across for a firmer lace.
FO.
Make 2 laces, one for each bootie.
Thread one lace through the side openings like a sneaker lace.
Tie a small bow at the front.
Trim ends evenly.
For baby safety, keep the laces short and stitch the bow in place if gifting for use.
Optional Side Detail
For a more finished sneaker look, use white yarn to surface stitch a short side line on each side of the bootie.
Make a small curved stitch from the side panel toward the toe cap.
Keep it simple and secure.
Assembly Check
Check the following before finishing:
- Sole is firm and oval
- White sole wall is even
- Black stripe is not too tight
- Toe cap is centered
- Tongue sits behind toe cap
- Heel section is secure
- Opening is comfortable
- Laces are threaded evenly
- All ends are woven in
Finishing
Weave in all yarn tails securely.
Shape the bootie with your fingers.
Flatten the sole gently.
Adjust the tongue and bow.
Repeat the full pattern for the second bootie.
Make sure both booties are the same size before gifting.
Tips & Variations
Use gray for a classic sneaker look.
Use pale blue for a soft baby boy style.
Use blush pink for a sweet baby shower gift.
Use beige and cream for a neutral newborn photo prop.
Use navy with white soles for a sporty look.
Use cotton yarn for crisp stitch definition.
Use soft acrylic yarn for a warmer, stretchier bootie.
For a cleaner finish, embroider the laces instead of threading loose laces.
For a safer baby version, stitch the bow down so it cannot be pulled loose.
FAQ
Is this baby sneaker bootie pattern beginner-friendly?
This pattern is best for confident beginners. The sole and basic rows are simple, but the toe cap, tongue, and side panels require careful placement.
Is this the exact pattern from the photo?
No. This is a new original baby sneaker bootie pattern inspired by the general look of crochet baby shoes. The construction, stitch counts, shaping, and details are original.
Can babies walk in these booties?
No. These are soft crochet booties for pre-walkers, photos, gifts, and cozy wear. They are not walking shoes.
What yarn works best?
Worsted weight cotton or soft acrylic yarn works well. Cotton gives sharper shoe structure, while acrylic feels softer.
Can I resize the booties?
Yes. Use a larger hook or add one chain to the starting sole chain for a slightly bigger size. Always measure the sole before continuing.
Conclusion
These Baby Street Sneaker Crochet Booties are cute, soft, and full of handmade charm. The white sole, contrast stripe, colored toe cap, black heel section, and tiny laces give them a playful sneaker style while keeping the construction realistic for crochet.
Make them in gray, blue, beige, blush, or navy for a sweet baby gift, photo prop, or nursery keepsake. This crochet baby bootie pattern is detailed, practical, and perfect for creating tiny handmade shoes with personality.



