Basketweave Crochet Slippers With Woven-Look Texture
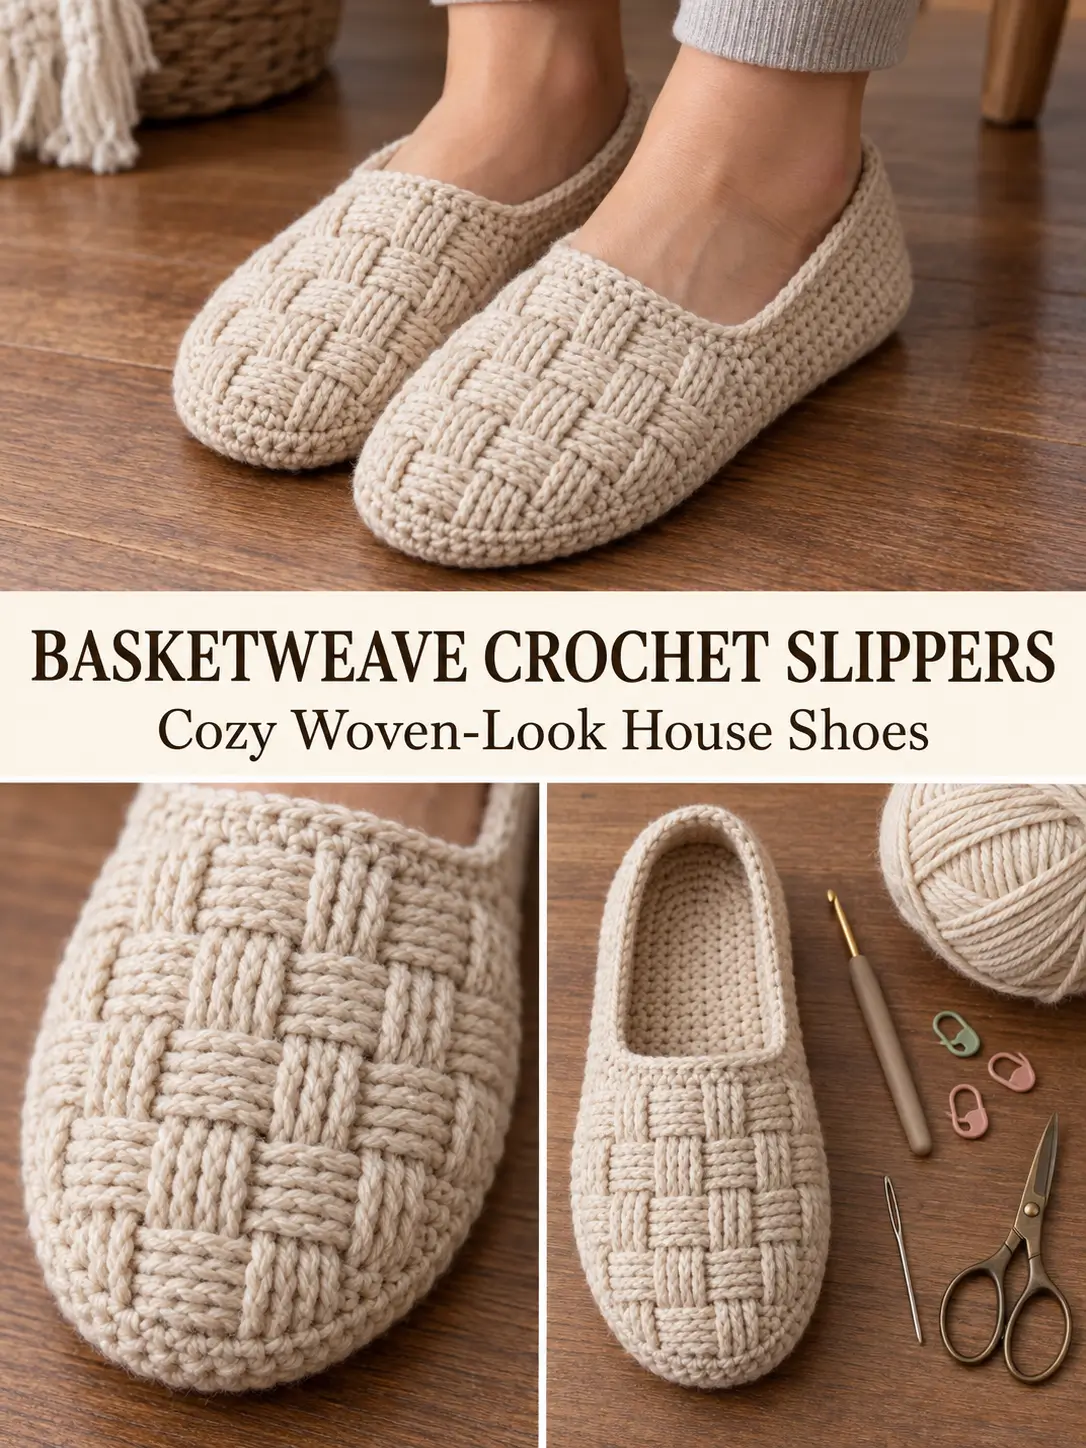
The footwear in the reference image has a beautiful over-and-under basket texture, a rounded closed toe, low sides, and a softly structured opening.
One important detail before beginning: the reference itself appears to be knitted rather than crocheted. The live stitches visible on the needle in the lower part of the image are characteristic of knitting. Because of that, an exact crochet transcription of the original cannot be recovered reliably from the photo alone.
The pattern below is a new crochet construction designed to reproduce the same visual idea: a dense cream slipper with alternating woven-looking blocks, a rounded toe, shaped sides, and a firm crochet border.
Finished Size
The main instructions make a women’s medium slipper approximately:
9½ inches / 24 cm long
Best for approximately:
US women’s 7–8
EU 38–39
Finished sole width at the widest point:
approximately 3¾ inches / 9.5 cm
The slippers are designed with slight negative ease so they stay comfortably on the foot.
Materials
- Medium weight #4 yarn
- Approximately 180–220 yards / 165–200 meters for one pair
- 4 mm crochet hook
- 3.5 mm crochet hook for the final edging, optional
- Yarn needle
- Scissors
- Stitch markers
- Non-slip fabric paint or sew-on sole material, optional
A smooth cotton blend, cotton-acrylic blend, or tightly spun acrylic works especially well because it shows the basketweave texture clearly.
Gauge
In the basketweave pattern:
16 stitches × 12 rows = approximately 4 × 4 inches / 10 × 10 cm
Check your gauge before starting.
The finished length of the sole is more important than matching the exact hook size.
Abbreviations
This pattern uses US crochet terminology.
ch — chain
sc — single crochet
hdc — half double crochet
dc — double crochet
sl st — slip stitch
FPdc — front post double crochet
BPdc — back post double crochet
st / sts — stitch / stitches
RS — right side
WS — wrong side
How the Woven Texture Works
The basket effect is made from groups of:
4 FPdc
alternating with:
4 BPdc
for four rows.
After four rows, the groups are reversed.
So a raised vertical block is followed by a recessed block, and then the direction switches.
The repeat is:
4 stitches wide × 4 rows high
This produces compact woven-looking squares similar to the texture visible in the reference.
Front Post Double Crochet
Yarn over.
Insert the hook from front to back and then back to front around the post of the stitch below.
Yarn over and pull up a loop.
Yarn over and pull through 2 loops.
Yarn over and pull through the final 2 loops.
Back Post Double Crochet
Yarn over.
Insert the hook from back to front and then back to back around the post of the stitch below.
Yarn over and pull up a loop.
Yarn over and pull through 2 loops.
Yarn over and pull through the final 2 loops.
Construction
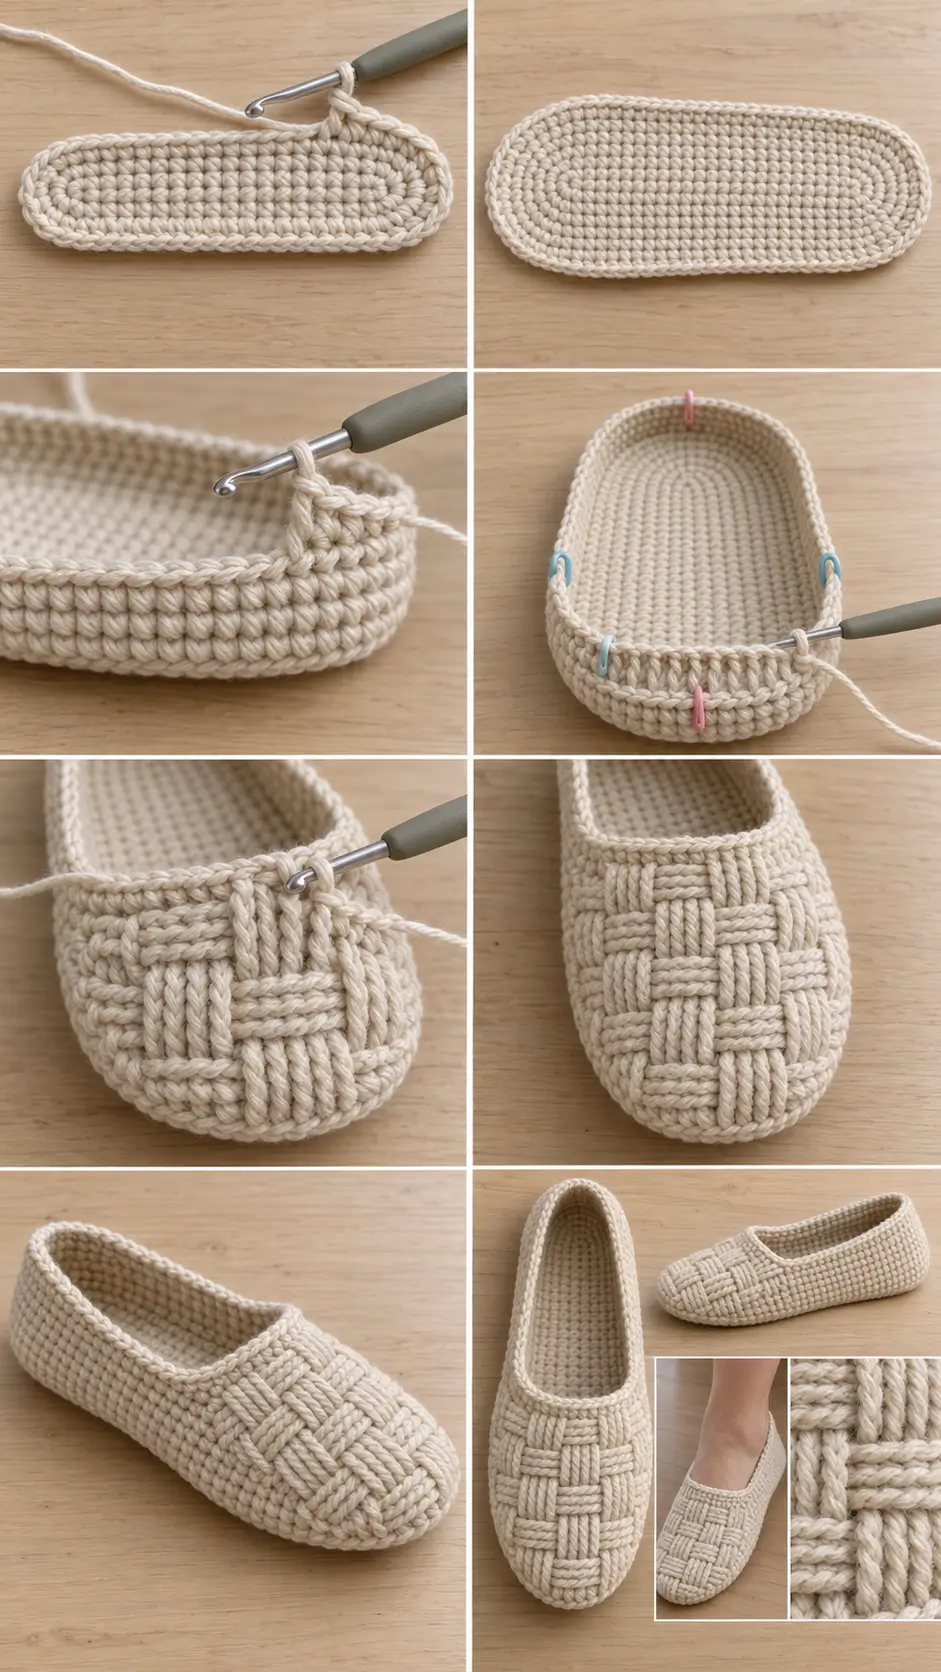
Each slipper has three main parts:
- Crocheted oval sole
- Basketweave upper
- Firm single-crochet opening and heel edging
The upper is joined directly to the sole so there is no bulky seam under the foot.
Make two identical slippers.
Sole
Use the 4 mm hook.
Foundation
Ch 31.
The foundation chain should measure approximately:
7¼–7½ inches / 18.5–19 cm
Sole Round 1
Beginning in the second chain from the hook:
Sc in the next 29 chains.
Work:
3 sc in the last chain
Turn the work so you can crochet along the unused loops on the opposite side of the foundation chain.
Sc in the next 28 chains.
Work:
2 sc in the final foundation chain
Join with a sl st to the first sc.
62 sts
Sole Round 2
Ch 1.
Sc in the same stitch.
Sc in each stitch along the first long side until you reach the 3-stitch curved end.
Work:
2 sc in each of the next 3 stitches
Sc evenly along the opposite long side.
At the heel curve, work:
2 sc in each of the next 3 stitches
Join.
68 sts
Sole Round 3
Ch 1.
Work sc along the straight side.
Across each rounded end, distribute increases as follows:
(1 sc, 2 sc in next st) × 3
Work sc along the second straight side.
Repeat the same increase sequence around the opposite curve.
Join.
74 sts
Sole Round 4
Ch 1.
Sc around, increasing 6 stitches evenly around the toe half and 2 stitches evenly around the heel half.
Join.
82 sts
The sole should now measure approximately:
9¼–9½ inches / 23.5–24 cm long
and:
3½–3¾ inches / 9–9.5 cm wide
If necessary, add one additional sc round with only a few increases at the toe and heel until the sole matches your foot length.
Do not continue increasing once the sole is wide enough.
Create the Side Wall
This round turns the sole upward.
Ch 1.
Working in the back loop only, sc in every stitch around.
Do not increase.
Join.
This creates a visible turning ridge around the sole.
Side Wall Round 2
Ch 1.
Sc in every stitch around through both loops.
Join.
Fasten off.
You now have a shallow slipper base.
Mark the Toe Section
Fold the sole exactly in half lengthwise.
Place a marker at the center front toe.
Place another marker at the center back heel.
Count 20 stitches to the left of the toe marker and place a marker.
Count 20 stitches to the right of the toe marker and place another marker.
You now have approximately:
41 stitches across the front upper section
including the center toe stitch.
This marked section will become the basketweave vamp.
Basketweave Toe and Vamp
Join yarn at the right-hand toe marker.
The upper is worked back and forth.
For clean shaping, the first and last stitch of every row are regular dc edge stitches.
The basketweave pattern is worked between them.
Vamp Setup Row
Ch 2.
Dc in each stitch across the marked toe section.
You should have approximately:
41 dc
Turn.
This setup row gives the post stitches something to wrap around.
Basketweave Section 1
Row 1
Ch 2.
Dc in the first stitch.
Across the center stitches, work:
4 FPdc
4 BPdc
Repeat the 8-stitch pattern across as far as possible.
If 1–3 center stitches remain before the final edge stitch, continue them in the same post-stitch direction as the preceding group.
Dc in the final stitch.
Turn.
Row 2
Ch 2.
Dc in first stitch.
Because the work has been turned, work the opposite post stitch over each visible group so the texture continues facing the same direction on the outside of the slipper.
Work:
4 BPdc
over the previous raised section,
then:
4 FPdc
over the neighboring section.
Continue across.
Dc in the last stitch.
Turn.
Row 3
Repeat Row 1.
Row 4
Repeat Row 2.
You now have the first row of basketweave blocks.
Basketweave Section 2
Now reverse the block direction.
Row 5
Ch 2.
Dc in first stitch.
Where you previously worked a raised 4-stitch block, begin with the recessed texture.
Work:
4 BPdc
then:
4 FPdc
across.
Dc in final stitch.
Turn.
Row 6
Work the opposite post stitches over the groups so the newly reversed blocks stay consistent.
Row 7
Repeat Row 5.
Row 8
Repeat Row 6.
You should now clearly see the woven checkerboard forming.
Shape the Toe
Beginning with the next basketweave section, decrease gradually at both edges.
Do not decrease inside the 4-stitch texture groups unless necessary.
The easiest shaping method is to reduce the plain edge area.
Row 9
Ch 2.
Skip the first stitch.
Work the basketweave pattern across.
Leave the final stitch unworked.
Turn.
You have decreased:
2 stitches
Row 10
Repeat the basketweave texture across the reduced stitch count without decreasing.
Row 11
Decrease one stitch at both ends again.
Row 12
Work even.
Continue alternating:
one decrease row
then:
one even row
until the upper reaches approximately:
5½–6 inches / 14–15 cm from the front toe toward the ankle
when measured over the top of the slipper.
The last upper row should contain approximately:
29–31 stitches
depending on your gauge.
Fasten off.
Form the Back and Sides
The toe panel currently covers the front of the foot.
Now work around the unworked sides and heel.
Join yarn at one side where the basketweave vamp begins.
Heel Round 1
Ch 1.
Sc evenly along:
- first unworked side of the sole
- heel stitches
- opposite unworked side
When you reach the opposite edge of the basketweave upper, stop.
Turn.
Heel Row 2
Ch 1.
Sc across.
Turn.
Heel Rows 3–8
Continue in sc.
At the beginning and end of every second row, decrease one stitch.
To decrease:
Insert hook in next stitch and pull up a loop.
Insert hook in following stitch and pull up a loop.
Yarn over and pull through all 3 loops.
This gently shapes the back toward the ankle.
Continue until the heel section measures approximately:
2–2½ inches / 5–6.5 cm high
at the center back.
Do not make the heel as high as an ankle boot.
The reference has a low slipper opening.
Join the Heel to the Vamp
With the slipper inside out, align each upper side edge of the heel section with the corresponding side edge of the basketweave vamp.
Using yarn and a tapestry needle, mattress stitch the short side seams.
You can also slip stitch the edges together with your crochet hook.
Keep the seams flat.
Do not pull tightly.
Turn the slipper right side out.
Crochet the Opening
Join yarn at the center back.
Use the 3.5 mm hook if you want a firmer edge.
Opening Round 1
Ch 1.
Sc evenly around the entire opening.
Along the basketweave edges, work approximately:
2 sc for every 3 row ends
Along the heel, work:
1 sc in each stitch
The opening must remain flat.
Join with a sl st.
Opening Round 2
Ch 1.
Sc in every stitch around.
At the two corners where the vamp meets the heel, work:
sc2tog
if the opening appears loose.
Join.
Opening Round 3
Work:
sl st loosely in every stitch around
This creates the compact raised border visible around the opening.
Fasten off.
Optional Thicker Opening
For the thicker structured collar seen in the reference, add two more rounds before the slip-stitch finish:
Round 3: sc around
Round 4: sc around
Round 5: loose sl st around
Do not add too many rounds or the slipper will begin looking like a boot.
Shape the Slipper
Place the slipper on your foot while the yarn is still slightly flexible.
Use your fingers to arrange the basketweave blocks neatly over the toe.
The toe should be:
- rounded
- fully closed
- snug but not compressed
- wide enough for the toes to move naturally
The opening should sit below the ankle bone.
Make the Second Slipper
Repeat the entire pattern.
Because the slipper construction is symmetrical, you do not need separate left- and right-foot instructions.
After wearing them once or twice, the fabric will naturally conform slightly to each foot.
Optional Double Sole
For slippers that will be worn frequently indoors, make four sole pieces instead of two.
For each slipper:
Place two soles wrong sides together.
Sc around both layers before beginning the side-wall rounds.
This gives the slipper:
- more structure
- better cushioning
- less stretch under the foot
- longer wear
Then continue the upper normally.
Optional Non-Slip Bottom
Crochet slippers can be slippery on hard floors.
You can add:
- dots of non-slip fabric paint
- silicone sock-grip product
- sew-on suede patches
- pre-cut slipper soles
Allow any liquid grip product to dry completely before wearing.
Adjusting the Length
The most reliable way to resize the slippers is to change the foundation chain of the sole.
For approximately every:
½ inch / 1.25 cm
of additional foot length, add:
2 foundation chains
For a shorter slipper, remove 2 chains.
Always crochet the sole until it measures approximately:
¼ inch / 6 mm shorter than the wearer’s actual foot
because the crochet will stretch slightly during wear.
Women’s Small
For approximately:
US 5–6 / EU 35–37
begin with approximately:
27–29 chains
and aim for a finished sole around:
8¾–9 inches / 22–23 cm
Women’s Medium
For approximately:
US 7–8 / EU 38–39
use:
31 chains
and aim for:
9¼–9½ inches / 23.5–24 cm
Women’s Large
For approximately:
US 9–10 / EU 40–42
begin with approximately:
33–35 chains
and aim for:
10–10½ inches / 25.5–26.5 cm
For every size, adjust the marked toe section so it covers approximately the front half of the sole circumference.
If the Toe Is Too Narrow
Undo the upper to the setup row.
Move each toe marker:
2 stitches farther toward the heel
This gives the vamp approximately 4 additional stitches.
Do not simply crochet very loosely, because that will distort the basketweave texture.
If the Toe Is Too Wide
Move each toe marker:
2 stitches toward the center toe
before working the upper.
The vamp will begin with approximately 4 fewer stitches.
If the Opening Is Too Loose
Do not shorten the whole upper.
Instead, work:
1–3 evenly spaced sc2tog decreases
during Opening Round 2.
Then try the slipper on again.
The edge should hold the foot without digging into the skin.
If the Basketweave Looks Like Ribs Instead of Squares
Count your rows carefully.
Each texture direction should remain in place for:
4 rows
Then it must reverse.
The visual repeat is:
4 stitches wide × 4 rows high
If you continue the same direction for too many rows, you will create long ribs instead of woven blocks.
Keeping the Texture Neat
When making FPdc and BPdc stitches, pull the initial loop up to the full height of a double crochet before completing the stitch.
This prevents the fabric from becoming too tight.
Keep the 4-stitch groups clearly separated.
The strongest basket effect comes from:
4 raised posts beside 4 recessed posts
rather than changing direction randomly.
Finishing
Weave all yarn ends securely into the inside of the slipper.
Trim the excess.
If using cotton yarn, lightly mist the slippers with water and shape them by hand.
Do not flatten the basketweave blocks.
Allow the slippers to dry in their natural three-dimensional shape.
Pattern Summary
Make an oval crochet sole approximately 9½ inches / 24 cm long.
Turn the final sole edge upward with a back-loop-only round.
Add one straight sc side-wall round.
Mark approximately 41 stitches across the front half for the vamp.
Work one dc setup row.
Create the woven texture using:
4 FPdc + 4 BPdc
for 4 rows.
Reverse the blocks for the next 4 rows.
Continue the basketweave while gradually decreasing both edges to shape the toe and instep.
Work the remaining sole stitches in sc to create the sides and low heel.
Join the heel edges to the basketweave vamp.
Finish the opening with several compact rounds of single crochet and a final loose slip-stitch round.
The completed slipper has the same key visual characteristics as the reference: a cream monochrome finish, rounded moccasin-style shape, prominent woven basket texture, and thick structured edge, while using an entirely crochet-based construction.