Beautiful Interlocking Block Stitch Crochet Blanket
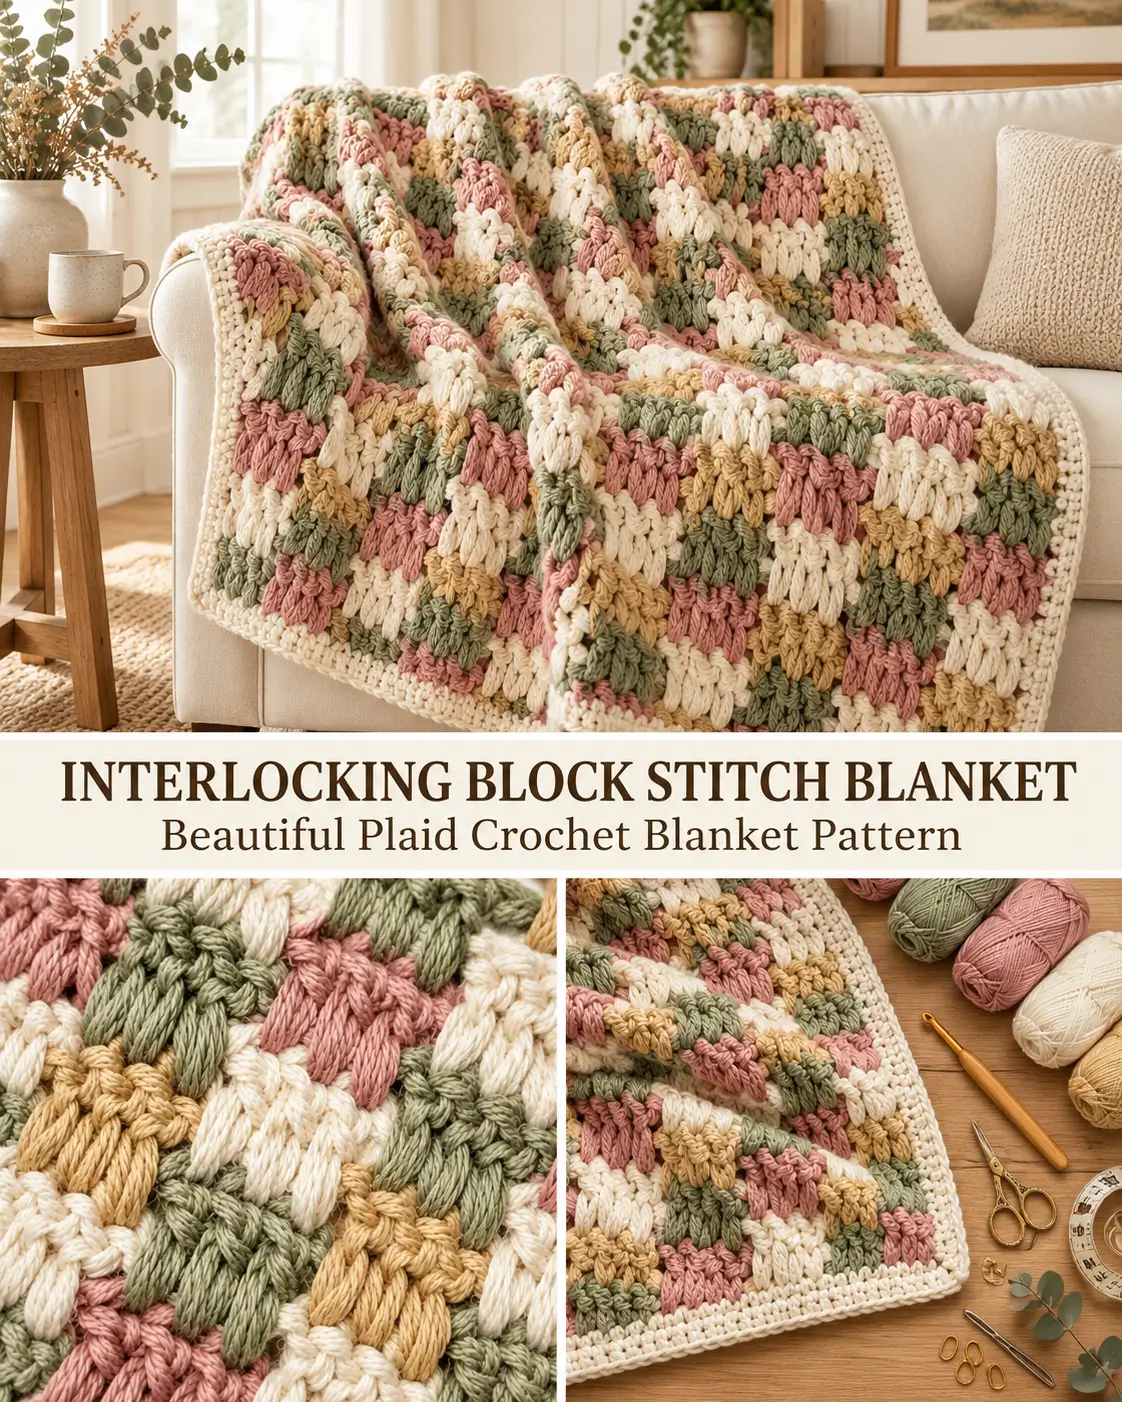
Some crochet blankets are beautiful because of their colors. Others stand out because of their unusual texture. This gorgeous interlocking block stitch blanket brings both together in one cozy handmade project.
At first glance, the fabric looks almost woven, with small blocks of soft sage green, dusty rose, creamy ivory, and muted golden yarn fitting together like tiny pieces of a mosaic.
But here’s the lovely surprise: this intricate-looking texture is created with a repeating combination of familiar crochet stitches.
The interlocking block stitch, sometimes called the plaid stitch, creates little rectangular groups of stitches that visually overlap with the colors around them. The result is a richly textured blanket that looks much more complicated than its basic stitch combinations suggest.
This soft vintage-inspired version is perfect for a cozy living room throw, a thoughtful handmade gift, or a beautiful blanket for a neutral bedroom.
And once you understand how the rows interlock, it’s the kind of project you can enjoy while relaxing in the evening.
Why You’ll Love This Crochet Blanket
- Beautiful interlocking texture that resembles woven fabric.
- Soft, vintage-inspired color combination.
- Made using basic crochet stitches and a special long double crochet technique.
- Repeating two-row pattern once the foundation is established.
- Warm, substantial fabric with an attractive appearance on both sides.
- Easy to customize into a baby blanket, lap blanket, or larger throw.
- Lovely opportunity to experiment with coordinated yarn colors.
- Simple border that gives the finished blanket a clean, polished appearance.
Although the finished fabric looks intricate, the individual stitches become quite manageable with practice.
If you’re comfortable with chains, double crochet, single crochet, and changing yarn colors, you’re ready to learn this beautiful technique.
Pattern Overview
Project: Interlocking Block Stitch Crochet Blanket
Alternative stitch name: Plaid Stitch
Skill level: Advanced beginner to intermediate
Crochet terminology: US terms
Suggested finished size: Approximately 48 × 60 inches
Yarn weight: Medium-weight #4 (worsted)
Recommended hook: 5.5 mm (I/9), adjusted as needed for gauge
Construction: Worked flat in rows
Stitch repeat: Two repeating rows after the foundation row
Starting chain multiple: 6 + 5
Colors: Sage green, dusty rose, ivory, and muted gold
Border: Simple single crochet edging
The finished measurements are a target size, not a tested guarantee. Make a gauge swatch and adjust the starting chain and number of rows to achieve your desired dimensions.
Materials You’ll Need
Gather the following materials before beginning:
- Medium-weight worsted yarn in sage green
- Medium-weight worsted yarn in dusty rose pink
- Medium-weight worsted yarn in creamy ivory
- Medium-weight worsted yarn in muted champagne gold
- 5.5 mm crochet hook, or a size suitable for your yarn
- Tapestry needle
- Scissors
- Measuring tape
- Stitch markers
- Optional blocking mats
Choosing the Perfect Yarn
For this blanket, look for a yarn with smooth, clearly defined strands.
A soft acrylic yarn is an excellent option for an everyday blanket because it’s widely available and often easy to care for.
Cotton blends can produce beautiful stitch definition, but they may create a heavier blanket.
A soft wool or acrylic-wool blend can also work well if you prefer extra warmth.
The most important thing is to choose yarns with similar thicknesses.
Because the stitches must interlock neatly, using dramatically different yarn weights can make the finished texture uneven.
The Beautiful Four-Color Palette
The colors in this blanket are inspired by soft botanical and vintage cottage-style decor.
Color A – Muted Sage Green
A gentle gray-green shade, similar to dried eucalyptus leaves.
This color gives the blanket a natural, calming appearance.
Color B – Creamy Ivory
A warm off-white rather than bright white.
Ivory makes the surrounding colors look softer and helps highlight the raised crochet stitches.
Color C – Dusty Rose Pink
A muted antique pink with warm undertones.
Dusty rose adds a delicate floral touch without making the blanket overly bright.
Color D – Soft Champagne Gold
A light golden beige, similar to pale wheat or warm sand.
This shade brings warmth to the palette and complements the sage and pink.
Recommended Color Sequence
For this four-color adaptation, alternate the colors in the following order:
Sage Green → Ivory → Dusty Rose → Champagne Gold → Repeat
Each new pattern row uses the next color.
The blocks will gradually form a soft, staggered arrangement across the blanket.
For a slightly more random appearance, you can occasionally change the color order, but keep the stitch pattern unchanged.
How Much Yarn Will You Need?
The amount of yarn depends on your gauge, blanket dimensions, hook size, and yarn choice.
For planning a medium-sized throw, you might begin with approximately 2,000–2,600 yards of medium-weight yarn distributed across the four colors, then verify your actual needs using a sample.
This is a preliminary purchasing estimate, not a measured yardage for a tested sample.
The interlocking texture can use more yarn than a simple open granny stitch because many double crochet stitches extend down into earlier rows.
A Better Way to Estimate Yarn
- Crochet a sample measuring at least 8 × 8 inches.
- Use all four colors in the same sequence planned for your blanket.
- Weigh the completed sample.
- Calculate the area of the desired blanket.
- Divide that area by the sample area.
- Multiply the result by the sample weight.
- Add extra yarn for your border and a safety margin.
This method is especially helpful when using yarn from your stash.
Crochet Abbreviations
All instructions are written in US crochet terminology.
- Ch: Chain
- Sc: Single crochet
- Hdc: Half double crochet
- Dc: Double crochet
- Sl st: Slip stitch
- St: Stitch
- Sk: Skip
- Rep: Repeat
- RS: Right side
- WS: Wrong side
- Long dc: Long double crochet worked into a stitch two rows below
- Long hdc: Long half double crochet worked into a lower row
Understanding the Interlocking Block Stitch
Before beginning the blanket, it’s important to understand what makes this stitch special.
A regular double crochet stitch is generally worked into the top of a stitch or into a chain space in the previous row.
The interlocking block stitch is different.
Some of the double crochet stitches are worked down into the stitches two rows below, passing in front of the chain spaces from the intervening row.
These elongated double crochet stitches create the interlocking appearance.
The fabric is built from alternating groups of:
- Three double crochet stitches
- Three chain stitches
- Three elongated double crochet stitches worked into an earlier row
As each new row is completed, the stitches fit into the openings created by previous rows.
Instead of forming open holes, the new stitches fill the spaces and create small blocks of interwoven-looking color.
What Is a Long Double Crochet?
A long double crochet is worked like a regular double crochet, but its insertion point is lower in the fabric.
To make one:
- Yarn over.
- Locate the correct stitch two rows below the current working row.
- Insert your hook into that stitch, working in front of the intervening chain space.
- Yarn over and draw up a long loop to the height of your current row.
- Yarn over and pull through two loops.
- Yarn over and pull through the remaining two loops.
The result is an elongated double crochet that reaches down into the earlier row.
Important: Do not pull the stitch too tightly. It should reach comfortably to the top of the current row without bunching the fabric.
Blanket Size Options
You can customize the blanket by changing the foundation chain.
The pattern uses a foundation-chain multiple of 6 + 5.
Here are several valid starting chains to consider:
| Blanket Style | Starting Chain |
|---|---|
| Small practice blanket | 95 |
| Baby blanket starting point | 113 |
| Lap blanket starting point | 149 |
| Medium throw starting point | 185 |
| Large throw starting point | 221 |
These chain counts establish the stitch pattern correctly; they are not exact finished-width measurements.
Your actual width will depend on yarn thickness, hook size, and gauge.
For this project, we’ll use 185 starting chains, then work until the blanket reaches the desired length.
Before committing to the full blanket, make a sample to confirm the fabric width.
Step-by-Step Interlocking Block Stitch Blanket Pattern
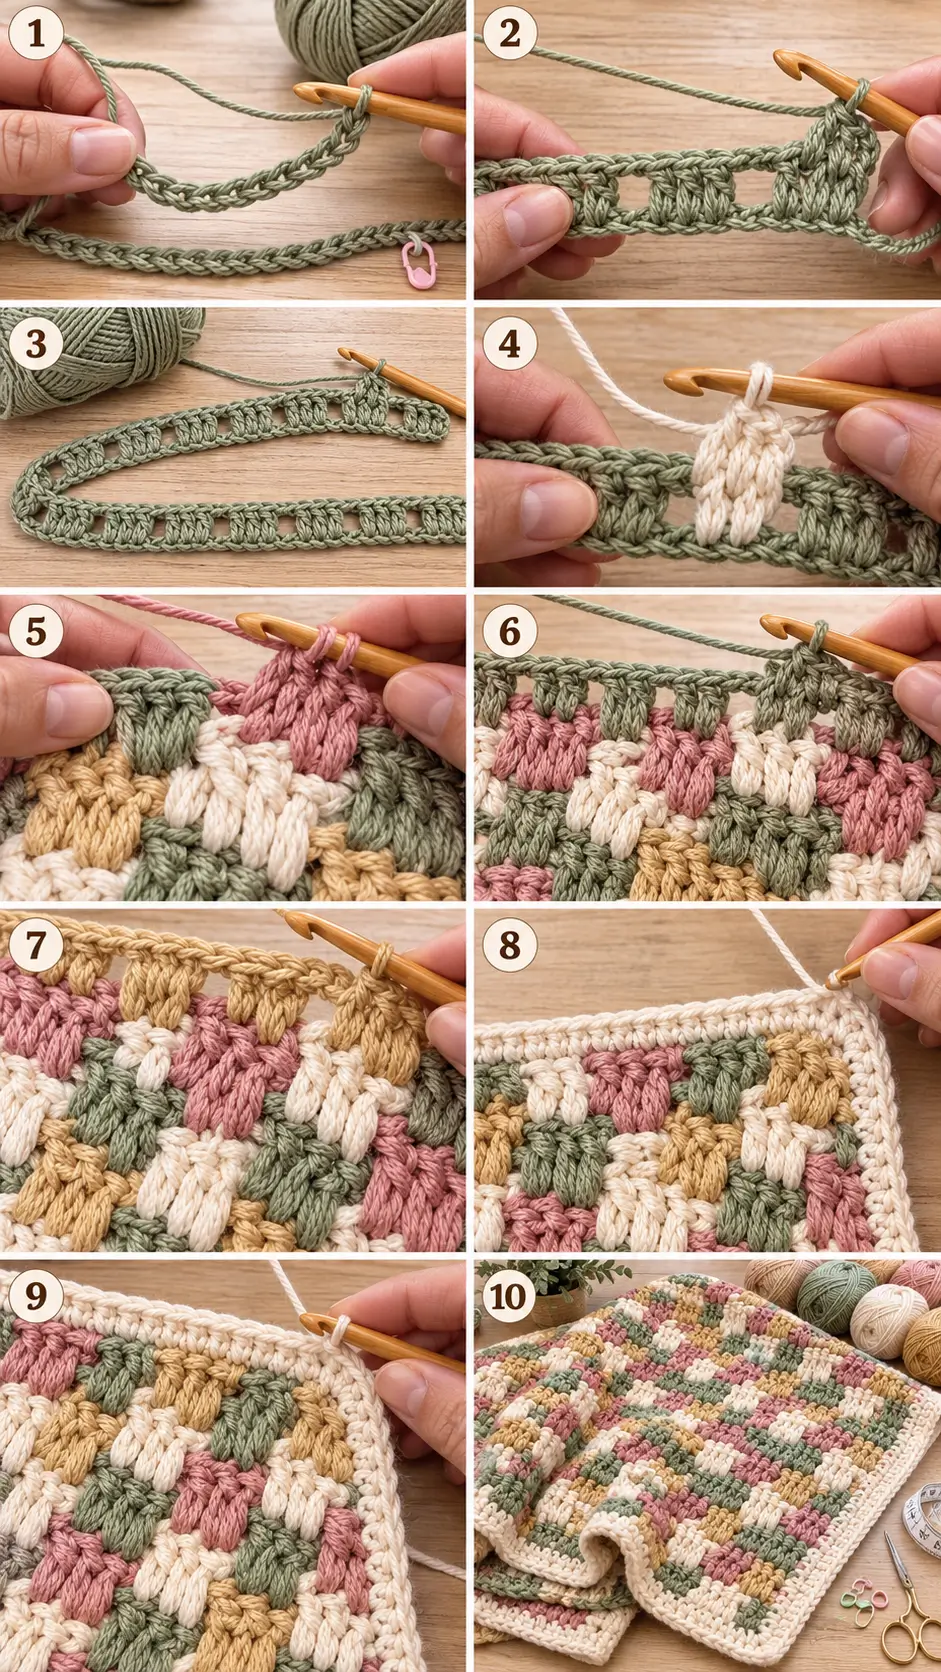
Step 1: Create the Foundation Chain
Using Color A (sage green) and your 5.5 mm crochet hook:
Chain 185.
Keep the chains relaxed and even.
Try not to make the foundation chain excessively tight because this can cause the lower edge of the blanket to pull inward.
If you tend to crochet tightly, you may prefer to use a slightly larger hook for the foundation chain and then switch back to your regular hook.
After making the foundation chain, lay it flat on your work surface and check that it isn’t twisted.
Step 2: Crochet the Foundation Row
Row 1 – Sage Green
- Work one double crochet in the fourth chain from your hook.
- Work one double crochet in the next chain.
The three skipped beginning chains count as the first double crochet, so you have three double crochet stitches at the beginning of the row.
- Chain 3.
- Skip the next 3 foundation chains.
- Work one double crochet in each of the next 3 chains.
- Repeat Steps 3–5 across the entire row.
Your foundation row should alternate between groups of three double crochet stitches and chain-3 openings.
The row begins and ends with a group of three double crochet stitches.
With a starting chain of 185, you should have 31 groups of three double crochets separated by 30 chain-3 spaces.
This creates the structure needed for the interlocking stitch.
Step 3: Work the Second Row
Row 2 – Creamy Ivory
Change to ivory yarn at the end of Row 1 and turn your work.
The second row begins the interlocking effect.
- Chain 3.
- Skip the first group of 3 double crochet stitches from the previous row.
- Look through the first chain-3 opening and locate the three foundation chains beneath it.
- Work one long double crochet into each of those three foundation chains.
- Chain 3.
- Skip the next group of three double crochet stitches.
- Work three long double crochets into the three foundation stitches beneath the next chain-3 opening.
- Continue this sequence across the row.
When you reach the final group of three double crochets, chain 2 and slip stitch into the top of the beginning chain-3 at the far edge.
Your new ivory stitches should occupy the openings between the sage-green blocks.
Tip: The elongated stitches should pass in front of the previous row’s chain spaces, not through the chain stitches themselves.
You should now see the beginning of the distinctive overlapping block texture.
Step 4: Work the Third Row
Row 3 – Dusty Rose
Change to dusty rose yarn and turn.
This row creates another staggered set of blocks.
- Chain 3. This counts as the first double crochet.
- Work a long double crochet into each of the next two sage-green double crochet stitches located two rows below, working in front of the ivory chain space.
- Chain 3.
- Skip the next group of three ivory double crochet stitches.
- Work three long double crochets into the three sage-green stitches two rows below the next chain-3 opening.
- Repeat the chain-3, skip-3, long-double-crochet sequence across the row.
The final stitches should complete the last three-stitch block at the edge.
You now have three colorful rows of interlocking crochet blocks.
Notice how the dusty rose stitches visually overlap the sage and ivory sections.
The fabric should begin to resemble a woven mosaic.
Step 5: Work the Fourth Row
Row 4 – Champagne Gold
Change to champagne gold and turn.
This row follows the same structure as Row 2.
- Chain 3.
- Skip the first group of three stitches.
- Work three long double crochets into the appropriate three stitches two rows below, through the chain-space opening.
- Chain 3.
- Skip the next group of three double crochet stitches.
- Repeat across the row.
- Finish with chain 2 and a slip stitch into the top of the beginning chain-3 at the opposite edge.
The soft gold stitches will fill the remaining gaps, adding more depth to the woven-looking texture.
At this point, you should clearly see the interlocking pattern.
Step 6: Continue the Two-Row Repeat
Once you’ve finished Row 4, the main blanket becomes much easier.
Continue alternating the two established row types:
- Odd-numbered pattern rows follow the structure of Row 3.
- Even-numbered pattern rows follow the structure of Row 4.
Continue rotating the yarn colors:
| Row | Color | Instructions |
|---|---|---|
| 1 | Sage Green | Foundation row |
| 2 | Ivory | Interlocking Row 2 |
| 3 | Dusty Rose | Interlocking Row 3 |
| 4 | Champagne Gold | Interlocking Row 4 |
| 5 | Sage Green | Repeat Row 3 |
| 6 | Ivory | Repeat Row 4 |
| 7 | Dusty Rose | Repeat Row 3 |
| 8 | Champagne Gold | Repeat Row 4 |
| 9 | Sage Green | Repeat Row 3 |
| 10 | Ivory | Repeat Row 4 |
Continue this sequence for the rest of the blanket.
Each row adds another layer of interlocking colored blocks.
The finished texture should appear dense, tidy, and beautifully coordinated.
Important Stitch Placement Reminder
Every elongated double crochet must be placed into the correct stitch two rows below.
The hook passes in front of the chain space from the intervening row.
Do not simply place the stitches into the chain-3 spaces, as that creates a different stitch pattern.
If the blocks begin to look uneven, stop and inspect the placement before continuing.
Step 7: Managing Four Yarn Colors
One of the advantages of the interlocking block stitch is that it can be worked with multiple colors without creating separate motifs.
For this version, use four colors in rotation.
You have two main options.
Option 1: Carry the Yarn Along the Side
Leave unused colors attached and carry them loosely up the blanket edge until needed again.
Because this version uses four colors, the carried strands may span several rows.
Keep the strands relaxed so they don’t pull the side edge inward.
Later, you can cover the carried yarn with a sufficiently wide border.
Avoid long, loose floats that could catch during use.
Option 2: Cut the Yarn at Every Change
Fasten off each color at the end of its row and join the next shade.
This produces more yarn tails to weave in but gives you more control over the blanket edges.
If you choose this method, leave generous yarn tails and weave them securely into the finished fabric.
For a blanket intended for frequent washing, secure every end carefully.
Step 8: Continue Until the Blanket Reaches Your Desired Length
Repeat the stitch pattern until your blanket approaches its intended finished length.
For a medium throw, you might aim for approximately 58–59 inches of patterned fabric before adding the border.
Measure the blanket occasionally rather than relying on a specific row count.
Crocheters naturally work at different tensions, so the exact number of rows needed will vary.
As your blanket grows, the four colors will create a delicate staggered plaid effect.
The fabric should remain relatively flat, without excessive holes between the stitch groups.
If your edges begin to narrow, check that you’re keeping the correct stitch groups at the beginning and end of each row.
Step 9: Crochet the Final Leveling Row
The final row closes the open spaces along the top of the blanket.
Finish your main stitch repeat after a Row 3-type row, so the last open spaces can be filled cleanly.
For a coordinated finish, use sage green.
Final Row
- Turn and chain 1.
- Work one half double crochet into each of the first three top stitches, counting the edge turning-chain stitch as the third stitch where applicable.
- Over the next chain-3 gap, work three long double crochet stitches into the corresponding stitches two rows below.
- Work one half double crochet into each of the next three top stitches.
- Repeat the alternating groups of three long double crochets and three half double crochets across the row.
Your top edge should now be filled and reasonably straight, without the large openings created by the chain-3 spaces.
This creates a stable edge for the blanket border.
Step 10: Add a Simple Crochet Border
A simple border is the perfect finishing touch for this highly textured blanket.
Because the main stitch pattern is already quite decorative, an understated edging works beautifully.
Use sage green or creamy ivory for the border.
Border Round 1 – Single Crochet
With your border color attached:
- Chain 1.
- Work single crochet stitches evenly along the top edge.
- At the first corner, work 3 single crochet stitches into the corner.
- Continue working single crochet stitches along the first side edge.
- Distribute your stitches evenly around the ends of the rows.
- Work 3 single crochet stitches into the next corner.
- Continue along the foundation edge.
- Work 3 single crochet stitches into the next corner.
- Crochet evenly up the remaining side.
- Work 3 single crochet stitches into the final corner.
- Join to the first single crochet with a slip stitch.
Your goal is a neat, flat border without puckering or rippling.
Border Round 2 – Clean Finished Edge
Chain 1.
Work one single crochet in each stitch around the blanket.
At each corner, work three single crochet stitches into the center corner stitch.
Continue around and join with a slip stitch.
Fasten off and weave in the yarn.
Optional Third Round
If you prefer a slightly thicker border, add one more round of single crochet.
Cream-colored edging gives the blanket a delicate vintage appearance, while sage green creates a more understated, coordinated finish.
Step 11: Weave In All Ends
Use a tapestry needle to weave the loose yarn ends into the surrounding stitches.
Because this pattern uses several colors, you may have a considerable number of ends to secure.
Try to weave each tail through several nearby stitches, changing direction to reduce the risk of unraveling.
Avoid pulling the yarn so tightly that it distorts the fabric.
Trim excess yarn only after the ends are securely woven in.
Step 12: Block and Finish Your Blanket
Blocking can help straighten the edges and improve the appearance of the interlocking stitches.
First, check the care instructions for your yarn.
If appropriate for the fiber, gently wash or dampen the blanket.
Lay it flat on clean towels or blocking mats.
Carefully shape the edges and corners until the blanket lies evenly.
Allow it to dry completely.
Avoid aggressive stretching, as this can distort the carefully aligned interlocking blocks.
Your cozy vintage-inspired blanket is now finished!
Tips for Perfect Interlocking Block Stitches
Keep the Long Double Crochets Relaxed
The elongated stitches must reach down into the earlier row without pulling the fabric upward.
If they’re too tight, the blanket may begin to bunch.
If they’re too loose, the stitches may look uneven.
Aim for comfortable, consistent tension.
Count the Three-Stitch Groups
Each block should contain three stitches.
Missing or adding stitches can affect the staggered pattern.
Check your work at the end of every row.
Watch the Chain-3 Spaces
The chain spaces are essential to the interlocking construction.
They provide room for the longer stitches in later rows.
Don’t Confuse This With Ordinary Block Stitch
Although the names sound similar, the interlocking block stitch uses longer double crochet stitches worked into earlier rows.
These create the distinctive overlapping texture shown in the photo.
Ordinary block stitch is constructed differently and will not produce the same appearance.
Choose Smooth Yarn
Smooth, medium-weight yarn helps the interlocking blocks remain clearly defined.
Very fuzzy yarn can obscure the stitch texture.
Use a Coordinated Palette
The combination of muted sage green, dusty rose, warm ivory, and soft champagne gold creates a gentle vintage appearance.
Using four colors with similar softness and saturation helps the pattern look balanced.
Easy Ways to Customize Your Blanket
Make a Baby Blanket
Choose a smaller foundation chain and work fewer rows.
Soft sage, cream, and dusty pink create a lovely pastel-inspired baby blanket.
For baby use, secure all yarn ends carefully, avoid loose decorative attachments, and follow current safe-sleep guidance.
Create a Larger Sofa Throw
Start with a longer foundation chain using the 6 + 5 formula.
Continue the rows until the blanket is long enough to cover your sofa comfortably.
Try a Three-Color Version
For a more traditional plaid effect, use just three colors.
The interlocking stitch looks particularly attractive with a repeating three-color sequence.
Make a Modern Neutral Blanket
Use oatmeal, cream, warm taupe, and soft brown.
This creates a more understated design that works beautifully in neutral bedrooms and living rooms.
Try a Bold Autumn Palette
Replace the pastel shades with rust orange, mustard yellow, chocolate brown, and olive green.
The result is a rich, cozy blanket perfect for fall decorating.
Frequently Asked Questions
Is the interlocking block stitch suitable for beginners?
It’s best for confident beginners who already know how to make chains, double crochet stitches, and basic color changes.
The stitch becomes easier after you’ve completed the first few rows.
Is interlocking block stitch the same as plaid stitch?
Yes, these terms are often used for the same crochet technique.
The staggered long double crochet stitches create the characteristic plaid-like appearance.
Does this stitch make a warm blanket?
Yes. The interlocking blocks create a relatively substantial fabric that works well for blankets and throws.
The exact warmth depends on your yarn fiber, weight, and crochet tension.
Can I use different colors?
Absolutely.
The stitch works with two colors, three colors, four colors, or many more.
The number of colors affects the appearance of the repeating blocks, but it does not change the fundamental stitch construction.
Can I use cotton yarn?
Yes. Cotton can produce beautiful stitch definition.
However, a large cotton blanket may be heavier than one made with acrylic or wool blends.
Does the blanket look good on both sides?
Yes. The interlocking block stitch creates an attractive, fairly reversible texture.
Small differences may be visible depending on how you work your color changes.
How do I prevent crooked edges?
Pay attention to the beginning and ending stitches, count the blocks regularly, and maintain even tension.
A simple single crochet border can help neaten minor edge irregularities.
Can I make this blanket without a border?
Yes, although the border helps conceal carried yarn and creates a cleaner overall finish.
More Beautiful Crochet Blanket Ideas to Try
If you love the textured appearance of this blanket, explore these projects next:
- Cozy granny square crochet blanket
- Easy waffle stitch crochet blanket
- Beautiful alpine stitch blanket
- Beginner-friendly moss stitch blanket
- Colorful scrap yarn crochet throw
- Soft textured baby blanket
- Classic crochet granny stripe blanket
You can also explore different yarn combinations to see how much the same crochet stitch can change in appearance.
Final Thoughts
The interlocking block stitch is one of those wonderful crochet techniques that turns basic stitches into something truly special.
The combination of elongated double crochet stitches, neatly staggered blocks, and softly coordinated colors creates a blanket with the look of woven fabric and the beautiful character of handmade crochet.
With sage green, dusty rose, creamy ivory, and champagne gold, this version feels gentle, timeless, and wonderfully cozy.
Whether you’re making it for your home, creating a special gift, or simply exploring a beautiful new crochet stitch, the finished blanket is sure to become a favorite handmade piece.
Take your time with the first few rows, enjoy watching the blocks interlock, and have fun seeing your colorful blanket grow.