Beautiful Raised Wave Crochet Dishcloth Pattern – Free Textured Cotton Washcloth
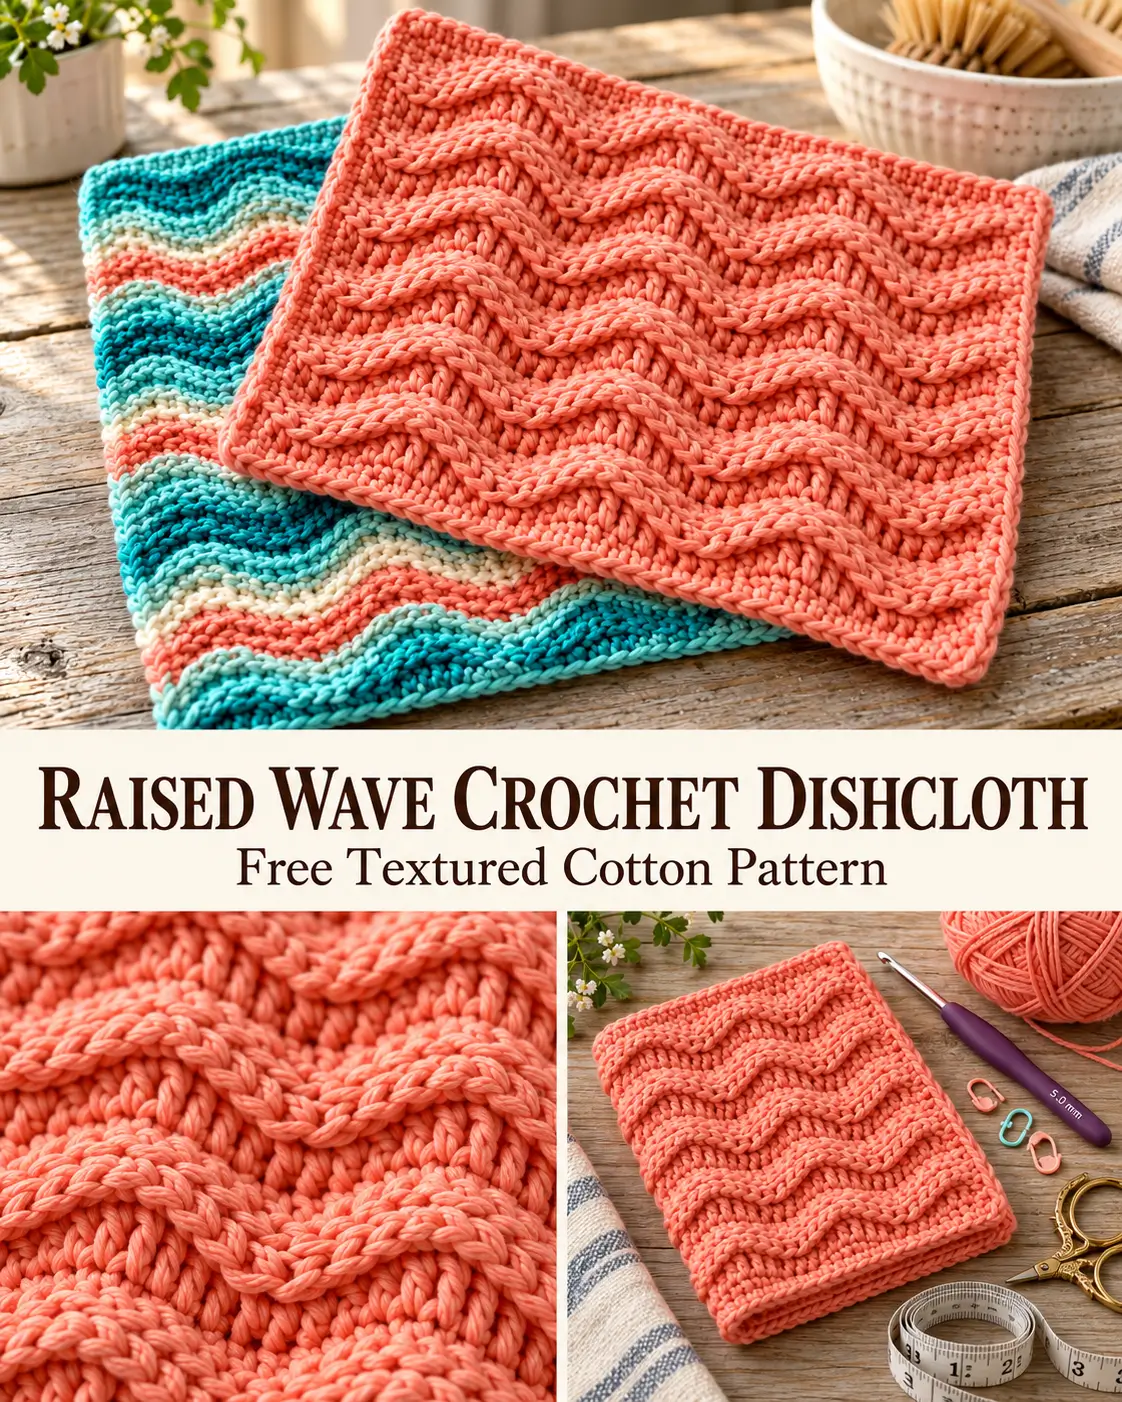
If you love crochet patterns that look intricate but use familiar stitches, this beautiful raised wave crochet dishcloth is a lovely project to try. Its rippling texture adds a decorative touch to an everyday kitchen essential, turning a simple cotton washcloth into something special.
The design combines short and tall crochet stitches to create repeating waves across the fabric. Raised ridges add definition between the waves, giving the dishcloth a textured finish that looks attractive in both solid and multicolored yarn.
Soft coral, peach, and pink shades create a warm, delicate appearance, while variegated combinations of teal, turquoise, coral, and cream make the pattern look especially interesting.
Best of all, the design is worked in rows using a repeating stitch sequence. Once you understand how the waves are formed, you can continue crocheting until your dishcloth reaches your preferred size.
Whether you’re making practical kitchen accessories, handmade housewarming gifts, or reusable cotton washcloths, this textured pattern is a useful addition to your crochet collection.
Why You’ll Love This Crochet Dishcloth
This pattern combines decorative texture with everyday practicality.
- Beautiful wave texture: Alternating stitch heights create repeating raised and recessed areas.
- Practical cotton fabric: Cotton yarn is absorbent and suitable for reusable kitchen cloths.
- Simple construction: The entire dishcloth is worked flat in turned rows.
- Easy to customize: Make a smaller washcloth or a larger kitchen cloth by adjusting the foundation chain.
- Great for handmade gifts: A few coordinating dishcloths make a thoughtful addition to a housewarming basket.
- Colorful possibilities: Use solid cotton yarn for subtle texture or variegated yarn to emphasize the pattern.
The design is especially satisfying because the wave pattern becomes more visible as additional rows are completed.
Raised Wave Crochet Dishcloth Pattern Details
Skill level: Adventurous beginner to intermediate
Crochet terminology: US terms
Finished size: Approximately 8–9 inches wide, with the length adjusted to make a square
Yarn weight: Medium weight (#4) cotton yarn
Recommended hook: 5.0 mm (H/8)
Construction: Worked flat in rows
Stitch pattern: Four-row repeating sequence
Foundation: Chain 35
Stitches per row: 34
Special techniques: Alternating stitch heights and back-loop-only crochet
The finished dimensions will vary depending on your yarn, hook size, and tension. Because dishcloth gauge is flexible, measuring your work is more useful than trying to match an exact row gauge.
Materials You’ll Need
Gather the following supplies before beginning:
- Approximately 100–130 yards of worsted-weight, 100% cotton yarn, allowing extra for an optional border
- 5.0 mm crochet hook
- Scissors
- Yarn needle for weaving in ends
- Measuring tape
- Optional stitch markers
Choosing the Best Yarn
For kitchen dishcloths, 100% cotton yarn is an excellent choice because it absorbs water and is generally durable through repeated washing.
Medium-weight cotton provides enough structure to show off the raised texture without making the dishcloth excessively bulky.
For a soft, delicate appearance, choose a solid coral, dusty pink, peach, or cream.
For something more colorful, try cotton yarn that transitions between turquoise, teal, coral, and pale blue. Variegated shades can make the repeating waves particularly eye-catching.
Avoid very fuzzy yarns because they can obscure the stitch definition.
Crochet Abbreviations (US Terms)
| Abbreviation | Meaning |
|---|---|
| ch | Chain |
| sl st | Slip stitch |
| sc | Single crochet |
| hdc | Half double crochet |
| dc | Double crochet |
| tr | Treble crochet |
| st / sts | Stitch / stitches |
| BLO | Back loop only |
| RS | Right side |
| WS | Wrong side |
| rep | Repeat |
Basic Stitches Used
Slip stitch (sl st): Insert your hook into the indicated stitch, yarn over, and pull through both the stitch and the loop already on your hook.
Single crochet (sc): Insert hook into stitch, yarn over and pull up a loop. Yarn over and pull through both loops.
Half double crochet (hdc): Yarn over, insert hook into stitch, yarn over and pull up a loop. Yarn over and pull through all three loops.
Double crochet (dc): Yarn over, insert hook into stitch, yarn over and pull up a loop. Yarn over and pull through two loops twice.
Treble crochet (tr): Yarn over twice, insert hook into stitch, yarn over and pull up a loop. Yarn over and pull through two loops three times.
Back loop only (BLO): Instead of inserting your hook beneath both top loops of the stitch, work through the loop farthest from you.
Working into the back loop leaves the front loop unworked, creating a visible ridge across the fabric.
Understanding the Raised Wave Stitch
The defining feature of this pattern is its changing stitch height.
Rather than using the same stitch across an entire row, the wave sections combine slip stitches, single crochet, half double crochet, double crochet, and treble crochet.
The shorter stitches form lower sections, while the taller stitches create elevated sections.
A following row of single crochet provides stability and creates an additional ridge by working through the back loops.
The next wave row reverses the arrangement of the tall and short stitches, creating a contrasting rise-and-fall effect.
Together, these rows give the fabric a repeating textured appearance.
Important Pattern Notes
Before starting, remember these details:
- The turning chain 1 does not count as a stitch.
- Every completed row contains 34 stitches.
- Each eight-stitch wave sequence is repeated four times.
- One single crochet is worked at each edge to help stabilize the sides.
- Slip stitches count as stitches, even though they are shorter than the others.
- Work the slip stitches loosely enough that you can insert your hook into them on the following row.
- Unless BLO is specified, work under both top loops of the indicated stitch.
- Turn your work after every row.
Maintaining the correct number of stitches is important because it keeps the waves aligned.
Step-by-Step Instructions
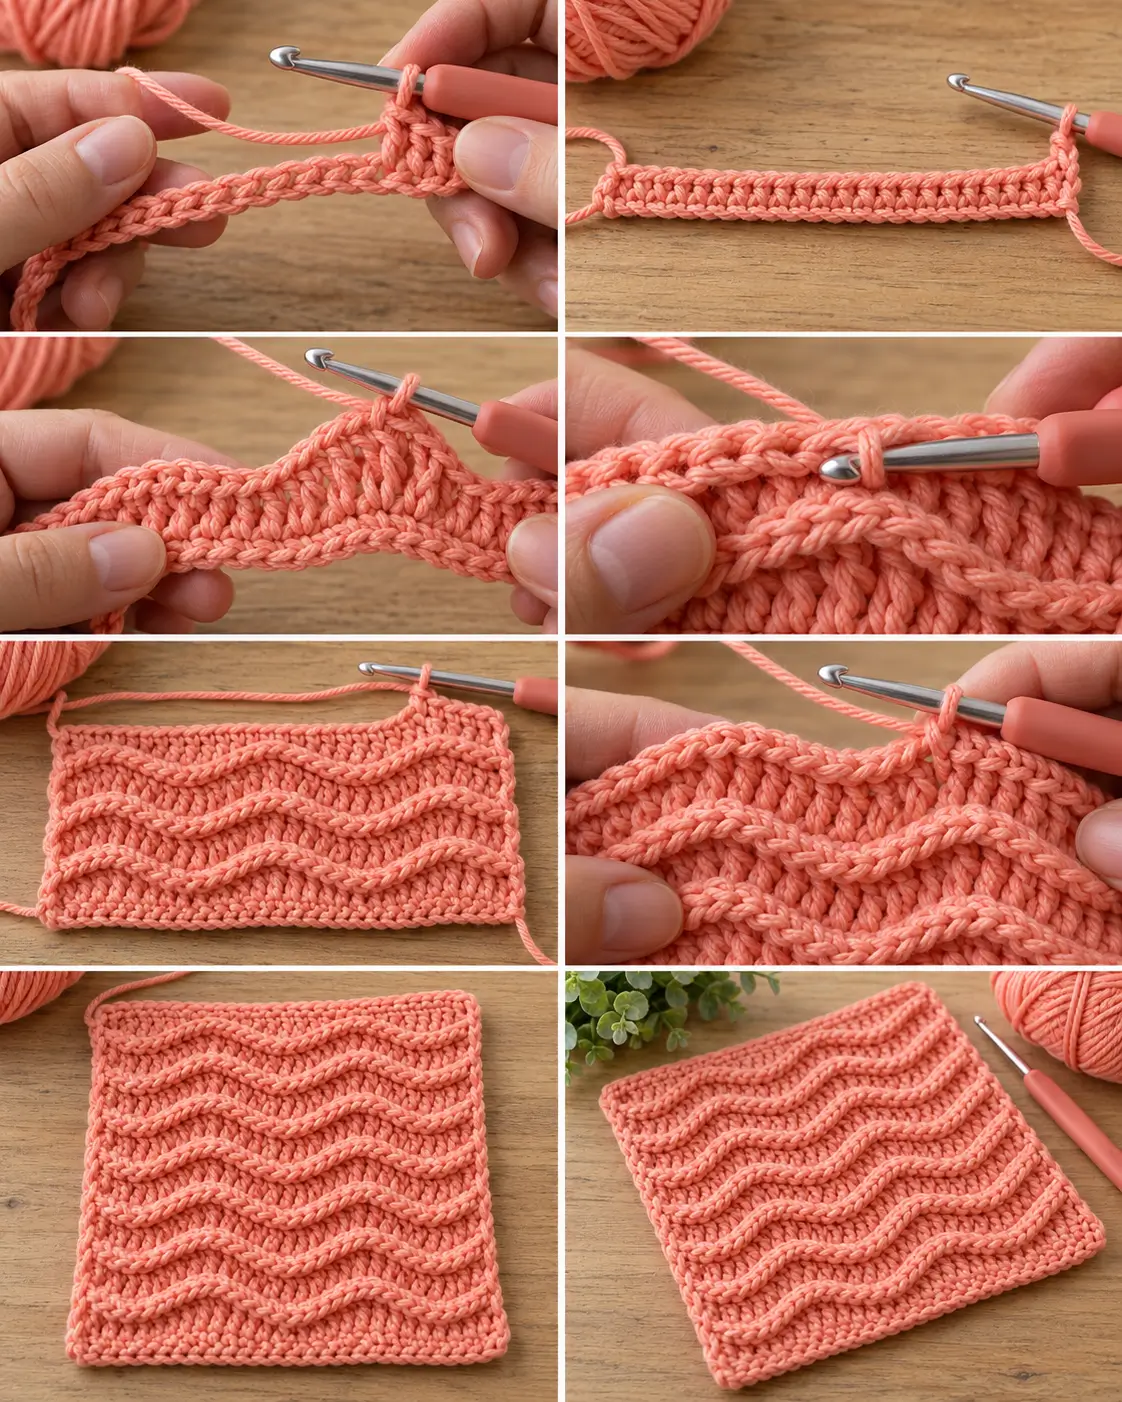
Step 1: Create the Foundation Chain
Using your chosen cotton yarn and a 5.0 mm crochet hook:
Chain 35.
Make the foundation chain with relaxed tension. A chain that is too tight may cause the bottom edge of your dishcloth to pull inward.
Do not count the loop currently on your hook as a chain stitch.
You are now ready to create the first row.
Step 2: Crochet the Foundation Row
Row 1 – Single Crochet Foundation
Work 1 sc into the second chain from your hook.
Continue working 1 sc into each remaining chain across the foundation.
At the end of the row, turn your work.
Stitch count: 34 sc.
This first row creates a stable foundation for the wave pattern.
Check that you have exactly 34 stitches before continuing.
Step 3: Crochet the First Wave Row
Row 2 – First Wave Sequence (WS)
Chain 1.
Work 1 sc into the first stitch.
Now work the following eight-stitch sequence:
- Slip stitch in the next stitch.
- Single crochet in the next stitch.
- Half double crochet in the next stitch.
- Double crochet in the next stitch.
- Treble crochet in the next stitch.
- Double crochet in the next stitch.
- Half double crochet in the next stitch.
- Single crochet in the next stitch.
Repeat this eight-stitch sequence four times in total.
Work 1 sc into the final stitch.
Turn your work.
Stitch count: 34 stitches.
What You Should Notice
Your row will contain repeating sections of increasing and decreasing stitch heights.
The treble crochet stitches form the highest points of the sequence, while the slip stitches sit at the lowest points.
Do not worry if the top edge appears slightly uneven. This is part of the way the wave texture develops.
The following rows help balance the different stitch heights.
Step 4: Add the First Raised Ridge
Row 3 – Back-Loop Single Crochet (RS)
Chain 1.
Work 1 sc through both loops of the first stitch.
Work 1 sc in the back loop only of each of the next 32 stitches.
Work 1 sc through both loops of the last stitch.
Turn your work.
Stitch count: 34 sc.
Why This Row Matters
The back-loop stitches create a subtle raised line because the unused front loops remain visible on the right side.
This gives the pattern an extra layer of texture rather than leaving the waves completely flat.
Keep your tension comfortable, especially when working into the shorter slip stitches from the previous row.
If a stitch is difficult to enter, gently loosen it with your hook rather than pulling tightly on the yarn.
Step 5: Crochet the Second Wave Row
Row 4 – Reversed Wave Sequence (WS)
Chain 1.
Work 1 sc into the first stitch.
Now work the following eight-stitch sequence:
- Treble crochet in the next stitch.
- Double crochet in the next stitch.
- Half double crochet in the next stitch.
- Single crochet in the next stitch.
- Slip stitch in the next stitch.
- Single crochet in the next stitch.
- Half double crochet in the next stitch.
- Double crochet in the next stitch.
Repeat this eight-stitch sequence four times in total.
Work 1 sc into the final stitch.
Turn your work.
Stitch count: 34 stitches.
How This Creates the Wave Effect
This row changes the placement of the tallest and shortest stitches.
Instead of repeating the same rise-and-fall arrangement, the stitch heights are shifted to create contrasting high and low sections.
As additional pattern repeats are worked, the alternating stitch heights create a rippled appearance across the fabric.
Try to keep your treble crochet stitches consistent in height so the texture remains balanced.
Step 6: Work the Second Raised Ridge
Row 5 – Back-Loop Single Crochet (RS)
Chain 1.
Work 1 sc through both loops of the first stitch.
Work 1 sc in the back loop only of each of the next 32 stitches.
Work 1 sc through both loops of the last stitch.
Turn your work.
Stitch count: 34 sc.
You have now completed the first full four-row pattern repeat.
At this stage, you should see the beginning of the alternating wave texture, along with visible ridges formed by the back-loop stitches.
Step 7: Continue the Wave Pattern
Repeat Rows 2–5, following the instructions in the same order.
The repeating sequence is:
Wave A → Back-loop single crochet → Wave B → Back-loop single crochet
Continue until the dishcloth reaches your desired length.
Begin checking the dimensions after approximately eight complete four-row repeats, including the first repeat.
If the cloth is not yet as tall as it is wide, continue adding complete repeats.
For the neatest finish, stop after completing a Row 5-style ridge row.
Stitch Count Check
Every row should contain:
1 edge stitch + 32 pattern stitches + 1 edge stitch = 34 stitches.
The wave section is made from four repeats of eight stitches:
4 × 8 = 32 pattern stitches.
If your count changes, inspect the slip stitches first. They are easy to overlook because they sit lower than the taller stitches.
Step 8: Check the Shape and Size
Lay the crochet dishcloth on a flat surface without stretching it.
Measure from side to side and from top to bottom.
For a square dishcloth, continue the pattern until the length approximately matches the width.
A little variation is perfectly acceptable for a handmade kitchen cloth.
If your finished project seems slightly narrower or wider than expected, remember that cotton yarns can behave differently depending on their thickness and your stitching tension.
The alternating tall and short stitches can also create gentle rippling before the fabric is washed and shaped.
Step 9: Add an Optional Crochet Border
You can leave the dishcloth without a border for a simple textured finish.
However, a single crochet border provides a neater edge and helps define its square shape.
Simple Single Crochet Border
After completing the final pattern row, do not fasten off.
Chain 1 and turn.
Work single crochet evenly around the entire dishcloth.
Along the top and bottom edges, work approximately one single crochet for each stitch.
Along the side edges, distribute stitches evenly into the ends of the rows. Taller wave rows may require two single crochets around their row ends, while shorter rows may need only one.
At each corner, work:
(1 sc, ch 1, 1 sc) into the corner stitch or corner space.
Continue around all four sides.
Join with a slip stitch to the first single crochet.
Check that the border lies flat.
If the edges begin to curl inward, you may need a few more stitches along the sides.
If the fabric becomes wavy or ruffled, too many border stitches may have been added.
You can work another round of single crochet if you prefer a slightly more substantial border, placing (sc, ch 1, sc) in each corner chain space.
Step 10: Fasten Off and Weave in Ends
Once you are satisfied with the dishcloth’s size and border:
- Cut the yarn, leaving a tail approximately 6 inches long.
- Pull the yarn tail through the final loop to secure it.
- Thread the tail onto a yarn needle.
- Weave the end back and forth through several stitches on the wrong side of the fabric.
- Change direction at least once to help secure the tail.
- Trim any remaining excess yarn.
Repeat for the starting yarn tail and any ends created by color changes.
Avoid cutting your yarn tails too close before weaving them in, especially when using cotton yarn.
Step 11: Wash and Shape Your Dishcloth
A gentle wash can help the stitches relax and settle into a more even shape.
Follow the washing instructions on your yarn label.
If needed, lightly dampen the finished dishcloth and lay it flat on a clean towel.
Gently straighten the corners and edges without pulling aggressively on the fabric.
Allow the cloth to dry fully before using or gifting it.
The raised texture should remain visible, although the amount of definition will depend on the yarn and your tension.
How to Adjust the Dishcloth Size
One of the benefits of this pattern is that you can change the width without changing the overall stitch arrangement.
The body requires a stitch count that is a multiple of eight plus two.
The additional two stitches provide one stable edge stitch on each side.
Because the first single crochet is worked into the second foundation chain, the foundation chain must contain one extra chain.
Suggested Foundation Chains
| Foundation chain | Row stitch count | Wave repeats |
|---|---|---|
| Chain 27 | 26 | 3 |
| Chain 35 | 34 | 4 |
| Chain 43 | 42 | 5 |
| Chain 51 | 50 | 6 |
For a smaller cloth, start with chain 27.
For a larger kitchen cloth, start with chain 43 or 51.
Repeat the wave sequence the appropriate number of times and keep one single crochet at each edge.
Adjust the number of four-row repeats to achieve your desired length.
Beautiful Color Ideas for This Pattern
The wave texture looks different depending on the yarn colors you choose.
1. Soft Coral Waves
Use a single shade of coral pink for the entire cloth.
This allows the stitch texture to become the main decorative feature. It creates a soft, modern appearance that works beautifully with neutral kitchen decor.
2. Coastal Teal and Coral
Choose variegated cotton yarn containing teal, aqua, coral, and cream.
The changing colors add movement to the waves and make each finished dishcloth unique.
3. Classic Cream Cotton
A natural cream or ivory-colored yarn gives the dishcloth a simple, farmhouse-inspired look.
This is a particularly attractive choice if you want to emphasize the stitch definition.
4. Two-Color Raised Waves
Try alternating two coordinating colors after complete four-row pattern repeats.
For example, work one repeat in coral and the next in soft aqua.
Change colors at the end of a completed ridge row to keep the stripes organized.
Remember to leave enough yarn for securely weaving in the color-change ends.
Helpful Tips for a Neat Raised Wave Dishcloth
Keep Your Slip Stitches Relaxed
Slip stitches are shorter and generally tighter than the other stitches in this pattern.
If you pull them too tightly, the following single crochet row can become difficult to work.
Use a gentle, consistent tension whenever you make a slip stitch.
Count the Stitches Regularly
The mixture of stitch heights makes it easy to accidentally skip a low stitch.
Count your stitches after each wave row, especially during the first few repeats.
Every row must maintain the same stitch count for the pattern to align correctly.
Use Cotton Yarn for Kitchen Projects
Acrylic yarn may produce attractive texture, but cotton is generally better suited for an absorbent dishcloth.
Choose a durable cotton yarn that can tolerate regular washing.
Do Not Pull the Treble Crochet Stitches Too Tight
The treble stitches are responsible for the taller portions of each wave.
If they are worked too tightly, the wave heights may be less noticeable.
Try to maintain an even stitch height throughout the project.
Give the Texture Time to Develop
The first few rows may not immediately resemble a finished wave pattern.
The alternating sections become more recognizable as you work additional repeats.
If your stitch count is correct and the fabric is lying reasonably flat, continue until several wave sections have formed before judging the finished texture.
Common Crochet Dishcloth Problems and Solutions
Why Are My Dishcloth Edges Uneven?
Slight movement along the edges can occur because the pattern includes stitches of different heights.
However, noticeably uneven sides may indicate accidental increases or decreases.
Make sure you’re working one single crochet at the beginning and end of every row and maintaining the correct total stitch count.
Adding a simple border can also improve the finished appearance.
Why Does My Fabric Look Too Tight?
You may be working the slip stitches too tightly or using a hook that is too small for your yarn.
Try loosening your tension slightly.
If necessary, experiment with a hook one size larger to produce more flexible fabric.
Why Are My Waves Not Very Visible?
Some yarns show texture more clearly than others.
Smooth, medium-weight cotton usually reveals stitch definition better than very fuzzy or loosely constructed yarn.
Your personal tension can also affect how pronounced the taller stitches appear.
Why Is My Dishcloth Curling?
Tight stitches, especially along the foundation chain or the shorter slip-stitch sections, can cause curling.
Make sure your foundation chain is relaxed and that you aren’t pulling the yarn too tightly.
A gentle wash and reshaping may help. If the fabric is severely distorted, adjust your tension before continuing.
Frequently Asked Questions
Is This Crochet Dishcloth Suitable for Beginners?
This is a good project for an adventurous beginner who already understands basic crochet stitches.
You will need to know how to make slip stitches, single crochet, half double crochet, double crochet, and treble crochet.
You will also practice working through the back loops.
Although the stitch combinations require some concentration initially, the four-row repeat becomes easier to remember with practice.
Can I Use This Pattern to Make a Washcloth?
Yes. The same stitch pattern can be used for a bathroom washcloth.
Choose soft cotton yarn, especially if the cloth will be used against the skin.
You can adjust the finished dimensions to suit your needs.
How Much Yarn Do I Need?
Approximately 100–130 yards of worsted-weight cotton is a useful starting allowance for a dishcloth of this general size, including an optional border.
Actual yarn consumption will depend on your gauge, finished dimensions, and edging.
Larger dishcloths or tighter stitching may require additional yarn.
Can I Make This Pattern With Different Yarn Weights?
Yes, but the finished size and texture will change.
A thinner yarn will generally produce a smaller, lighter fabric when used with a suitable hook.
A thicker yarn creates larger stitches and a more substantial texture.
For a practical kitchen dishcloth, medium-weight cotton provides a good balance between absorbency, structure, and flexibility.
Can I Make a Matching Dish Towel?
Yes. Increase the number of foundation stitches using the multiple-of-eight-plus-two formula.
Then continue repeating the four-row pattern until your towel reaches the desired length.
For a larger project, choose a cotton yarn that maintains its shape well after washing.
How Should I Care for My Crochet Dishcloth?
Follow the washing and drying recommendations on your yarn label.
Many kitchen cotton yarns can be machine-washed, although care requirements vary.
Allow the dishcloth to dry thoroughly between uses.
Washing regularly and avoiding prolonged damp storage will help keep handmade kitchen cloths fresh.
More Creative Ways to Use the Raised Wave Stitch
Once you’ve become comfortable with the repeating wave texture, you can experiment with it in other rectangular crochet projects.
A wider version could make an attractive textured hand towel, while a smaller square could be used as a reusable cleaning cloth.
You could also adapt the stitch pattern into a decorative placemat or a rectangular table accessory.
For an even larger project, consider using the repeating waves in a cotton lap blanket or lightweight throw, adjusting the stitch count and testing a swatch before committing to the full size.
The textured design also makes a lovely coordinated gift set when crocheted in several complementary shades.
Final Thoughts
A handmade crochet dishcloth doesn’t have to be plain to be practical.
This raised wave crochet dishcloth combines familiar stitches with an interesting repeating texture, creating a reusable cotton cloth that looks as attractive as it is useful.
The alternating stitch heights add movement to the fabric, while the back-loop ridges introduce another layer of detail.
Whether you prefer a simple solid coral shade or a colorful combination of teal, aqua, and peach, this pattern offers plenty of room for creativity.
Once you’ve mastered the four-row repeat, you can adjust the size, experiment with different cotton yarns, and create matching pieces for your kitchen or handmade gift collection.
Pick your favorite cotton yarn, grab your crochet hook, and enjoy making a beautiful textured dishcloth one wave at a time!