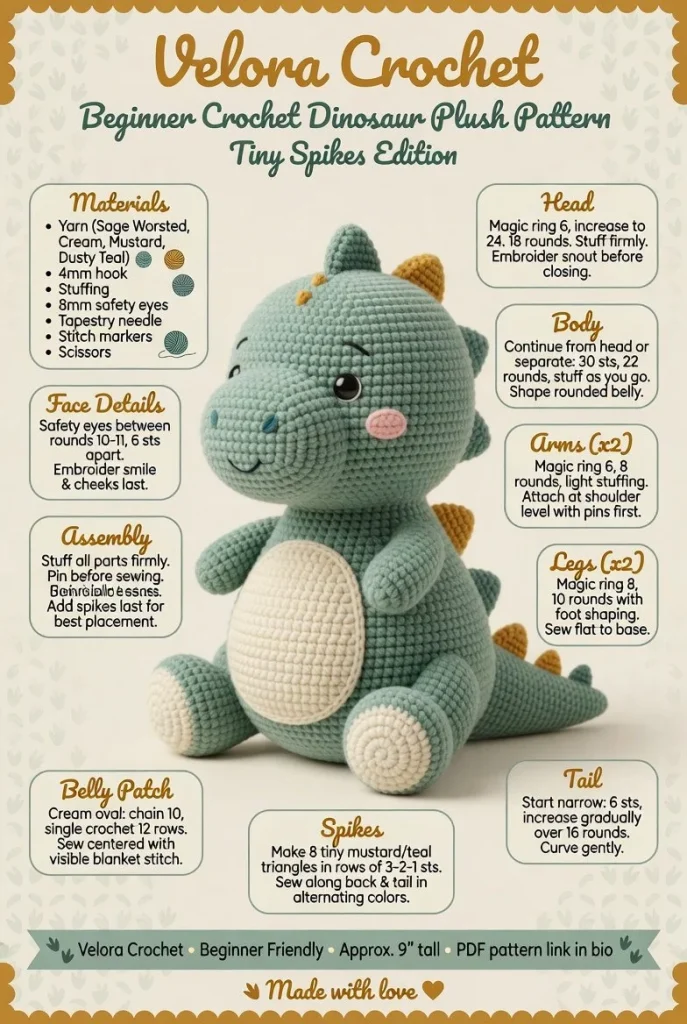
Looking to add a playful charm to your crochet collection? This adorable crochet dinosaur plush pattern is perfect for beginners and sure to delight both children and plushie collectors alike. Featuring a rounded body, tiny spikes, and a friendly face, this little dinosaur is an enjoyable project that adds a touch of whimsy to anyone’s handmade crochet collection.
Materials
To create your friendly dinosaur plush, you will need the following materials:
- 1 skein of worsted weight yarn (in green or color of your choice)
- 1 skein of worsted weight yarn (for belly patch, in a contrasting color)
- 4mm crochet hook
- Polyfill stuffing
- Yarn needle
- Stitch marker
- Safety eyes or black yarn for the eyes
- Scissors
Abbreviations
Familiarize yourself with these crochet abbreviations that will help you navigate the pattern:
- MR: magic ring
- ch: chain
- sc: single crochet
- hdc: half double crochet
- dc: double crochet
- inc: increase
- dec: decrease
- sl st: slip stitch
Instructions
Head
- Start with a magic ring (MR), and ch 1.
- Round 1: 6 sc in MR (6)
- Round 2: Inc in each stitch around (12)
- Round 3: 1 sc, inc repeat around (18)
- Rounds 4-6: Sc in each stitch around (18)
- Attach safety eyes or embroider eyes as desired.
- Fasten off and leave a long tail for sewing.
Body
- Start with a MR and ch 1.
- Round 1: 6 sc in MR (6)
- Round 2: Inc in each stitch around (12)
- Round 3: 1 sc, inc repeat around (18)
- Round 4: 2 sc, inc repeat around (24)
- Rounds 5-8: Sc in each stitch around (24)
- Begin to stuff the body lightly.
Arms
Make 2:
- Using your yarn, ch 2.
- Round 1: 6 sc in 2nd ch from hook (6)
- Rounds 2-4: Sc in each stitch around (6)
- Leave a long tail for sewing.
Legs
Make 2:
- Start with a ch of 2.
- Round 1: 6 sc in 2nd ch from hook (6)
- Rounds 2-3: Sc in each stitch around (6)
- Leave a long tail for sewing.
Tail
- Ch 15.
- Row 1: Starting from 2nd ch from hook, hdc in each ch (14)
- Fasten off, leaving a long tail for sewing.
Spikes
Make 5:
- Ch 3, and in the 2nd ch from the hook, make 2 sc.
- Turn and sc in the 3rd ch (2).
- Fasten off, leaving long tails for sewing.
Belly Patch
- With the contrasting yarn, ch 6.
- Row 1: Sc in 2nd ch from hook and next 4 ch (5)
- Row 2: Ch 1, turn. Sc across (5)
- Leave a long tail for sewing.
Face Details
Embellish the face with a smile using black yarn or embroidery. You can also add blushing cheeks using fabric paint for a special touch!
Assembly and Finishing
- Attach the belly patch to the body using the yarn needle.
- Sew the head onto the body, ensuring it is centered.
- Securely sew on the arms and legs in desired positions.
- Attach the tail to the back of the body.
- Position the spikes down the back, sewing each securely in place.
- Weave in any loose ends.
Tips for the Best Result
- Be careful not to overstuff your plushie to maintain its cuddly shape.
- Use stitch markers to keep track of your place in rounds, especially if you’re new to crochet.
- For a smoother finish, consider lightly blocking your pieces before assembly.
With its cute and friendly design, this dinosaur plush is more than just a craft project; it’s a heartfelt gift in the making. Consider trying out different colors to personalize your dinosaur, or create a whole family of them! This delightful DIY crochet project promises a satisfying experience and a soft, cuddle-worthy result that will be cherished for years to come. For further inspiration, don’t hesitate to check out this crochet tutorial that showcases various adorable dinosaur designs.



