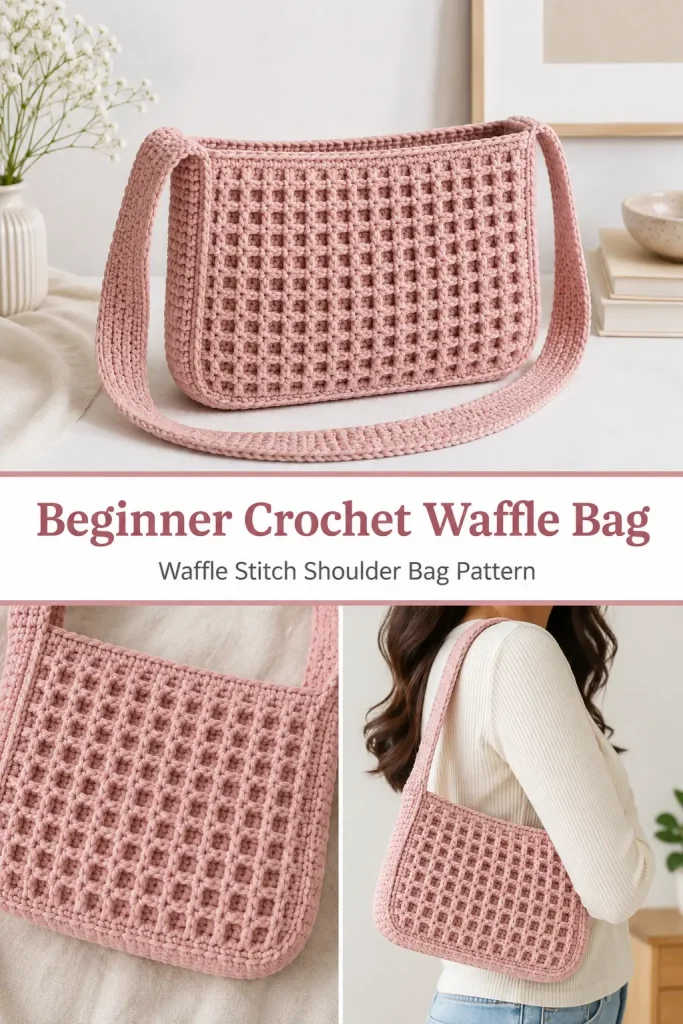
This crochet waffle bag is a compact shoulder bag with a beautiful raised texture and a simple rectangular shape. The dusty pink color gives it a soft, modern look, while the dense waffle stitch makes the small bag feel substantial and stylish.
The bag is made from two identical waffle-stitch panels and one long thermal-stitch strap. The strap wraps continuously around both sides and the bottom, creating the depth of the bag while also forming the shoulder handle. It is a satisfying beginner crochet project for anyone ready to practice double crochet, front post stitches, and simple sewing.
Description
The finished waffle bag measures approximately 8 inches wide by almost 5 inches tall. It has two rectangular textured panels, a narrow structured base, and one continuous shoulder strap measuring approximately 35 inches. The panels use a two-row waffle stitch repeat, while the strap is crocheted with thermal single crochet to reduce stretching. The design has an open top with no zipper, button, lining, or additional hardware. The original project uses approximately 130 g of weight 4 cotton yarn and a 5 mm crochet hook.
Materials
- 130 g weight 4 cotton yarn in dusty pink
- 5 mm crochet hook
- Yarn needle
- Scissors
- Four stitch markers
- Measuring tape
Abbreviations
- BLO – back loop only
- ch – chain
- dc – double crochet
- FPdc – front post double crochet
- sc – single crochet
- st – stitch
- sts – stitches
Finished Size
- Bag width: approximately 8 inches
- Bag height: almost 5 inches
- Strap length: approximately 35 inches
- Strap width: 6 thermal single crochet stitches
Finished measurements may vary slightly depending on yarn, hook size, and tension.
Pattern Notes
- This pattern uses US crochet terminology.
- Make two identical waffle-stitch panels.
- Each panel begins with 32 chains and has 30 stitches across.
- Each panel contains 12 rows.
- The waffle texture uses a two-row repeat.
- Begin each waffle row with a stacked single crochet instead of turning chains.
- The stacked single crochet counts as the first stitch.
- Work the panel edging only along the two short sides and the foundation edge. Leave the top edge open.
- Each edged panel should have 56 single crochet stitches from one top corner to the other.
- The strap begins with 7 chains and remains 6 stitches wide.
- The sample strap measures approximately 35 inches and takes about 260 short rows.
- The strap is sewn into one continuous loop before the panels are attached.
- Keep the right sides of both waffle panels facing outward during assembly.
Special Stitches
Stacked Single Crochet
Do not chain before beginning a waffle-stitch row.
Insert the hook into the first stitch and work 1 sc.
Insert the hook into the left vertical loop of the sc just made.
Work another sc into that loop.
The two stacked single crochet stitches create the height of a double crochet and count as the first stitch of the row.
Front Post Double Crochet
Yarn over.
Insert the hook from front to back around the post of the indicated stitch, then bring the hook back to the front on the opposite side of the post.
Yarn over and pull up a loop.
Yarn over and pull through 2 loops.
Yarn over and pull through the remaining 2 loops.
Do not also work into the top loops of the stitch whose post was used.
Thermal Single Crochet
Insert the hook through the back loop of the next stitch and through the corresponding unused loop directly below it.
Yarn over and pull through both layers.
Yarn over and pull through the 2 loops on the hook.
This creates a thick, firm strap that stretches less than a regular single crochet strap.
Step-by-Step Instructions
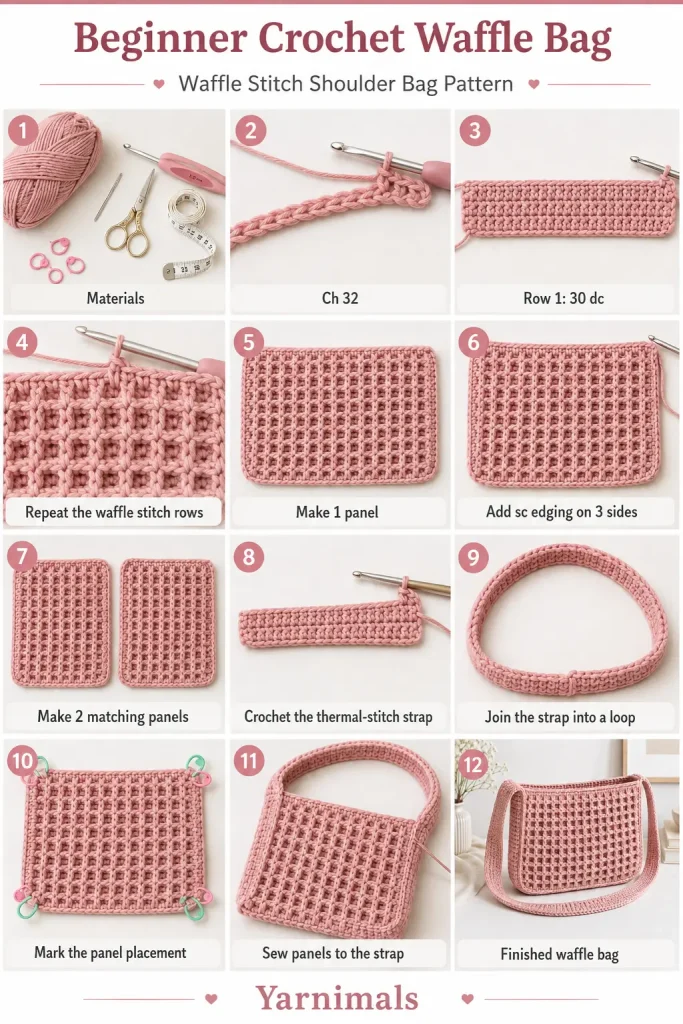
Part One: First Waffle-Stitch Panel
Foundation Chain
Ch 32.
Turn the chain so the back bumps are facing you.
Row 1
Skip the first 2 back bumps.
Work 1 dc in the third back bump from the hook.
Work 1 dc in every remaining back bump across.
You should have 30 dc.
Turn.
Row 2
Make 1 stacked sc in the first st. This counts as the first stitch.
Work 1 FPdc around the post of the next st.
Work 1 dc in each of the next 2 sts.
Continue repeating:
- 1 FPdc around the next st
- 1 dc in each of the next 2 sts
Repeat until 2 sts remain.
Work 1 FPdc around the next st.
Work 1 dc in the final st.
You should still have 30 sts.
Turn.
Row 3
Make 1 stacked sc in the first st.
Work 1 dc in the next st.
Work 1 FPdc around each of the next 2 sts.
Work 1 dc in the next st.
Continue repeating:
- 1 FPdc around each of the next 2 sts
- 1 dc in the next st
Repeat across until 2 sts remain.
Work 1 dc in each of the final 2 sts.
You should have 30 sts.
Turn.
Rows 4–12
Repeat Rows 2 and 3.
- Even-numbered rows repeat Row 2.
- Odd-numbered rows repeat Row 3.
Finish after completing Row 12.
Do not add another waffle row.
Part Two: Edge the Panel
The top edge of the panel remains open. Add single crochet only along the first short side, the foundation edge, and the second short side.
First Side
Begin at one upper corner.
Place a stitch marker in the first edging stitch.
Work 12 sc evenly down the side of the panel.
A helpful placement method is to work approximately 2 sc along the side of each visible waffle section.
At the lower corner, work 1 additional sc into the same corner opening.
Foundation Edge
Work 1 sc in each foundation stitch across the bottom.
You should have 30 sc across this edge.
Second Side
At the second lower corner, work 1 sc to turn the corner.
Work another sc in the same corner area.
Continue working evenly up the second side until there are 12 sc along that side.
Place a stitch marker in the final edging stitch.
Count from the first marker to the final marker.
You should have 56 sc around the three edged sides.
Fasten off.
Part Three: Make the Second Panel
Repeat all instructions for the first panel.
Make sure both panels have:
- 30 stitches across
- 12 waffle rows
- 56 edging stitches around the two sides and bottom
- Matching width and height
Set both panels aside.
Part Four: Crochet the Thermal Stitch Strap
Strap Foundation
Ch 7.
Turn the chain so the back bumps are visible.
Strap Row 1
Skip the first back bump.
Work 1 sc in each of the remaining 6 back bumps.
You should have 6 sc.
Strap Row 2
Ch 1 and turn.
Skip the turning chain.
Working in the BLO, work 1 sc in each of the 6 sts.
You should have 6 sc.
Strap Row 3
Ch 1 and turn.
Skip the turning chain.
Insert the hook through the BLO of the first st and through the corresponding loop directly below it.
Work 1 thermal sc.
Repeat across all 6 sts.
You should have 6 thermal sc.
Remaining Strap Rows
Repeat Row 3 until the strap measures approximately 35 inches.
The original strap uses approximately 260 rows, but measure the physical length because individual row gauge can vary.
Keep all rows at 6 stitches.
The completed strap should be thick, narrow, and firm.
Part Five: Join the Strap Ends
After reaching the desired length, leave a yarn tail approximately 30 cm long.
Cut the yarn and pull it through the final loop.
Bring the two short ends of the strap together without twisting the strap.
Thread the long yarn tail through a yarn needle.
Match the 6 stitches of one end to the 6 stitches of the other end.
Sew through corresponding stitches across the strap width.
Turn the strap over and sew through the remaining back loops to close any visible gap.
Pass the needle back and forth through the joined area until the seam is firm and tidy.
Tie the two available yarn tails securely.
Weave the ends into the strap.
You should now have one continuous thermal-stitch loop.
Position the joined strap seam at the upper section of the finished bag, where it will be less noticeable.
Part Six: Mark the Panel Sections
Each panel has 56 edged stitches divided into:
- 13 stitches along the first side
- 30 stitches along the bottom
- 13 stitches along the second side
Keep the existing markers in the first and last edging stitches.
Beginning at one top marker, count 13 edging stitches toward the bottom and place a marker in the lower corner stitch.
Beginning at the opposite top marker, count 13 edging stitches toward the bottom and place another marker in the other lower corner.
The 30 stitches between the two lower corner markers form the bottom of the panel.
Repeat the marker placement on the second panel.
Part Seven: Align the First Panel with the Strap
Place the continuous strap loop flat.
Position the strap seam at the top of the loop.
Place the first panel inside the lower part of the strap loop with the right side of the waffle texture facing outward.
Look along one edge of the thermal strap. Small V-shaped stitches should be visible.
Match the panel markers to corresponding strap V stitches:
- Attach the first upper panel marker to one strap V.
- Follow the next 13 strap positions and attach the first lower corner marker.
- Match the next 30 strap positions to the bottom edge.
- Attach the second lower corner marker.
- Match the remaining 13 side positions to the final upper marker.
The strap should follow one side of the panel, continue across the bottom, and rise along the opposite side.
The panel’s top edge must remain open.
Part Eight: Align the Second Panel
Turn the strap and first panel over.
Position the second panel directly opposite the first panel with its right side facing outward.
Align the top and lower corner markers with the same horizontal points on the opposite edge of the strap.
Check that:
- Both panels are at the same height.
- Both bottom edges are aligned.
- The waffle rows run in the same direction.
- The strap is not twisted.
- The panel tops remain open.
Secure all marked points before sewing.
Part Nine: Sew the First Panel to the Strap
Cut approximately 1.5 meters of matching yarn.
Thread the yarn through a yarn needle.
Begin at one upper corner.
For each join:
- Insert the needle through the front loop of the next visible strap V.
- Insert the needle through the back loop of the corresponding panel edging stitch.
- Pull the yarn through.
- Bring the yarn back toward you.
- Pass the needle through the same two loops a second time.
- Pull the yarn snugly without puckering the fabric.
Continue joining every corresponding strap and panel stitch.
Sew down the first side, across the bottom, and up the second side.
Do not sew across the top edge.
At the final corner, take the yarn to the inside of the bag.
Secure it with a small knot and weave in the yarn tail.
Part Ten: Sew the Second Panel
Turn the project over.
Repeat the same joining process for the second panel.
Pass the needle twice through each matched strap loop and panel edging stitch.
Sew around the two sides and bottom only.
Keep the top open.
Secure the final yarn tail inside the bag and weave it in thoroughly.
Finishing
Weave in every remaining yarn end.
Check the inside corners and reinforce any loose areas.
Shape the bottom and side edges with your fingers.
Gently arrange the waffle squares so they sit evenly.
Check that the continuous strap is smooth and not twisted.
The finished bag should have:
- Two matching dusty pink waffle-stitch panels
- A rectangular baguette-style shape
- A thick thermal-stitch strap
- A structured bottom and narrow sides
- One open top
- No separate closure
- No lining
- No hardware
Tips and Variations
Cotton yarn is a good choice because it gives the waffle stitch clear definition and helps the bag maintain its shape.
Count 30 stitches at the end of every panel row. An accidental stitch added after a front post double crochet can make the panel wider or crooked.
Remember that the front post stitch already uses the indicated stitch. Do not work another double crochet into the top of that same stitch.
Keep the front post stitches relaxed. Pulling them too tightly can make the waffle texture stiff and uneven.
The edging count is important for assembly. Both panels must have 56 stitches around the three joined sides.
Measure the strap rather than relying only on the suggested 260 rows. Crochet tension can change the finished length considerably.
For a shorter shoulder bag, stop the strap before it reaches 35 inches. Hold the loop around the panel before joining its ends to check the drop.
For a longer crossbody version, continue the thermal stitch until the strap reaches the preferred length.
Use the same yarn for the panels and strap so the stitch thickness and color remain consistent.
The original design is unlined. A lining may be added separately, but it is not part of this construction.
Frequently Asked Questions
Is the waffle bag suitable for beginners?
It is suitable for a confident beginner who knows single crochet and double crochet. The front post double crochet and thermal stitch may be new, but both use simple repeated movements.
Why does the pattern use a stacked single crochet?
The stacked single crochet replaces turning chains and creates a straighter, more solid panel edge. This makes it easier to add the final single crochet border and attach the strap evenly.
Why is the strap worked in thermal stitch?
Thermal single crochet creates a double-thick fabric that stretches less than a regular single crochet strip. This gives the shoulder strap a firmer and more durable finish.
Conclusion
This beginner crochet waffle bag combines rich texture with a clean, wearable shape. The two matching panels make the waffle pattern easy to practice, while the continuous thermal-stitch strap forms the sides, base, and handle in one practical piece. Save the pattern and make the bag in dusty pink or choose a favorite cotton yarn color for a simple handmade accessory you can use throughout the year.



