Beginner-Friendly Crochet Cozy Tea Cup Kitten Amigurumi Pattern
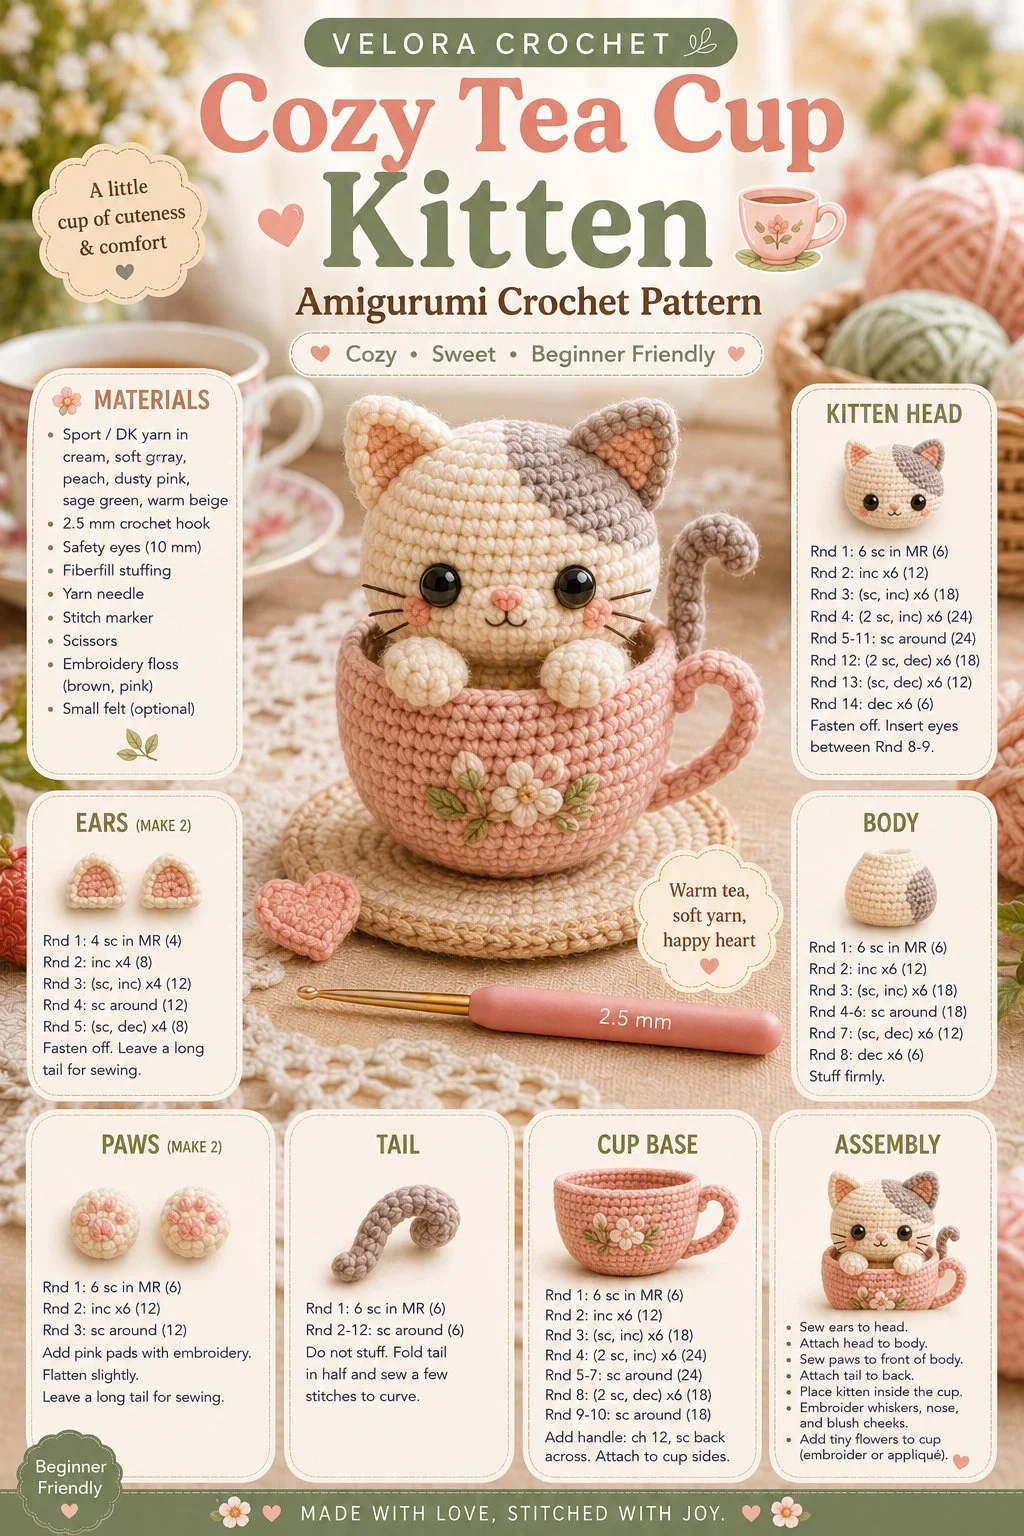
A charming project perfect for both beginners and seasoned crocheters alike, this delightful kitten nestled within a cozy tea cup will bring warmth and joy to your home or make a thoughtful handmade gift. With its rounded shapes and friendly features, this crochet creation is sure to become a beloved keepsake.
Materials
- Worsted weight yarn (in your preferred colors)
- Crochet hook (size G/4.0 mm)
- Fiberfill stuffing
- Tapestry needle
- Stitch marker (optional)
- Scissors
- Safety eyes (optional, for added cuteness)
Abbreviations
- MR: magic ring
- ch: chain
- sc: single crochet
- inc: increase
- dec: decrease
- sl st: slip stitch
Instructions
Kitten Head
- Start with a MR and work 6 sc into it. (6)
- Inc in each stitch around: (12)
- Sc in next stitch, inc in next stitch around: (18)
- Sc in next 2 stitches, inc in next stitch around: (24)
- Sc in each stitch for 5 rounds.
- Begin decreasing: Sc in next 2 stitches, dec in next stitch around: (18)
- Sc in next stitch, dec in next stitch around: (12)
- Stuff the head firmly and continue to dec until closed.
Ears (make 2)
- Start with a MR and work 4 sc into it. (4)
- Inc in each stitch around: (8)
- Sc in each stitch for 1 round.
- Dec in each stitch around: (4)
- Stuff lightly and sew onto the top of the head.
Body
- Create a MR and work 6 sc into it. (6)
- Inc in each stitch around: (12)
- Sc in next stitch, inc in next stitch around: (18)
- Sc in each stitch for 3 rounds.
- Dec: Sc in next 2 stitches, dec in next stitch around: (12)
- Stuff the body and continue to dec until closed.
Paws (make 2)
- Start with a MR and work 5 sc into it. (5)
- Sc in each stitch for 2 rounds.
- Dec in each stitch around: (3)
- Stuff lightly before closing.
Tail
- Start with a MR and work 6 sc into it. (6)
- Sc in each stitch for 8 rounds.
- Leave a long tail for sewing.
Cup Base
- Create a MR and work 6 sc into it. (6)
- Inc in each stitch around: (12)
- Sc in next stitch, inc in next stitch around: (18)
- Sc in each stitch for 2 rounds.
- Finish off, leaving a long tail for assembly.
Face Details
- Sew safety eyes onto the head before closing completely.
- Use embroidery or a black thread to create whiskers and a little nose.
Assembly
- Begin by sewing the head onto the body securely.
- Attach the ears symmetrically on top of the head.
- Position the paws so they sit over the edge of the cup and sew in place.
- Attach the tail to the back of the kitten and secure it down.
- Finally, sew the cup base to the kitten’s body. Make sure it sits snugly.
Tips for the Best Result
- When stuffing, be careful not to overstuff the head or body; this helps retain the cute rounded shapes.
- Use a stitch marker to keep track of your rounds, especially when working on the body and cup base.
- Take your time with sewing the pieces together; a little patience goes a long way in achieving a neat finish.
Conclusion
This adorable kitten in a tea cup is not only a fun crochet project but also an excellent gift for cat lovers and friends who appreciate handmade charm. Experiment with different colors or accessories, and consider making a whole collection of kittens for a truly delightful display! Happy crocheting!