Introduction
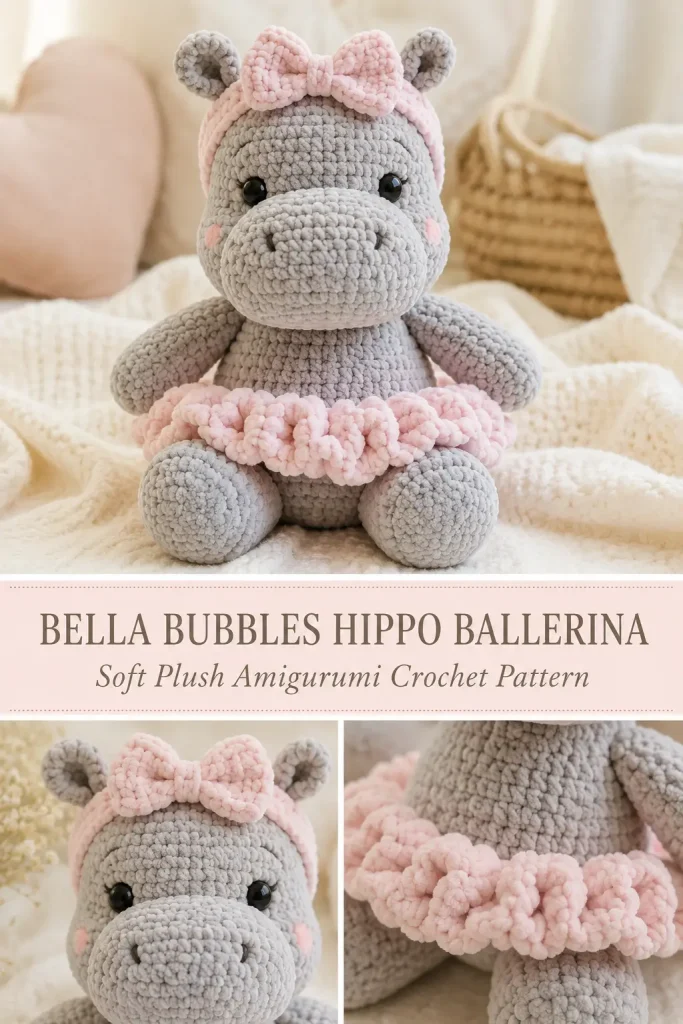
A plush hippo amigurumi already has that sweet, squishy charm people love, but adding a soft ballerina twist makes it feel even more giftable and scroll-stopping. This Bella Bubbles Hippo Ballerina is designed as a cute modern plush with a rounded body, oversized head, tiny ears, soft arms, chunky feet, a removable-look ruffle tutu, and a little bow headband.
This pattern is inspired by the idea of a gray plush hippo with pink ballet details, but the design, stitch counts, shaping, tutu style, bow, and finishing are created fresh so the project feels unique and original.
It is a cozy plush crochet toy with a nursery-friendly look, perfect for handmade gifts, baby shower decor, amigurumi collections, craft markets, and cute shelf styling.
Description
Bella Bubbles is a chubby plush hippo made with soft chenille yarn. She has a large rounded head, a wide snout, tiny rounded ears, simple embroidered nostrils, glossy black eyes, and a sweet gentle expression. Her body is round and soft, with short arms and chunky little legs that help her sit upright.
The “trending hack” in this design is the textured bubble tutu: instead of a flat skirt, the tutu is made with soft looped ruffles that look fluffy, playful, and more dimensional in photos. The headband is made as a simple crochet band with a small bow, giving the plush a finished boutique-style look without making the construction too difficult.
The main color is soft dove gray, with pale blush pink used for the tutu, bow, and optional cheek details.
Materials
- Super bulky chenille yarn in soft dove gray for the hippo body
- Super bulky chenille yarn in pale blush pink for the tutu and bow
- Small amount of black yarn for nostrils and smile details
- Small amount of pale pink yarn for cheeks, optional
- 6 mm crochet hook
- Yarn needle
- Scissors
- Stitch marker
- Polyester fiberfill
- 12 mm safety eyes, or black yarn for embroidered eyes
- Pins for assembly
Finished Size
Approximate finished size with super bulky chenille yarn:
- Height: 9–11 inches
- Width: 6–7 inches across the body
- Head width: about 5 inches
Finished size may vary depending on yarn, hook size, stuffing, and tension.
Gauge
Gauge is not strict for this plush, but your stitches should be tight enough to hold stuffing.
If stuffing shows through, use a smaller hook.
If the plush feels too stiff, use a slightly larger hook.
Abbreviations
- MR: magic ring
- ch: chain
- sc: single crochet
- hdc: half double crochet
- dc: double crochet
- inc: increase, 2 sc in same stitch
- dec: invisible decrease
- sl st: slip stitch
- st: stitch
- sts: stitches
- FLO: front loop only
- BLO: back loop only
- FO: fasten off
Pattern Notes
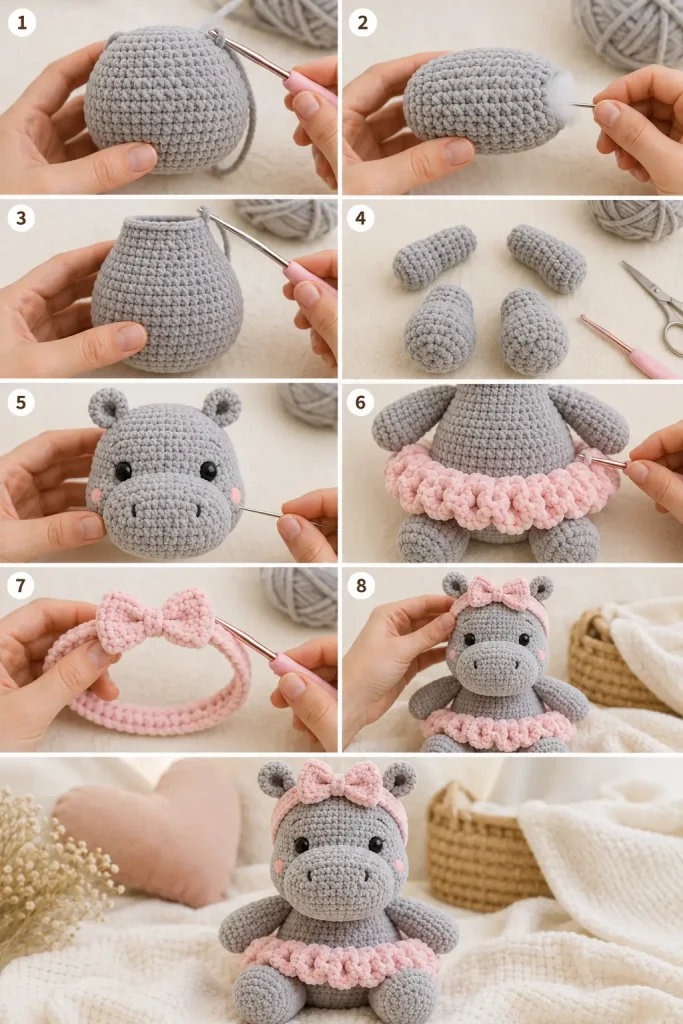
The head, body, arms, legs, ears, snout, tutu, and bow are made separately and sewn together.
The tutu is attached around the body after the body is complete.
Use stitch markers to track rounds.
Stuff the head and body firmly, but do not overstuff the arms and legs.
For baby-safe plush toys, embroider the eyes instead of using safety eyes.
Step-by-Step Instructions
Head
Use soft dove gray yarn.
Round 1
Make a MR.
Work 6 sc into the ring. (6)
Round 2
Inc in each st around. (12)
Round 3
Repeat around: sc in next st, inc in next st. (18)
Round 4
Repeat around: sc in next 2 sts, inc in next st. (24)
Round 5
Repeat around: sc in next 3 sts, inc in next st. (30)
Round 6
Repeat around: sc in next 4 sts, inc in next st. (36)
Rounds 7–12
Sc in each st around. (36)
If using safety eyes, place them between Rounds 9 and 10, about 7 stitches apart.
Round 13
Repeat around: sc in next 4 sts, dec. (30)
Round 14
Repeat around: sc in next 3 sts, dec. (24)
Begin stuffing the head firmly.
Round 15
Repeat around: sc in next 2 sts, dec. (18)
Round 16
Repeat around: sc in next st, dec. (12)
Add more stuffing if needed.
Round 17
Dec around. (6)
FO and close the opening.
Shape the head into a soft round oval.
Snout
Use soft dove gray yarn.
Round 1
Ch 7.
Sc in the 2nd ch from hook.
Sc in next 4 ch.
Work 3 sc in last ch.
Now work along the opposite side of the chain.
Sc in next 4 ch.
Work 2 sc in last ch. (14)
Round 2
Inc in first st.
Sc in next 4 sts.
Inc in each of next 3 sts.
Sc in next 4 sts.
Inc in each of last 2 sts. (20)
Round 3
Sc in next st, inc in next st.
Sc in next 4 sts.
Repeat 3 times: sc in next st, inc in next st.
Sc in next 4 sts.
Repeat 2 times: sc in next st, inc in next st. (26)
Rounds 4–5
Sc in each st around. (26)
FO, leaving a long tail for sewing.
Lightly stuff the snout before attaching.
Body
Use soft dove gray yarn.
Round 1
Make a MR.
Work 6 sc into the ring. (6)
Round 2
Inc in each st around. (12)
Round 3
Repeat around: sc in next st, inc in next st. (18)
Round 4
Repeat around: sc in next 2 sts, inc in next st. (24)
Round 5
Repeat around: sc in next 3 sts, inc in next st. (30)
Round 6
Repeat around: sc in next 4 sts, inc in next st. (36)
Rounds 7–12
Sc in each st around. (36)
Round 13
Repeat around: sc in next 4 sts, dec. (30)
Round 14
Sc in each st around. (30)
Round 15
Repeat around: sc in next 3 sts, dec. (24)
Round 16
Sc in each st around. (24)
Begin stuffing the body firmly.
Round 17
Repeat around: sc in next 2 sts, dec. (18)
Round 18
Repeat around: sc in next st, dec. (12)
FO, leaving a long tail for sewing.
The body should be round and slightly pear-shaped.
Arms
Make 2 using soft dove gray yarn.
Round 1
Make a MR.
Work 6 sc into the ring. (6)
Round 2
Repeat around: sc in next st, inc in next st. (9)
Rounds 3–8
Sc in each st around. (9)
Stuff lightly at the hand end only.
Flatten the top opening.
Sc through both layers across the opening. (4)
FO, leaving a long tail for sewing.
Legs
Make 2 using soft dove gray yarn.
Round 1
Make a MR.
Work 6 sc into the ring. (6)
Round 2
Inc in each st around. (12)
Round 3
Repeat around: sc in next 3 sts, inc in next st. (15)
Rounds 4–6
Sc in each st around. (15)
Round 7
Repeat around: sc in next 3 sts, dec. (12)
Stuff firmly enough to hold shape.
Flatten the top slightly.
FO, leaving a long tail for sewing.
Ears
Make 2 using soft dove gray yarn.
Round 1
Make a MR.
Work 6 sc into the ring. (6)
Round 2
Inc in each st around. (12)
Round 3
Sc in each st around. (12)
Flatten the ear.
Sc through both layers across the opening. (6)
FO, leaving a long tail for sewing.
Tail
Use soft dove gray yarn.
Tail
Ch 7.
Sc in 2nd ch from hook and in each ch across. (6)
FO, leaving a tail for sewing.
Optional: add a tiny pink yarn tassel or knot at the end for a playful detail.
Bubble Ruffle Tutu
Use pale blush pink yarn.
The tutu is made around the body after the body is stuffed and closed.
Join pink yarn around the body between Rounds 10 and 11.
Work around the body in the spaces between stitches.
Tutu Base Round
Ch 1.
Sc evenly around the body, placing about 30 sc around the waist area.
Join with sl st to first sc. (30)
Ruffle Round 1
Ch 2.
Work 3 hdc in each st around.
Join with sl st.
This creates a soft flared tutu base.
Bubble Ruffle Round 2
Ch 1.
Repeat around: sl st in next st, ch 4, sl st in same st, sl st in next st.
This creates soft looped bubble ruffles.
Join with sl st.
FO and weave in ends.
Gently pull the loops outward with your fingers so the tutu looks fluffy.
Optional Second Tutu Layer
For a fuller boutique-style tutu, join pink yarn one round above the first tutu base.
Repeat the same tutu base and bubble ruffle round.
Keep the second layer slightly shorter by using ch 3 loops instead of ch 4 loops.
This creates a layered fluffy skirt.
Headband
Use pale blush pink yarn.
Headband Strap
Ch 38.
Sc in 2nd ch from hook and in each ch across.
FO, leaving a long tail.
Wrap the band gently around the top of the head.
Sew the ends together at the back of the head.
Do not pull too tight.
Bow
Use pale blush pink yarn.
Bow Center
Ch 8.
Sc in 2nd ch from hook and in each ch across. (7)
Ch 1, turn.
Rows 2–4
Sc in each st across. (7)
FO, leaving a long tail.
Wrap the yarn tail tightly around the center of the rectangle several times to pinch it into a bow shape.
Secure the yarn at the back.
Sew the bow to one side of the headband.
Face
Sew the snout to the lower front of the head, centered between the eyes.
Lightly stuff the snout before closing the final stitches.
Using black yarn, embroider two short vertical nostril lines on the snout.
Optional: embroider a tiny curved smile below the nostrils.
Optional: add two tiny pale pink cheek stitches below the eyes.
Keep the expression soft and simple.
Assembly
Pin all pieces before sewing.
Attach the Head
Place the head on top of the body.
The snout should face forward.
Sew around the neck opening several times until secure.
Attach the Arms
Sew one arm to each side of the upper body, just below the head.
Angle the arms slightly outward.
Attach the Legs
Sew the legs to the lower front of the body so the hippo can sit.
Place them slightly apart under the tutu.
Attach the Ears
Sew the ears to the top sides of the head.
Place them slightly behind the headband line.
Attach the Tail
Sew the tail to the back of the body below the tutu.
Add the Headband and Bow
Place the headband around the top of the head.
Sew it lightly in place in a few hidden spots.
Sew the bow to one side of the headband.
Finishing
Weave in all yarn tails.
Check that the tutu is secure.
Check that the headband and bow are attached firmly.
Shape the body and head with your hands.
Brush chenille yarn gently with your fingers, not a comb.
Trim loose fibers carefully.
Tips & Variations
Use dove gray for the classic plush hippo look.
Use blush pink for the tutu and bow for a soft ballerina style.
Use lavender for the tutu if you want a trendier pastel version.
Use cream for the body and peach for the tutu for a softer nursery look.
Make the tutu with one layer for a simple plush.
Make the tutu with two layers for a fuller photo-ready plush.
Embroider the eyes for a baby-safe version.
Use safety eyes only for display toys or older children.
Add tiny ballet slippers by crocheting small pink bands around the feet.
Use jumbo chenille yarn for a larger statement plush.
FAQ
Is this hippo ballerina pattern beginner-friendly?
This pattern is best for confident beginners. The stitches are simple, but the shaping, tutu, bow, and assembly need careful placement.
Is this the exact pattern from the photo?
No. This is a new original hippo ballerina pattern inspired by the general plush style. The construction, stitch counts, tutu, bow, body shape, and finishing details are original.
What makes this version different?
This design uses a rounded plush body, an oval snout, a bubble ruffle tutu, a separate bow headband, chunky legs, and fresh stitch counts for a unique handmade look.
What yarn works best?
Super bulky chenille yarn gives the softest plush result. You can also use worsted weight yarn for a smaller version.
Can I make it without the tutu?
Yes. You can skip the tutu and make a simple plush hippo, or replace the tutu with a crochet scarf or little sweater band.
Conclusion
The Bella Bubbles Hippo Ballerina is soft, cute, and full of personality. Her rounded plush body, sweet snout, tiny ears, bubble ruffle tutu, and bow headband make her feel special without making the pattern too complicated.
This plush crochet toy is perfect for nursery decor, handmade gifts, amigurumi collections, craft markets, and anyone who loves cute animal crochet projects with a soft boutique-style finish.



