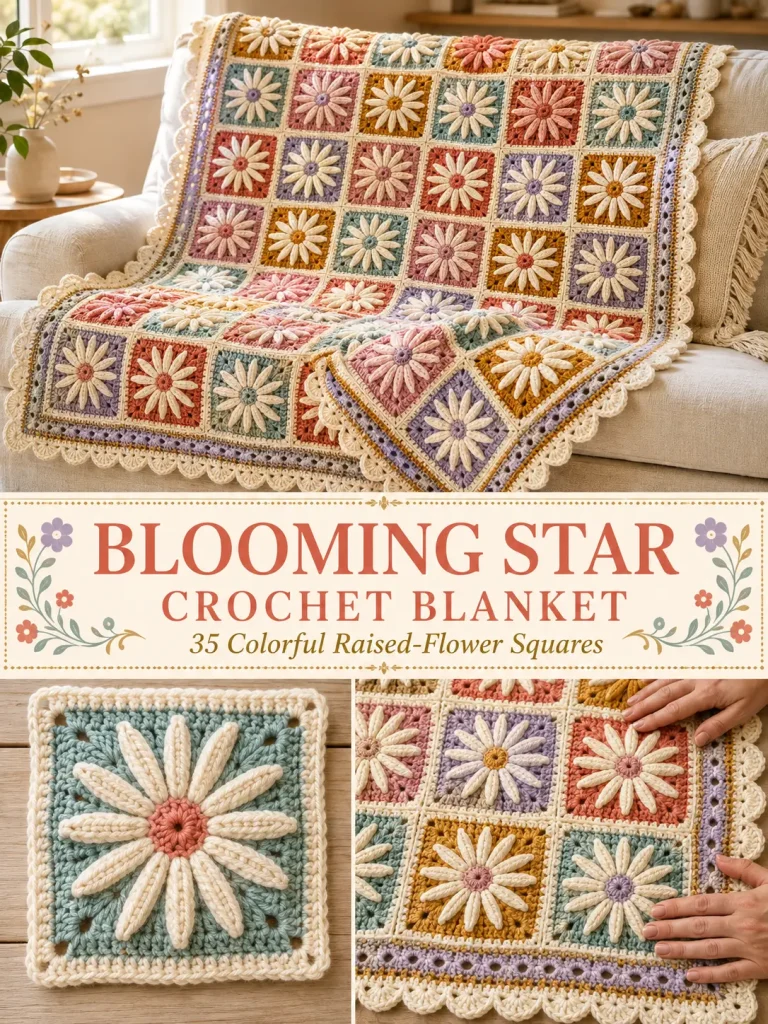
This colorful crochet blanket is built from large squares that look almost like flowers turning into stars.
The dramatic part happens on the surface: each square has a round center surrounded by 12 long raised petals, while the background gradually changes from a circle into a geometric square.
Despite the finished appearance, every motif uses exactly the same construction.
Make the squares.
Add the raised petals.
Block them.
Join them into a 5 × 7 grid.
Then finish the blanket with a colorful layered border.
Pattern at a Glance
Skill level: Intermediate
Terminology: US crochet terms
Construction: Individual square motifs joined afterward
Suggested yarn: DK / Category 3
Hook: 4.5 mm
Motif size: Approximately 7½ inches after blocking
Motifs required: 35
Layout: 5 squares across × 7 squares down
Finished size: Approximately 40 × 55 inches including border
Main feature: 12-petal raised star-flower motif
Color Palette
For this version use:
A — Warm Cream
Main joining and border color
B — Antique Gold
Warm golden yellow
C — Dusty Coral
Muted peach-coral
D — Soft Lavender
Light dusty purple
E — Seafoam
Soft aqua/mint
F — Dusty Rose
Muted pink
G — Terracotta
Soft warm rust
The blanket should feel colorful without using harsh primary colors.
Approximate Yarn Requirements
Have approximately:
- Warm cream: 900–1,000 yards
- Antique gold: 450–550 yards
- Dusty coral: 450–550 yards
- Soft lavender: 450–550 yards
- Seafoam: 400–500 yards
- Dusty rose: 350–450 yards
- Terracotta: 300–400 yards
Approximately:
3,300–3,900 yards total
Yarn consumption will vary, especially because the raised petals use extra yarn.
Materials
You will need:
- DK-weight yarn in 7 colors
- 4.5 mm crochet hook
- Yarn needle
- Scissors
- Stitch markers
- Blocking mats
- Rust-resistant blocking pins
- Measuring tape
Abbreviations
- ch = chain
- sc = single crochet
- hdc = half double crochet
- dc = double crochet
- tr = treble crochet
- sl st = slip stitch
- BLO = back loop only
- FLO = front loop only
- sp = space
- st = stitch
- sts = stitches
- rep = repeat
Important Construction Note
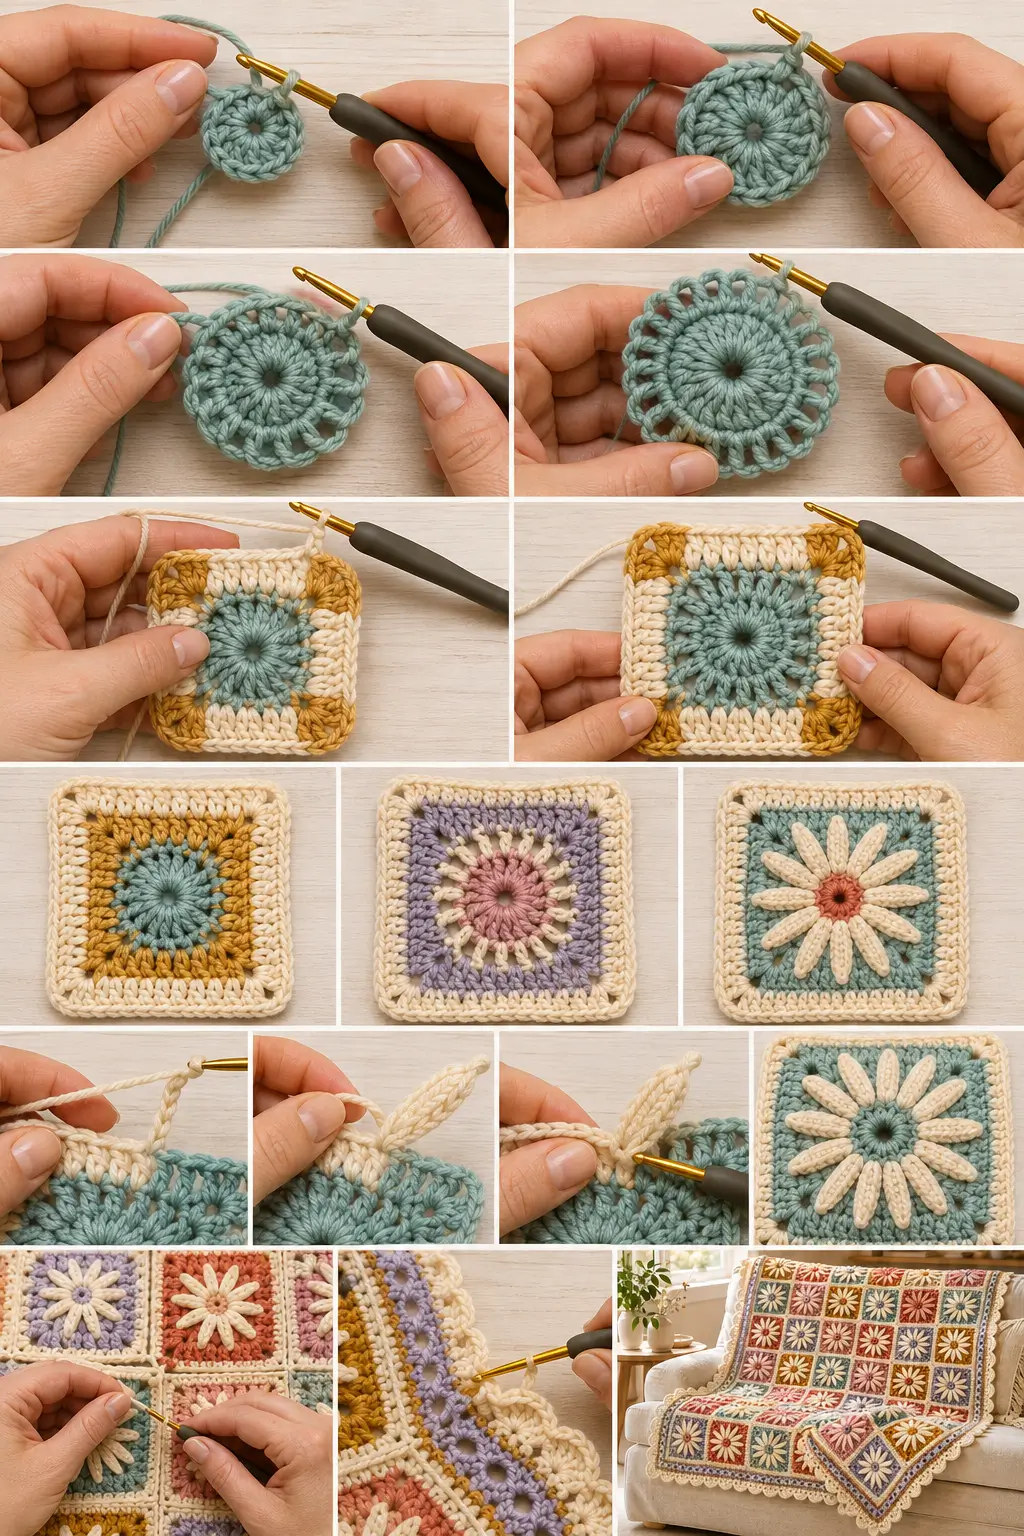
The flower petals are not separate appliqués.
Round 2 is intentionally crocheted through the back loops only.
That leaves the 12 front loops from Round 1 available.
After the square is finished, the long petals are crocheted directly into those unused front loops.
This creates the raised flower-star effect without sewing 12 separate pieces onto every square.
PART 1 — BLOOMING STAR SQUARE
Round 1 — Center
Using your center color:
Make a magic ring.
Ch 3.
The beginning ch 3 counts as the first dc.
Work:
11 dc into the ring
Join with sl st to top of beginning ch 3.
You should have:
12 dc
Pull the ring closed.
Round 2 — Expand the Center
Change to the second color.
This round is important.
Work BLO only.
Ch 3.
Work another dc in the BLO of the same stitch.
Then work:
2 dc BLO in every remaining stitch around
Join.
You should have:
24 dc
Fasten off.
Important
You now have 12 unused front loops from Round 1 visible around the center.
Do not crochet into them yet.
Those loops will hold the flower petals later.
Round 3 — Turn the Circle Into a Square
Join your background color in any stitch.
Ch 3.
In the same stitch work:
1 dc, ch 2, 2 dc
This creates the first corner.
Now:
Dc in next 5 sts
In next stitch work:
2 dc, ch 2, 2 dc
Dc in next:
5 sts
Repeat around until you have four corners.
Join.
You should now have:
- 4 ch-2 corners
- 9 dc along each side between corner spaces
The motif should begin looking square.
Round 4
Sl st into the first corner ch-2 space.
Ch 3.
Work:
1 dc, ch 2, 2 dc
in the same corner.
Dc in every stitch across the first side.
In next corner work:
2 dc, ch 2, 2 dc
Continue around.
Join.
You should now have:
13 dc along each side
between corner spaces.
Round 5
Change color.
Join in any corner.
Ch 2.
The beginning ch 2 does not count as a stitch.
In the corner work:
2 hdc, ch 2, 2 hdc
Hdc in every stitch across.
At every corner:
2 hdc, ch 2, 2 hdc
Continue around.
Join.
You should have:
17 hdc along each side
between corner spaces.
Round 6
Change color if desired.
Join in a corner.
Ch 1.
In the same corner work:
2 sc, ch 2, 2 sc
Sc in every stitch across.
At every corner work:
2 sc, ch 2, 2 sc
Continue around.
Join.
You should have:
21 sc along each side
between corners.
Round 7 — Outer Frame
Use warm cream or your assigned outer-frame color.
Join in any corner.
Ch 3.
Work:
1 dc, ch 2, 2 dc
into the corner.
Dc in every stitch across.
At every corner:
2 dc, ch 2, 2 dc
Continue around.
Join.
You should have:
25 dc along each side
between corner spaces.
Fasten off.
PART 2 — ADD THE 12 STAR PETALS
Now return to those unused front loops from Round 1.
Lay the square right side up.
Join your petal color into any unused FLO.
Long Star Petal
From the same front loop:
Ch 7
Starting in the second chain from the hook work:
- sl st in next ch
- sc in next ch
- hdc in next ch
- tr in next ch
- dc in next ch
- hdc in final ch
Now sl st back into the same front loop where the petal began.
One long petal is complete.
Move to the Next Petal
Sl st into the next unused front loop.
Repeat the Long Star Petal instructions.
Continue around until you have:
12 petals
Fasten off.
Shape the Flower
Use your fingers to gently arrange the petals so they radiate evenly from the center.
Each square should contain:
- one circular center
- exactly 12 long petals
- square geometric background
- four clearly defined corners
The petals should lie over the square rather than standing vertically.
If the Petals Curl
A little curl is normal before blocking.
If they curl strongly:
- loosen your chain tension
- use a 5 mm hook only for the petals
- lightly steam or wet-block them according to your yarn’s care instructions
Do not stretch them aggressively.
Finished Motif Size
After blocking, aim for approximately:
7½ × 7½ inches
Exact size is less important than consistency.
All 35 squares should be approximately the same size before joining.
PART 3 — MAKE 35 SQUARES
Use the same construction for every square but rotate the colors.
Make:
35 motifs total
Colorway 1 — Make 7
- Center: Seafoam
- Round 2: Dusty rose
- Background: Antique gold
- Round 5: Soft lavender
- Round 6: Antique gold
- Outer frame: Warm cream
- Petals: Warm cream
Colorway 2 — Make 7
- Center: Antique gold
- Round 2: Warm cream
- Background: Dusty coral
- Round 5: Seafoam
- Round 6: Dusty coral
- Outer frame: Soft lavender
- Petals: Warm cream
Colorway 3 — Make 7
- Center: Dusty coral
- Round 2: Antique gold
- Background: Soft lavender
- Round 5: Warm cream
- Round 6: Soft lavender
- Outer frame: Dusty rose
- Petals: Seafoam
Colorway 4 — Make 7
- Center: Dusty rose
- Round 2: Seafoam
- Background: Warm cream
- Round 5: Antique gold
- Round 6: Warm cream
- Outer frame: Dusty coral
- Petals: Soft lavender
Colorway 5 — Make 7
- Center: Warm cream
- Round 2: Terracotta
- Background: Seafoam
- Round 5: Dusty rose
- Round 6: Seafoam
- Outer frame: Antique gold
- Petals: Warm cream
PART 4 — BLOCK THE MOTIFS
Blocking is important for this blanket.
Pin every square to approximately:
7½ inches
Make sure:
- all four corners are square
- sides are straight
- petals radiate evenly
- square centers remain flat
- outer rounds are not overstretched
Allow the motifs to dry completely.
PART 5 — BLANKET LAYOUT
Arrange the motifs:
5 across × 7 down
Use this sequence:
Row 1
1 – 2 – 3 – 4 – 5
Row 2
3 – 5 – 2 – 1 – 4
Row 3
5 – 4 – 1 – 3 – 2
Row 4
2 – 1 – 4 – 5 – 3
Row 5
4 – 3 – 5 – 2 – 1
Row 6
1 – 5 – 2 – 4 – 3
Row 7
3 – 2 – 4 – 1 – 5
This distributes the dominant colors throughout the blanket rather than placing identical squares beside one another repeatedly.
Take a photo before joining.
PART 6 — FLAT SLIP-STITCH JOIN
Use warm cream yarn.
Place two squares beside each other with:
right sides facing upward
Align the corresponding edge stitches.
Insert the hook through:
- back loop of the stitch on the first motif
- front loop of the corresponding stitch on the second motif
Yarn over.
Pull through both loops and the loop already on your hook.
Continue with loose slip stitches across the entire seam.
Joining Order
First join each row of five squares.
You will have:
7 long strips
Then join the strips together horizontally.
Check frequently that the intersections of four squares line up neatly.
Important Joining Tip
Do not tighten the slip-stitch seam.
The seam should be flexible.
If your joining stitches are naturally tight, use a:
5 mm hook
for joining.
PART 7 — FOUNDATION BORDER
After all motifs are joined, use warm cream.
Join yarn in any outer corner.
Border Round 1
Ch 1.
Sc evenly around the blanket.
Across the top and bottom of every motif, work approximately:
1 sc in each stitch
When crossing a joining seam, keep the stitches close enough that no hole appears.
At every blanket corner work:
3 sc
Join.
Check the Blanket
Lay it flat before continuing.
If the border waves strongly, you have too many stitches.
If it pulls inward, you have too few.
Correct Round 1 before adding the decorative rounds.
Border Round 2 — Antique Gold
Change to antique gold.
Ch 2.
Hdc in every stitch around.
At each corner:
3 hdc in the center corner stitch
Join.
Border Round 3 — Color Windows
Change to soft lavender.
Ch 3.
Dc in same stitch.
Then repeat:
ch 1, skip 1 st, dc in next st
around.
At each corner work:
dc, ch 2, dc
in the corner stitch/space.
Continue the eyelet repeat along each side.
Join.
This gives the border a lighter geometric look.
Border Round 4 — Cream Scallops
Change to warm cream.
Join in any corner.
Work sc evenly until you reach a suitable starting point for the shell repeat.
Then repeat:
skip 1 st
5 dc in next st
skip 1 st
sl st in next st
Continue around.
At the Corners
Do not force the exact shell repeat.
Adjust the stitches immediately before the corner so that one:
5-dc shell
sits naturally around each corner.
The border should stay flat.
Fasten off.
Finished Border
The blanket should now have:
- warm cream joining
- warm cream foundation border
- antique-gold structural round
- lavender eyelet round
- warm cream scalloped edge
This creates a colorful frame without competing with the large star flowers.
PART 8 — FINAL FINISHING
Weave in every remaining yarn tail.
Inspect all:
- motif centers
- petal attachments
- joining seams
- corners
- border stitches
Secure anything loose.
Lightly block the entire blanket if needed.
Finished Measurements
Using 7½-inch squares:
Motif field
5 × 7½ inches:
37½ inches wide
7 × 7½ inches:
52½ inches long
The border adds approximately:
1¼–1½ inches per side
Final size:
Approximately 40 × 55 inches
Your exact size may vary.
How to Make a Smaller Blanket
Use:
4 motifs across × 5 motifs down
Total:
20 squares
Before border:
Approximately:
30 × 37½ inches
This makes a good stroller or smaller child blanket.
Larger Throw
Use:
6 motifs across × 8 motifs down
Total:
48 squares
Before border:
Approximately:
45 × 60 inches
Add the same border.
Why Are the Petals Added After the Square?
Working the petals afterward solves two problems.
First, the square can be crocheted and blocked normally without long petals interfering with the outer rounds.
Second, the petals sit on top of the geometric background, which creates much stronger depth.
That is what makes the finished blanket look far more complicated than the actual construction.
What If My Square Is Not Flat?
Check Round 3 carefully.
You must use exactly:
24 stitches from Round 2
divided into four sections.
Each section consumes:
- 1 corner stitch
- 5 ordinary stitches
That gives:
6 × 4 = 24 stitches
If you accidentally work an extra corner or skip a stitch, the square will distort.
What If My Corners Are Rounded?
Make sure every corner contains:
2 stitches, ch 2, 2 stitches
The ch-2 space creates the actual corner point.
When blocking, pin directly through each ch-2 space.
What If One Motif Is Larger?
Do not force a noticeably oversized motif into the blanket.
Check:
- hook size
- tension
- whether you accidentally added stitches
- whether your yarn thickness changed
A difference of a few millimeters can be blocked out.
A large difference should be corrected.
What If the Petals Cover Too Much of the Background?
Use:
ch 6 instead of ch 7
for each petal.
Keep all 12 petals the same length.
What If I Want Larger Petals?
Use:
ch 8
and work the stitches back down the chain proportionally.
Do not change petal length halfway through one blanket.
Can I Make All the Petals Cream?
Yes.
This is actually one of the easiest ways to make a very colorful blanket feel coordinated.
Use different square backgrounds but keep:
all 12 petals warm cream
on every motif.
Can I Make Every Square Identical?
Absolutely.
Choose one colorway and make all 35 motifs the same.
The raised star-flower texture will still give the blanket plenty of interest.
Can I Use Worsted Yarn?
Yes.
Use an appropriate hook, usually around:
5–5.5 mm
Your motifs will be larger, so make fewer squares if you want the same finished blanket dimensions.
Can I Use Cotton?
Yes.
Cotton produces particularly crisp petal and geometric definition.
A cotton/acrylic blend can make a lighter, softer throw.
Can I Join As I Go?
You could, but I recommend joining after blocking.
The long petals and geometric square shape look much cleaner when every motif is blocked to the same size first.
Are the Petals Sewn On?
No.
Every petal is crocheted directly into an unused front loop from Round 1.
There are no individual petals to sew onto the blanket.
How Many Petals Are in the Whole Blanket?
Each square contains:
12 petals
There are:
35 squares
So the completed blanket contains:
420 raised petals
That repeated detail is what gives the blanket such a dramatic finished appearance.
Frequently Asked Questions
How many squares do I need?
For the standard throw:
35
What is the layout?
5 across × 7 down
How many rounds are in each square?
The base square contains:
7 rounds
Then the 12 surface petals are added.
Does the flower use separate motifs?
No.
The flower is part of the square.
Is there sewing?
Only yarn-tail weaving is necessary if you use the crochet slip-stitch joining method.
Is this suitable for beginners?
I would call it intermediate.
The basic stitches are simple, but the pattern requires:
- BLO work
- careful stitch counting
- working surface petals
- consistent motif sizing
- joining many squares
A confident beginner who already understands granny-square construction could still make it successfully.
Final Thoughts
The finished blanket looks complicated because your eye sees dozens of flowers, hundreds of long petals, multiple colors, and a geometric background all at once.
But you never actually crochet all of that at once.
You make one small circle.
Turn it into a square.
Add twelve petals.
Then start the next one.
By the time 35 motifs are laid across the floor, the little star flowers begin connecting visually and the entire blanket takes on that dramatic stained-glass-meets-flower-garden effect.
That is exactly the kind of crochet project where the finished result looks far more difficult than the individual steps required to build it.



