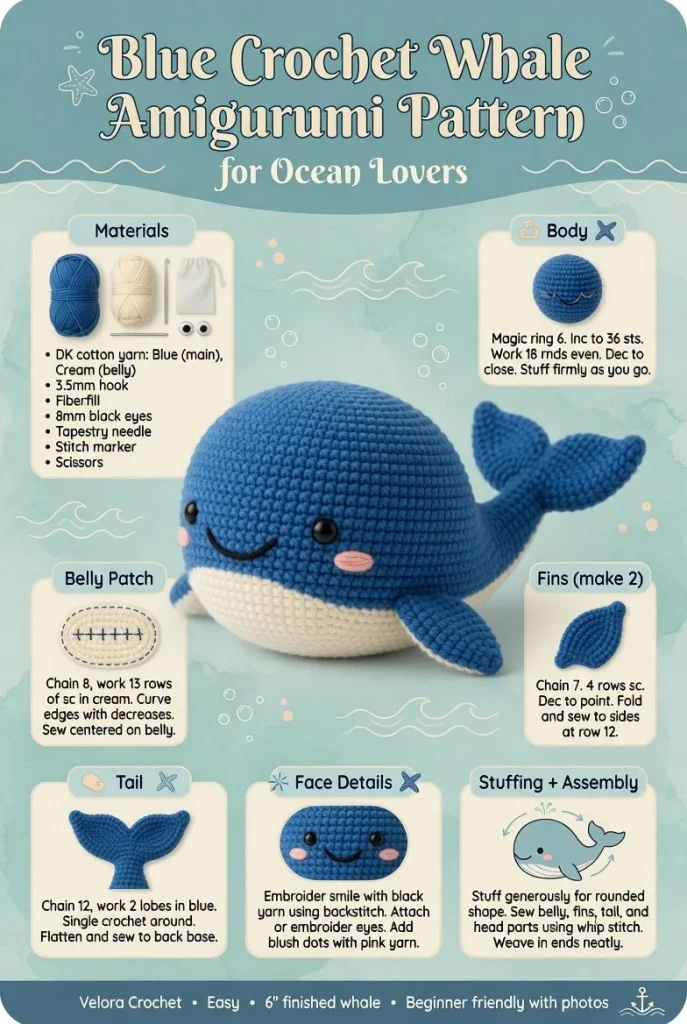
Create a delightful blue crochet whale that will charm any nursery or become a lovely gift. This playful project features a rounded body, sweet side fins, a whimsical tail fin, a cuddly belly patch, and an adorable smiling face, making it an ideal choice for beginners eager to dive into the world of crochet. Let’s jump into this easy crochet project perfect for summer ocean themes!
Materials
- Yarn in blue, white, and black
- 3.5 mm (E) crochet hook
- Fiberfill stuffing
- Yarn needle for sewing
- Scissors
- Safety eyes (optional)
Abbreviations
- MR: magic ring
- ch: chain
- sc: single crochet
- hdc: half double crochet
- dc: double crochet
- inc: increase
- dec: decrease
- sl st: slip stitch
Body
- Start with a magic ring.
- Round 1: 6 sc in MR. (6)
- Round 2: Inc in each st around. (12)
- Round 3: (sc in next st, inc) repeat around. (18)
- Round 4: (sc in next 2 st, inc) repeat around. (24)
- Rounds 5-11: Sc in each st around. (24)
- Round 12: (sc in next 2 st, dec) repeat around. (18)
- Round 13: (sc in next st, dec) repeat around. (12)
- Round 14: Dec around. (6)
At this point, you can choose to stuff your whale with fiberfill to begin shaping it. A light hand while stuffing will keep your whale cuddly and soft!
Belly Patch
- With white yarn, make a magic ring.
- Round 1: 4 sc in MR. (4)
- Round 2: Inc in each st around. (8)
- Round 3: (sc in next st, inc) repeated. (12)
- Fasten off, leaving a long tail for sewing.
This belly patch will add a cute touch, so take your time to sew it on neatly after the body is complete.
Fins
Side Fins (make 2)
- With blue yarn, ch 5.
- Row 1: Sc in 2nd ch from hook and in each ch across. (4)
- Row 2: Ch 1, turn, sc in each st. (4)
- Row 3: Ch 1, turn, dec, sc in next 2 st. (3)
- Row 4: Ch 1, turn, dec. (2)
- Fasten off, leaving long tails for sewing.
Tail Fin
- With blue yarn, ch 7.
- Row 1: Sc in 2nd ch from hook and in each ch across. (6)
- Row 2: Ch 1, turn, sc in each st. (6)
- Row 3: Ch 1, turn, dec, sc in next 2 st. (4)
- Row 4: Ch 1, turn, dec. (2)
- Fasten off, leaving long tail for sewing.
The fins are perfect for giving your whale a playful posture!
Face Details
Using black yarn, you can either stitch on a smile or attach safety eyes for a charming expression. If you’re using safety eyes, remember to secure them before finishing your whale!
Stuffing
As you assemble your whale, don’t forget to add fiberfill at each step. This way, you can ensure that the body is shaped evenly and has a soft, friendly look.
Assembly
- Sew the belly patch onto the body securely.
- Attach the side fins on either side of the body.
- Position and sew the tail fin to the back, making sure it aligns well.
- Lastly, add the face details, ensuring everything is symmetric and looks cheerful.
For an additional layer of charm, you might consider pairing this project with other ocean-themed handmade crochet pieces like the ocean whisper jelly crochet pattern!
Tips for the Best Result
- Use consistent tension throughout your project to ensure a neat finish and a well-formed whale.
- When sewing pieces together, take your time to ensure symmetrical placement for a polished look.
- If you find your seams a little loose, a gentle tightening can help maintain the whale’s shape.
In conclusion, this darling crochet whale will make a delightful addition to any space. Whether as part of a nursery decor or a thoughtful handmade gift, you can easily customize it with different shades of blue or even experiment with lively patterns. Happy crocheting!



