Blue Floral Granny Square Cardigan Crochet Pattern
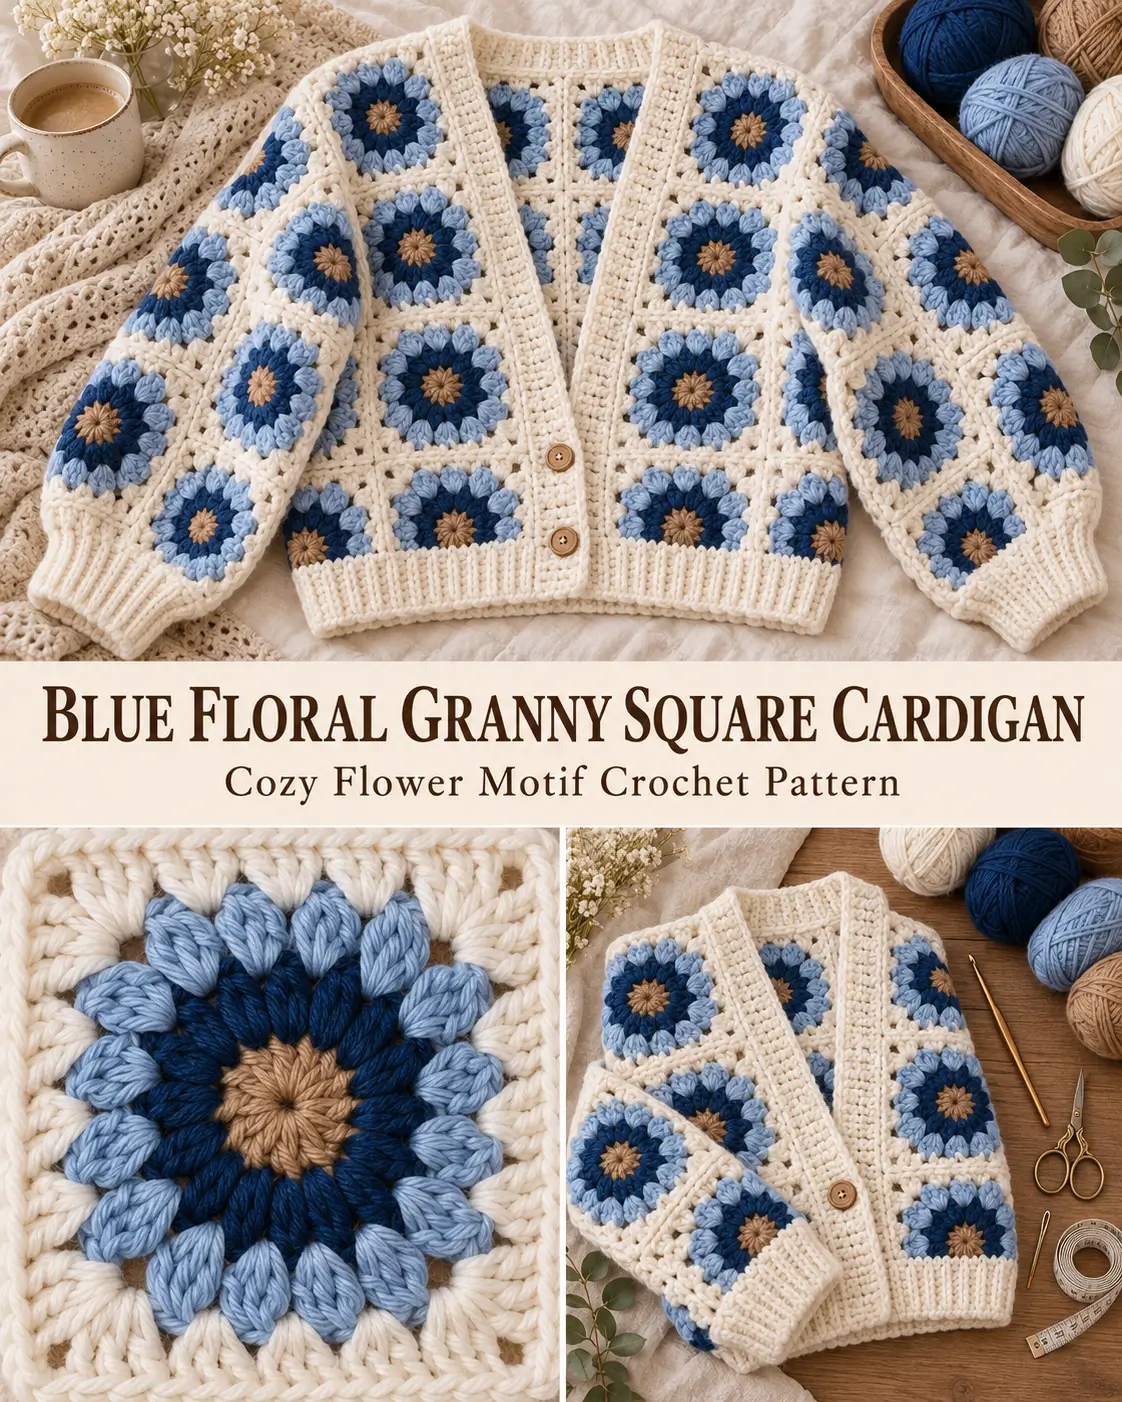
Some granny squares are nice.
Some are useful.
And then there are the granny squares that instantly make crocheters stop scrolling.
This beautiful blue floral granny square is one of those designs.
With its soft tan center, rich navy flower petals, pale blue outer petals, and creamy square frame, it has the kind of elegant, slightly vintage look that feels special the moment you see it. And instead of using it for just a single square tutorial, this project turns that motif into something much more exciting: a full cozy cardigan.
The result is a striking patchwork-style sweater with floral motif squares across the body and sleeves, finished with simple ribbed cuffs, hem, and front bands for a polished wearable piece.
If you love granny square cardigans but want one that feels fresher and more distinctive than a basic classic square, this project is a beautiful next step.
Why You’ll Love This Cardigan
- Uses a unique floral granny square with layered petals
- More eye-catching than a standard granny square cardigan
- Combines statement crochet style with approachable construction
- Built from repeatable motifs, so it’s easy to work on in stages
- Soft cream finishing gives the design a clean and elevated look
- Roomy sleeves and relaxed fit make it comfortable to wear
- Great for spring, fall, or cool summer evenings
- A strong visual project for Pinterest, Facebook, and crochet blogs
Pattern Overview
Skill level: Confident beginner to intermediate
Crochet terminology: US terms
Construction: Floral granny square panels joined with seams
Fit: Relaxed, slightly oversized, cropped cardigan
Sizes: XS/S, M/L, XL/2XL, 3XL/4XL
Main techniques: Puff petals, double crochet, seaming, ribbing
Style: Open-front or button-front cardigan
This cardigan uses the same overall motif layout as our previous cozy granny square cardigan build:
- 27 body squares
- 8 larger sleeve squares
- 35 total floral motif squares
Finished Sizes
Use the same panel arrangement for every size and change the size of the finished motifs.
| Size | Body Square | Sleeve Square | Approx. Finished Chest |
|---|---|---|---|
| XS/S | 4.5 in | 6.5 in | 40.5 in |
| M/L | 5 in | 7.5 in | 45 in |
| XL/2XL | 5.5 in | 8.5 in | 49.5 in |
| 3XL/4XL | 6 in | 9.5 in | 54 in |
These measurements follow the same cardigan-panel logic as the earlier square cardigan layout and are planning measurements, not a standardized clothing size chart.【turn202390view0†L67-L80】
Materials
- Medium-weight (#4) yarn
- Color A: warm tan or light camel
- Color B: deep navy blue
- Color C: soft powder blue
- Color D: creamy ivory or warm white
- Optional Color E: matching ivory for ribbing and edging
- 5 mm (H/8) crochet hook, or size needed for gauge
- Yarn needle
- Scissors
- Stitch markers
- Measuring tape
- Optional: 2–4 wooden or neutral buttons
- Optional: blocking mats and pins
Suggested Color Placement
To preserve the floral effect seen in the inspiration image:
- Round 1: Tan center
- Round 2: Deep navy petals
- Round 3: Powder-blue outer petals
- Round 4 and beyond: Cream square border
You can keep every motif identical for a refined cardigan, or vary the outer cream rounds very slightly for a softer patchwork feel.
Abbreviations
- Ch: Chain
- Sc: Single crochet
- Hdc: Half double crochet
- Dc: Double crochet
- Sl st: Slip stitch
- St: Stitch
- Sp: Space
- Rep: Repeat
- BLO: Back loop only
- Puff: Yarn over, insert hook, pull up a loop; repeat until 7 loops are on the hook, yarn over and pull through all loops, ch 1 to close puff
- Sc2tog: Single crochet 2 together
Floral Granny Square Motif Instructions
This is an original motif pattern inspired by the image, not a chart copy.
The goal is to create a floral square with:
- a compact tan center,
- a ring of dark navy petals,
- a ring of pale blue petals,
- and a soft cream granny-style square frame.
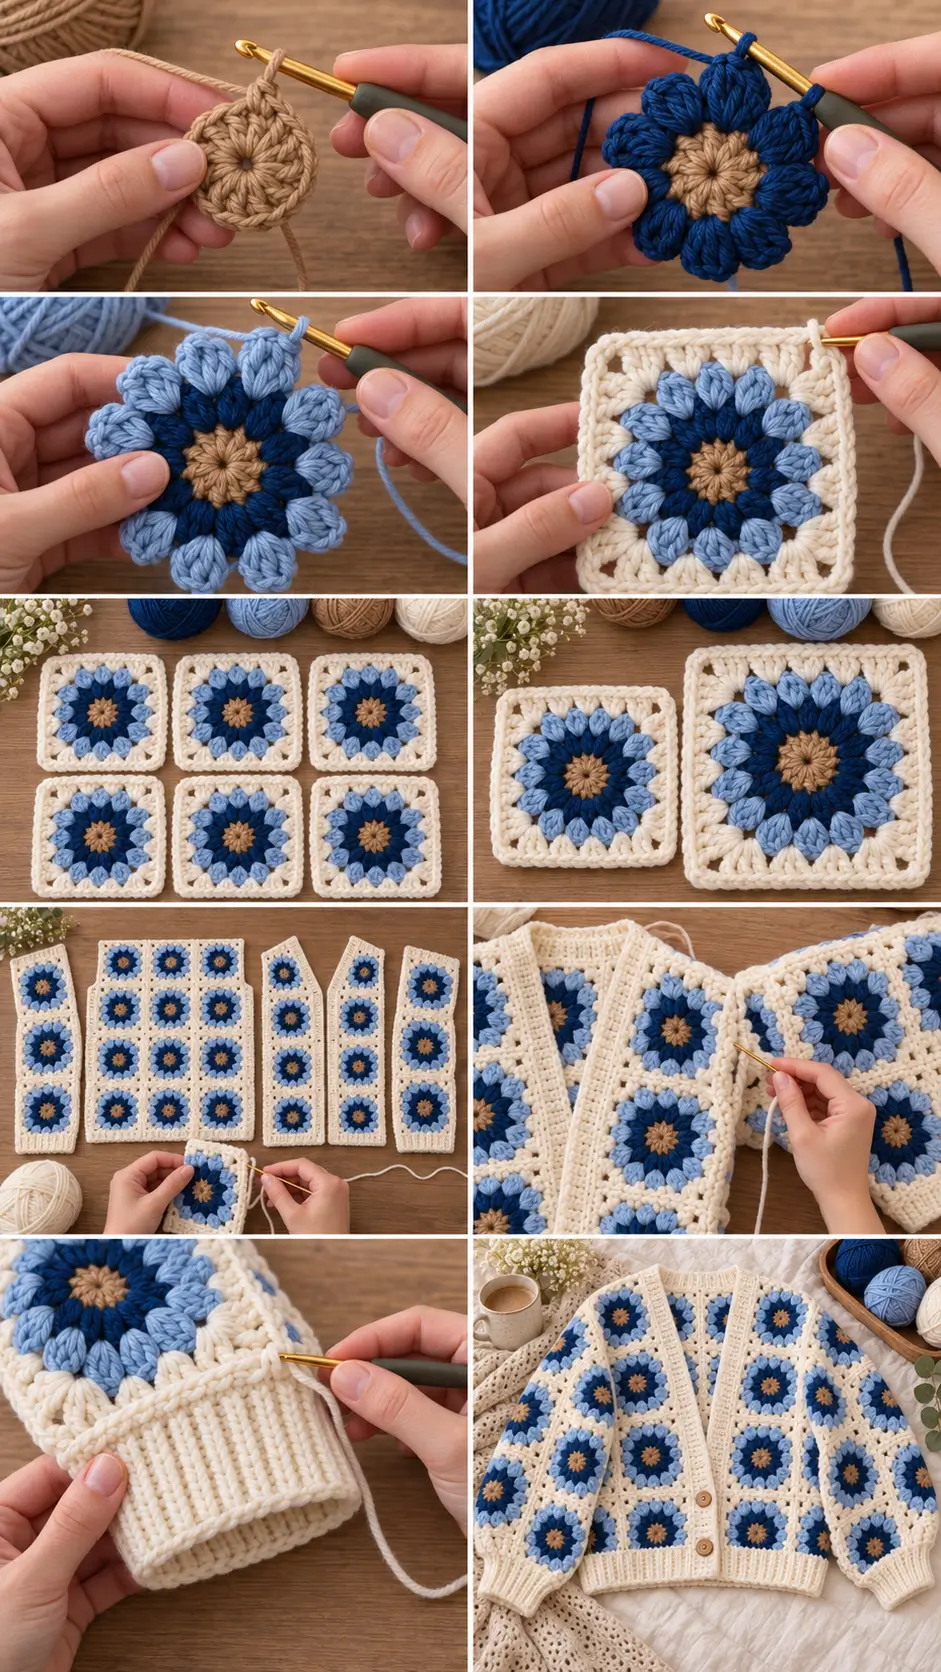
Round 1 – Tan Center
Using Color A (tan):
- Make a magic ring.
- Ch 2 (does not count as a stitch).
- Work 12 dc into the ring.
- Sl st to the first dc to join.
- Fasten off.
You should have 12 dc forming a small round center.
Round 2 – Navy Petals
Join Color B (deep navy) in any stitch.
- Ch 1.
- In the same stitch, make 1 puff stitch, ch 1.
- Skip the next stitch.
- In the next stitch, make 1 puff stitch, ch 1.
- Rep around.
Join with sl st to the first puff-space and fasten off.
You should have 6 navy puff petals evenly spaced around the center.
Round 3 – Powder Blue Outer Petals
Join Color C (powder blue) in any ch-1 space between navy puffs.
- Ch 1.
- In the same space, work (puff, ch 2, puff).
- In the next ch-1 space, work (puff, ch 2, puff).
- Rep around in every ch-1 space.
- Join with sl st and fasten off.
You should now have 12 light-blue puff petals, creating a layered flower effect.
Round 4 – Begin Squaring the Motif
Join Color D (cream) in any ch-2 space.
- Ch 3 (counts as dc), 2 dc, ch 2, 3 dc in the same ch-2 space — this forms your first corner.
- In the next ch-2 space, work 3 dc.
- In the next ch-2 space, work 3 dc.
- In the next ch-2 space, work 3 dc, ch 2, 3 dc for the next corner.
- Continue around, placing:
- 3 dc in regular petal spaces
- 3 dc, ch 2, 3 dc in every third petal space to create 4 corners
- Join with sl st.
The flower is now enclosed inside a square.
Round 5 – Grow the Square
Still using cream:
- Sl st into the nearest corner space.
- Ch 3, 2 dc, ch 2, 3 dc in the corner.
- Ch 1.
- Work 3 dc in each side space.
- Ch 1 between side clusters.
- In each corner, work 3 dc, ch 2, 3 dc.
- Join with sl st.
Round 6 and Beyond
Repeat Round 5 until the motif reaches the measurement needed for either a body square or sleeve square.
- All body squares should be the same size.
- All sleeve squares should be the same size.
- Sleeve squares are larger than body squares.
Motif Tip
If the floral center cups slightly, block the squares before joining. Puff-petal centers often relax beautifully with light blocking.
How Many Squares to Make
Body Squares
Make 27 smaller floral granny squares.
Arrange them like this:
| Section | Number of Squares |
|---|---|
| Back panel | 15 |
| Left front panel | 6 |
| Right front panel | 6 |
| Total | 27 |
- Back panel: 5 squares across × 3 squares down
- Each front panel: 2 squares across × 3 squares down
Sleeve Squares
Make 8 larger floral granny squares.
Each sleeve uses:
- 2 squares across
- 2 squares down
So each sleeve is one rectangle of 4 large squares.
Make 2 sleeve rectangles total.
Block and Arrange the Motifs
Lay all the finished motifs on a flat surface.
Because this cardigan uses a floral center, blocking is especially helpful. It opens the petals and helps each square sit neatly before joining.
Once blocked, arrange the body motifs into:
- one back panel,
- two front panels,
- and two sleeve rectangles.
Because every square has the same flower motif, the cardigan will already feel coordinated. Still, check that the navy and powder-blue centers are evenly distributed and all motifs face the same direction if that matters to your styling preference.
Joining the Panels
Use a yarn needle and cream yarn to join the squares.
A mattress stitch or neat whip stitch both work well.
Back Panel
- Arrange 15 body squares in 5 columns and 3 rows.
- Join each row.
- Join the rows together.
Front Panels
- Arrange 6 body squares for the left front in 2 columns and 3 rows.
- Join them.
- Repeat for the right front.
Shoulder Seams
- Lay the back panel flat.
- Place the front panels over it with right sides together.
- Join the top edge of each front panel to the outer top sections of the back panel.
- Leave the center top section open to create the neckline.
Side Seams
- Fold the front panels down.
- Join side seams from the hem upward.
- Stop below the top to leave an armhole.
A helpful rule: the armhole circumference should roughly match the sleeve opening when the sleeve panel is folded into a tube.
Make and Attach the Sleeves
Construct the Sleeve Tubes
- Take one 2 × 2 sleeve rectangle.
- Fold it lengthwise with right sides together.
- Join the long edge to form a sleeve tube.
- Repeat for the second sleeve.
Attach Sleeves to Body
- Turn cardigan body inside out.
- Keep sleeve right side out.
- Insert sleeve into armhole.
- Match the sleeve seam to the underarm seam.
- Pin evenly with stitch markers.
- Sew around the armhole.
- Repeat for second sleeve.
Turn the cardigan right side out and check the fit.
Ribbed Sleeve Cuffs
The larger floral sleeves become more wearable and cozy when finished with simple ribbed cuffs.
Use cream or ivory yarn.
Prepare the Wrist Opening
Join yarn at the sleeve edge.
Work one round of sc evenly around the sleeve opening.
If needed, decrease evenly using sc2tog so the wrist opening fits comfortably.
Cuff Ribbing
- Ch 9.
- Sc in the second ch from hook and in each remaining ch. (8 sc)
- Sl st into the next 2 sleeve-edge sts.
- Turn.
- Skip the attachment sl sts and sc BLO across.
- Turn, ch 1, sc BLO across.
- Sl st into next 2 sleeve-edge sts.
- Rep until the cuff goes all the way around.
Join the short ends and fasten off.
Repeat for second sleeve.
Bottom Hem Ribbing
Join cream yarn at one lower front corner.
Work a foundation row of sc evenly across the bottom edge of the cardigan.
Then work ribbing the same way as the cuffs:
- Ch 9
- Work 8 sc
- Attach with 2 sl sts
- Work back and forth in BLO sc
Continue until you reach the opposite front corner.
Front Edging
Join cream yarn at one lower front edge.
Work sc evenly:
- up the first front edge,
- around the back neckline,
- and down the opposite front edge.
Work 1–3 rows total, depending on your desired band width.
Optional Buttonholes
If you want a button-front cardigan:
- Mark 2–4 button positions on one front band.
- On the next edging row, sc to marker, ch 2, skip 2 sts, continue.
- On the following row, work 2 sc into each ch-2 space.
Sew buttons to the opposite band.
Finishing
- Weave in all ends securely.
- Block the finished cardigan lightly if needed.
- Check seams, neckline, cuffs, and hem.
- Try it on and confirm sleeve comfort and drape.
Your Blue Floral Granny Square Cardigan is complete.
Customization Ideas
Make It More Romantic
Use a blush center, dusty denim petals, pale sky-blue outer petals, and an ivory border.
Make It Moody
Try camel center, charcoal petals, slate-blue outer petals, and a soft gray border.
Make It More Vintage
Use cream centers, faded navy petals, powder-blue outer petals, and antique white borders.
Make It Longer
Add one more row of body squares before assembly.
That means:
- 5 extra squares for the back
- 2 extra for each front
- 9 extra body squares total
Make It an Open Cardigan
Skip the buttons and keep the front band simple.
Frequently Asked Questions
Is this the same as a traditional granny square cardigan?
Not exactly. The construction is similar, but the motif itself is more decorative because it uses a layered floral center rather than a plain classic granny square.
How many floral motifs does this cardigan need?
This version uses 35 total motifs:
- 27 smaller body motifs
- 8 larger sleeve motifs
Can beginners make this cardigan?
Yes, if they’re comfortable with basic stitches and willing to learn a simple puff-petal motif.
Can I use other colors?
Absolutely. The floral motif works beautifully in soft vintage shades, bright retro palettes, or modern neutrals.
Should I block the motifs?
Yes, especially if your puff petals make the center curl slightly. Blocking helps the motifs sit flatter and join more neatly.
Final Thoughts
This cardigan is exactly the kind of project that turns a pretty crochet motif into something much more clickable, wearable, and memorable.
Instead of publishing just another square tutorial, you’re showing crocheters what they can make with the square — and that’s often the better hook.
The layered floral motif gives the cardigan a fresh look while the familiar joined-square construction keeps the project approachable.
It’s cozy, distinctive, highly visual, and much stronger as a finished-project content idea than the square by itself.