Blueberry Duckling Amigurumi Crochet Pattern
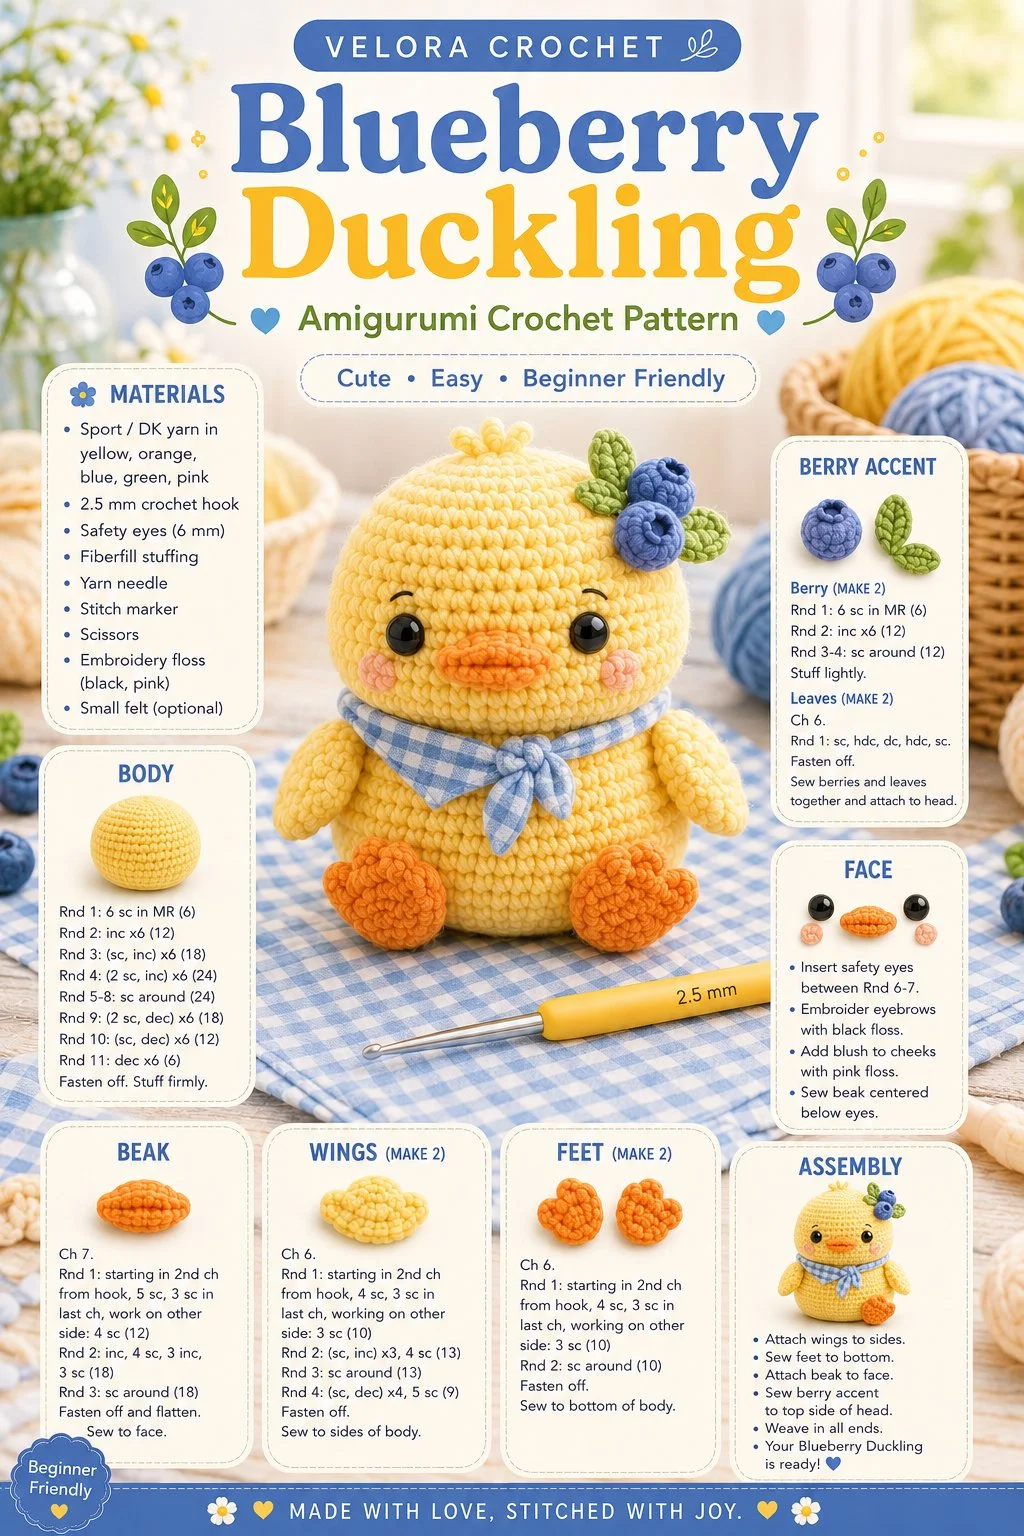
Creating a cute blueberry-themed duckling is a delightful DIY crochet project that brightens up any corner of your home or makes a perfect gift. With its charming round body, playful features like small wings, a sweet beak, and vibrant accents, this cheerful little character is not only a joy to make but also a joy to display. Whether you’re a seasoned crocheter or just starting your journey, this simple and beginner-friendly crochet pattern will guide you through each step to create a fun and colorful crochet toy or decoration.
Materials
- Yarn: Blue, yellow, orange, green (worsted weight)
- Crochet Hook: 4.0 mm (G/6)
- Safety Eyes: 6 mm
- Stitch Marker
- Fiberfill Stuffing
- Tapestry Needle
- Scissors
Abbreviations
- MR: magic ring
- ch: chain
- sc: single crochet
- inc: increase
- dec: decrease
- sl st: slip stitch
Body
- Start with a magic ring (MR).
- Round 1: 6 sc in MR (6)
- Round 2: inc in each stitch (12)
- Round 3: (sc in next stitch, inc) repeat 6 times (18)
- Round 4: (sc in next 2 stitches, inc) repeat 6 times (24)
- Rounds 5-10: sc in each stitch (24)
- Round 11: (sc in next 2 stitches, dec) repeat 6 times (18)
- Round 12: (sc in next stitch, dec) repeat 6 times (12)
- Round 13: dec in each stitch (6).
- Fasten off, leaving a long tail for sewing. Stuff the body lightly.
Head
- Start with a magic ring (MR).
- Round 1: 6 sc in MR (6)
- Round 2: inc in each stitch (12)
- Round 3: (sc in next stitch, inc) repeat 6 times (18)
- Round 4: (sc in next 2 stitches, inc) repeat 6 times (24)
- Round 5: (sc in next 3 stitches, inc) repeat 6 times (30)
- Rounds 6-8: sc in each stitch (30)
- Round 9: (sc in next 3 stitches, dec) repeat 6 times (24)
- Rounds 10-11: sc in each stitch (24)
- Round 12: (sc in next 2 stitches, dec) repeat 6 times (18)
- Fasten off, leaving a long tail for sewing. Lightly stuff the head.
Beak
- Use orange yarn.
- Ch 5, sc in the second ch from hook, sc in next 2 ch, 3 sc in last ch and continue on the other side: sc in next 2 ch, sl st to the first sc.
- Fasten off and leave a long tail for sewing.
Wings (Make 2)
- Use yellow yarn.
- Ch 5 and sc in the second ch from hook. Sc in next 2 ch, 3 sc in last ch, continuing on the other side: sc in next 2 ch, sl st to the first sc.
- Fasten off, leaving a long tail for sewing.
Feet (Make 2)
- Use orange yarn.
- Ch 5, sc in second ch from hook. Sc in next ch, 3 sc in last ch, and continue on the other side: sc in next ch, sl st to the first sc.
- Fasten off, leaving a long tail for sewing.
Berry Accent
- Use green yarn.
- Ch 4, sc in second ch from hook, ch 1, turn, sc in first ch, sl st to the end.
- Fasten off, leaving a long tail for sewing.
Face Details
Sew the safety eyes onto the head securely, placing them about 4-5 stitches apart. Attach the beak centered below the eyes, and you can add a little blush or rosy cheeks with embroidery if you wish.
Assembly and Finishing
- Position the head on top of the body and sew securely.
- Attach the wings to either side of the duckling’s body.
- Stitch the feet to the bottom of the body, ensuring they are even.
- Finally, attach the berry accent to the head or body for a playful touch.
Tips for the Best Result
- Use a light stuffing for the body and head to maintain the shape without overstuffing.
- Consider using stitch markers to keep track of your rounds; this can make stitching much more manageable.
- Carefully sew each piece into place to ensure symmetry, which enhances the adorable look of your duckling.
Creating this playful blueberry-themed duckling is not just a fun crochet project; it’s a delightful piece that adds a touch of whimsy to your space. It also makes for a wonderful handmade gift for friends or family. Feel free to experiment with various colors to make each duckling unique! Happy crocheting!