Introduction
A shell and lace crochet blanket has that soft heirloom feeling people instantly love. It looks delicate, cozy, and detailed, but it can still be made with clear sections if the construction is planned carefully.
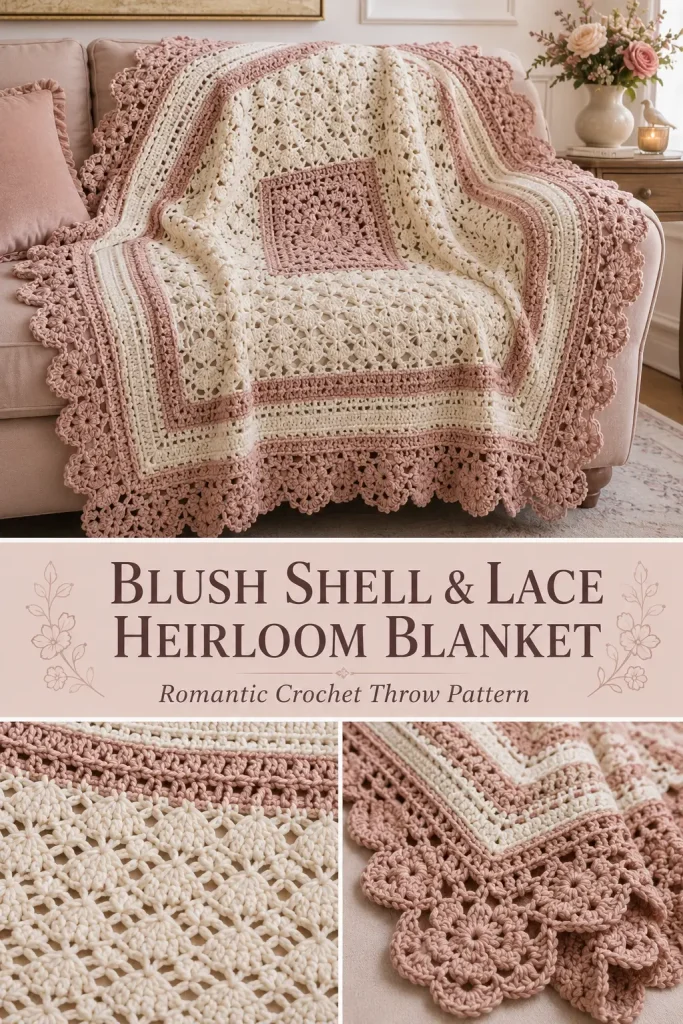
This Blush Shell & Lace Heirloom Crochet Blanket is an original crochet blanket pattern inspired by the look of a textured square throw with shell sections, lace bands, striped color framing, and a decorative scalloped floral edge. It is not a copy of the paid designer pattern. This version uses its own stitch counts, repeat sections, border layout, and construction so the blanket is buildable and safe to publish.
The blanket is worked from the center outward in joined rounds. That is the best way to handle every side correctly, because the shell texture, stripe bands, lace rounds, and scalloped border can grow evenly around all four sides.
Description
The finished blanket is a square throw with a warm cream center, soft blush-mauve accent bands, and a wide decorative outer border. The center section uses a simple shell stitch texture. Around it, the blanket grows with solid cream rounds, mauve stripe rounds, lace eyelet rounds, and a final floral scalloped edge.
The outer border is the statement detail. It uses rounded shell clusters along each side and shaped corner shells so the edge stays square instead of curling or pulling. The result is soft, feminine, and heirloom-inspired without being overly complicated.
This crochet blanket is beautiful for sofa styling, bedroom decor, handmade gifts, nursery display, cozy reading corners, or a special keepsake throw.
Materials
- Worsted weight yarn in warm cream
- Worsted weight yarn in dusty blush-mauve
- 5.0 mm crochet hook
- Yarn needle
- Scissors
- Stitch markers
- Measuring tape
Finished Size
Approximate finished size:
- 48 x 48 inches
You can make it smaller or larger by adjusting the number of center rounds and border repeats.
Gauge
Approximate gauge:
- 4 shell repeats = 4 inches
- 8 rounds = 4 inches
Gauge is not extremely strict for a throw, but each side should stay flat and even.
Abbreviations
- ch: chain
- sc: single crochet
- hdc: half double crochet
- dc: double crochet
- tr: treble crochet
- sl st: slip stitch
- st: stitch
- sts: stitches
- sp: space
- ch-sp: chain space
- FO: fasten off
Special Stitches
Shell
Work 5 dc in the same stitch or space.
Small Shell
Work 3 dc in the same stitch or space.
Lace V-Stitch
Work dc, ch 1, dc in the same stitch or space.
Pattern Notes
The blanket is worked from the center outward in square rounds.
Ch 3 counts as a double crochet.
Join each round with a slip stitch unless stated otherwise.
Use stitch markers in each corner so the blanket stays square.
Each corner is worked with extra stitches to prevent pulling.
The final border is designed with scalloped shells around all four sides.
Change colors at the end of a round by completing the final slip stitch with the new color.
Step-by-Step Instructions
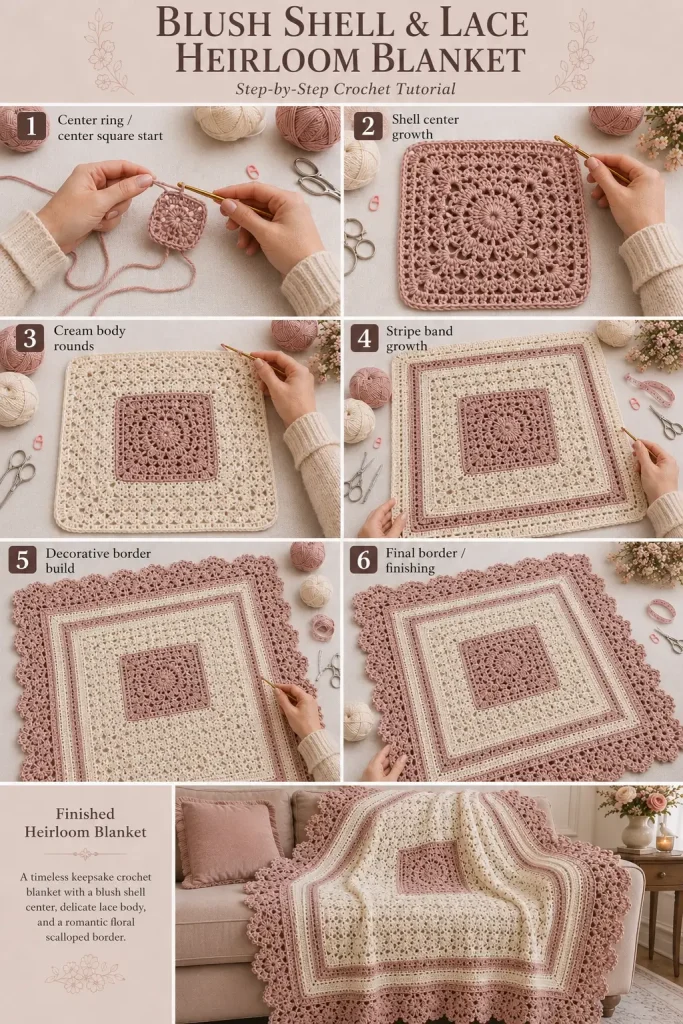
Center Square
Use warm cream yarn.
Round 1
Ch 4.
Join with sl st to form a ring.
Ch 3.
Work 2 dc into the ring.
Ch 2.
Repeat 3 times: 3 dc into the ring, ch 2.
Join with sl st to top of beginning ch 3.
You should have 4 clusters and 4 corner spaces.
Round 2
Sl st into the next corner ch-2 sp.
Ch 3, work 2 dc, ch 2, 3 dc in the same corner sp.
Ch 1.
In each remaining corner ch-2 sp, work: 3 dc, ch 2, 3 dc.
Ch 1 between each corner group.
Join with sl st to top of beginning ch 3.
Round 3
Sl st into the next corner ch-2 sp.
Ch 3, work 2 dc, ch 2, 3 dc in the same corner sp.
Ch 1.
Work 3 dc in each side ch-1 sp.
Ch 1.
In each corner ch-2 sp, work: 3 dc, ch 2, 3 dc.
Continue around.
Join with sl st.
Rounds 4–8
Repeat Round 3.
Each round adds one more 3-dc group along each side.
This creates the basic square center foundation.
Shell Texture Center Section
Continue with warm cream yarn.
Round 9
Sl st into the next corner ch-2 sp.
Ch 3, 2 dc, ch 2, 3 dc in the same corner sp.
Skip next 3-dc group.
Work shell in next ch-1 sp.
Skip next 3-dc group.
Repeat across each side: shell in next ch-1 sp, skip next 3-dc group.
In each corner ch-2 sp, work: 3 dc, ch 2, 3 dc.
Join with sl st.
Round 10
Sl st into the corner ch-2 sp.
Ch 3, 2 dc, ch 2, 3 dc in same corner.
Work shell in the center dc of each shell from the previous round.
In each corner, work: 3 dc, ch 2, 3 dc.
Join with sl st.
Rounds 11–16
Repeat Round 10.
Keep all shell columns aligned.
The center should now have a raised shell texture on all four sides.
Cream Stabilizing Band
Round 17
Ch 1.
Sc in each stitch around.
In each corner ch-2 sp, work: sc, ch 2, sc.
Join with sl st.
Round 18
Ch 1.
Hdc in each st around.
In each corner ch-2 sp, work: hdc, ch 2, hdc.
Join with sl st.
Round 19
Repeat Round 18.
Change to dusty blush-mauve at the final join.
First Blush Stripe Band
Use dusty blush-mauve yarn.
Round 20
Ch 1.
Hdc in each st around.
In each corner ch-2 sp, work: 2 hdc, ch 2, 2 hdc.
Join with sl st.
Round 21
Ch 1.
Hdc in each st around.
In each corner ch-2 sp, work: 2 hdc, ch 2, 2 hdc.
Join with sl st.
Round 22
Ch 1.
Sc in each st around.
In each corner ch-2 sp, work: sc, ch 2, sc.
Join with sl st.
Change to warm cream.
Cream Lace Band
Use warm cream yarn.
Round 23
Ch 3.
Dc in next st.
Ch 1, skip next st.
Repeat around: dc in next 2 sts, ch 1, skip next st.
At each corner ch-2 sp, work: dc, ch 2, dc.
Join with sl st.
Round 24
Ch 3.
Dc in each dc and ch-1 sp around.
In each corner ch-2 sp, work: 2 dc, ch 2, 2 dc.
Join with sl st.
Round 25
Ch 1.
Sc in each st around.
In each corner ch-2 sp, work: sc, ch 2, sc.
Join with sl st.
Second Blush Stripe Band
Use dusty blush-mauve yarn.
Round 26
Ch 1.
Hdc in each st around.
In each corner ch-2 sp, work: 2 hdc, ch 2, 2 hdc.
Join with sl st.
Round 27
Ch 1.
Hdc in each st around.
In each corner ch-2 sp, work: 2 hdc, ch 2, 2 hdc.
Join with sl st.
Round 28
Ch 1.
Sc in each st around.
In each corner ch-2 sp, work: sc, ch 2, sc.
Join with sl st.
Change to warm cream.
Wide Cream Body Band
Round 29
Ch 3.
Dc in each st around.
In each corner ch-2 sp, work: 2 dc, ch 2, 2 dc.
Join with sl st.
Round 30
Ch 1.
Hdc in each st around.
In each corner ch-2 sp, work: 2 hdc, ch 2, 2 hdc.
Join with sl st.
Round 31
Ch 3.
Dc in each st around.
In each corner ch-2 sp, work: 2 dc, ch 2, 2 dc.
Join with sl st.
Round 32
Ch 1.
Sc in each st around.
In each corner ch-2 sp, work: sc, ch 2, sc.
Join with sl st.
Change to dusty blush-mauve.
Outer Blush Floral Shell Border
This border gives the blanket the rounded scalloped look. Work carefully and keep the corners marked.
Round 33
Ch 1.
Sc in each st around.
In each corner ch-2 sp, work: sc, ch 2, sc.
Join with sl st.
Round 34
Ch 3.
Skip next st.
Work shell in next st.
Skip next st.
Dc in next st.
Repeat around: skip next st, shell in next st, skip next st, dc in next st.
At each corner ch-2 sp, work: shell, ch 2, shell.
Join with sl st.
Round 35
Ch 1.
Sc in each dc around.
When you reach each shell, work:
Sc in first dc, hdc in second dc, dc in third dc, hdc in fourth dc, sc in fifth dc.
In each corner ch-2 sp, work: sc, ch 2, sc.
Join with sl st.
This round shapes the shell petals without making the edge too wavy.
Round 36
Ch 3.
Work shell in the center dc of each shaped shell from the previous round.
Work dc in each single dc between shells.
At each corner, work: shell, ch 2, shell.
Join with sl st.
Round 37
Repeat Round 35.
Round 38
Ch 1.
Sc in each st around.
In each corner ch-2 sp, work: sc, ch 2, sc.
Join with sl st.
Round 39: Final Scallop Edge
Ch 1.
Skip next st.
Work 5 dc in next st.
Skip next st.
Sl st in next st.
Repeat around.
At each corner, work 7 dc in the corner ch-2 space.
Continue the scallop pattern evenly around all four sides.
Join with sl st.
FO and weave in ends.
Optional Extra Floral Texture
For a more floral look like the inspiration photo, add small surface circles in the outer blush border.
Use dusty blush-mauve yarn and a yarn needle.
Around the center of selected shells, sew a small spiral stitch or small ring of chain stitches.
Do this only on every other shell to avoid overcrowding.
This is optional and decorative.
Finishing
Weave in every yarn tail securely.
Lay the blanket flat.
Check that all four sides are even.
Gently shape the corners and scallops with your hands.
Lightly steam-block if your yarn allows it.
Do not press the shell stitches flat.
Let the blanket dry completely before folding or photographing.
Size Adjustments
Smaller Baby Photo Blanket
Stop after Round 28, then work the outer shell border.
Use only for supervised photos or decor.
Medium Throw
Follow the pattern as written.
Larger Blanket
After Round 32, add more cream or blush hdc rounds before starting the outer border.
Keep the corner formula the same:
In each corner, work 2 stitches, ch 2, 2 stitches for dc or hdc rounds.
For sc rounds, work sc, ch 2, sc in each corner.
Tips & Variations
Use cream and blush-mauve for a soft heirloom look.
Use ivory and taupe for a neutral farmhouse blanket.
Use cream and dusty rose for a romantic bedroom throw.
Use sage and ivory for a botanical version.
If the blanket starts cupping inward, add more stitches at the corners.
If the blanket waves too much, reduce extra corner stitches slightly or block gently.
For a softer drape, use a slightly larger hook.
For more structure, use a slightly smaller hook.
Always keep the corner ch-2 spaces marked while working the border.
FAQ
Is this the exact Shell & Lace Throw pattern?
No. The original designer pattern appears to be sold as a paid PDF, while this is a new original pattern with its own stitch counts, round structure, shell sections, lace bands, and border.
Why is this worked from the center outward?
A square blanket with decorative borders needs balanced growth on all four sides. Working from the center outward makes it easier to keep the blanket square and handle every side correctly.
Can I make this as a rectangle?
This version is written as a square blanket. To make a rectangle, the construction would need to be redesigned from rows instead of center-out rounds.
What yarn works best?
Worsted weight acrylic, wool-blend, or soft washable yarn works well. Choose a smooth yarn so the shell and lace texture is visible.
How do I stop the border from ruffling?
Keep your tension even, do not add extra stitches along the sides, and use the corner formulas exactly. If needed, block the blanket lightly after finishing.
Conclusion
The Blush Shell & Lace Heirloom Crochet Blanket is designed to handle the full look properly: textured shell center, cream lace bands, blush stripe sections, a wide decorative shell border, shaped corners, and a soft scalloped edge.
It has the cozy heirloom feeling of a special handmade throw, but the construction is planned clearly from the center outward so every side grows evenly and the border sits flat.




I would very much like the pattern for the blanket shown in the video. I do not have an account that supports the download suggested. Is there another link please?
Could you please specify the amount of wool that is required to complete this project?