Intro
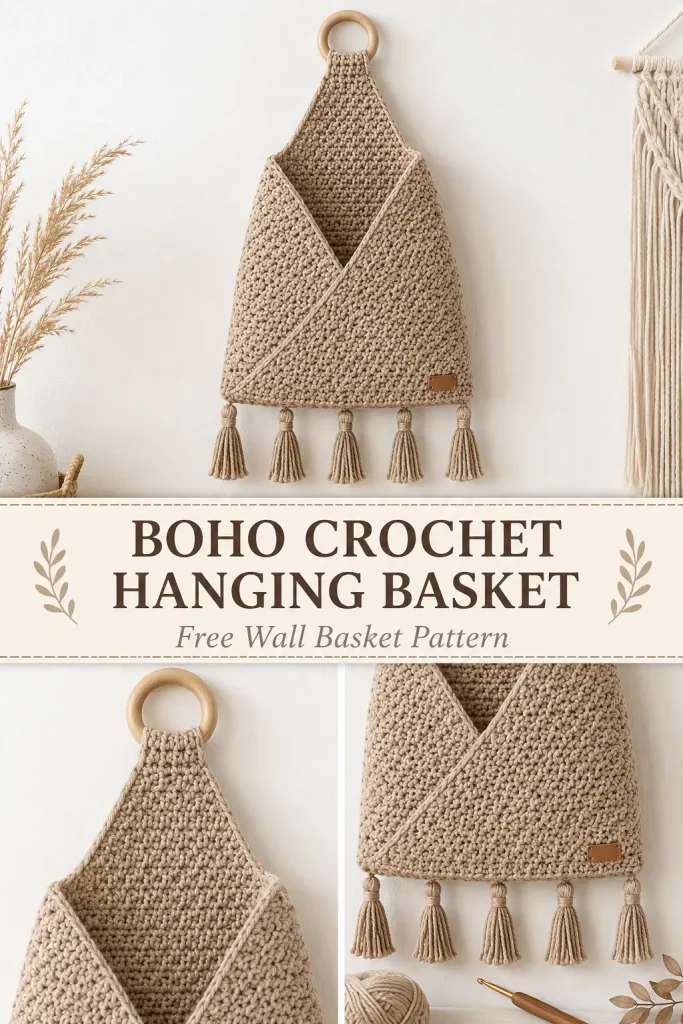
This boho crochet hanging basket combines textured stitches, an overlapping front pocket, a natural wooden hanging ring, and a row of soft tassels for a beautiful handmade wall-storage piece.
The finished design has the same distinctive silhouette as the reference: a wide lower body that narrows toward the top, a short crochet tab wrapped securely around a wooden ring, two overlapping front panels that create the deep V-shaped opening, and five tassels hanging evenly across the bottom.
It works beautifully for storing lightweight items such as rolled washcloths, yarn, dried flowers, small accessories, or other little household essentials.
Description
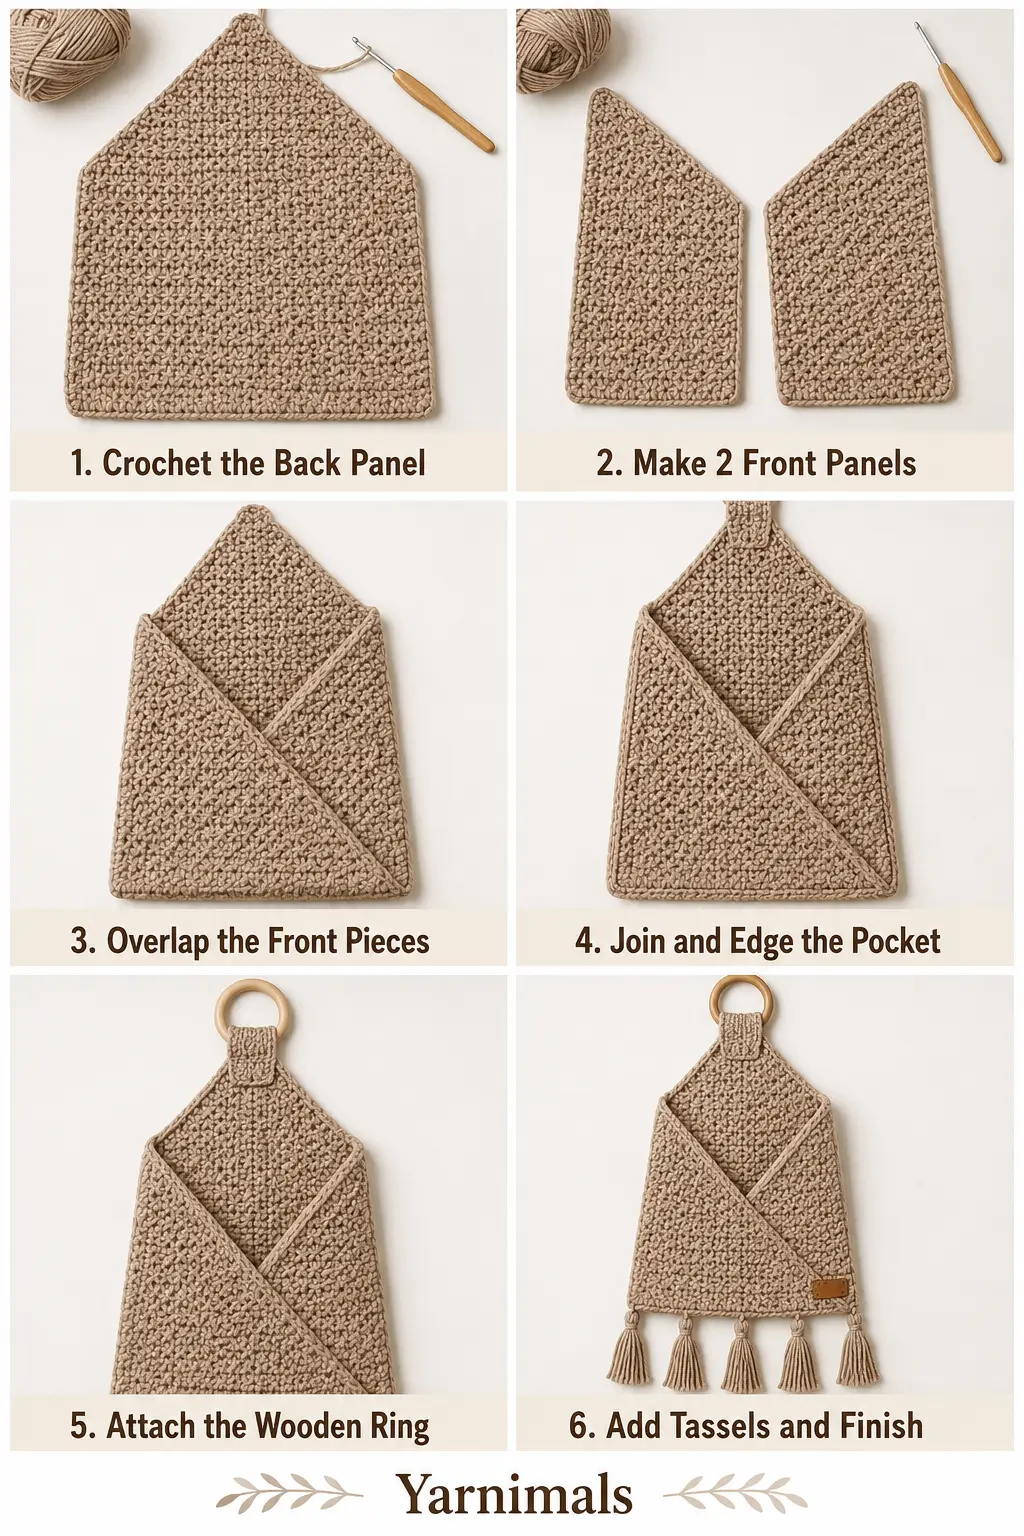
This crochet hanging basket is constructed from one large tapered back panel and two smaller overlapping front pocket panels. The back starts wide and gradually narrows toward the top before continuing into a sturdy hanging tab. Two textured triangular side panels are sewn across the lower front, overlapping at the center to create the deep envelope-style pocket opening visible in the inspiration. A natural wooden ring is enclosed by the upper tab, while five matching yarn tassels decorate the straight lower edge.
For the closest look, use a warm oatmeal, taupe, camel, or natural flax-colored yarn with visible texture.
Materials
- Worsted weight #4 cotton, cotton-acrylic, or soft wool-blend yarn
- Approximately 300–350 yards
- 5 mm crochet hook
- 1 natural wooden ring, approximately 50–60 mm diameter
- Yarn needle
- Scissors
- Measuring tape
- Stitch markers
- Small piece of cardboard for making even tassels
- Optional small blank faux-leather handmade tag
Abbreviations
- ch – chain
- sc – single crochet
- hdc – half double crochet
- dc – double crochet
- dc2tog – double crochet 2 together
- sl st – slip stitch
- st – stitch
- sts – stitches
- Xdc – crossed double crochet
Pattern Notes
- US crochet terminology is used.
- Difficulty: intermediate beginner.
- The basket is made from three main crochet pieces.
- The large back panel includes the hanging tab.
- Two mirrored front panels create the overlapping pocket.
- The textured stitch uses crossed double crochet for the slightly diagonal, rustic surface.
- Ch 2 at the beginning of a double crochet row does not count as a stitch.
- Ch 1 at the beginning of a single crochet row does not count as a stitch.
- Keep the fabric fairly firm so the hanging basket holds its shape.
- The finished project is intended for lightweight storage rather than heavy objects.
Approximate Finished Size
Using worsted yarn and a 5 mm hook:
- Width at bottom: approximately 27–29 cm
- Main body height: approximately 35–38 cm
- Hanging tab: approximately 7–8 cm
- Overall height excluding tassels: approximately 42–45 cm
- Tassels: approximately 10–12 cm long
Gauge does not need to be exact, but all three panels should use the same yarn, hook, and tension.
Special Stitch
Crossed Double Crochet – Xdc
Skip the next stitch.
Dc in the following stitch.
Then reach back and work 1 dc into the skipped stitch.
The two double crochet stitches cross over one another and create a subtle diagonal texture.
Step-by-Step Instructions
Part 1: Crochet the Main Back Panel
Using the main taupe or oatmeal yarn:
Ch 41.
Row 1
Hdc in the second ch from the hook.
Hdc in every chain across.
40 sts
Ch 1 and turn.
Row 2
Sc in every stitch across.
40 sts
Ch 2 and turn.
Row 3 – Textured Row
Dc in first st.
Work Xdc across the next 38 sts.
Dc in final st.
40 sts
Ch 1 and turn.
Row 4
Sc across.
40 sts
Ch 2 and turn.
Rows 5–24
Repeat Rows 3–4.
You should now have a broad rectangular lower section with a dense, slightly diagonal crochet texture.
This forms the back of the storage pocket.
Shape the Upper Body
Now begin narrowing both sides to create the long tapered silhouette.
Row 25
Dc2tog over the first 2 sts.
Continue in the established textured pattern until 2 sts remain.
Dc2tog over final 2 sts.
38 sts
Ch 1 and turn.
Row 26
Sc across.
38 sts
Row 27
Decrease one stitch at each side again.
36 sts
Row 28
Sc across.
Continue in this way:
- textured row: decrease 1 st at each end
- following row: sc evenly without decreasing
Repeat until 12 sts remain.
This gradual shaping creates the long triangular upper section visible in the reference.
Do not fasten off.
Part 2: Make the Ring Tab
Once 12 sts remain, stop decreasing.
Continue with:
Tab Row 1
Sc across.
12 sts
Ch 1 and turn.
Remaining Tab Rows
Sc across each row.
Continue until the tab measures approximately:
8 cm
Fasten off, leaving a long sewing tail.
Do not attach the ring yet.
Part 3: Crochet the Left Front Pocket Panel
The front pocket is created from two overlapping panels rather than one flat piece.
Using the same yarn:
Ch 27.
Row 1
Hdc in second ch from hook and across.
26 sts
Ch 1 and turn.
Row 2
Sc across.
Ch 2 and turn.
Row 3
Dc in first st.
Work crossed dc stitches across.
Dc in final st.
Ch 1 and turn.
Row 4
Sc across.
Now begin creating the diagonal upper edge.
Row 5
Decrease at the inner edge only.
Dc2tog over the first 2 sts.
Continue the textured pattern across the remaining stitches.
Row 6
Sc evenly across.
Row 7
Work the established texture, decreasing one stitch again at the same inner edge.
Continue alternating:
- textured row with 1 decrease at the inner edge
- sc row without decreasing
until approximately 8 sts remain.
Fasten off.
The finished piece should resemble a right-angled wedge:
- one straight vertical outer edge
- one straight lower edge
- one long diagonal inner edge
Part 4: Crochet the Right Front Pocket Panel
Make a second panel exactly like the first.
The two pieces are identical.
When assembling the basket, simply flip the second piece so its diagonal edge runs in the opposite direction.
This creates the symmetrical crossed front.
Part 5: Arrange the Pocket Panels
Lay the large back panel flat with the right side facing upward.
Position the first pocket panel over the lower left side.
Its:
- straight outer edge should follow the left side of the back
- lower edge should align with the bottom
- diagonal edge should travel downward toward the center/right
Position the second pocket panel over the lower right side.
Its:
- straight outer edge follows the right side
- lower edge aligns with the bottom
- diagonal edge travels downward toward the center/left
Allow the two panels to overlap several centimeters at the lower center.
The diagonal edges should create a deep V-shaped opening.
Before sewing, compare the arrangement to the desired shape.
The opening should be wide near the upper middle and narrow where the panels overlap toward the bottom.
Part 6: Join the Front Pocket
Pin or stitch-marker the panels temporarily in position.
Using the same yarn and a yarn needle, sew:
- the straight left edge of the left panel to the back
- its lower edge to the bottom
- the straight right edge of the right panel to the back
- its lower edge to the bottom
Where the two lower panels overlap, stitch through both front layers and the back for several centimeters along the bottom.
This reinforces the base of the pocket.
Do not sew the diagonal upper edges closed.
Those diagonal edges form the actual pocket opening.
Part 7: Edge the Diagonal Opening
To give the pocket the neat raised edges visible in the reference, add a simple crochet border.
Join yarn near the upper end of one diagonal edge.
Work sc evenly down the diagonal.
Continue across the overlapping lower center if necessary.
Work up the opposite diagonal.
Fasten off.
The edging should remain firm but not tight enough to distort the pocket.
Part 8: Attach the Wooden Ring
Insert the narrow top tab through the wooden ring from front to back.
Fold approximately 3–4 cm of the tab downward behind the main tab.
The ring should now sit inside the fold.
Using the long yarn tail, sew through both layers of the tab securely.
Stitch across the full width several times.
The wooden ring must be firmly enclosed and should not slide from side to side.
Weave in the yarn end.
You should now have the characteristic narrow green- or taupe-colored top tab and natural wooden ring silhouette shown in the reference.
Part 9: Create the Five Tassels
The reference design has five evenly spaced tassels along the bottom.
Cut a piece of cardboard approximately:
12 cm long
Wrap yarn around the cardboard approximately 25–30 times for each tassel.
Cut through the wrapped yarn along one end.
Take the bundle and fold it in half.
Cut a separate yarn strand approximately 25 cm long.
Use this strand to attach the folded center of the bundle securely to the bottom edge of the basket.
Cut another strand approximately 20 cm long.
Wrap it firmly around the tassel approximately 1.5 cm below the upper fold.
Tie securely.
Trim the lower ends evenly.
Finished tassel length should be approximately:
10–12 cm
Make 5 tassels total.
Tassel Placement
Attach:
- Tassel 1 near the left corner
- Tassel 2 between the left corner and center
- Tassel 3 at the center
- Tassel 4 between center and right corner
- Tassel 5 near the right corner
Keep the spacing even.
All five tassels should hang from the same horizontal lower edge.
Part 10: Optional Decorative Tag
The inspiration includes a small rectangular label near one lower front corner.
To recreate that finishing detail without branding, use a small plain unbranded faux-leather or washable fabric tag.
Position it near the lower right edge of the front pocket.
Sew through the corner holes securely with matching yarn or thread.
This is optional and does not affect the construction.
Finishing
Weave in every loose yarn end.
Arrange the overlapping pocket panels so the V-shaped opening is symmetrical.
Straighten the diagonal edging.
Gently block the main crochet body if necessary, but avoid stretching the pocket opening.
Comb or straighten the tassels with your fingers and trim them evenly.
Hang the basket from the wooden ring.
Design Consistency Lock
For the closest finished result, preserve these exact features:
- one elongated tapered back panel
- warm natural taupe/oatmeal yarn
- dense diagonal-looking crochet texture
- one narrow tab at the top
- one natural wooden hanging ring
- two overlapping front pocket panels
- deep V-shaped front opening
- visible diagonal crochet edging
- straight lower edge
- exactly 5 matching tassels
- optional small neutral label at one lower corner
Do not replace the V-shaped pocket with a straight rectangular pocket.
Do not use a single flat front panel.
Do not add multiple wooden rings, handles, flowers, granny squares, buttons, or fringe around the sides.
Tips & Variations
Cotton or cotton-blend yarn will give the basket good stitch definition and enough structure for the overlapping front panels.
For a rustic boho version, use oatmeal, camel, taupe, flax, or warm beige.
For a botanical look, sage or moss green works beautifully with the natural wooden ring.
If the basket feels too floppy, drop down to a 4.5 mm hook.
For a larger hanging organizer, increase the starting chain of the back panel and make both front panels proportionally wider.
You can also shorten the tassels for a more minimal modern appearance.
Use the basket for lightweight items only. Heavy objects can distort the pocket and place too much stress on the wooden ring.
FAQ
What can I put inside this crochet hanging basket?
It works best for lightweight items such as rolled washcloths, spare yarn, scarves, dried flowers, small craft supplies, or lightweight bathroom accessories.
How is the V-shaped opening created?
Two separate triangular crochet panels overlap across the front. Their diagonal inner edges remain open, forming the deep V-shaped pocket.
Can I make it without tassels?
Yes. The basket is fully functional without them, but the five tassels are an important part of the boho appearance shown in the inspiration.
Conclusion
This boho crochet hanging basket turns a simple wall organizer into a decorative handmade feature. The textured tapered body, crossed envelope-style pocket, wooden hanging ring, and five soft tassels create the distinctive relaxed look of the reference while still giving you useful storage. Make it in warm neutral yarn for a rustic home, or choose your favorite earthy shade for a personalized crochet wall organizer.



