Brown Patchwork Granny Square Cardigan
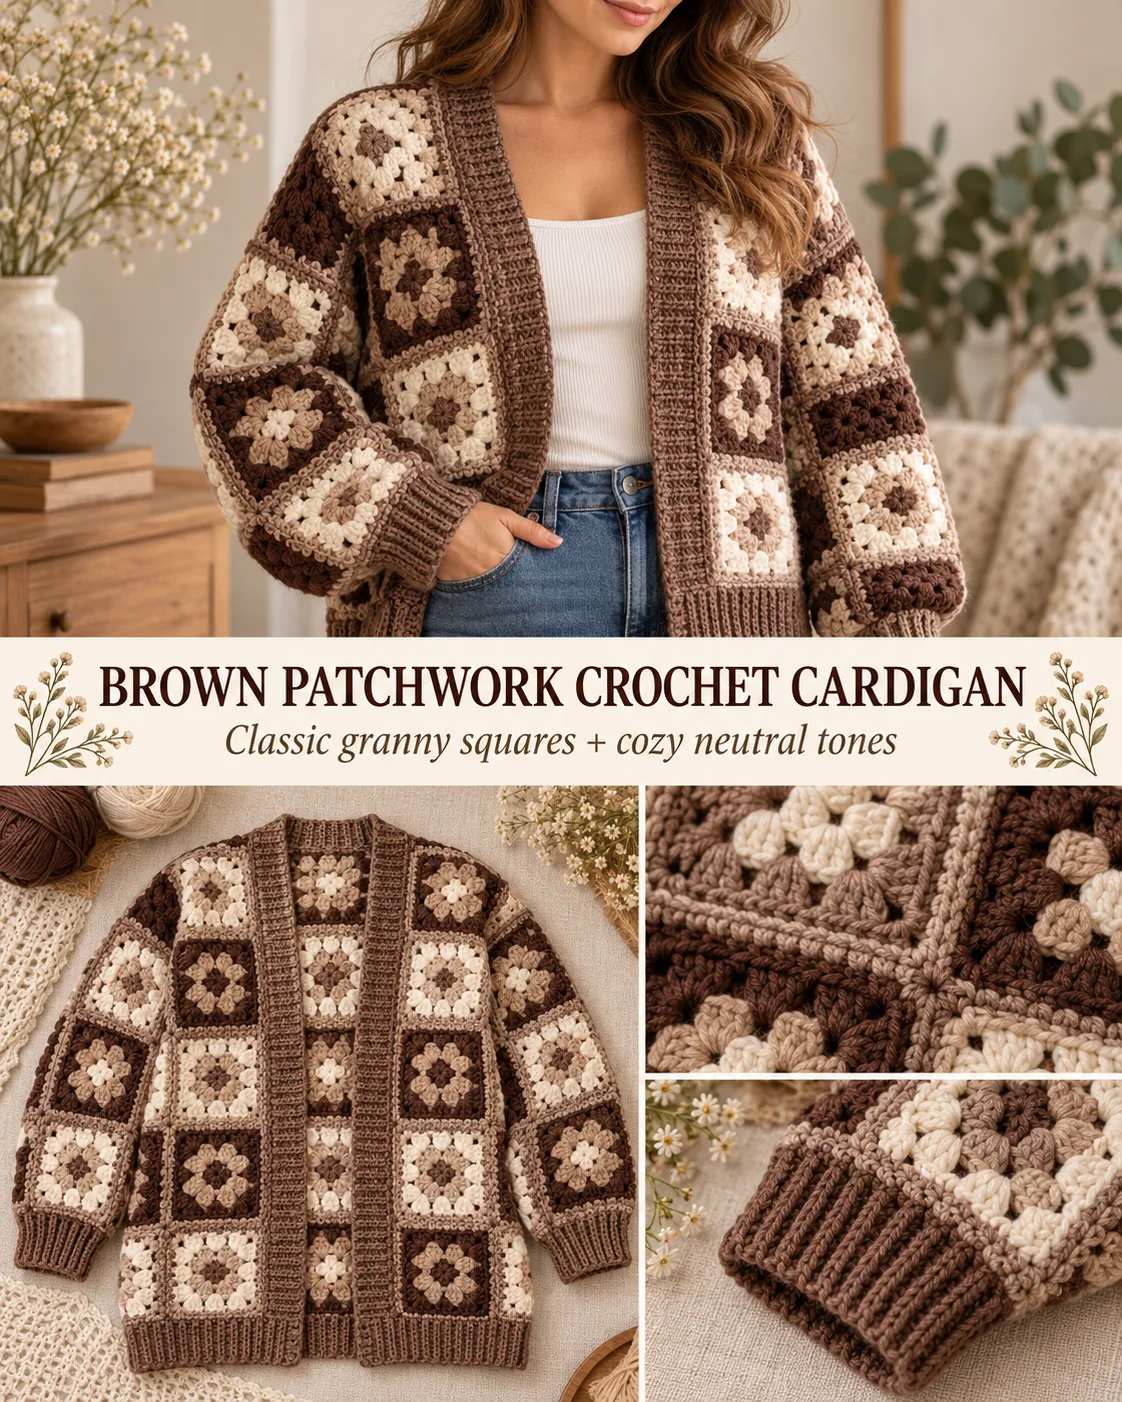
The Brown Patchwork Granny Square Cardigan is a relaxed open-front garment built from exactly 58 four-round granny squares in espresso brown, camel-taupe, and soft ivory. This corrected Yarnimals version is locked to one adult M/L size and now includes the complete shoulder, neckline, armhole, sleeve, side-seam, cuff, hem, and front-band geometry needed to assemble the garment without guessing.
The key to this construction is blocking every motif to exactly 5.5 inches before joining. Once the motifs match, the back, two fronts, and two sleeve panels are predictable rectangles. The shoulder seams use only the outer one-square width on each side, leaving the center of the back and the two inner front-square top edges free to form the neckline. Each 16.5-inch sleeve top then fits into a 16.5-inch armhole made from 8.25 inches of front edge plus 8.25 inches of back edge.
Finished Size and Project Specification
- Size: one relaxed adult M/L
- Approximate closed chest circumference including front bands: 46-47 inches / 117-119 cm
- Back width before bands: 22 inches / 56 cm
- Body motif length before hem ribbing: 27.5 inches / 70 cm
- Finished length: approximately 31 inches / 79 cm
- Sleeve motif length before cuff: 16.5 inches / 42 cm
- Finished sleeve length from dropped armhole: approximately 19-19.5 inches / 48-50 cm
- Motifs: exactly 58
- Blocked motif size: exactly 5.5 inches / 14 cm
- Yarn: #4 worsted-weight
- Hook: 5.0 mm H-8
- Colors: espresso brown, camel-taupe, soft ivory
- Construction: joined motif panels with dropped shoulders and attached BLO sc ribbing
Materials
- Approximately 1,050 yd / 960 m espresso brown worsted yarn
- Approximately 1,000 yd / 915 m camel-taupe worsted yarn
- Approximately 900 yd / 825 m soft ivory worsted yarn
- 5.0 mm crochet hook
- Optional 4.5 mm hook for firmer ribbing
- Tapestry needle
- Locking stitch markers
- Scissors
- Flexible measuring tape
- Blocking mats and rust-proof pins
Skill Level
Confident beginner to intermediate. You should be comfortable making granny squares, changing colors, blocking motifs to a fixed size, joining motifs, measuring armhole depth, and working attached back-loop single-crochet ribbing.
Abbreviations
- ch = chain
- sc = single crochet
- dc = double crochet
- sl st = slip stitch
- sp = space
- st(s) = stitch(es)
- BLO = back loop only
- RS = right side
- WS = wrong side
Gauge
One completed four-round granny square must block to 5.5 x 5.5 inches. The garment dimensions are built directly from that measurement, so make and block one sample before committing to the full motif set.
If the square is too small, move up a hook size. If it is too large, move down. Do not add or remove granny rounds to change the size because the entire panel layout assumes four-round motifs.
Locked Motif Colorways
Square A:
- Round 1: espresso
- Round 2: camel-taupe
- Round 3: ivory
- Round 4: espresso
Square B:
- Round 1: camel-taupe
- Round 2: ivory
- Round 3: espresso
- Round 4: camel-taupe
Make exactly 29 Square A and 29 Square B.
Exact Motif Distribution by Garment Piece
- Back, 4 x 5: 20 motifs = 10 A + 10 B
- Left front, 2 x 5: 10 motifs = 5 A + 5 B
- Right front, 2 x 5: 10 motifs = 5 A + 5 B
- Left sleeve, 3 x 3: 9 motifs = 5 A + 4 B
- Right sleeve, 3 x 3: 9 motifs = 4 A + 5 B
Total: 58 motifs = 29 A + 29 B.
Checkerboard Layouts
Back — 4 across x 5 down:
- Row 1: A, B, A, B
- Row 2: B, A, B, A
- Row 3: A, B, A, B
- Row 4: B, A, B, A
- Row 5: A, B, A, B
Left front — 2 across x 5 down:
- Row 1: A, B
- Row 2: B, A
- Row 3: A, B
- Row 4: B, A
- Row 5: A, B
Right front — mirror the left front:
- Row 1: B, A
- Row 2: A, B
- Row 3: B, A
- Row 4: A, B
- Row 5: B, A
Left sleeve — 3 x 3:
- Row 1: A, B, A
- Row 2: B, A, B
- Row 3: A, B, A
Right sleeve — 3 x 3:
- Row 1: B, A, B
- Row 2: A, B, A
- Row 3: B, A, B
Joining Method
Use camel-taupe yarn for all structural motif seams. Place motifs RS up. Hold two edges side by side and slip stitch through corresponding back loops, matching corner spaces, ch-1 spaces, and dc stitch tops in order. Keep every seam relaxed enough that two joined blocked squares still measure 11 inches across.
If you prefer sewing, a neat whipstitch through corresponding back loops can be substituted, but use the same method on the entire garment.
Construction Overview
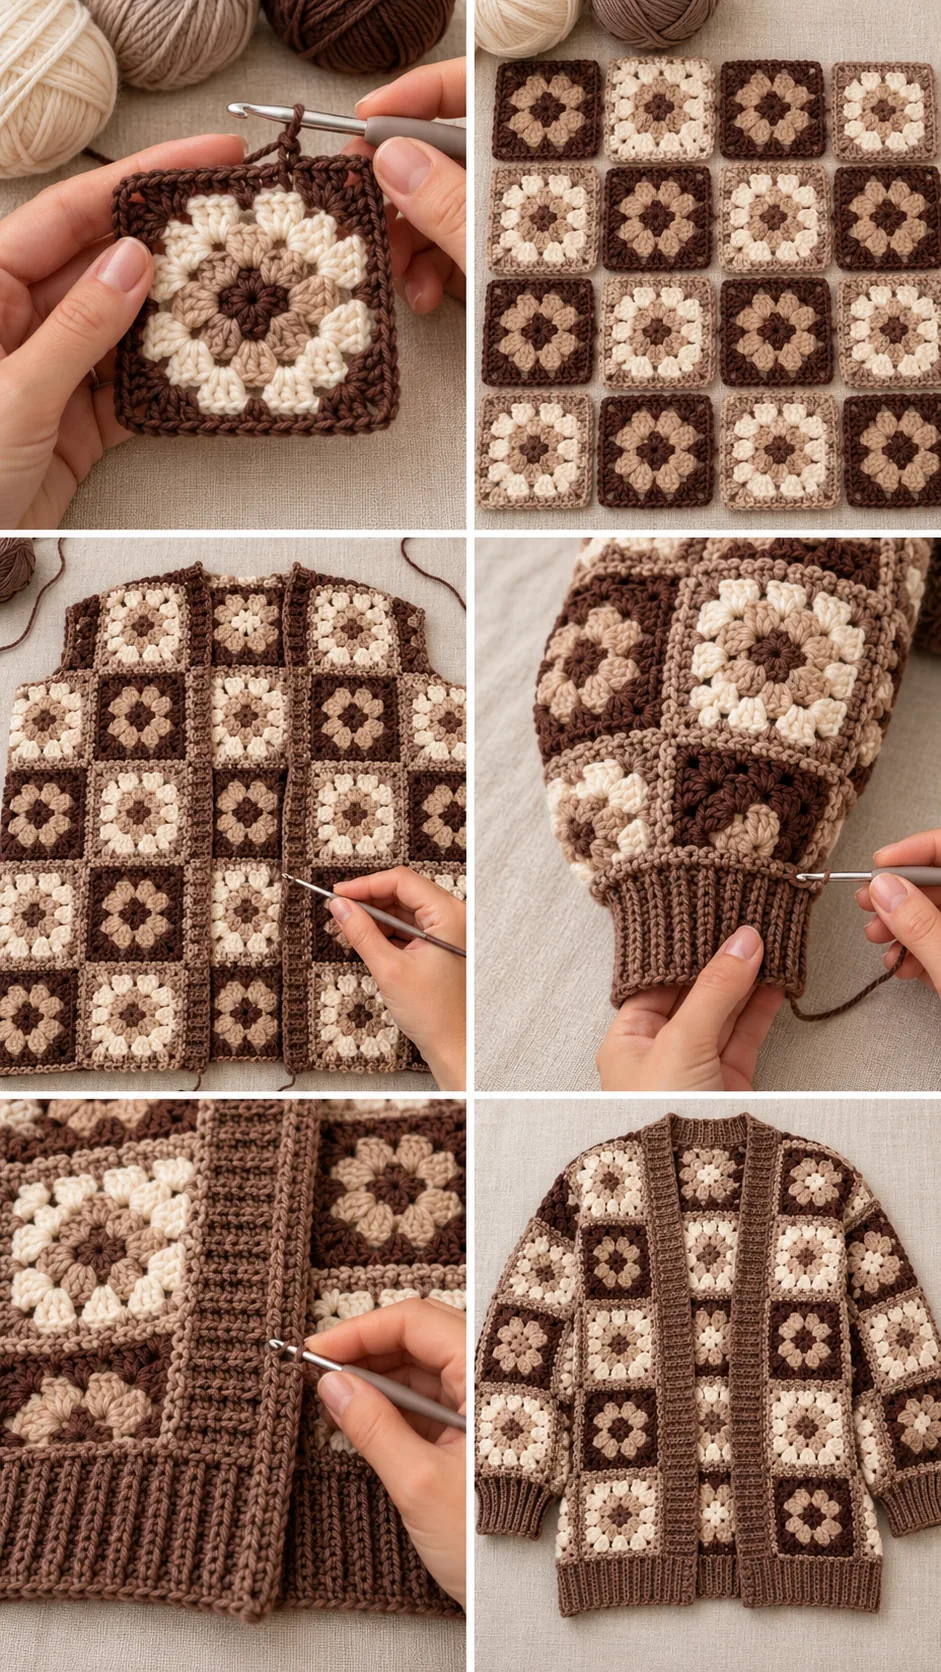
Make and block all 58 motifs. Join the back, both front panels, and both sleeve panels separately. Join only one motif-width at each shoulder. Mark an 8.25-inch armhole depth on both the front and back outer edges. Close the body side seams below those markers. Attach one 16.5-inch sleeve edge around each 16.5-inch armhole. Close each sleeve underarm seam. Add exact-count foundation stitches around the cuffs, hem, and front/neck opening, then work attached BLO sc ribbing.
Detailed Pattern
Four-Round Granny Square
Round 1: With the first color, make a MR. Ch 3, 2 dc in ring, ch 2. *3 dc in ring, ch 2* three more times. Join to top of beginning ch-3. Fasten off. 4 granny groups and 4 corner spaces.
Round 2: Join the second color in any corner. Ch 3, 2 dc, ch 2, 3 dc in the same corner. Ch 1. In each remaining corner work (3 dc, ch 2, 3 dc), placing ch 1 between corners. Join and fasten off.
Round 3: Join the third color in any corner. Work (3 dc, ch 2, 3 dc) in the corner, ch 1, 3 dc in the next side ch-1 space, ch 1. Repeat around, working the full corner group in every ch-2 corner and one 3-dc group in every side ch-1 space. Join and fasten off.
Round 4: Join the fourth-round color in any corner. Work (3 dc, ch 2, 3 dc) in each corner. Along each side work 3 dc in each of the two ch-1 spaces, placing ch 1 between every granny group. Join and fasten off.
Weave in ends and block to exactly 5.5 inches square.
Join the Back Panel
Arrange the 20 back motifs in the locked 4 x 5 layout. Join motifs across each horizontal row, then join the five completed rows to one another. The finished blocked back should measure approximately 22 inches wide x 27.5 inches long.
Join the Two Front Panels
Join the 10 left-front motifs into a 2 x 5 rectangle. Join the 10 right-front motifs into a mirrored 2 x 5 rectangle. Each blocked front should measure approximately 11 inches wide x 27.5 inches long.
Join the Sleeve Panels
Join each set of nine sleeve motifs into a 3 x 3 square panel. Each sleeve panel should measure approximately 16.5 x 16.5 inches. Leave both panels flat for now.
Correct Shoulder and Neck Construction
Lay the back RS up with the top 22-inch edge nearest you. Label the four top back squares from left to right B1, B2, B3, B4.
Place the left front against the upper-left side of the back. The outer top square of the left front aligns with B1. Join exactly one 5.5-inch square edge to form the left shoulder seam. Leave the top edge of the inner left-front square unjoined.
Place the right front against the upper-right side of the back. Join the outer top square of the right front to B4 for exactly one 5.5-inch shoulder seam. Leave the inner right-front top square unjoined.
Do not join the fronts across B2 or B3. The free top edges of back squares B2 and B3 form an 11-inch back-neck edge. The free top edge of one inner square on each front continues that neckline toward the open front.
Mark the Armholes
At each outer shoulder, place a marker exactly where the 5.5-inch shoulder seam meets the outer body edge.
Measure 8.25 inches downward along the front outer edge and place a marker. Measure 8.25 inches downward along the corresponding back outer edge and place another marker. This is exactly 1.5 motif heights on the blocked panels.
The distance around the open armhole from the front marker, up to the shoulder, and down to the back marker is:
- 8.25 inches front
- 8.25 inches back
- 16.5 inches total
This exactly matches one 16.5-inch edge of the 3 x 3 sleeve panel.
Close the Body Side Seams
Starting at the left-front armhole marker, join the left-front outer edge to the corresponding back edge all the way to the lower hem. The joined length is approximately 19.25 inches. Repeat on the right side.
Do not close the 8.25-inch sections above the markers. Those remain open for the sleeves.
Attach the Sleeves
Choose one 16.5-inch edge of the left sleeve panel as the sleeve cap edge. Mark its center at 8.25 inches.
Match that center mark to the outer end of the shoulder seam. Match one sleeve corner to the front armhole marker and the other sleeve corner to the back armhole marker.
Join the entire 16.5-inch sleeve edge evenly around the open armhole: approximately 8.25 inches attaches to the front edge and 8.25 inches attaches to the back edge. Keep motif seam intersections aligned where possible but prioritize matching the three marked points and keeping the sleeve edge flat.
Repeat for the right sleeve.
Close the Sleeve Underarm Seams
Fold each attached 3 x 3 sleeve panel lengthwise so its two free 16.5-inch side edges meet under the arm. Starting at the cuff edge, join those matching edges up to the armhole. The sleeve now forms a tube approximately 16.5 inches long before ribbing.
Cuff Foundation Round — 42 sc
Each cuff opening is made from the three motif edges along the end of the sleeve. Join camel-taupe at the underarm seam.
Work 14 sc evenly across each of the three 5.5-inch motif edges. Join to the first sc. 42 sc total.
Attached Cuff Ribbing
Using the 4.5 mm hook if desired, ch 13.
Ribbing Row 1: Sc in 2nd ch from hook and in next 11 ch. 12 sc. Sl st into the first cuff-foundation sc. Ch 1, turn.
Ribbing Row 2: Sc in BLO of each of the 12 ribbing stitches. Ch 1, turn.
Ribbing Row 3: Sc in BLO of each of the 12 stitches back toward the cuff. Sl st into the next unworked cuff-foundation sc. Ch 1, turn.
Repeat Rows 2-3, anchoring each ribbing return to the next unworked cuff stitch, until all 42 cuff stitches have been used. Seam the final ribbing row to the foundation edge of Ribbing Row 1. Fasten off. Repeat for the second cuff.
The cuff ribbing is approximately 3 inches deep. The 42 anchored rib rows draw the 16.5-inch motif opening inward to a comfortable wrist opening without changing the sleeve-panel count.
Bottom Hem Foundation — 112 sc
The open lower edge contains eight motif-edge segments total: two from the left front, four from the back, and two from the right front.
Join camel-taupe at the lower inner corner of one front. Work 14 sc evenly across each 5.5-inch motif edge around the entire lower opening. 8 edges x 14 sc = 112 sc.
Bottom Hem Ribbing
Ch 15. Sc in 2nd ch from hook and across. 14 sc. Work attached BLO sc ribbing along the 112-stitch hem foundation exactly as for the cuffs, anchoring each return row to the next unworked foundation sc. Continue until all 112 foundation stitches are used. Fasten off.
Front and Neck Foundation — 196 sc
The open front-and-neck path contains exactly 14 motif-edge segments:
- 5 vertical motif edges up the left front
- 1 free top edge of the left inner front square
- 2 back-neck motif edges across B2 and B3
- 1 free top edge of the right inner front square
- 5 vertical motif edges down the right front
Join camel-taupe at the lower left-front corner. Work 14 sc evenly along each of these 14 motif-edge segments. 196 sc total.
Front and Neck Ribbing
Ch 13. Sc in 2nd ch from hook and across. 12 sc. Work the same attached BLO sc ribbing used for the cuffs, anchoring each return row to the next unworked front/neck foundation stitch until all 196 stitches are used.
Keep your ribbing tension relaxed through the two front-neck corners and across the 11-inch back neck. If needed, switch from the 4.5 mm hook to the 5.0 mm hook only for this band so it lies flat.
Assembly Measurements Before Finishing
- Back before bands: 22 x 27.5 inches
- Each front before bands: 11 x 27.5 inches
- Each shoulder seam: 5.5 inches
- Back neck: 11 inches
- Armhole opening: 16.5 inches total
- Body side seam below armhole: approximately 19.25 inches
- Sleeve before cuff: 16.5 inches long
- Cuff foundation: 42 sc
- Hem foundation: 112 sc
- Front/neck foundation: 196 sc
Visual Checkpoints
After blocking the motifs: stack them. Corners and sides should align, and every square should measure 5.5 inches.
After joining the back: the panel must measure 4 motifs across x 5 down.
After the shoulders: only one square-width is joined on each shoulder. If two front squares are joined on either shoulder, the neckline is wrong.
Before attaching sleeves: confirm 8.25 inches remains open on both front and back at each armhole.
After sleeve attachment: the sleeve panel center aligns to the shoulder seam and both sleeve corners meet the armhole markers.
Troubleshooting
The neck opening disappeared
Only the outer one-square width of each 2-square-wide front is joined to the back. Undo any seam joining an inner front square to one of the two center back squares.
The sleeve edge is longer than the armhole
Recheck the armhole markers. You need 8.25 inches open on the front and 8.25 inches on the back, for 16.5 inches total.
The sleeve is twisted
Before closing the underarm seam, make sure the 3 x 3 sleeve panel lies flat from shoulder to cuff and that the two free long edges meet directly under the arm.
The cuff is too loose
Confirm the cuff foundation contains exactly 42 sc, not one sc in every visible granny-square stitch. The controlled 42-stitch foundation is what reduces the wide motif sleeve to a wearable cuff.
The front band pulls the neckline inward
Use looser ribbing tension or the 5.0 mm hook around the front and neck. The 196 foundation sc should remain the same.
Finishing
Weave in every remaining tail on the WS, working each tail through the matching color wherever possible. Wet block or steam block according to the yarn label. Shape the cardigan flat, square the motif panels, align the front bands, and straighten the cuffs and hem. Let the garment dry fully before wearing.
Pattern at a Glance
- Make 58 squares: 29 A + 29 B.
- Block every motif to 5.5 inches.
- Back: 4 x 5.
- Each front: 2 x 5.
- Each sleeve: 3 x 3.
- Shoulders: join only outer 1-square width on each side.
- Armholes: leave 8.25 inches open on front and back.
- Sleeve cap edge: 16.5 inches.
- Cuff foundation: 42 sc each.
- Hem foundation: 112 sc.
- Front/neck foundation: 196 sc.
- Add attached BLO sc ribbing.
This corrected construction keeps the original 58-motif project lock while resolving the shoulder and armhole geometry: the neckline remains open, the sleeve edge exactly matches the measured armhole, and each finishing band begins from a controlled stitch count.