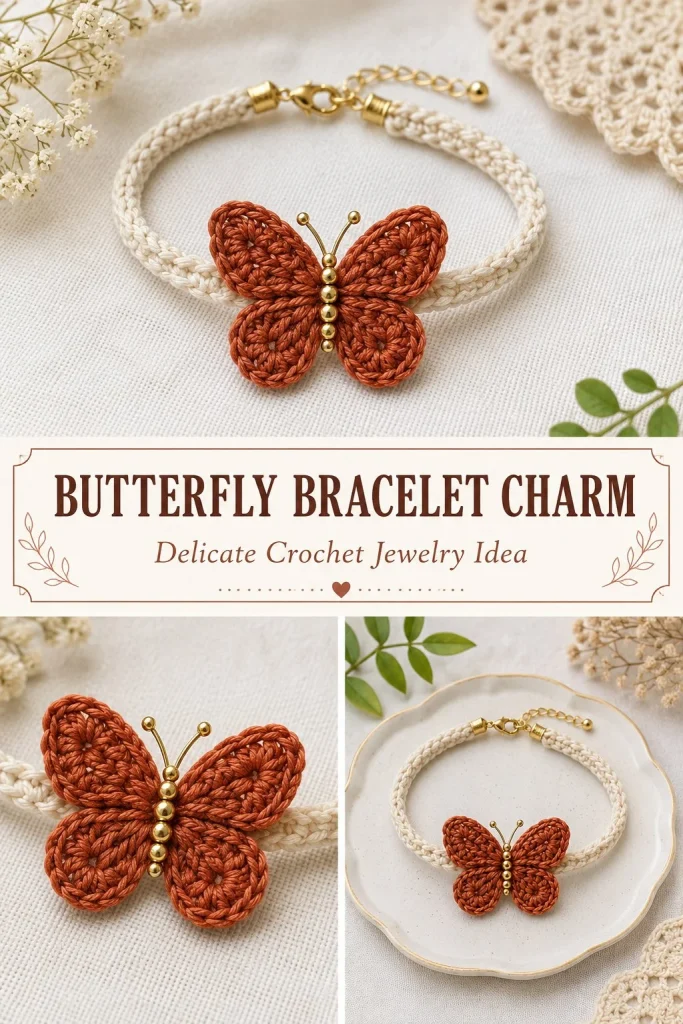
This delicate butterfly bracelet charm is a charming accessory that’s both adorable and practical. It features a detailed butterfly motif approximately 4.5 cm wide, perched on a slim, adjustable crochet band that fits comfortably around your wrist. Perfect as a sweet gift or a personal touch to your casual outfit, this pattern uses lightweight crochet thread and fine stitches, making it a rewarding project for beginners who want to improve their skills. I’ve found that working the wings into a magic ring and carefully shaping them ensures the butterfly holds its form beautifully. If you enjoy making small wearable charms, this piece fits wonderfully alongside other cute accessories like the easy crochet kawaii cat charm bracelet, which uses similar fine yarn and attention to detail.
Why You’ll Love This Crochet Pattern
- Creates an adjustable tie bracelet that fits many wrist sizes comfortably.
- Combines simple stitches into an elegant butterfly motif perfect for beginners.
- Uses fine cotton thread and a small hook, ideal for making dainty jewelry.
- Detailed shaping of the wings and antennae offers a satisfying finishing touch.
- Lightweight and wearable, great for gifts or layering with other accessories.
- Encourages practice of magic ring technique and stitch consistency for cleaner designs.
Finished Size
The butterfly measures about 4.5 cm (1.75 in) in width, and the band is approximately 1 cm (0.4 in) wide. The overall bracelet length adjusts to fit a typical adult wrist, with the foundation chain made 4 cm shorter than wrist circumference to allow room for ties. Keep in mind that finished size may vary slightly depending on your crochet tension and thread thickness.
Skill Level
This pattern suits advanced beginners because it combines basic stitches like single crochet (sc) and double crochet (dc) with working into a magic ring (MR) and joining pieces by sewing. While the stitch types are straightforward, shaping the butterfly wings and attaching antennae require some attention to detail. It’s beginner-friendly but encourages skill growth in shaping small motifs.
Materials Needed
- Size 3 crochet thread or fine cotton yarn: rust or pink (about 10 g), cream (15 g), dark brown scrap for details
- 2.25 mm crochet hook
- Yarn needle for sewing
- Scissors
- Optional small bead for the butterfly head
Stitches and Abbreviations
- MR (Magic Ring): Adjustable loop to start rounds seamlessly
- ch (chain): Create base loops
- sl st (slip stitch): Join or move stitches
- sc (single crochet): Basic single stitch
- hdc (half double crochet): Slightly taller stitch that adds texture
- dc (double crochet): Taller stitch for shaping
- tr (treble crochet): Even taller stitch that adds wing height
Gauge and Tension Notes
Exact gauge is not critical, but maintaining consistent tension helps the butterfly wings stay firmly shaped and the band lie flat without curling. Working too tightly can make stiff fabric; too loose can cause floppy wings or curling edges. Aim for a firm yet flexible feel, especially when pulling the magic ring closed.
Pattern Notes Before You Start
The butterfly is worked mainly from the center outwards, starting with the wing shapes crocheted into a magic ring. The four wings are worked in a specific order and shaped differently to form the characteristic butterfly silhouette. The antennae and body are added separately using dark brown yarn, then sewn onto the band. The band itself is crocheted in rows of single crochet for a flat, smooth base, with ties crocheted on both ends for adjustment. Color changes happen mainly between the butterfly wings and band, and sewing secures all pieces together neatly.
Step-by-Step Crochet Instructions
-
Butterfly Wings (Using Wing Color):
Make a magic ring (MR). Work the wings into this ring in this order:- Upper wing 1: ch 3, 3 tr, 3 dc, ch 3, sl st into the ring.
- Lower wing 1: ch 2, 3 dc, 3 hdc, ch 2, sl st into the ring.
- Lower wing 2: ch 2, 3 hdc, 3 dc, ch 2, sl st into the ring.
- Upper wing 2: ch 3, 3 dc, 3 tr, ch 3, sl st into the ring.
Pull the MR tightly closed and fasten off.
-
Antennae and Body (Dark Brown Yarn):
Chain 8. Starting in the second chain from hook, slip stitch in each chain (7 stitches total). At the starting end, ch 4, then slip stitch back along 3 chains (first antenna). Repeat: ch 4, slip stitch back along 3 chains (second antenna). Fasten off.
Sew this 7-stitch body vertically over the butterfly center with antennae on top. Optionally, sew a small bead as a head on top. -
Band Base:
Measure the wearer’s wrist and subtract about 4 cm (1.5 in) for tie space. Chain this number for the band foundation chain. Row 1: Starting in second chain from hook, single crochet (sc) across. Row 2: ch 1, turn, sc in each stitch across. Fasten off. -
Crochet Ties (Cream Yarn):
Join cream yarn at one short end of the band. Ch 26, then slip stitch (sl st) back along all 25 chains; fasten off. Repeat at the other end. Knot last 1 cm of each tie to prevent fraying.
Assembly and Finishing
Center the butterfly charm on the outside of the band. Sew the butterfly body several times through the band to secure firmly. Take care to add a small stitch on the inner edge of each wing so the charm lies flat without distorting wing shapes. Weave in all loose ends carefully to maintain a neat finish. Tie the two cords in a bow around the wrist, ensuring the bracelet is comfortable, not tight.
Helpful Tips
- When closing the magic ring, pull firmly to ensure a tight center that keeps the wings close together.
- Use a smaller hook if your stitches look loose to maintain crisp wing shapes.
- Weaving in ends under stitches rather than cutting close prevents fraying later.
- If the butterfly wings curl, gently block with a light steam or shape while damp.
- Place the bead for the head securely with multiple stitches to prevent loss with wear.
Common Mistakes to Avoid
- Not pulling the magic ring closed tightly, resulting in loose wings.
- Skipping the slip stitches in the bands’ ties which can cause them to fray or stretch out.
- Sewing the butterfly too tightly and crushing the wing shape. Sew each wing edge lightly to preserve form.
- Using yarn that’s too thick; this can make details bulky and lose delicate shaping.
- Over-tightening wrist ties, reducing comfort and causing uneven wear.
Customization Ideas
- Change the butterfly colors to match a season or outfit—soft pastels for spring, bright hues for summer.
- Use embroidery thread for an even finer, more delicate butterfly.
- Add more beads or tiny embroidered details on wings for sparkle.
- Make multiple butterflies and join them into a multi-charm bracelet for a layered look.
How to Use or Display This Crochet Project
This butterfly bracelet charm works wonderfully as a lightweight, everyday accessory. It can be worn alone for a subtle pop of color or layered with other bracelets for a boho style. It also makes a thoughtful handmade gift for friends or family who enjoy delicate jewelry, suitable for birthdays or special occasions.
Care Instructions
Hand wash gently in cold water with mild soap. Avoid wringing to keep the butterfly shape intact. Lay flat to dry, reshaping the wings gently while damp. Store flat or in a jewelry box to avoid crushing the delicate motif.
Frequently Asked Questions
Q: Can I use thicker yarn or a larger hook?
A: You can, but the butterfly will be bigger and less delicate. Adjust your stitches accordingly and be mindful that finer thread gives the best shape for jewelry.
Q: How do I keep the butterfly wings flat?
A: Make sure the magic ring is tight and sew the wings gently to the band without pulling them flat. Blocking the finished piece helps too.
Q: What if my band is too long or short?
A: Measure the wrist carefully and adjust the foundation chain accordingly. Remember to leave enough room for the ties.
Q: Can I make this non-adjustable?
A: Yes, replace yarn ties with a clasp or button closure for a fixed size.
Q: How to add more charms to the band?
A: Sew additional charms evenly spaced along the band, securing each as described.
Final Thoughts
This butterfly bracelet charm is a sweet and practical project that combines beginner-friendly stitches with a touch of delicate shaping. Taking your time with construction and finishing ensures a pretty accessory you’ll love to wear or gift. With a bit of practice, you’ll find it’s a wonderful pattern to build confidence in working with fine threads and small motifs. Enjoy creating a wearable piece that reflects your crafting touch.



