Chunky Round Crochet Basket With Built-In Handles
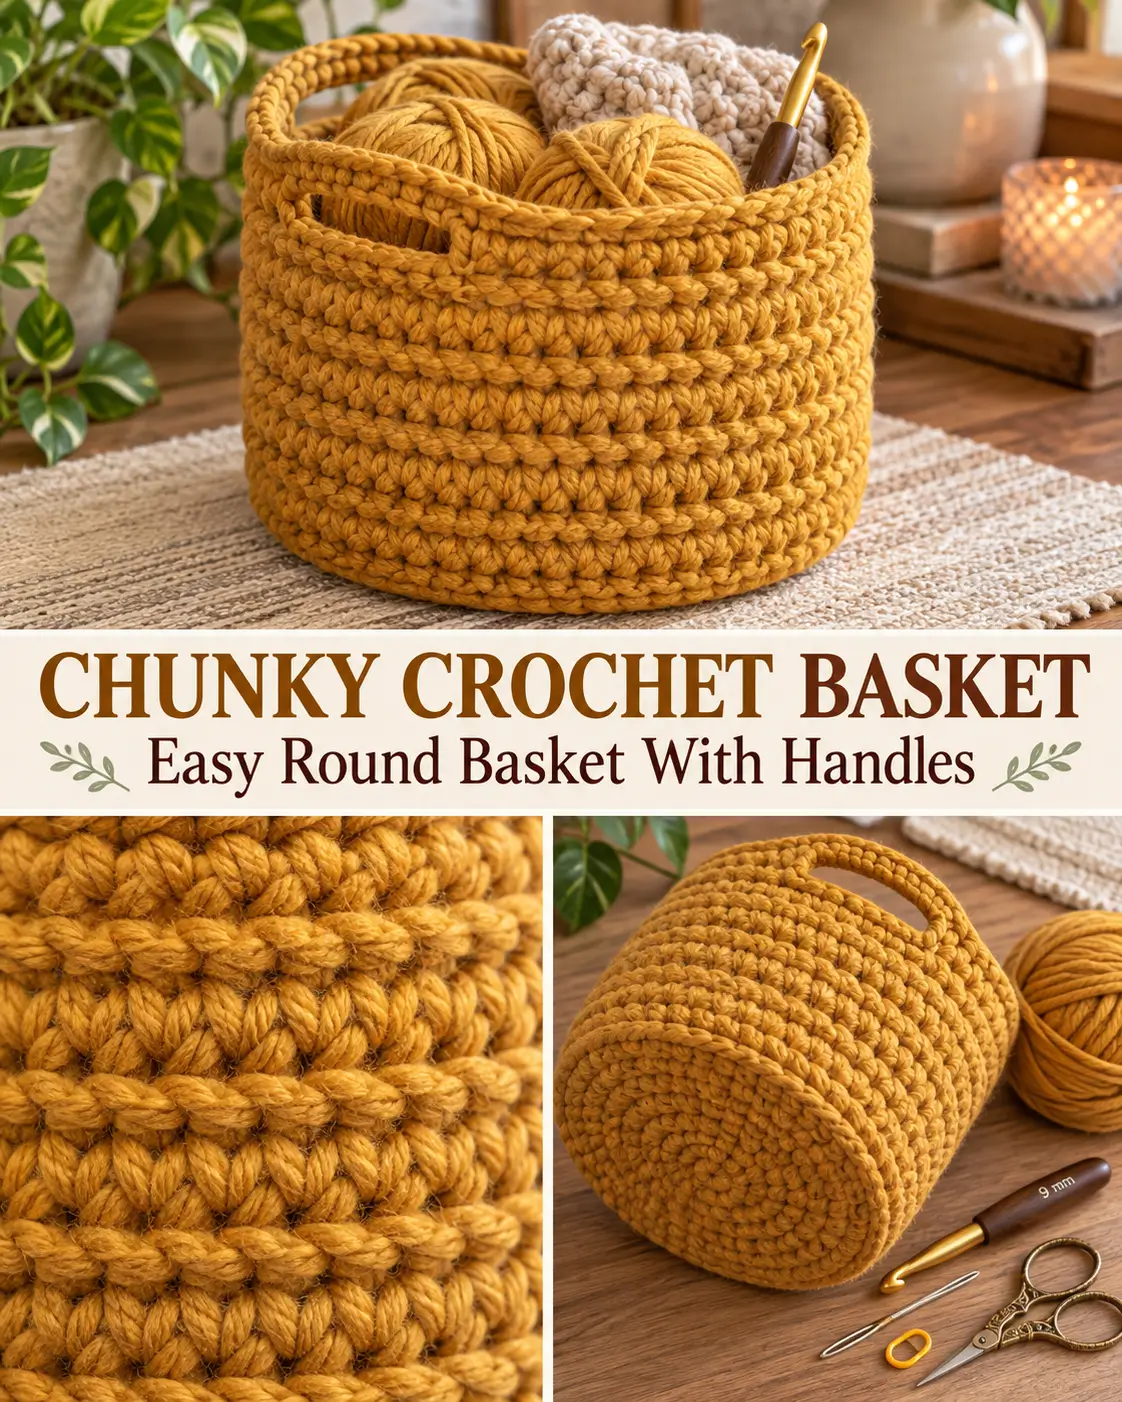
This chunky round crochet basket is sturdy enough to stand on its own while still feeling soft and flexible. The warm mustard-gold yarn gives it a cozy handmade look, and the two built-in handles make it easy to carry yarn, small projects, towels, toys, or everyday supplies.
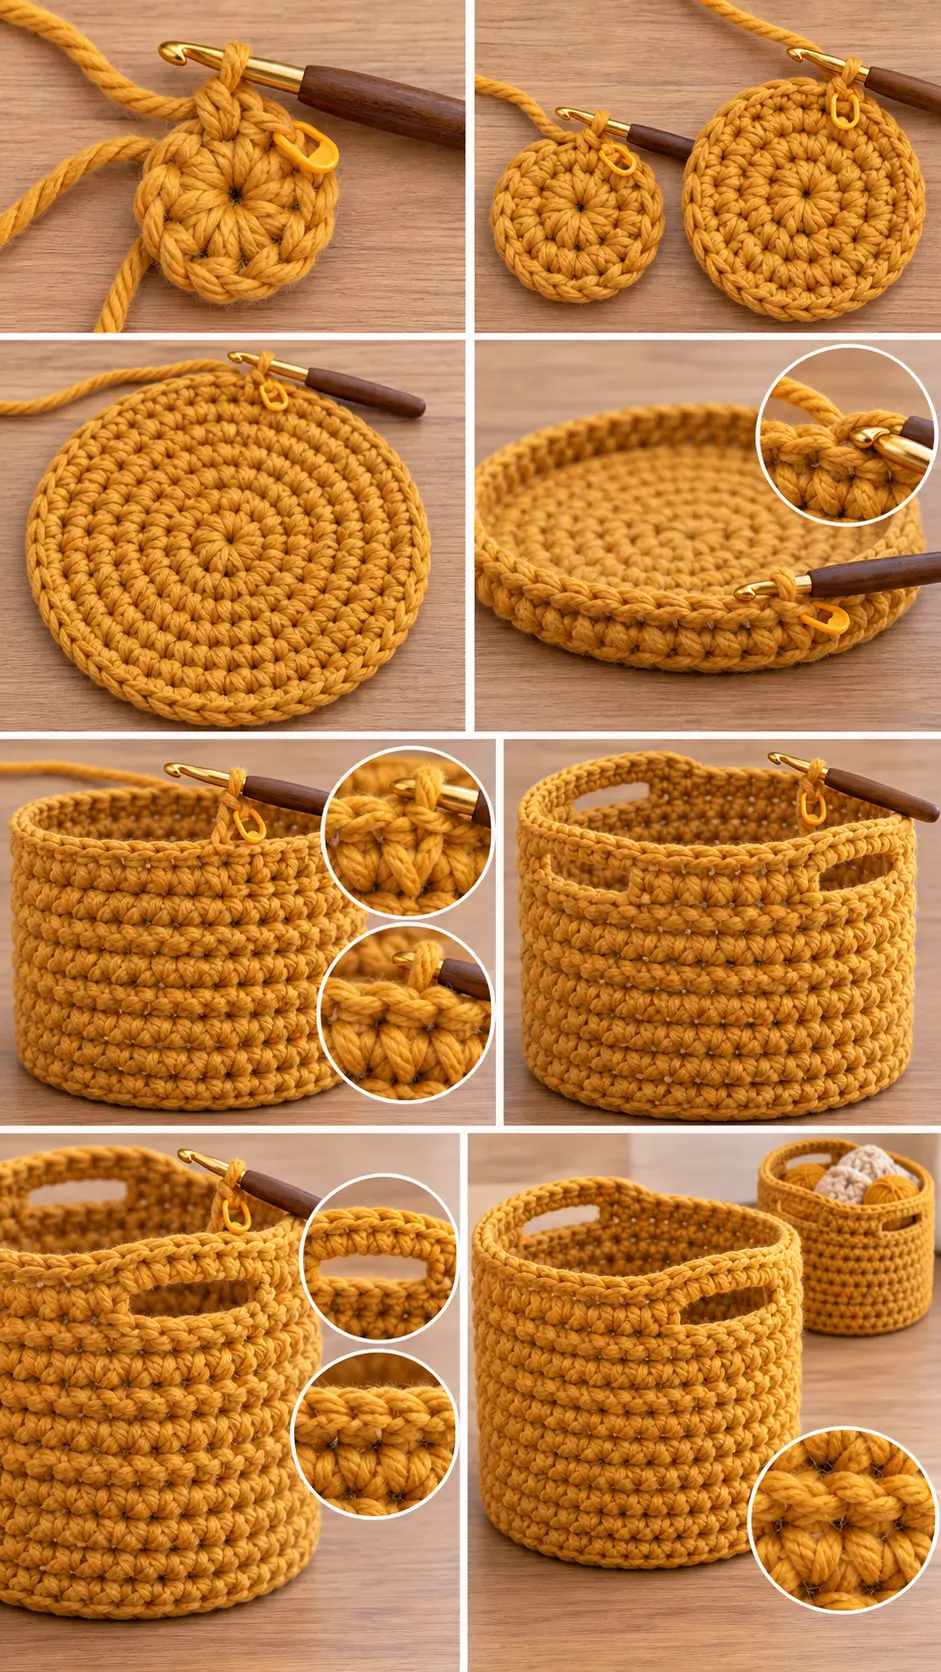
The basket is worked seamlessly from the bottom upward. A flat circular base is made first, followed by a crisp turning round that brings the sides upright. The body uses a dense textured stitch combination, and the handles are crocheted directly into the final rounds so there is nothing to sew on afterward.
Finished Size
Approximately:
10–11 inches / 25–28 cm in diameter
and:
7–8 inches / 18–20 cm tall
excluding the height of the handles.
The finished size may vary slightly depending on your yarn and tension.
Materials
- Super bulky #6 yarn
- Approximately 220–260 yards / 200–238 meters
- 9 mm crochet hook
- Stitch marker
- Yarn needle
- Scissors
Choose a firm super bulky yarn rather than a very soft plush yarn. A yarn with good stitch definition will help the basket keep its shape.
For the warm look shown here, use a:
mustard gold / butterscotch shade
Skill Level
Confident beginner
You should know how to:
- make a magic ring
- half double crochet
- single crochet
- work in the back loop only
- work in continuous rounds
- make chain stitches
- skip stitches
- slip stitch
The basket is worked in a spiral, so most rounds are not joined.
Abbreviations
This pattern uses US crochet terminology.
MR — magic ring
ch — chain
sc — single crochet
hdc — half double crochet
inc — 2 stitches in the same stitch
sl st — slip stitch
BLO — back loop only
st / sts — stitch / stitches
Special Stitch: Split Single Crochet
The textured body uses a split single crochet, sometimes called a center single crochet.
Instead of inserting the hook under the top loops of the next stitch, insert the hook directly through the center of the V-shaped stitch below.
Yarn over.
Pull up a loop.
Yarn over again and pull through both loops.
The stitch creates a compact knit-like V on the front of the basket.
Because this stitch is tighter than ordinary single crochet, keep your loops slightly taller than usual.
Construction
The basket is made in four sections:
- Flat circular base
- Turning round
- Textured side walls
- Built-in handles and finishing rim
The entire basket is made as one piece.
Basket Base
Work the base in continuous rounds.
Place a stitch marker in the first stitch of every round and move it upward as you work.
Do not join unless instructed.
Round 1
Make a magic ring.
Ch 1.
Work:
8 hdc into the MR
Pull the ring closed.
8 sts
Round 2
Work:
2 hdc in every stitch around
16 sts
Round 3
Repeat:
1 hdc in next st, 2 hdc in next st
around.
24 sts
Round 4
Repeat:
1 hdc in each of next 2 sts, 2 hdc in next st
around.
32 sts
Round 5
Repeat:
1 hdc in each of next 3 sts, 2 hdc in next st
around.
40 sts
Round 6
Repeat:
1 hdc in each of next 4 sts, 2 hdc in next st
around.
48 sts
The base should now measure approximately:
9½–10½ inches / 24–27 cm across
depending on tension.
Lay it flat before continuing.
The circle should lie smoothly without cupping or obvious ruffling.
Turning Round
The next round creates the sharp transition between the bottom and the side wall.
Round 7
Working in the back loop only:
Sc in every stitch around.
48 sts
Do not increase.
As this round develops, the fabric should begin turning upward naturally.
Textured Basket Sides
The side texture alternates split single crochet with back-loop single crochet.
This creates a chunky surface with small vertical ridges and defined V-shaped stitches.
Round 8
Repeat around:
split sc in next st
sc BLO in next st
Continue the repeat all the way around.
48 sts
Rounds 9–14
Repeat Round 8.
For every round:
split sc in next st, sc BLO in next st
around.
Maintain:
48 stitches
Do not increase.
Because the stitch count is even, the texture should continue lining up neatly around the basket.
Check the Height
After Round 14, the basket should have a low cylindrical shape.
The side wall should measure approximately:
5–5½ inches / 12.5–14 cm
from the turning ridge.
If you want a taller basket, add one or two additional textured rounds before making the handles.
Keep the stitch count at:
48
Handle Round
The basket has two handles positioned directly opposite each other.
Switch to ordinary single crochet for easier handle construction.
Round 15
Sc in the next:
8 stitches
Ch:
8
Skip the next:
8 stitches
Sc in the next:
16 stitches
Ch:
8
Skip the next:
8 stitches
Sc in the final:
8 stitches
You have now created two matching handle openings.
Do not join.
The handle placement is:
8 sc — ch 8 — skip 8 — 16 sc — ch 8 — skip 8 — 8 sc
Both handles should sit directly opposite one another.
Reinforce the Handles
Round 16
Sc in each of the first:
8 sc
When you reach the first ch-8 handle loop, work:
8 sc around the chain loop
Work around the chain itself rather than forcing the hook into individual chain stitches.
Sc in the next:
16 stitches
Work:
8 sc around the second ch-8 handle loop
Sc in the final:
8 stitches
48 sts
The handles should now look thicker and more substantial.
Final Rim Round
Round 17
Working loosely in the back loops:
sl st BLO in every stitch around
This final slip-stitch round firms the basket opening and gives the handles a clean finished edge.
Do not pull the slip stitches tightly.
Join to the first slip stitch if necessary.
Fasten off.
Finishing
Cut the yarn, leaving a tail approximately:
6–8 inches / 15–20 cm
Thread the tail onto a yarn needle.
Weave it through several stitches on the inside of the basket.
Change direction and weave through several more stitches.
Trim the excess.
Secure the beginning tail in the same way.
Shaping the Basket
Place the finished basket on a flat surface.
Push the bottom outward gently with your hands.
Straighten the turning ridge around the base.
Smooth the side walls upward.
Pull both handles gently into matching arches.
The basket should have:
- a flat round bottom
- straight or slightly relaxed sides
- two centered handles
- a firm upper rim
No blocking is usually necessary with super bulky yarn.
How the Textured Stitch Should Look
The finished side wall should have a dense, chunky appearance.
The split single crochet creates small centered V shapes.
The alternating back-loop single crochet creates subtle horizontal and vertical definition between those V stitches.
The result should look textured without creating large openings.
If your fabric has noticeable holes, tighten your tension slightly or try a smaller hook.
If the Base Starts Ruffling
Ruffling means the base is receiving more width than your tension needs.
Check your stitch counts first.
Round 6 should contain exactly:
48 hdc
If the count is correct but the base still ruffles significantly, use a slightly smaller hook.
Do not begin the side walls until the base lies reasonably flat.
If the Base Starts Cupping
If the base turns upward before Round 7, your stitches may be too tight.
Check that all increases were worked.
The stitch counts should be:
Round 1 — 8
Round 2 — 16
Round 3 — 24
Round 4 — 32
Round 5 — 40
Round 6 — 48
If the counts are correct, try loosening your tension or moving up one hook size.
Keeping the Basket Sturdy
Basket fabric should be considerably firmer than scarf or blanket fabric.
If your basket collapses easily:
- use a firmer super bulky yarn
- tighten your tension slightly
- use an 8 mm hook instead of 9 mm
- avoid very soft chenille yarn
- keep the split single crochet stitches compact
The fabric should still be flexible enough for the handles to bend comfortably.
Making the Handles Neat
When making each ch-8 handle:
Keep the chains relaxed and consistent.
Do not pull them tightly.
After making the second handle, compare both openings.
They should be the same width.
During Round 16, work the 8 single crochets evenly around each chain loop.
Slide the stitches along the chain slightly if necessary so the handle is evenly covered.
Making a Taller Basket
Complete additional textured rounds before Round 15.
Every extra side round contains:
48 stitches
For approximately one additional inch of height, add around:
2 textured rounds
depending on your tension.
Then make the handles normally.
Making a Shorter Basket
Begin the handles after Round 12 or Round 13 instead of Round 14.
Do not alter the base.
A shorter basket works well for:
- bathroom storage
- small yarn balls
- nursery supplies
- desk storage
Making a Wider Basket
Continue increasing the base before beginning the turning round.
After Round 6:
Additional Increase Round
Repeat:
1 hdc in each of next 5 sts, 2 hdc in next st
around.
56 sts
If you use 56 stitches, the side-wall texture still works because the stitch count remains even.
For handles, divide the basket symmetrically.
One simple 56-stitch handle round is:
10 sc, ch 8, skip 8, 20 sc, ch 8, skip 8, 10 sc
Then reinforce each handle with 8 sc.
Making a Smaller Basket
Stop the base after Round 5.
You will have:
40 stitches
Then work the BLO turning round.
For the handles, use:
6 sc, ch 8, skip 8, 12 sc, ch 8, skip 8, 6 sc
This creates a smaller basket suitable for toiletries, small craft supplies, or gifts.
Yarn Basket Idea
This size works especially well as a crochet project basket.
Place:
- two or three yarn balls
- crochet hook case
- scissors
- stitch markers
- current small project
inside.
The round base keeps yarn from rolling away, while the two handles make the basket easy to carry between rooms.
Gift Basket Idea
The same crochet basket can become reusable gift packaging.
Fill it with:
- rolled washcloths
- spa items
- baby supplies
- yarn and hooks
- coffee or tea gifts
- small blankets
- handmade accessories
The recipient can reuse the basket for storage afterward.
Final Pattern at a Glance
Round 1
8 hdc in MR.
8 sts
Round 2
2 hdc in each st.
16 sts
Round 3
(1 hdc, inc) around.
24 sts
Round 4
(2 hdc, inc) around.
32 sts
Round 5
(3 hdc, inc) around.
40 sts
Round 6
(4 hdc, inc) around.
48 sts
Round 7
Sc BLO around.
48 sts
Rounds 8–14
Repeat:
split sc, sc BLO
around.
48 sts
Round 15 — Handles
8 sc, ch 8, skip 8, 16 sc, ch 8, skip 8, 8 sc.
Round 16
8 sc, 8 sc around first handle, 16 sc, 8 sc around second handle, 8 sc.
48 sts
Round 17
Sl st BLO loosely around.
Fasten off.
The finished basket measures approximately 10–11 inches across and 7–8 inches tall, with a chunky mustard-gold texture, a firm round base, and two sturdy built-in crochet handles.