Introduction
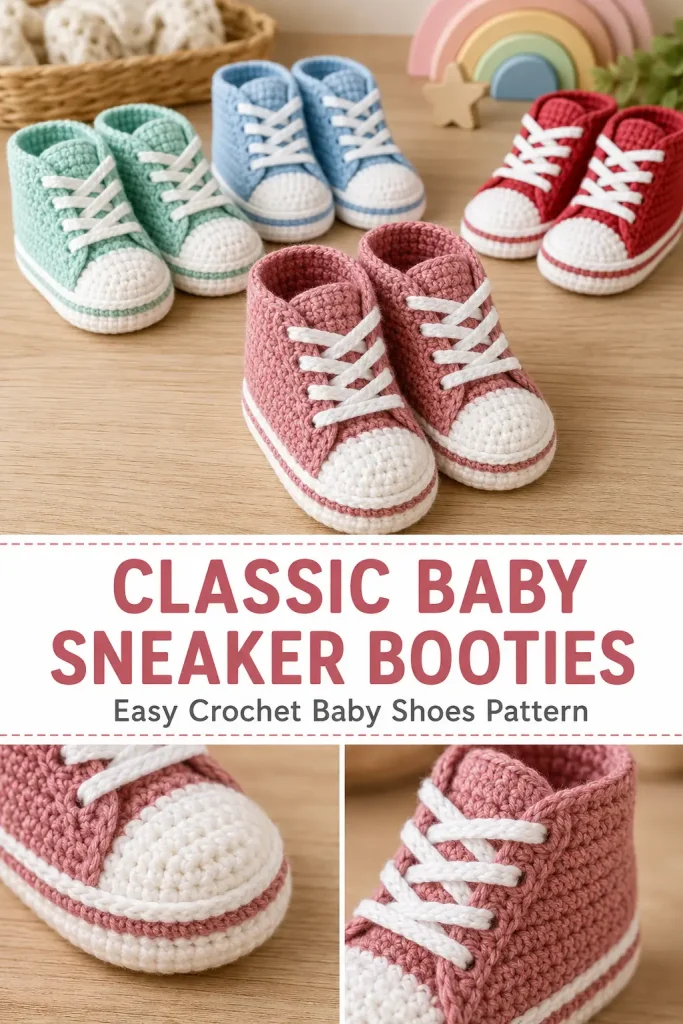
Tiny crochet sneaker booties are one of the cutest handmade baby gifts you can make. They look playful and stylish, but they are still soft, cozy, and gentle for little feet. This pattern creates a high-top baby sneaker style with a white sole, rounded toe cap, colored upper, tongue, and simple crochet laces.
The linked inspiration appears to point readers toward a separate free pattern listing rather than showing the full written pattern directly on the page, so this version is written as a new original baby sneaker booties pattern with its own stitch counts and construction. The referenced listing notes a baby sneaker-style crochet pattern by Suzanne Resaul and describes it as a free Ravelry download using basic stitches such as single crochet, half double crochet, and chains. (Your Crochet)
This easy crochet pattern is best for confident beginners because the stitches are simple, but the small shoe details need careful placement. The finished booties are soft, photo-ready, and perfect for baby shower gifts, newborn outfits, nursery keepsakes, or handmade baby gift sets.
Description
These crochet baby sneaker booties have a soft white oval sole, a rounded white toe cap, a colorful high-top upper, a small tongue, and white crochet laces woven through the front. The shape is inspired by classic lace-up baby sneakers, but the construction is simplified so the booties are realistic to make.
The sole is worked first in an oval shape. Then the sides are built upward, the toe cap is worked over the front stitches, and the side panels are worked around the heel to create the high-top shape. The tongue is added in the center front, and a simple chain lace finishes the look.
You can make them in dusty rose, baby blue, red, mint, lavender, tan, navy, or soft neutral shades. They are not meant for walking babies, but they work beautifully as soft crib shoes, photo props, stroller booties, or handmade gifts.
Materials
- Worsted weight baby yarn or soft cotton-blend yarn in white for the sole, toe cap, and laces
- Worsted weight yarn in your main shoe color
- 4 mm crochet hook
- Yarn needle
- Stitch markers
- Scissors
- Measuring tape
Finished Size
This pattern is written for approximately 0–3 months.
Approximate finished sole length:
- 3.75–4 inches long
To make the booties larger, use a slightly larger hook or add extra rows to the side panels and tongue. For best results, measure the baby’s foot if possible.
Gauge
Using worsted weight yarn and a 4 mm hook:
- 16 single crochet stitches = about 4 inches
- 18 single crochet rows = about 4 inches
Gauge matters for baby booties. If your sole is too small, use a larger hook. If your sole is too large, use a smaller hook.
Abbreviations
- ch: chain
- sc: single crochet
- hdc: half double crochet
- sl st: slip stitch
- inc: increase, 2 stitches in the same stitch
- dec: single crochet 2 stitches together
- BLO: back loop only
- st: stitch
- sts: stitches
- FO: fasten off
Pattern Notes
Make 2 booties.
The sole is worked in joined oval rounds.
The shoe wall is worked around the sole.
The toe cap is worked in rows over the front stitches.
The side panel is worked around the heel and sides, leaving the front open.
The tongue is worked separately into the top of the toe area.
The laces are made as simple crochet chains and woven through the side panel eyelets.
The ch 1 at the beginning of rounds and rows does not count as a stitch.
For baby use, do not add buttons, beads, or hard decorations. Keep all details soft and securely sewn.
Step-by-Step Instructions

Sole
Make 2 using white yarn and a 4 mm hook.
Round 1
Ch 11.
Work 2 hdc in the 2nd ch from hook.
Hdc in next 8 ch.
Work 6 hdc in the last ch.
Now work along the opposite side of the chain.
Hdc in next 8 ch.
Work 2 hdc in the last ch.
Join with sl st to first hdc. (26)
Round 2
Ch 1.
Work 2 hdc in each of the next 2 sts.
Hdc in next 8 sts.
Work 2 hdc in each of the next 6 sts.
Hdc in next 8 sts.
Work 2 hdc in each of the last 2 sts.
Join with sl st. (36)
Round 3
Ch 1.
Repeat 2 times: hdc in next st, 2 hdc in next st.
Hdc in next 8 sts.
Repeat 6 times: hdc in next st, 2 hdc in next st.
Hdc in next 8 sts.
Repeat 2 times: hdc in next st, 2 hdc in next st.
Join with sl st. (46)
The sole should now be an oval shape.
Shoe Wall
Continue with white yarn.
Round 4
Ch 1.
Working in BLO, sc in each st around.
Join with sl st. (46)
Round 5
Ch 1.
Sc in each st around.
Join with sl st. (46)
Switch to your main shoe color.
Round 6
Ch 1.
Sc in each st around.
Join with sl st. (46)
FO main color.
This creates the base wall of the bootie.
Mark the Toe
Lay the sole flat with the rounded toe facing you.
Count 16 stitches across the front center of the bootie.
Place a stitch marker at the first and last stitch of this 16-stitch front section.
This marked section will become the toe cap.
Toe Cap
Use white yarn.
Join yarn at the first marked toe stitch.
Row 1
Ch 1.
Sc across the 16 marked toe stitches.
Turn. (16)
Row 2
Ch 1.
Dec, sc in next 12 sts, dec.
Turn. (14)
Row 3
Ch 1.
Dec, sc in next 10 sts, dec.
Turn. (12)
Row 4
Ch 1.
Dec, sc in next 8 sts, dec.
Turn. (10)
Row 5
Ch 1.
Dec, sc in next 6 sts, dec.
Turn. (8)
FO and weave in the end.
The toe cap should curve gently over the front of the bootie.
Side and Heel Panel
Use main shoe color.
Join yarn in the first unworked stitch beside the toe cap.
You will work around the side, heel, and opposite side, using the 30 stitches not used for the toe cap.
Row 1
Ch 1.
Sc in each of the 30 unworked stitches around the sides and heel.
Turn. (30)
Row 2
Ch 1.
Sc in each st across.
Turn. (30)
Row 3: Eyelet Row
Ch 1.
Sc in first 2 sts.
Ch 1, skip next st.
Sc across until 3 sts remain.
Ch 1, skip next st.
Sc in last 2 sts.
Turn. (30, counting ch-1 spaces as stitches)
Row 4
Ch 1.
Sc in each sc and ch-1 space across.
Turn. (30)
Row 5: Eyelet Row
Ch 1.
Sc in first 2 sts.
Ch 1, skip next st.
Sc across until 3 sts remain.
Ch 1, skip next st.
Sc in last 2 sts.
Turn. (30)
Row 6
Ch 1.
Sc in each sc and ch-1 space across.
FO and weave in the end.
This creates the high-top side panels and two lace holes on each side.
Tongue
Use main shoe color.
Join yarn to the top edge of the white toe cap, working across the 8 stitches from Row 5 of the toe cap.
Row 1
Ch 1.
Sc in each of the 8 stitches across.
Turn. (8)
Rows 2–7
Ch 1.
Sc in each st across.
Turn after each row. (8)
FO, leaving a long tail.
Use the tail to tack the lower edge of the tongue lightly to the inside of the toe cap if needed. Do not sew the tongue flat; it should sit behind the laces.
White Sole Stripe
Use white yarn if you want the bottom edge to look cleaner.
Join white yarn at the side of the bootie, along the line between the sole and upper.
Sl st loosely around the bootie.
Join with sl st.
FO and weave in ends.
Keep the slip stitches loose so the bootie does not tighten.
Crochet Laces
Make 2 using white yarn.
Lace
Ch 70.
FO and pull both ends tight.
Tie a small knot at each end if desired.
Weave the lace through the eyelets from bottom to top, crossing over the tongue like a small sneaker lace.
Tie a soft bow at the front.
For baby safety, keep the laces short and check that they are secure.
Finishing
Weave in all remaining ends.
Shape the toe cap with your fingers.
Pull the tongue upward gently.
Adjust the laces so they sit evenly.
Make sure both booties match in size and shape.
Check all seams before gifting.
Size Adjustments
Newborn Size
Use a 3.5 mm hook and DK weight yarn, or make the sole with only 2 increase rounds instead of 3.
0–3 Months
Follow the pattern as written.
3–6 Months
Use a 4.5 mm hook and add 1 extra plain sc round after Round 6 before starting the toe cap.
6–9 Months
Use a 4.5 mm hook, add 1 extra sole round, and add 2 extra rows to the side panel and tongue.
Always check the sole length as you work.
Tips & Variations
Use white for the sole, toe cap, and laces for the clearest sneaker look.
Try dusty rose, red, mint, navy, lavender, or baby blue for the main shoe color.
Use cotton-blend yarn for a slightly firmer shape.
Use soft baby acrylic for a warmer, cozier bootie.
For a simpler version, skip the decorative sole stripe.
For a more colorful version, make the tongue a different color from the side panels.
Keep laces short if the booties are for a baby.
Do not add hard eyelets, buttons, beads, or metal decorations.
FAQ
Is this baby sneaker booties pattern beginner-friendly?
This pattern is best for confident beginners. The stitches are simple, but the construction includes several small parts: sole, toe cap, side panels, tongue, and laces.
Can I make these booties without laces?
Yes. You can skip the laces and sew the tongue lightly to the side panels for a softer slip-on version.
What yarn works best?
Soft cotton-blend, baby acrylic, or smooth worsted weight yarn works well. Choose something washable and gentle for baby feet.
Are these booties for walking?
No. These are soft baby booties, not walking shoes. They are best for newborn photos, crib wear, stroller rides, and gifts.
Can I make the booties in different sizes?
Yes. Adjust the hook size, sole length, side panel height, and tongue length. Always check the finished sole measurement.
Conclusion
These Classic High-Top Baby Sneaker Booties are cute, soft, and full of handmade charm. The white sole, rounded toe cap, colorful upper, little tongue, and crochet laces create a tiny sneaker look while keeping everything baby-friendly and comfortable.
Make them in sweet pastel colors, bold sporty shades, or soft neutrals for a handmade baby gift that feels playful and special. This easy crochet pattern is a lovely choice for baby showers, newborn photo props, and cozy little keepsakes.



