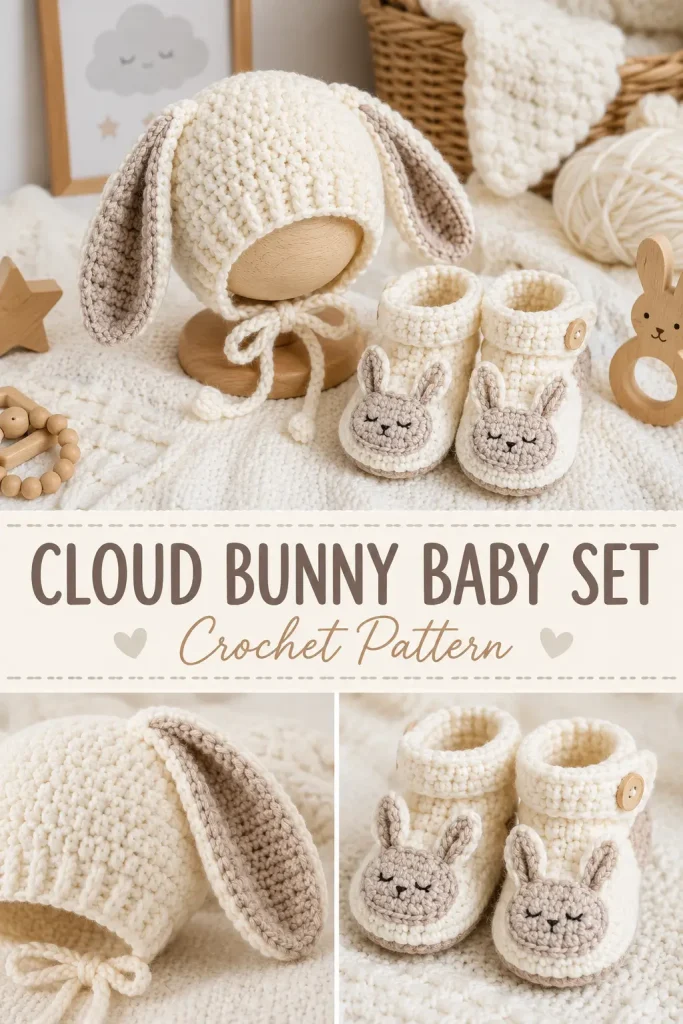
This cloud bunny baby set is soft, sweet, and made for the kind of handmade gift that feels extra special. The bonnet has a cozy ribbed edge and floppy bunny ears, while the matching booties have tiny bunny-ear details on the front for a gentle nursery-style finish.
The design works beautifully in warm cream and pale oatmeal yarn, giving it a soft cloud-like look without needing bright colors or extra decorations. It is a lovely crochet baby gift for baby showers, newborn photos, Easter baskets, winter outfits, or a handmade keepsake set.
Description
This crochet baby set includes a soft bonnet and matching baby booties. The bonnet is made with a simple textured body, a ribbed front brim, and two floppy bunny ears sewn near the top. Each ear has a warm cream outer piece with a pale oatmeal inner piece, then the base is pinched slightly so the ears drape softly. The baby booties are worked from an oval sole upward, shaped around the toe, and finished with a soft cuff. Small bunny ears are sewn to the front of each bootie so the whole set matches beautifully.
Materials
- DK or light worsted baby yarn in warm cream
- DK or light worsted baby yarn in pale oatmeal
- 4.0 mm crochet hook
- 3.5 mm crochet hook for smaller details, optional
- Yarn needle
- Scissors
- Stitch markers
- Measuring tape
- Optional small buttons for bootie straps, only if securely sewn and used with supervision
Abbreviations
- ch = chain
- sl st = slip stitch
- sc = single crochet
- hdc = half double crochet
- dc = double crochet
- inc = increase, 2 stitches in the same stitch
- dec = decrease
- hdc2tog = half double crochet 2 stitches together
- BLO = back loop only
- st = stitch
- sts = stitches
- rep = repeat
Pattern Notes
- This pattern uses US crochet terms.
- The set is designed for a soft baby size, approximately 0–6 months.
- The bonnet is worked as a textured panel, then seamed at the back.
- The ribbed brim is added around the face opening.
- The bunny ears are made separately and sewn to the bonnet.
- The booties are worked from the sole upward.
- Cotton-blend, acrylic baby yarn, or soft washable wool-blend yarn can be used.
- Keep all sewn details secure.
- Avoid long ties for everyday baby wear. If you add bonnet ties, use them only for supervised photos.
Finished Size
Approximate bonnet size:
- Fits baby head circumference: 14–16 inches
- Bonnet depth from front brim to back: about 6 inches
Approximate bootie size:
- Sole length: about 3.75–4 inches
- Fits approximately 0–6 months, depending on yarn and tension
Check your gauge and measure as you go for the best fit.
Step-by-Step Instructions
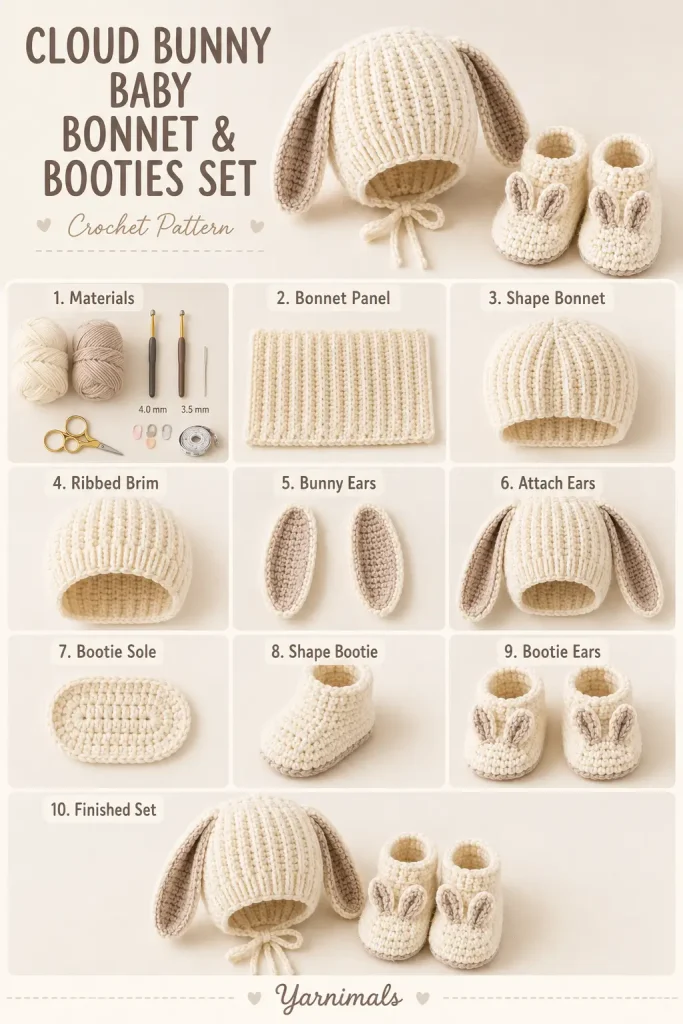
Bonnet Body
Use warm cream yarn and a 4.0 mm hook.
The bonnet body is worked flat. The starting chain creates the depth of the bonnet from the face opening toward the back of the head. The rows create the width around the head.
Row 1
Ch 42.
Hdc in the 2nd ch from hook.
Hdc in each ch across.
Ch 1, turn.
41 hdc
Row 2
Hdc in BLO of each st across.
Ch 1, turn.
41 hdc
Rows 3–32
Repeat Row 2.
You should have a soft ribbed-texture rectangle.
For a smaller newborn bonnet, work fewer rows.
For a larger baby bonnet, add more rows.
Shape and Seam the Bonnet
Fold the rectangle in half with the ribbed rows running from front to back.
The fold will sit at the top of the bonnet.
The two short row edges meet at the back.
Using a yarn needle and matching cream yarn, sew the back seam from the crown down toward the lower back edge.
Do not sew the face opening.
Turn the bonnet right side out.
Shape the back gently with your fingers so it forms a soft rounded bonnet shape.
Lower Neck Edge
Join cream yarn at one lower back corner.
Ch 1.
Sc evenly along the lower neck edge.
Work one sc into the end of each row.
Fasten off and weave in the end.
This keeps the lower edge neat and soft.
Ribbed Front Brim
Use cream yarn.
This ribbing is made separately and sewn around the face opening.
Row 1
Ch 8.
Sc in the 2nd ch from hook and in each ch across.
Ch 1, turn.
7 sc
Row 2
Sc in BLO of each st across.
Ch 1, turn.
7 sc
Continue the Ribbing
Repeat Row 2 until the ribbed strip fits around the bonnet face opening from one lower front corner, around the top, and down to the other lower front corner.
For most baby sizes, this will be about 44–50 rows.
Do not stretch the ribbing too much while measuring.
Fasten off, leaving a long tail for sewing.
Attach the Brim
Pin the ribbed strip evenly around the face opening.
Use the long tail to sew the brim to the bonnet.
Keep the ribbing smooth and slightly stretchy.
Weave in the end.
The bonnet should now have a soft ribbed frame around the face.
Bonnet Bunny Ears
Make 2 outer ears in cream.
Make 2 inner ears in pale oatmeal.
Outer Ear
Use cream yarn and a 4.0 mm hook.
Ch 18.
Round 1
Sc in the 2nd ch from hook.
Hdc in next ch.
Dc in next 13 ch.
Hdc in next ch.
Work 5 hdc in the last ch.
Now work along the opposite side of the foundation chain.
Hdc in next ch.
Dc in next 13 ch.
Hdc in next ch.
Sc in last ch.
Join with sl st.
Round 2
Ch 1.
Sc evenly around the entire ear.
At the rounded top, work 2 sc into each of the 3 center stitches to help the ear stay rounded.
Join with sl st.
Fasten off, leaving a long tail for sewing.
Inner Ear
Use pale oatmeal yarn and a 3.5 mm or 4.0 mm hook.
Ch 15.
Sc in the 2nd ch from hook.
Hdc in next ch.
Dc in next 10 ch.
Hdc in next ch.
Work 4 hdc in the last ch.
Work along the opposite side:
Hdc in next ch.
Dc in next 10 ch.
Hdc in next ch.
Sc in last ch.
Join with sl st.
Fasten off, leaving a tail for sewing.
Assemble the Ears
Place one oatmeal inner ear on top of one cream outer ear.
Sew the inner ear to the outer ear using small neat stitches.
Repeat for the second ear.
Pinch the bottom of each ear slightly to create a soft folded base.
Sew through the pinched base a few times to hold the shape.
Attach the Ears to the Bonnet
Lay the bonnet flat with the back seam centered.
Place the ears near the top of the bonnet, slightly toward the front, one on each side of the crown.
The ears should lean outward and flop gently.
Pin them in place.
Sew each ear securely to the bonnet, stitching through the pinched base several times.
Check that both ears are even before weaving in the ends.
Optional Bonnet Ties
If you want ties for photos, join cream yarn to one lower front corner.
Ch 35–40.
Fasten off.
Repeat on the other side.
Knot the ends and trim neatly.
Use ties only with supervision.
Baby Booties
Make 2 booties.
Use warm cream yarn and a 4.0 mm hook.
Sole
Round 1
Ch 10.
Work 2 hdc in the 2nd ch from hook.
Hdc in next 7 ch.
Work 5 hdc in the last ch.
Now work along the opposite side of the foundation chain.
Hdc in next 7 ch.
Work 3 hdc in the last ch.
Join with sl st.
24 sts
Round 2
Ch 1.
Inc in next 2 sts.
Hdc in next 7 sts.
Inc in next 5 sts.
Hdc in next 7 sts.
Inc in next 3 sts.
Join with sl st.
34 sts
Round 3
Ch 1.
Hdc in next st, inc in next st.
Rep 2 times total.
Hdc in next 7 sts.
Hdc in next st, inc in next st.
Rep 5 times total.
Hdc in next 7 sts.
Hdc in next st, inc in next st.
Rep 3 times total.
Join with sl st.
44 sts
The sole should be oval and flat.
Bootie Side Wall
Round 4
Ch 1.
Working in BLO, sc in each st around.
Join with sl st.
44 sts
Round 5
Ch 1.
Sc in each st around.
Join with sl st.
44 sts
Round 6
Ch 1.
Sc in next 14 sts.
Hdc2tog 8 times across the toe area.
Sc in last 14 sts.
Join with sl st.
36 sts
Round 7
Ch 1.
Sc in next 12 sts.
Hdc2tog 6 times.
Sc in last 12 sts.
Join with sl st.
30 sts
Round 8
Ch 1.
Sc in next 10 sts.
Hdc2tog 5 times.
Sc in last 10 sts.
Join with sl st.
25 sts
Round 9
Ch 1.
Sc in each st around.
Join with sl st.
25 sts
Bootie Cuff
Round 10
Ch 2.
Hdc in each st around.
Join with sl st.
25 sts
Round 11
Ch 2.
Work alternating front and back texture by placing hdc in BLO of each st around.
Join with sl st.
25 sts
Round 12
Repeat Round 11.
Fasten off and weave in the end.
Fold the cuff slightly outward if you want a softer baby-bootie look.
Tiny Bunny Ears for Booties
Make 4 tiny ears in cream.
Make 4 smaller inner ear stitches in pale oatmeal if desired.
Tiny Ear
Use cream yarn and a 3.5 mm hook.
Ch 7.
Sc in the 2nd ch from hook.
Hdc in next 4 ch.
Work 3 hdc in the last ch.
Now work along the opposite side.
Hdc in next 4 ch.
Sc in last ch.
Join with sl st.
Fasten off, leaving a tail for sewing.
Repeat until you have 4 ears.
Optional Tiny Inner Ear
Use pale oatmeal yarn.
Embroider one small straight stitch line down the center of each tiny ear.
Keep it subtle and soft.
Attach Bootie Ears
Place 2 tiny ears on the front of each bootie.
Position them slightly apart, leaning outward like little bunny ears.
Sew the base of each ear securely to the front top area of the bootie.
Leave the tips free so they stand up softly.
Repeat for the second bootie.
Optional Bootie Trim
Join pale oatmeal yarn at the back of the cuff.
Sl st loosely around the top edge.
Join and fasten off.
This gives the booties a soft matching accent.
Finishing the Set
Weave in every yarn tail securely.
Check that the bonnet ears are firmly attached.
Check that the bootie ears are firmly sewn down at the base.
Shape the bonnet brim with your fingers.
Shape the booties so the soles sit flat and the toe is rounded.
Lightly steam or block only if needed.
Do not press the ears flat.
Tips & Variations
Use warm cream and pale oatmeal for the soft cloud bunny look.
Use white and blush pink for a classic baby bunny style.
Use beige and cream for a neutral teddy-bunny look.
Use cotton yarn for a firmer photo-prop set.
Use soft baby acrylic for a cozy wearable set.
For a smaller bonnet, reduce the body rows and make shorter ears.
For larger booties, add one extra sole increase round before building the side wall.
For a more playful style, add a tiny pom-pom tail to the back of each bootie, but avoid loose details for babies.
For a gift set, make a matching small blanket or bunny lovey in the same yarn colors.
FAQ
Is this crochet baby set beginner-friendly?
Yes, it is suitable for confident beginners. The bonnet uses simple rows and seaming, while the booties use basic shaping and small sewn details.
What yarn is best for this set?
Soft baby yarn is best. DK or light worsted acrylic, cotton-blend, or washable wool-blend yarn will work well.
Can I make the bonnet without ties?
Yes. The bonnet can be made without ties for a safer everyday style. If ties are added, use them only with supervision.
Can I make only the booties?
Yes. The booties work beautifully on their own and still have the bunny look because of the tiny front ears.
Conclusion
This cloud bunny baby bonnet and booties set is a soft and charming crochet project for handmade baby gifts. The ribbed bonnet, floppy bunny ears, matching booties, and tiny ear details make the whole set feel sweet, cozy, and special.
Make it in warm cream and pale oatmeal for a gentle cloud-like look, or choose your favorite baby colors for a custom bunny set. Save this pattern for your next baby shower gift, newborn photo prop, or cozy handmade nursery project.



