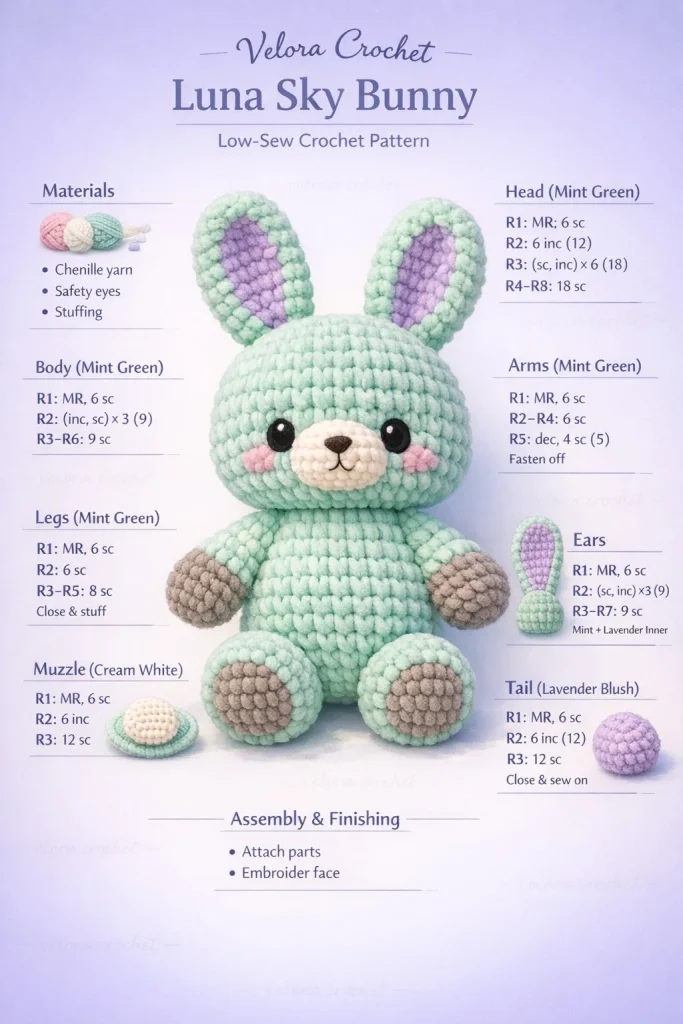
Create a soft and charming mini crochet bunny with this beginner-friendly amigurumi pattern. With its calming pastel palette and simple shaping, this Clover Bunny is perfect for gifts, decor, or adding to your handmade collection.
Materials
- Yarn colors:
- Soft mint (main body)
- Warm beige (muzzle & tail)
- Dusty teal (facial details)
- Pale cream (inner ears)
- Muted peach (optional accents)
- 2.5 mm crochet hook
- 10 mm safety eyes
- Tapestry needle
- Stitch marker
- Fiberfill stuffing
Abbreviations
- MR – Magic Ring
- sc – Single Crochet
- inc – Increase (2 sc in same stitch)
- dec – Decrease (invisible decrease)
- st(s) – Stitch(es)
Pattern Instructions
Head (Soft Mint)
R1: Create a magic ring with 6 sc (6)
R2: Increase in each stitch (12)
R3: (sc, inc) repeat 6 times (18)
R4: (2 sc, inc) repeat 6 times (24)
R5: (3 sc, inc) repeat 6 times (30)
R6–10: Single crochet evenly around (30)
Insert safety eyes between rounds 7 and 8
R11: (3 sc, dec) repeat 6 times (24)
R12: (2 sc, dec) repeat 6 times (18)
Stuff the head firmly
R13: (sc, dec) repeat 6 times (12)
R14: Decrease in each stitch (6)
Fasten off
Body (Soft Mint)
R1: Magic ring with 6 sc (6)
R2: Increase in each stitch (12)
R3: (sc, inc) repeat 6 times (18)
R4: (2 sc, inc) repeat 6 times (24)
R5: (3 sc, inc) repeat 6 times (30)
R6–11: Single crochet around (30)
R12: (3 sc, dec) repeat 6 times (24)
R13: (2 sc, dec) repeat 6 times (18)
Stuff the body
R14: (sc, dec) repeat 6 times (12)
Fasten off, leaving a tail for sewing
Arms (Soft Mint) x2
R1: Magic ring with 6 sc (6)
R2–6: Single crochet around (6)
Add a small amount of stuffing
Flatten the top and stitch closed
Legs (Soft Mint) x2
R1: Magic ring with 6 sc (6)
R2: Increase in each stitch (12)
R3–5: Single crochet around (12)
R6: (2 sc, dec) repeat 3 times (9)
Lightly stuff and fasten off
Ears / Details
Ears (Soft Mint + Pale Cream) x2
R1: Magic ring with 6 sc (6)
R2: Increase in each stitch (12)
R3–8: Single crochet around (12)
Flatten each ear and gently fold
Add inner ear detail using pale cream yarn (embroidered or sewn patch)
Accessories
Tail (Warm Beige)
R1: Magic ring with 6 sc (6)
R2: Increase in each stitch (12)
R3: Single crochet around (12)
Lightly stuff and fasten off
Muzzle (Warm Beige)
R1: Magic ring with 6 sc (6)
R2: (sc, inc) repeat 3 times (9)
R3: Single crochet around (9)
Fasten off and sew onto the face
Embroider the nose using dusty teal yarn, then add a small mouth
Whiskers (Dusty Teal)
Embroider three short lines on each side of the muzzle
Assembly & Finishing
- Sew the head securely onto the body
- Attach ears evenly on top of the head
- Position and sew arms slightly toward the front
- Attach legs at the base to create a seated position
- Sew the tail to the back of the body
- Attach the muzzle and complete facial embroidery
- Adjust stuffing and shape the bunny for a neat, balanced finish
Tips for Best Results
- Use a stitch marker to keep track of rounds, especially for small pieces
- Stuff gradually to avoid lumps and maintain a smooth shape
- Keep stitches tight to prevent stuffing from showing
- Symmetry is key—pin pieces in place before sewing
- Use invisible decreases for a cleaner amigurumi finish
Conclusion
This Clover Bunny crochet pattern is a delightful mini crochet project that’s simple enough for beginners yet detailed enough to feel special. With soft textures and gentle colors, it’s a perfect handmade companion or thoughtful gift. Enjoy bringing your bunny to life, one stitch at a time.



