Introduction
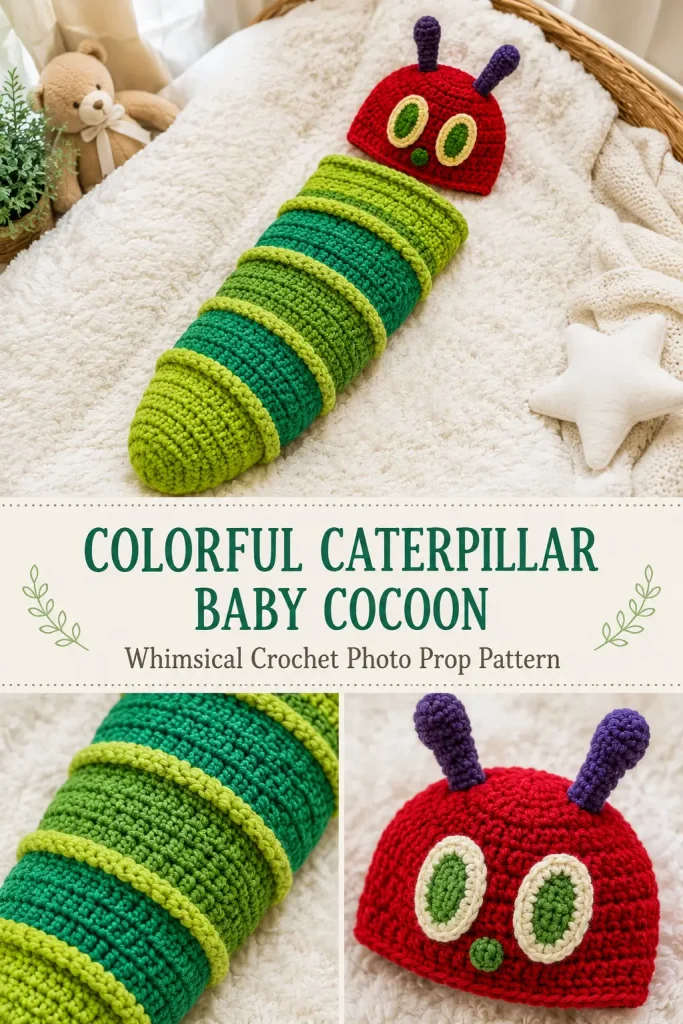
A crochet baby cocoon is such a sweet handmade project for newborn photos, baby shower gifts, and nursery keepsakes. The soft wrapped shape keeps the baby looking cozy, while the colorful caterpillar-inspired body makes the whole design playful and eye-catching.
This Colorful Caterpillar Baby Cocoon Crochet Pattern is an original design inspired by the general idea of a caterpillar-style newborn photo outfit, but it uses fresh construction, different stitch counts, and a unique color layout. It includes the striped cocoon body, rounded body segments, a red character-style baby hat, large oval eyes, and soft antennae.
The main design is made for supervised newborn photography only. It is not meant for sleepwear, unattended use, or everyday sleeping.
Description
This crochet set includes a long cocoon-style sack and a matching baby hat. The cocoon is worked from the bottom up in chunky green, teal, and lime color bands to create a segmented caterpillar look. Raised texture rounds help each section look rounded and plush.
The hat is worked separately in bright red with two purple antennae and oversized green-and-cream oval eyes sewn to the front. The finished look is colorful, whimsical, and perfect for a handmade baby photo prop.
This pattern is best for confident beginners who can work in rounds, change colors, crochet basic shapes, and sew appliqués securely.
Materials
- Bulky weight yarn in lime green
- Bulky weight yarn in teal green
- Bulky weight yarn in medium leaf green
- Bulky weight yarn in red for the hat
- Small amount of cream yarn for eye outer ovals
- Small amount of bright green yarn for eye centers
- Small amount of purple yarn for antennae
- Small amount of dark brown or black yarn for nose/mouth detail, optional
- 6 mm crochet hook
- Yarn needle
- Scissors
- Stitch markers
- Measuring tape
- Polyester fiberfill for antennae only, optional
Finished Size
Approximate newborn photo prop size:
- Cocoon length: 18–20 inches
- Cocoon width when laid flat: 8–9 inches
- Hat circumference: 13–14 inches
- Hat height: about 5 inches
This pattern is designed for newborn photography and should only be used with supervision.
Gauge
Approximate gauge:
- 10 hdc stitches = 4 inches
- 8 hdc rounds = 4 inches
Gauge matters for baby sizing. If your cocoon is too small, use a larger hook. If it is too large, use a smaller hook.
Abbreviations
- MR: magic ring
- ch: chain
- sc: single crochet
- hdc: half double crochet
- dc: double crochet
- sl st: slip stitch
- BLO: back loop only
- FLO: front loop only
- st: stitch
- sts: stitches
- inc: increase, 2 stitches in same stitch
- dec: decrease
- FO: fasten off
Pattern Notes
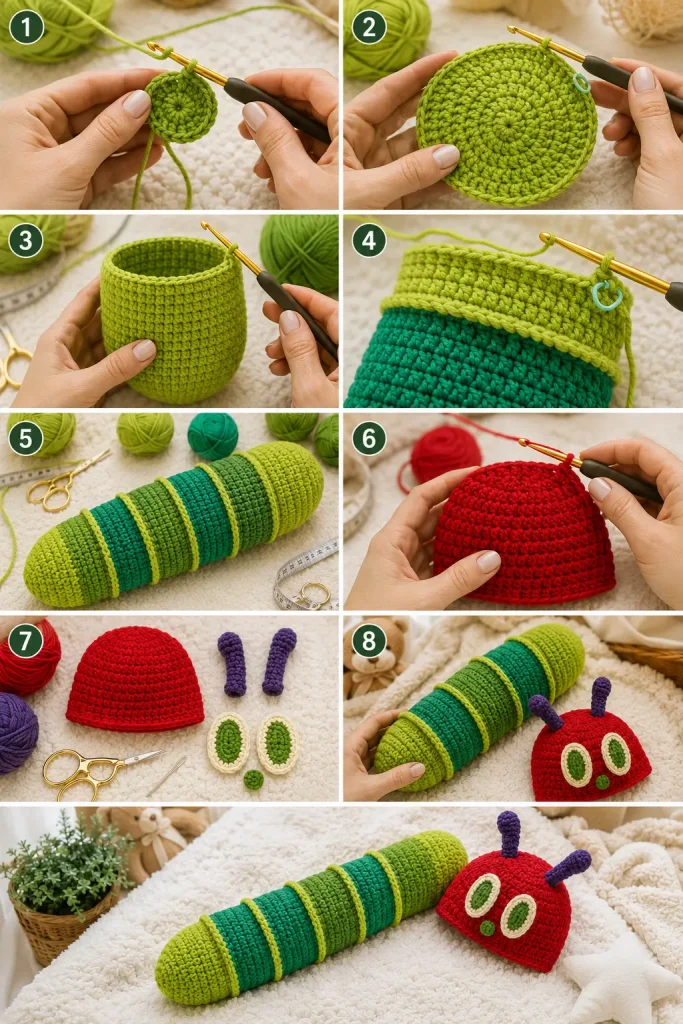
The cocoon is worked from the closed bottom upward.
The body uses color bands to create a caterpillar segment effect.
Raised ridge rounds separate the body sections.
The hat is worked separately from the top down.
Eyes and antennae are made separately and sewn on.
For baby safety, do not use safety eyes, buttons, or loose pieces. Sew everything securely.
Step-by-Step Instructions
Cocoon Body
Use lime green yarn.
Round 1
Make a MR.
Ch 1.
Work 8 hdc into the ring.
Pull ring closed.
Join with sl st to first hdc. (8)
Round 2
Ch 1.
Work 2 hdc in each st around.
Join with sl st. (16)
Round 3
Ch 1.
Repeat around: hdc in next st, inc in next st.
Join with sl st. (24)
Round 4
Ch 1.
Repeat around: hdc in next 2 sts, inc in next st.
Join with sl st. (32)
Round 5
Ch 1.
Repeat around: hdc in next 3 sts, inc in next st.
Join with sl st. (40)
Round 6
Ch 1.
Repeat around: hdc in next 4 sts, inc in next st.
Join with sl st. (48)
The bottom should now be a rounded circle.
First Body Segment
Continue with lime green.
Rounds 7–11
Ch 1.
Hdc in each st around.
Join with sl st. (48)
Ridge Round 12
Ch 1.
Working in FLO, sc in each st around.
Join with sl st. (48)
Change to teal green at the final join.
This ridge helps separate the first body segment.
Second Body Segment
Use teal green.
Round 13
Ch 1.
Working in BLO of Round 12, hdc in each st around.
Join with sl st. (48)
Rounds 14–17
Ch 1.
Hdc in each st around.
Join with sl st. (48)
Ridge Round 18
Ch 1.
Working in FLO, sc in each st around.
Join with sl st. (48)
Change to medium leaf green at the final join.
Third Body Segment
Use medium leaf green.
Round 19
Ch 1.
Working in BLO of Round 18, hdc in each st around.
Join with sl st. (48)
Rounds 20–23
Ch 1.
Hdc in each st around.
Join with sl st. (48)
Ridge Round 24
Ch 1.
Working in FLO, sc in each st around.
Join with sl st. (48)
Change to lime green at the final join.
Fourth Body Segment
Use lime green.
Round 25
Ch 1.
Working in BLO of Round 24, hdc in each st around.
Join with sl st. (48)
Rounds 26–29
Ch 1.
Hdc in each st around.
Join with sl st. (48)
Ridge Round 30
Ch 1.
Working in FLO, sc in each st around.
Join with sl st. (48)
Change to teal green at the final join.
Fifth Body Segment
Use teal green.
Round 31
Ch 1.
Working in BLO of Round 30, hdc in each st around.
Join with sl st. (48)
Rounds 32–35
Ch 1.
Hdc in each st around.
Join with sl st. (48)
Ridge Round 36
Ch 1.
Working in FLO, sc in each st around.
Join with sl st. (48)
Change to medium leaf green at the final join.
Top Cocoon Section
Use medium leaf green.
Round 37
Ch 1.
Working in BLO of Round 36, hdc in each st around.
Join with sl st. (48)
Rounds 38–41
Ch 1.
Hdc in each st around.
Join with sl st. (48)
Top Edge
Round 42
Ch 1.
Sc in each st around.
Join with sl st. (48)
Round 43
Ch 1.
Sl st loosely in each st around.
Join with sl st.
FO and weave in ends.
The top edge should be soft, stretchy, and comfortable.
Optional Cocoon Shaping
If the cocoon feels too wide at the top, add one gentle decrease round before the final edge.
Optional Decrease Round
Ch 1.
Repeat around: hdc in next 6 sts, dec.
Join with sl st. (42)
Then work the top edge rounds.
Only use this if your cocoon is too loose.
Baby Hat
Use red yarn.
Round 1
Make a MR.
Ch 1.
Work 10 hdc into the ring.
Pull ring closed.
Join with sl st to first hdc. (10)
Round 2
Ch 1.
Work 2 hdc in each st around.
Join with sl st. (20)
Round 3
Ch 1.
Repeat around: hdc in next st, inc in next st.
Join with sl st. (30)
Round 4
Ch 1.
Repeat around: hdc in next 2 sts, inc in next st.
Join with sl st. (40)
Round 5
Ch 1.
Repeat around: hdc in next 7 sts, inc in next st.
Join with sl st. (45)
Rounds 6–11
Ch 1.
Hdc in each st around.
Join with sl st. (45)
Hat Edge
Ch 1.
Sc in each st around.
Join with sl st.
FO and weave in ends.
Antennae
Make 2 using purple yarn.
Round 1
Make a MR.
Ch 1.
Work 6 sc into the ring.
Pull ring closed. (6)
Rounds 2–6
Sc in each st around. (6)
Stuff very lightly if desired.
Round 7
Dec around until closed, or flatten the opening and sc across.
FO, leaving a long tail for sewing.
Eye Outer Ovals
Make 2 using cream yarn.
Round 1
Ch 8.
Sc in 2nd ch from hook.
Sc in next ch.
Hdc in next 3 ch.
Sc in next ch.
Work 3 sc in last ch.
Now work along the opposite side of the chain.
Sc in next ch.
Hdc in next 3 ch.
Sc in next ch.
Work 2 sc in last ch.
Join with sl st.
Round 2
Ch 1.
Sc in first st.
Hdc in next 2 sts.
Dc in next 3 sts.
Work 2 dc in each of next 3 sts.
Dc in next 3 sts.
Hdc in next 2 sts.
Sc in last sts around to smooth the oval.
Join with sl st.
FO, leaving a long tail for sewing.
Eye Centers
Make 2 using bright green yarn.
Round 1
Ch 6.
Sc in 2nd ch from hook.
Hdc in next ch.
Dc in next 2 ch.
Work 3 sc in last ch.
Now work along opposite side.
Dc in next 2 ch.
Hdc in next ch.
Sc in last ch.
Join with sl st.
FO, leaving a long tail for sewing.
Sew one green center onto each cream oval.
Nose or Mouth Detail
Use dark brown or black yarn.
Embroider one tiny oval nose or short mouth line centered between the eyes.
Keep this detail small and soft.
Do not use buttons or hard pieces.
Hat Assembly
Lay the red hat flat with the seam at the back.
Place the two eye appliqués on the front of the hat.
The eyes should sit slightly above the center front.
Pin them in place.
Sew around each cream outer oval securely.
Sew the green center again if needed so it lies flat.
Place the antennae on top of the hat, about 2 inches apart.
Angle them slightly outward.
Sew around the base of each antenna several times so they stand securely.
Add the small embroidered nose or mouth detail below the eyes.
Weave in all ends.
Cocoon Finishing
Check all color-change ends inside the cocoon.
Weave them in securely.
Turn the cocoon right side out.
Shape the body segments with your hands.
The ridge rounds should create gentle caterpillar-style bands.
Do not add stuffing to the cocoon.
Safety Notes
This set is intended for supervised newborn photography only.
Do not leave a baby unattended in the cocoon.
Do not use the cocoon for sleeping.
Avoid buttons, beads, safety eyes, or loose embellishments.
Keep all sewn pieces secure.
Make sure the top opening is not tight around the baby.
Size Adjustments
Smaller Newborn
Stop cocoon increases at 40 stitches.
Work fewer body rounds in each segment.
For the hat, stop increases at 40 stitches.
Larger Newborn
Continue cocoon increases to 54 stitches.
Add one extra round to each body segment.
For the hat, add one extra increase round to 50 stitches.
Shorter Cocoon
Work 4 body segments instead of 5.
Longer Cocoon
Add one more 5-round segment before the top edge.
Tips & Variations
Use several green yarns for a lively caterpillar body.
Use variegated green yarn for a soft blended effect.
Use red for the hat to keep the bright character look.
Use orange or coral for a unique version.
Use blue or violet antennae for playful contrast.
Make the body stripes wider by adding more rounds per segment.
Make the texture softer by skipping ridge rounds and working all hdc rounds.
Use bulky yarn for a plush photo prop look.
Use worsted weight yarn for a lighter version, but increase stitch counts as needed.
FAQ
Is this caterpillar cocoon beginner-friendly?
This pattern is best for confident beginners. The cocoon uses simple rounds, but the hat appliqués, antennae, and shaping require sewing and careful placement.
Is this the exact pattern from the image?
No. This is a new original caterpillar-style baby cocoon and hat pattern inspired by the visible idea in the screenshot. The stitch counts, construction, color layout, and details are original.
Can this be used for baby sleep?
No. This is a supervised photo prop only. Do not use it as sleepwear or leave a baby unattended inside it.
What yarn works best?
Bulky soft acrylic or washable baby yarn works well. Choose yarn that feels gentle and does not shed.
Can I make it without the hat?
Yes. The cocoon can be used alone as a colorful photo prop, but the hat completes the caterpillar-inspired look.
Conclusion
The Colorful Caterpillar Baby Cocoon Crochet Pattern is bright, cozy, and full of handmade personality. The green segmented cocoon creates the soft caterpillar body, while the red hat, large oval eyes, and purple antennae make the set playful and memorable.
Use it for supervised newborn photos, baby shower gifts, nursery keepsakes, or a special handmade prop. This original crochet pattern gives you a clear way to build the full design from bottom to top without missing the cocoon body, hat, eyes, antennae, edging, or finishing details.



