Colorful Ribbed Shell Fan Crochet Blanket

This colorful crochet blanket is built from deeply textured ribbed fan shells arranged in overlapping horizontal rows. Each shell is crocheted with short back-loop-only rows, which creates the strong raised ribs that make the motifs look almost like real seashells.
Small chain spaces between the fans create the tiny eyelets visible throughout the fabric, while changing color for each new shell band turns the texture into a warm striped design.
For this version, use the autumn-inspired palette shown in the reference:
rust red → chocolate brown → warm cream → terracotta → sage green → golden mustard → dusty blush pink → repeat
The stitch itself uses a foundation multiple of 19 + 2 and, after the setup, repeats Rows 3–6. The original stitch construction is designed around fingering-weight yarn with a 2.5–2.75 mm hook, although the yarn and hook can be changed as long as you make a swatch first.
Finished Size
This pattern is easy to customize.
For a baby blanket, aim for approximately:
30 × 36 inches / 76 × 91 cm
For a larger throw:
45 × 55 inches / 114 × 140 cm
Because this shell is much wider than an ordinary crochet stitch, calculate your starting chain from a swatch rather than relying on one universal chain count.
Materials
- Fingering-weight yarn in 7 coordinating colors
- 2.5–2.75 mm crochet hook
- Yarn needle
- Scissors
- Stitch markers
- Measuring tape
Suggested colors:
Color A — Rust Red
Color B — Chocolate Brown
Color C — Warm Cream
Color D — Terracotta
Color E — Sage Green
Color F — Golden Mustard
Color G — Dusty Blush Pink
The source stitch is specifically designed for fingering yarn and a 2.5–2.75 mm hook, but other yarn weights can be substituted with an appropriately sized hook.
Skill Level
Intermediate
You should be comfortable with:
- chain
- single crochet
- slip stitch
- treble crochet
- back-loop-only crochet
- working into chain spaces
- short rows
- turning frequently inside one motif
The individual stitches are simple. The unusual part is that each fan is built from several very short rows instead of being made from a group of tall stitches worked all at once.
Abbreviations
This pattern uses US terminology.
ch — chain
sc — single crochet
sl st — slip stitch
tr — treble crochet
BLO — back loop only
sp — space
st / sts — stitch / stitches
rep — repeat
Pattern Multiple
The foundation is:
19 × number of repeats + 2 chains
Examples:
| Repeats | Foundation Chain |
|---|---|
| 3 | 59 |
| 4 | 78 |
| 5 | 97 |
| 6 | 116 |
| 7 | 135 |
| 8 | 154 |
| 9 | 173 |
| 10 | 192 |
| 11 | 211 |
| 12 | 230 |
The source stitch uses a 19-stitch repeat plus 2 edge chains.
How to Choose Your Blanket Width
Before starting the full blanket, make at least:
3 pattern repeats
using:
ch 59
Work through Row 6.
Let the swatch relax.
Measure the width of:
one complete 19-stitch repeat
Then calculate:
desired blanket width ÷ width of one repeat = number of repeats needed
Round to the nearest whole repeat.
Then use:
19 × repeats + 2
for your foundation chain.
This is much more reliable than guessing because yarn thickness and tension dramatically affect the width of these large shells.
Understanding the Ribbed Shell
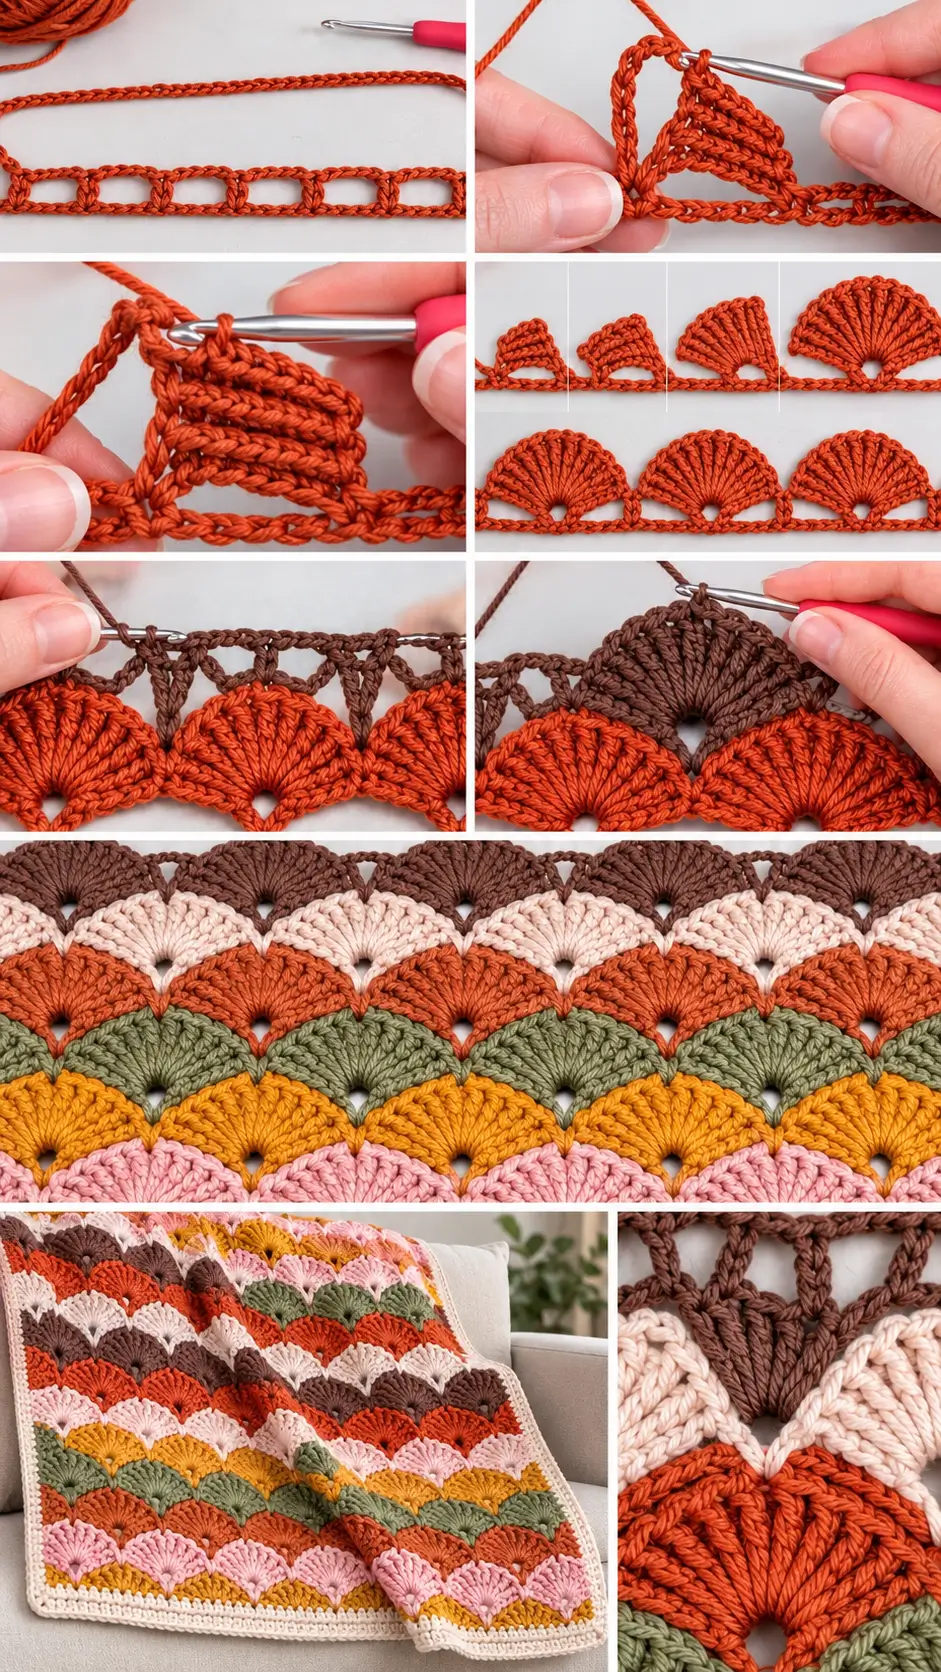
This is not an ordinary 5-dc shell.
Each fan is made from a narrow strip of:
4 single crochet stitches
worked repeatedly in:
back loop only
The strip is attached repeatedly to the same base chain space.
As more short rows are added, they spread outward like the ribs of a seashell.
The standard full fan contains:
15 short textured rows.
FULL RIBBED SHELL
You will use this shell many times throughout the pattern.
Work into the indicated anchor space.
Shell Setup
Ch:
7
Sl st back into the same anchor space.
Turn.
Ch:
3
Skip the first 3 chains of the ch-7 loop.
Work:
1 sc in each of the remaining 4 chains
Turn.
You now have the first 4-sc short row.
Build the Ribbing
Work the following two-row sequence:
Short Row A
Ch 2.
Work:
1 sc BLO in each of the 4 sc
Ch 3.
Sl st into the same original anchor space.
Turn.
Short Row B
Ch 3.
Work:
1 sc BLO in each of the same 4 stitches
Turn.
Continue repeating these two short rows until the shell contains:
15 textured short rows total
including the first 4-sc row.
The result should spread into a large ribbed fan. This construction follows the source’s full-shell method of 4 BLO sc worked through 15 short rows and repeatedly anchored to the same space.
COLOR PLAN
For the multicolor look, change colors by shell band, not inside individual fans.
Use:
First Band
Rust red
Second Band
Chocolate brown
Third Band
Warm cream
Fourth Band
Terracotta
Fifth Band
Sage green
Sixth Band
Golden mustard
Seventh Band
Dusty blush
Then repeat from:
rust red
Keep every fan in one horizontal band the same color.
FOUNDATION ROW — COLOR A
With rust red, make your calculated foundation chain.
For a practice swatch:
Ch 59
Row 1
Skip the first chain.
Sc in the next chain.
Now repeat:
Ch 2, skip 2 chains, sl st in next chain
two times.
Then:
Ch 1, skip 1 chain, sl st in next chain
Then:
Ch 2, skip 2 chains, sl st in next chain
Then:
Ch 1, skip 1 chain, sl st in next chain
Then repeat:
Ch 2, skip 2 chains, sl st in next chain
two more times.
Repeat that complete 19-chain sequence across.
At the end, work:
sc in the final chain
instead of the final sl st.
Turn.
You now have the chain-space framework that supports the first row of shells.
ROW 2 — FIRST RIBBED SHELL BAND
Continue with Color A.
Ch:
2
Now repeat across:
Work:
1 sc in the next ch-2 space
Skip:
- the next ch-2 space
- the next ch-1 space
In the following ch-2 space, work:
1 Full Ribbed Shell
using the 15-short-row instructions above.
When the fan is complete, return to the main row.
Skip:
- the next ch-1 space
- the next ch-2 space
Work:
1 sc in the next ch-2 space
Ch:
1
Repeat across.
At the end of the row, work:
1 sc in the final sc
instead of the last ch-1.
Turn.
You should now have your first complete row of large ribbed shells.
Fasten off Color A.
ROW 3 — CONNECTING THE FIRST SHELL BAND
Join:
Color B — Chocolate Brown
at the beginning edge.
Ch:
5
Work:
1 tr in the first sc
This creates the first edge section.
Ch:
1
Now work across the outer edges of the next ribbed shell.
The slip stitches in this row are worked into exposed back loops along selected short rows of the shell.
Skip the first:
3 shell short rows
Sl st into the BLO at the outer edge of the next shell row.
Now repeat:
Ch 2, skip 1 shell row, sl st BLO in the next shell row
until you have created:
4 ch-2 spaces
along the shell.
Ch:
1
In the next ch-1 space from Row 2, work:
tr, ch 1, tr
This forms a small V-shaped anchor between shells.
Repeat across:
ch 1 → connect across shell with four ch-2 spaces → ch 1 → tr/ch-1/tr in next ch-1 space
At the far edge, finish according to the edge structure with:
2 tr in the final ch-2 space
Turn.
This connecting row is the framework for the next staggered shell band.
ROW 4 — SECOND SHELL BAND
Continue with Color B.
This row begins and ends with partial shells so the new row of full fans sits between the fans below.
Beginning Partial Shell
Ch:
9
Skip the first 2 chains.
Work:
1 sc in each of the next 4 chains
Ch:
3
Sl st into the space between the first two treble stitches below.
Turn.
Ch 3.
Work:
1 sc BLO in each of the 4 sc
Turn.
Now continue using the same alternating short-row idea:
Ch 2, sc BLO across 4, ch 3, sl st into the same anchor space, turn
then:
Ch 3, sc BLO across 4, turn
Continue until this beginning shell contains:
8 textured short rows
total.
Continue Across Row 4
Skip the next:
ch-2 space
Sc in the following ch-2 space.
Ch:
1
Sc in the next ch-2 space.
Now locate the:
ch-1 space between the two treble stitches
and work:
1 Full Ribbed Shell
into that ch-1 space.
Continue repeating:
skip one ch-2 space, sc in next ch-2 space, ch 1, sc in next ch-2 space, Full Shell in next tr/ch-1/tr center
across.
Ending Partial Shell
At the final edge, after the last sc/ch-1/sc section, make the final partial shell.
Ch:
7
Sl st into the edge space between the treble and beginning ch-5 from the previous row.
Turn.
Ch 3.
Skip 3 chains.
Sc in each of the next:
4 chains
Turn.
Continue with the same BLO short-row method until the final edge shell contains:
9 textured short rows
total.
Turn.
The source uses an 8-row partial fan at one edge, full central shells, and a 9-row partial fan at the opposite edge to maintain the staggered pattern.
Fasten off Color B.
ROW 5 — CONNECT THE SECOND SHELL BAND
Join:
Color C — Warm Cream
Ch:
1
At the first partial shell, work into the exposed back loops along its outer edge.
Sc BLO in the next shell-row edge.
Then:
Ch 2, skip 1 shell row, sl st BLO in next shell row
Repeat once more so the partial shell has:
2 ch-2 spaces
along its upper edge.
Ch:
1
Work:
tr, ch 1, tr
into the next ch-1 space below.
Ch:
1
Now cross the next full shell:
Skip the first:
3 short rows
Sl st into the BLO at the outer edge of the next shell row.
Then repeat:
Ch 2, skip 1 shell row, sl st BLO in next row
until there are:
4 ch-2 spaces
across the full shell.
Repeat across:
ch 1 → tr/ch-1/tr in next ch-1 space → ch 1 → connect across next shell with four ch-2 spaces
At the final shell, work the reduced edge sequence so you finish with:
2 ch-2 spaces
along the partial shell.
Then:
sc in the top ch-2 space
Turn.
ROW 6 — THIRD SHELL BAND
Continue with Color C.
Ch:
2
Work:
1 sc in the next ch-2 space
Now work:
1 Full Ribbed Shell
into the next:
ch-1 space between two treble stitches
Skip the next ch-2 space.
Sc in the following ch-2 space.
Ch:
1
Repeat across:
sc in ch-2 space → Full Shell in tr-V ch-1 space → skip one ch-2 space → sc in next ch-2 space → ch 1
At the end:
work:
sc in the final sc
instead of the last ch-1.
Turn.
Fasten off Color C.
You now have three colored shell bands.
MAIN PATTERN REPEAT
From this point forward, repeat:
Rows 3–6
until your blanket reaches the desired length. The source pattern specifies Rows 3–6 as the continuing repeat.
Change to the next color whenever you begin the connector row for a new shell band.
Continue the color sequence:
Terracotta
then:
Sage Green
then:
Golden Mustard
then:
Dusty Blush
then return to:
Rust Red
and continue repeating the seven-color sequence.
What the Correct Pattern Should Look Like
After several repeats, you should see:
- large ribbed fan shells
- strong vertical ridges inside each fan
- shell rows staggered like overlapping scales
- small eyelets between neighboring fans
- scalloped horizontal color bands
- no flat ordinary 5-dc shells
- no puff stitches
- no bobbles
The texture should look deeply dimensional even though the fabric itself remains relatively light and flexible.
Keeping the Fans Even
Each full fan must contain:
15 short rows
If one shell contains fewer or more rows, its size will visibly differ from its neighbors.
Count each shell while making it.
A stitch marker can help mark:
Row 1, Row 5, Row 10, Row 15
of the fan while you learn the pattern.
Keeping the Four Chain Spaces Even
When working the connecting rows over a full fan, you should create:
4 ch-2 spaces
across the shell.
Those spaces determine where the next shell row sits.
If you accidentally make only three or five, the next band will shift out of alignment.
Changing Colors Cleanly
At the end of the last stitch of a shell band:
work until the final pull-through.
Use the new color for that final pull-through.
Alternatively, fasten off completely and join the next color at the beginning edge of the following row.
Because this pattern uses many colors, weave yarn tails into stitches of the same color whenever possible.
How Long to Make the Blanket
Continue repeating Rows 3–6 until the body reaches approximately:
Baby Blanket
34–35 inches / 86–89 cm
before the border.
Throw
53–54 inches / 135–137 cm
before the border.
Because every fan band is fairly tall, stop after a complete shell band rather than in the middle of a repeat.
SIMPLE BLANKET BORDER
The shell texture is already very decorative, so keep the border understated.
Use:
Warm Cream
for a neutral frame, or use:
Rust Red
for a stronger autumn finish.
Switch to a hook slightly smaller if your edge tends to flare.
Border Round 1
Join yarn at any corner.
Ch:
1
Work sc evenly around the entire blanket.
Across the top and bottom:
place sc evenly into the available stitches and spaces.
Along the sides:
work enough sc to create a smooth flat edge.
Do not force an exact number into every shell-row edge.
At each corner:
3 sc in the same corner location
Join with sl st.
Check the Border
Lay the blanket flat.
If the border:
ruffles
remove a few side stitches.
If the blanket edges:
pull inward
add several stitches evenly along that side.
The correct edge should lie flat without stretching the shell fabric.
Border Round 2
Ch 1.
Sc in every stitch around.
At each corner:
work:
3 sc in the center stitch of the previous corner
Join.
Fasten off.
Optional Third Round
For a slightly more defined edge, work one final round of:
reverse single crochet
or:
loose slip stitch
around the entire blanket.
Keep the border simple so the large fan shells remain the focal point.
Finishing
Weave every yarn tail securely through stitches of the matching color.
Because there are frequent color changes:
- weave in at least 2 inches / 5 cm
- reverse direction once
- weave through another section
- trim only after the tail feels secure
Avoid trimming directly beside an outer edge.
Blocking
This pattern benefits from light blocking.
Blocking helps:
- open the small eyelets
- relax the ribbed fans
- straighten the side edges
- make the scalloped bands look consistent
Dampen according to your yarn’s care instructions.
Lay flat.
Shape the blanket into a rectangle.
Smooth each shell with your fingers.
Do not stretch the ribs completely flat.
Allow to dry fully.
If the Shells Look Flat
Make sure every short row is being worked:
through the back loop only
Using both loops removes much of the raised ribbing.
The strong ridged texture comes from repeatedly working the 4-sc short rows in BLO.
If the Fans Are Too Narrow
Check the short-row count.
A full shell requires:
15 rows
The fan needs all 15 rows to spread properly.
If the Fans Become Too Wide
Make sure you are always working:
4 sc
in each short row.
Do not accidentally increase at either edge of the small strip.
If the Fabric Pulls Around the Fans
Your anchoring chains may be too tight.
Keep:
ch 2
and:
ch 3
relaxed.
They need enough length to allow the short-row fan to open naturally.
If the Shell Rows Stop Staggering
Check the V-shaped treble anchors.
The next shell row must be worked into the:
ch-1 space between the two treble stitches
not into one of the surrounding ch-2 spaces.
That center ch-1 space controls the position of the next shell.
If the Color Bands Look Uneven
Always change color at the same stage of the repeat.
For this blanket:
use one color for the connector row and the shell band that follows it.
That keeps each fan band visually unified.
Alternative Color Layout
For a quieter blanket, repeat only four colors:
Cream → Sage → Mustard → Terracotta
For a stronger fall palette:
Rust → Chocolate → Mustard → Olive
For a soft nursery version:
Cream → Blush → Sage → Pale Mustard → Dusty Blue
Keep every complete shell band in a single color.
Make a Scarf
Use:
3 or 4 repeats across
and continue the Rows 3–6 repeat until the scarf reaches your preferred length.
Because the shells are highly textured, a simple two-round sc border is enough.
Make a Cushion
Crochet two rectangles using identical repeat counts.
Stop when each piece is approximately square.
Join three sides with sc.
Insert a cushion pad.
Join the final side.
Make a Baby Blanket
Use enough 19-stitch repeats to reach approximately:
28–30 inches / 71–76 cm
before the border.
Continue in length to approximately:
34–36 inches / 86–91 cm
Add the simple border.
Final Pattern at a Glance
Foundation
Multiple of 19 + 2
Row 1
Create the foundation framework using:
- ch-2 spaces
- ch-1 spaces
- slip-stitch anchors
Row 2
Work the first row of:
15-short-row BLO ribbed shells
Row 3
Connect across each full fan with:
4 ch-2 spaces
and create:
tr, ch 1, tr
anchors between fans.
Row 4
Create:
- one partial edge shell
- full staggered shells
- one partial edge shell
Row 5
Connect across the staggered shells.
Row 6
Work the next full shell band.
Repeat
Repeat:
Rows 3–6
to the desired blanket length.
Use the color sequence:
Rust Red → Chocolate Brown → Warm Cream → Terracotta → Sage Green → Golden Mustard → Dusty Blush → repeat
Finish with a simple two-round single-crochet border.
The completed blanket should show large overlapping ribbed shell fans, tiny eyelets between motifs, and warm multicolor horizontal bands, preserving the sculptural Shell Fan Stitch while using the exact earthy color mood of the reference image.