Colorful Tunisian Crochet Blanket Pattern With Easy Checkerboard Blocks
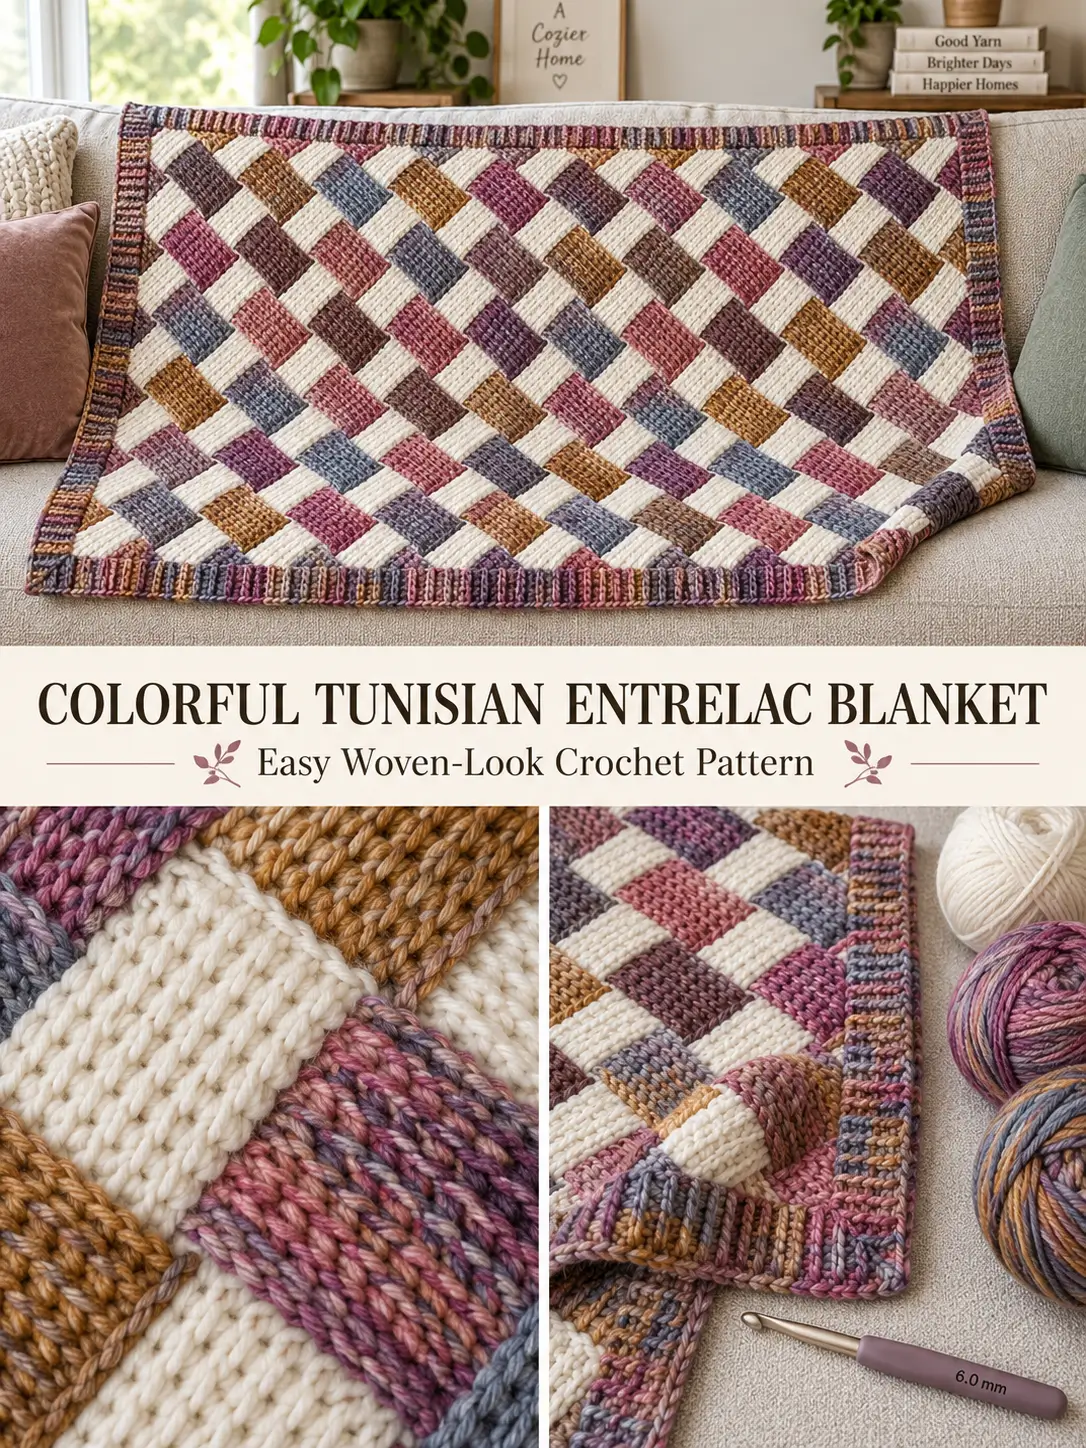
There is something especially satisfying about a crochet blanket that looks much more complicated than it really is.
This colorful Tunisian crochet blanket is built from small, repeatable blocks that create a woven checkerboard effect. Solid cream blocks break up the variegated pinks, purples, browns, golds, and blues, giving the finished blanket plenty of color without making it look too busy.
The finished blanket measures approximately 41 inches wide by 25 inches long (104 × 63 cm), making it a comfortable lap blanket, stroller blanket, or decorative throw.
The best part is that you do not need to memorize a complicated stitch pattern. Once you know how to make one small Tunisian block, you simply repeat it.
To make the construction easier to follow, this pattern uses a simple modular assembly method. You will make the blocks in strips, join the strips together, and then finish the entire blanket with a narrow ribbed border.
Finished Size
Approximately:
41 inches wide × 25 inches long
or
104 cm wide × 63 cm long
The checkerboard center should measure approximately:
40 inches × 23¼ inches
or about:
101 × 59 cm
The ribbed edging brings the blanket close to the final measurement.
Your finished size may vary slightly depending on yarn, hook size, and tension.
Blanket Layout
The center of the blanket contains:
21 blocks across
and
13 blocks from top to bottom
Each block is approximately:
1⅞ inches wide × 1¾ inches tall
or:
4.8 × 4.5 cm
The complete center therefore contains 273 small blocks.
You do not need to make 273 loose pieces before assembling the blanket. Work one strip at a time and attach each completed strip to the blanket before beginning the next one.
Materials
You will need:
- Medium-weight #4 / Aran yarn
- Solid cream or white yarn
- Pink, mauve, purple, or multicolor variegated yarn
- Brown, caramel, gold, blue, or multicolor variegated yarn
- 6 mm crochet hook
- Yarn needle
- Scissors
- Stitch markers
- Measuring tape
A regular crochet hook is long enough for these small Tunisian blocks because only 7 loops need to fit on the hook at one time.
Choose a hook with a smooth shaft rather than a large molded thumb grip if possible. It makes holding the Tunisian loops much easier.
Yarn Amount
Exact yardage can vary considerably because different medium-weight yarns contain different amounts per ball and Tunisian crochet tension can also vary.
The safest method is to make two test blocks before buying all of your yarn:
Make one cream block and one colored block.
Weigh each completed block.
For the 21 × 13 checkerboard layout, you will need approximately:
136 cream blocks
and
137 colored blocks
Then allow additional yarn for seaming and the ribbed border.
If using self-striping or gradient yarn, there is no need to force every colored block to be a particular shade. Letting the yarn change naturally creates the soft patchwork effect.
Abbreviations
ch — chain
sc — single crochet
sl st — slip stitch
BLO — back loop only
yo — yarn over
TSS — Tunisian simple stitch
RS — right side
WS — wrong side
This pattern uses US crochet terminology.
Before You Begin
There are two numbers to remember throughout the blanket:
6 pickups
and
5 rows
Each little Tunisian block begins with a foundation that allows you to pick up 6 new loops.
Because the working loop is already on the hook, you will have:
7 loops on the hook
before beginning the return pass.
Each block contains:
5 complete Tunisian rows
followed by a simple bind-off.
Keeping that same structure for every block is what makes the checkerboard line up neatly.
Tunisian Simple Stitch
Insert the hook from right to left underneath the front vertical bar of the next stitch.
Yarn over.
Pull up one loop.
Leave that loop on the hook.
Continue across without removing the previous loops.
For this pattern, you should have 7 loops on the hook before working each return pass.
Standard Tunisian Return Pass
The return pass is the same throughout the blanket.
Yarn over and pull through 1 loop only.
Then:
Yarn over and pull through 2 loops.
Repeat until only one loop remains on the hook.
That remaining loop becomes the first loop of the next forward pass.
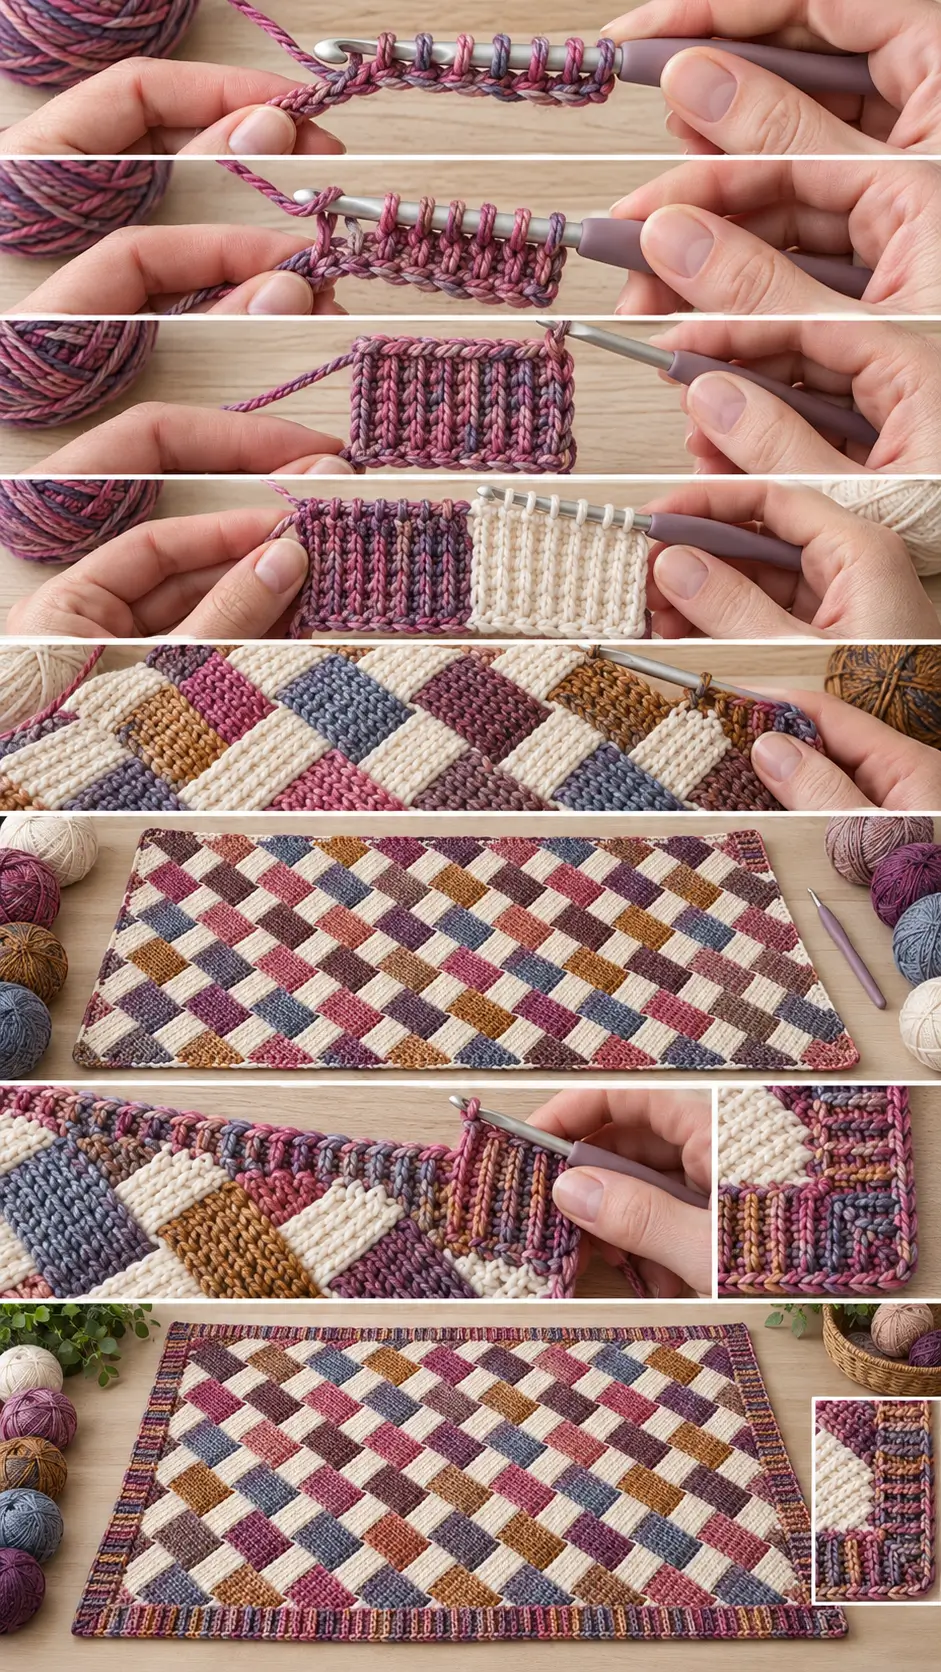
How to Make One Blanket Block
This is the block you will repeat throughout the entire checkerboard center.
Foundation
Ch 7.
Starting in the second chain from the hook, insert the hook into the back bump of the chain.
Yarn over and pull up a loop.
Leave the loop on the hook.
Repeat in each remaining chain.
You should now have:
7 loops on the hook
—the original working loop plus 6 picked-up loops.
Work the Standard Tunisian Return Pass.
You have completed Row 1.
Row 2
The loop already on your hook counts as the first edge loop.
Insert your hook under the next vertical bar and pull up a loop.
Continue picking up loops across.
At the last stitch, insert the hook under both strands of the outside edge stitch rather than just one strand. This gives the block a stronger, straighter outer edge.
You should once again have 7 loops on your hook.
Work the Standard Tunisian Return Pass.
Rows 3–5
Repeat Row 2.
After completing Row 5, check your block.
You should have a compact little rectangle with:
- 6 visible stitch spaces across the working section
- 5 Tunisian rows vertically
- straight side edges
- a dense fabric
- clear Tunisian vertical bars
Bind Off the Block
Do not work another return pass.
Insert the hook under the next vertical bar as though you were making a TSS.
Yarn over and pull the yarn through the stitch and through the loop already on your hook.
One bind-off stitch is complete.
Repeat across the block.
Fasten off, leaving enough yarn to weave in or use for joining.
The top of the block should now have a clean chain-like edge.
Check Your Block Size Before Continuing
This step is important if you want a blanket close to the stated 104 × 63 cm finished size.
One completed block should measure approximately:
4.8 cm wide × 4.5 cm tall
or about:
1⅞ × 1¾ inches
Do not stretch the block while measuring.
If your block is much wider or taller, the finished blanket will also be much larger.
If the block is too large, try a slightly smaller hook.
If it is too small, try a slightly larger hook.
Once your block is reasonably close to the target measurement, continue with that hook for the entire blanket.
Checkerboard Color Pattern
The easiest color arrangement is a simple two-position checkerboard.
Use:
W = white or cream
C = colored or variegated
For odd-numbered strips, work:
C – W – C – W – C – W
continuing the alternating pattern until you have 21 blocks.
Because there are 21 blocks, the final block will also be colored.
For even-numbered strips, reverse the arrangement:
W – C – W – C – W – C
and continue until there are 21 blocks.
Repeat these two strip layouts throughout all 13 strips.
This automatically produces the checkerboard effect.
For the colored squares, alternate between your pink-purple gradient yarn and brown-gold-blue gradient yarn whenever you want a new color section.
You do not need to make every colored block identical.
The shifting gradient is part of what gives this blanket its handmade patchwork appearance.
Make the First Strip
Make the first block in colored yarn.
Make the second block in cream.
Continue alternating colors until you have:
21 blocks total
Lay all 21 blocks in a straight horizontal line with their foundation edges facing the same direction.
Keeping all blocks oriented the same way makes the finished Tunisian texture look much neater.
Joining Blocks Side to Side
Place two neighboring blocks with their right sides facing you.
Bring the side edges together.
Thread the yarn tail from one block onto your yarn needle.
Use the 5 row-end spaces along the side of each block as your joining points.
Join one row-end space on the first block to the matching row-end space on the second block.
Continue from bottom to top.
You should make approximately 5 evenly spaced joins along each block side.
Use a mattress-style seam for the flattest finish.
Do not pull the yarn extremely tight.
The seam should close the gap without puckering either block.
Continue until all 21 blocks have been joined into one long strip.
Make Strip 2
Strip 2 begins with cream instead of colored yarn.
Follow this arrangement:
W – C – W – C – W – C
Continue alternating until you have 21 blocks.
Join the blocks side to side exactly as you did for Strip 1.
You now have two long checkerboard strips.
Joining Two Strips Together
Lay Strip 2 directly above Strip 1.
Check the colors before sewing.
A cream block should sit above a colored block, and a colored block should sit above a cream block.
The checkerboard should look like this:
Strip 1:
C | W | C | W | C
Strip 2:
W | C | W | C | W
Match each block carefully before joining.
Using a yarn needle and a long length of matching yarn, join the top edge of Strip 1 to the bottom foundation edge of Strip 2.
Each block contributes approximately 6 joining points across this edge.
Work through corresponding loops on both strips.
Keep the seam relaxed.
After joining several blocks, place the blanket flat and check that the seam is not shortening the strip.
Continue across all 21 blocks.
Build the Remaining Blanket
Continue making strips in the following sequence:
Strip 1: start with colored
Strip 2: start with cream
Strip 3: start with colored
Strip 4: start with cream
Continue alternating in this way until you have completed:
13 strips
with:
21 blocks in every strip
The final body will contain:
21 × 13 blocks
and should measure close to:
101 × 59 cm
before the ribbed border is added.
As the blanket grows, lay it flat every few strips.
Check three things:
The long edges should remain reasonably straight.
The short edges should remain approximately the same length.
The seams should be relaxed enough that the blanket does not pull inward.
Managing All Those Yarn Ends
A colorful checkerboard creates many yarn ends, so do not leave every end until the very end of the project.
After completing each strip, weave in the ends from that strip before starting the next one.
Run each tail underneath several stitches on the wrong side.
Change direction once and pass through several additional stitches.
Trim the excess only after the tail feels secure.
This makes finishing the blanket much more manageable.
Preparing the Blanket for the Border
Tunisian crochet naturally wants to curl, especially around the edges.
The ribbed border is not only decorative—it also helps stabilize the blanket and encourages the finished piece to lie flatter.
Before making the ribbing, work a preparation round of single crochet around the entire blanket.
Use one of your variegated yarns or a coordinating solid color.
Single Crochet Preparation Round
Begin at one corner.
Ch 1.
Work sc evenly around the blanket.
Do not force a stitch into every tiny strand. Instead, use the block structure to keep your spacing consistent.
Along Each Long Edge
There are:
21 blocks
and each block contributes approximately:
6 stitch spaces
That gives:
21 × 6 = 126 stitches
Add one balancing stitch near the final corner if necessary.
Target:
approximately 127 sc along each long edge
Along Each Short Edge
There are:
13 blocks
and each block contributes approximately:
5 row-end spaces
That gives:
13 × 5 = 65 stitches
Add one stitch at each corner area.
Target:
approximately 67 sc along each short edge
The exact count is less important than having a flat edge.
If the blanket begins to ruffle, you have too many stitches.
If the edge pulls inward, you have too few.
Finish the round and fasten off.
Ribbed Crochet Border
The border is made from short rows of 6 single crochet stitches worked perpendicular to the blanket edge.
Working into the back loops creates the stretchy ribbed appearance.
For the cleanest result, work the four sides separately rather than trying to force one continuous rib around every corner.
First Long Ribbed Edge
Attach border yarn at the corner of one long edge.
Ch 7.
Beginning in the second chain from the hook:
Sc in each chain across.
You should have:
6 sc
Slip stitch into the next 2 stitches of the preparation edge.
Turn.
Rib Row 2
Skip the 2 slip stitches you just made.
Sc BLO in each of the 6 rib stitches.
Ch 1.
Turn.
Rib Row 3
Sc BLO in each of the 6 stitches.
Do not chain before attaching.
Sl st into the next 2 stitches of the blanket edge.
Turn.
Continue the Rib
Repeat Rows 2 and 3 across the entire edge.
The rib should grow sideways while remaining attached to the blanket.
Every ridge will run perpendicular to the main blanket edge.
Do not pull the slip stitches tightly.
You want the border to support the blanket, not gather it.
When you reach the last available edge stitch, use one final slip stitch if necessary rather than forcing two stitches into the corner.
Finish the last rib row.
Fasten off.
Second Long Edge
Turn the blanket around.
Work the opposite long side exactly the same way.
Use the same border yarn or switch to another coordinating gradient.
Keep the rib depth at:
6 sc
so both sides match.
First Short Edge
Attach your border yarn at one short side.
Begin beside the completed long-edge ribbing.
Ch 7.
Work 6 sc across the chain.
Attach to the prepared blanket edge with 2 slip stitches.
Continue the same BLO ribbing repeat down the entire side.
When you approach the lower corner, allow the final rib row to meet the existing bottom border naturally.
Fasten off.
Final Short Edge
Repeat on the remaining side.
Before fastening off, place the blanket flat.
Check all four corners.
The ribbed borders should meet neatly without large gaps.
If there is a small opening at a corner, use the finishing yarn tail to stitch the two rib edges together invisibly.
Finishing the Blanket
Weave in all remaining yarn ends on the wrong side.
Pay particular attention to the four corners and any places where you changed border colors.
Lay the blanket flat and gently smooth it into shape.
The approximate finished measurement should now be:
104 cm wide × 63 cm long
or:
41 × 25 inches
Do not aggressively stretch the Tunisian blocks.
The goal is simply to straighten the checkerboard and relax the seams.
How to Block the Blanket
Check your yarn label before using heat.
For acrylic yarn, avoid placing a hot iron directly onto the crochet because excessive heat can permanently flatten or melt the fibers.
A gentle wet block is safer.
Dampen the blanket or wash it according to the yarn manufacturer’s instructions.
Lay it flat on clean towels or blocking mats.
Shape it to the correct rectangle.
Straighten the ribbing.
Allow it to dry completely before moving it.
The ribbed border should help reduce much of the curling once the blanket is relaxed.
How to Make the Blanket Larger
The pattern is easy to resize because everything is based on blocks.
For more width, add blocks to every strip.
For more length, add complete strips.
To maintain the checkerboard pattern, continue alternating the starting color of each new strip.
For example, if one strip starts with a colored block, the next should begin with cream.
For the same proportions as this blanket, keep your individual block size close to 4.8 × 4.5 cm.
Easy Baby Blanket Version
For a smaller baby blanket, use fewer blocks across and fewer strips.
Always make your width an odd number of blocks if you want the first and last blocks of an odd-numbered strip to be the same color.
Continue alternating the checkerboard exactly as before.
Finish with the same single-crochet preparation edge and 6-stitch ribbing.
Larger Throw Blanket Version
For a full sofa throw, continue adding blocks until the width is where you want it.
Then continue adding strips for extra length.
Because a larger blanket contains significantly more blocks, make sure you have enough cream yarn before beginning.
Gradient yarn is easier to substitute because slight color changes enhance the patchwork appearance rather than making the blanket look mismatched.
Tips for Neater Tunisian Blocks
Keep the loops on the hook loose enough that you can insert the hook easily on the next forward pass.
Do not tighten the first few loops of the return pass more than the remaining loops.
Always work the final edge stitch through two strands. This produces a sturdier side edge for seaming.
Count your loops frequently.
Before every return pass you should have:
7 loops
If you have only 6, you probably skipped one vertical bar.
If you have 8, you probably worked into the same vertical bar twice.
What If My Blocks Curl?
Some curling is normal in Tunisian simple stitch.
Do not keep increasing your hook size simply to eliminate all curling.
A small amount of curl will relax after assembly, edging, and blocking.
The attached ribbed border also adds weight and structure around the perimeter.
What If My Checkerboard Is Becoming Crooked?
Measure after every two or three strips.
The most common cause is pulling the joining seam too tightly.
The seam should hold the blocks together without shortening their edges.
If one strip suddenly becomes narrower than the others, loosen the seam before continuing.
What If My Blocks Are Different Sizes?
Count every block.
Each one should have:
6 picked-up loops plus the original working loop
for:
7 loops total
and:
5 complete Tunisian rows
before binding off.
Even one additional row can make the checkerboard noticeably uneven after several strips are assembled.
Can I Use Only Two Colors?
Yes.
A solid cream paired with one variegated yarn creates a particularly clear checkerboard.
You could also use:
cream and dusty rose,
cream and sage,
white and blue,
or two contrasting solids.
For the woven appearance to remain visible, choose colors with enough contrast that neighboring blocks do not disappear into one another.
Can Beginners Make This Blanket?
You should be comfortable making chains and handling yarn with a crochet hook, but you do not need advanced Tunisian crochet experience.
The entire body is built from one small repeat.
Practice a single block until you can consistently produce:
7 loops on the hook
and:
5 even rows
Once that block looks right, the rest of the blanket is repetition.
Colorful Tunisian Crochet Blanket Pattern Recap
The construction is simple once you see the full sequence:
Make a 6-pickup, 5-row Tunisian block → alternate cream and colored blocks → join 21 blocks into a strip → alternate the starting color → build 13 strips → join the strips → single crochet around the perimeter → add 6-stitch BLO ribbing → weave in ends → block gently.
The small blocks give this Tunisian crochet blanket its distinctive woven appearance, while the mix of solid and gradient yarn means every section looks slightly different.
The result is a colorful 41 × 25-inch Afghan-style crochet blanket with plenty of texture, a strong checkerboard design, and a ribbed finish that helps the edges sit neatly.