Cozy Crescent Moon Crochet Pillow Pattern
Introduction
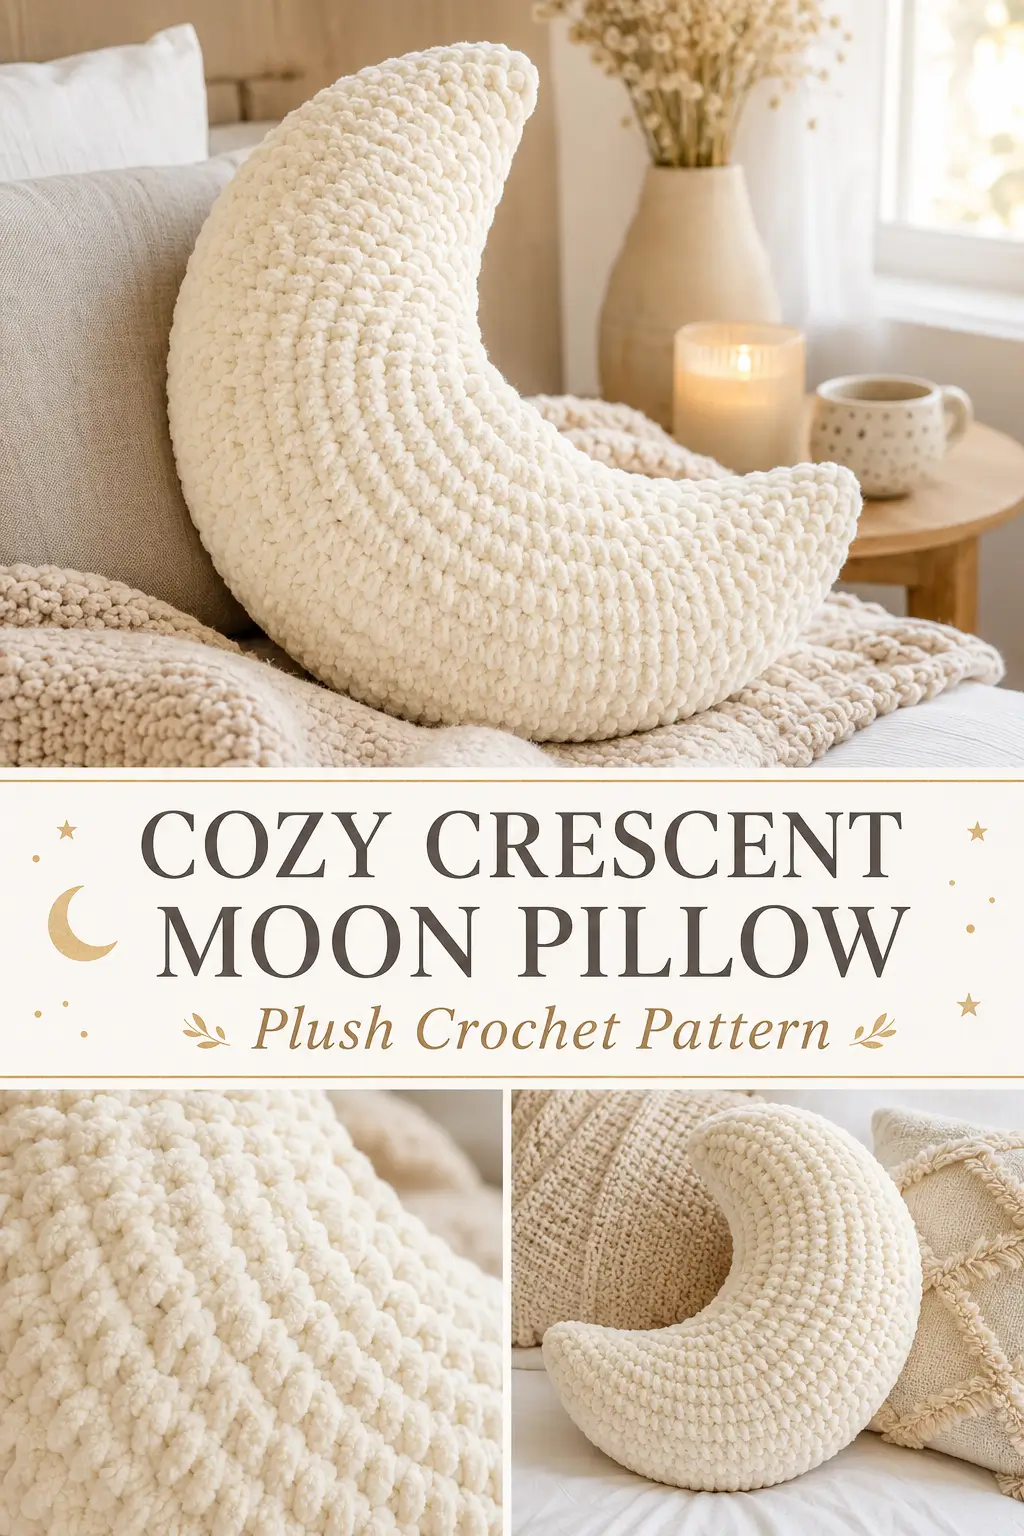
A crochet moon pillow is the kind of cozy handmade piece that makes a room feel softer right away. It has that dreamy celestial look, but it still feels simple, plush, and practical enough to use on a bed, reading chair, nursery shelf, or cozy corner.
The linked Beautiful Dawn Designs page shares its own free moon pillow pattern using super bulky yarn, a 6.5 mm hook, and a continuous-round construction. To keep this version original, this Cozy Crescent Moon Crochet Pillow uses a fresh tapered tube construction, different shaping sections, a different closing method, and a simple inner-curve shaping technique so the finished pillow bends into a crescent shape without copying the original stitch-by-stitch pattern.
This easy crochet pattern is soft, beginner-friendly, and perfect if you want a plush crochet toy, nursery pillow, celestial room decor, or handmade gift.
Description
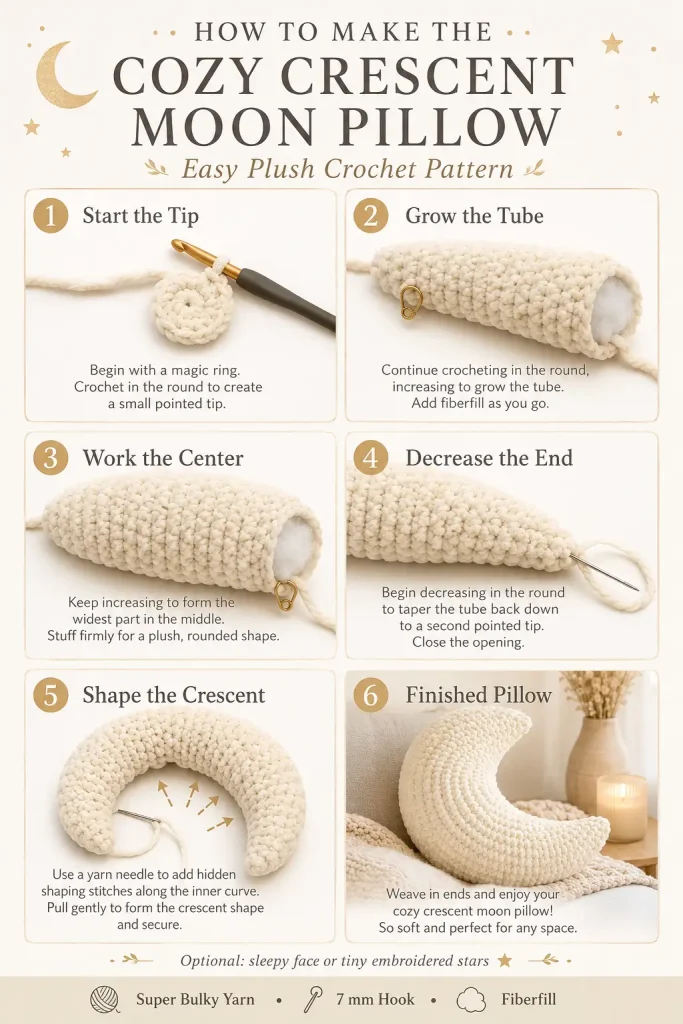
This moon pillow is made as one long tapered plush tube that starts at one pointed moon tip, grows wider through the center, then narrows back down to the second point. After stuffing, the pillow is gently shaped into a crescent by adding hidden tightening stitches along the inner curve.
The finished shape is soft and rounded, with two tapered points and a thick squishy center. You can make it in warm cream for a classic moon look, soft gray for a calm neutral style, pale yellow for a dreamy nursery version, or dusty blue for a night-sky theme.
This pattern works best with super bulky blanket yarn because it creates that plush, cloud-like texture seen in cozy crochet pillows.
Materials
- Super bulky blanket yarn in warm cream, ivory, soft gray, or pale yellow
- 7 mm crochet hook
- Polyester fiberfill
- Stitch marker
- Yarn needle
- Scissors
- Long yarn needle, helpful for shaping
- Optional: small amount of blush or gold yarn for star embroidery
Finished Size
Approximate finished size:
- Height from tip to tip: 16–18 inches
- Widest center section: 5–6 inches thick
Finished size will vary depending on yarn, hook, stuffing, and tension.
Gauge
Gauge is not strict for this pillow.
Your stitches should be tight enough to hold stuffing neatly.
If stuffing shows through, use a smaller hook.
If the fabric feels too stiff, use a slightly larger hook.
Abbreviations
- MR: magic ring
- ch: chain
- sc: single crochet
- inc: increase, 2 sc in the same stitch
- dec: invisible decrease
- sl st: slip stitch
- st: stitch
- sts: stitches
- FO: fasten off
Pattern Notes
This moon pillow is worked in continuous rounds.
Do not join at the end of each round.
Use a stitch marker to mark the first stitch of every round.
Stuff the pillow gradually as you work.
Do not overstuff the pointed tips.
The crescent shape is created after the tube is finished by gently pulling the inner curve inward with hidden shaping stitches.
Step-by-Step Instructions
Moon Body
Use your main moon color.
Round 1
Make a MR.
Work 6 sc into the ring. (6)
Round 2
Sc in each st around. (6)
Round 3
Repeat around: sc in next st, inc in next st. (9)
Round 4
Sc in each st around. (9)
Round 5
Repeat around: sc in next 2 sts, inc in next st. (12)
Round 6
Sc in each st around. (12)
Round 7
Repeat around: sc in next 3 sts, inc in next st. (15)
Round 8
Sc in each st around. (15)
Round 9
Repeat around: sc in next 4 sts, inc in next st. (18)
Round 10
Sc in each st around. (18)
Begin adding a small amount of stuffing to the first point.
Do not pack the tip too firmly.
Round 11
Repeat around: sc in next 5 sts, inc in next st. (21)
Round 12
Sc in each st around. (21)
Round 13
Repeat around: sc in next 6 sts, inc in next st. (24)
Round 14
Sc in each st around. (24)
Round 15
Repeat around: sc in next 7 sts, inc in next st. (27)
Round 16
Sc in each st around. (27)
Round 17
Repeat around: sc in next 8 sts, inc in next st. (30)
Rounds 18–22
Sc in each st around. (30)
Add more stuffing as the moon grows.
Shape the tube with your hands so it stays smooth and round.
Round 23
Repeat around: sc in next 9 sts, inc in next st. (33)
Rounds 24–29
Sc in each st around. (33)
This is the widest center section of the moon.
Stuff this area firmly enough to hold shape, but keep it soft.
Round 30
Repeat around: sc in next 9 sts, dec. (30)
Rounds 31–35
Sc in each st around. (30)
Round 36
Repeat around: sc in next 8 sts, dec. (27)
Round 37
Sc in each st around. (27)
Round 38
Repeat around: sc in next 7 sts, dec. (24)
Round 39
Sc in each st around. (24)
Round 40
Repeat around: sc in next 6 sts, dec. (21)
Round 41
Sc in each st around. (21)
Continue stuffing as you work.
Make sure the center stays full and the narrowing end stays smooth.
Round 42
Repeat around: sc in next 5 sts, dec. (18)
Round 43
Sc in each st around. (18)
Round 44
Repeat around: sc in next 4 sts, dec. (15)
Round 45
Sc in each st around. (15)
Round 46
Repeat around: sc in next 3 sts, dec. (12)
Round 47
Sc in each st around. (12)
Add final stuffing.
Do not overstuff the second tip.
Round 48
Repeat around: sc in next 2 sts, dec. (9)
Round 49
Sc in each st around. (9)
Round 50
Repeat around: sc in next st, dec. (6)
FO, leaving a long tail.
Use the tail to close the opening.
Weave in the end securely.
Shaping the Crescent
Lay the stuffed tube on a flat surface.
Curve it gently into a crescent shape.
Decide which side will be the inner curve.
Thread a long piece of matching yarn onto a yarn needle.
Starting near one tip on the inner curve, insert the needle through the pillow and come out about 2 inches farther along the inner curve.
Pull gently.
Continue making hidden stitches along the inner curve, spacing them about 1.5–2 inches apart.
Each time you pull the yarn, the inner curve will tighten and the outer curve will round outward.
Do not pull too tightly all at once.
Work slowly from one tip to the other.
When the crescent shape looks right, secure the yarn with several hidden knots.
Weave the end deep into the pillow.
Smoothing the Shape
Hold the moon in both hands.
Gently squeeze the center section to make it round.
Shape the tips so they curve slightly inward.
If one side looks flat, massage the stuffing into place.
If the inner curve is not tight enough, add a few more hidden shaping stitches.
Optional Face
You can leave the pillow plain for a modern decor look, or add a sleepy face.
Use black or dark gray yarn.
Sleepy Eyes
Embroider one curved closed eye on each side of the front center.
Place the eyes about 3 inches apart.
Smile
Embroider a tiny soft smile between the eyes.
Cheeks
Use blush pink yarn.
Add one small stitch below each eye.
Keep the face simple so the pillow still feels soft and cozy.
Optional Star Detail
Use pale gold yarn.
Embroider 2–3 tiny star stitches on one side of the moon.
To make a star:
Make one vertical stitch.
Make one horizontal stitch crossing it.
Add two small diagonal stitches.
Keep the stars small and spaced apart.
Finishing
Weave in all ends securely.
Check that both tips are closed.
Check that the shaping stitches are hidden.
Smooth the outer curve.
Shake the pillow gently to settle the stuffing.
Trim any fuzzy yarn ends carefully.
Size Adjustments
Smaller Moon Pillow
Use worsted weight yarn and a 4 mm hook.
Follow the same stitch counts.
The finished moon will be smaller and firmer.
Larger Moon Pillow
Use jumbo chenille yarn and an 8 mm hook.
Add extra center rounds before decreasing.
For a longer moon, add 4–8 extra rounds between Rounds 24–29.
Thinner Moon
Stop increasing at 30 stitches instead of 33.
Work the center section at 30 stitches before decreasing.
Chunkier Moon
Increase to 36 stitches at the center.
Work 6–8 straight rounds before decreasing.
Tips & Variations
Use warm ivory for a classic moon pillow.
Use soft gray for a modern neutral nursery.
Use pale yellow for a sweet celestial baby room.
Use white blanket yarn for a cloud-like look.
Use velvet yarn for an extra soft finish.
Stuff gradually so the pillow does not become lumpy.
Do not overstuff the pointed tips.
Use hidden shaping stitches slowly so the crescent curve looks smooth.
Make two moons in different sizes for cozy shelf decor.
Add a sleepy face for a cute plush toy style.
Leave it plain for minimalist home decor.
FAQ
Is this moon pillow beginner-friendly?
Yes. This pattern uses basic amigurumi-style rounds with increases and decreases. The shaping step takes patience, but it is not complicated.
Is this the exact Beautiful Dawn Designs pattern?
No. The linked page has its own free moon pillow pattern. This is a new original version with different stitch counts, a tapered tube construction, and a hidden inner-curve shaping method. (Beautiful Dawn Designs)
What yarn works best?
Super bulky blanket yarn works best for a soft plush pillow. Chenille and blanket yarn both give a cozy squishy result.
How do I make the moon curve?
After the tube is stuffed and closed, use hidden stitches along the inner curve and gently pull them tighter. This shortens the inner edge and bends the pillow into a crescent.
Can I wash this pillow?
Check your yarn label first. If your yarn is washable, place the pillow in a laundry bag and wash gently. Air dry flat.
Conclusion
The Cozy Crescent Moon Crochet Pillow is soft, dreamy, and simple enough to enjoy as a relaxing project. The tapered plush body creates the moon shape, while the hidden shaping stitches help form a smooth crescent curve.
Make it in cream, gray, yellow, or any cozy color you love. It is perfect for nursery decor, bedroom styling, handmade gifts, celestial-themed rooms, and soft crochet pillow collections.