Cozy Granny Square Cardigan Crochet Pattern
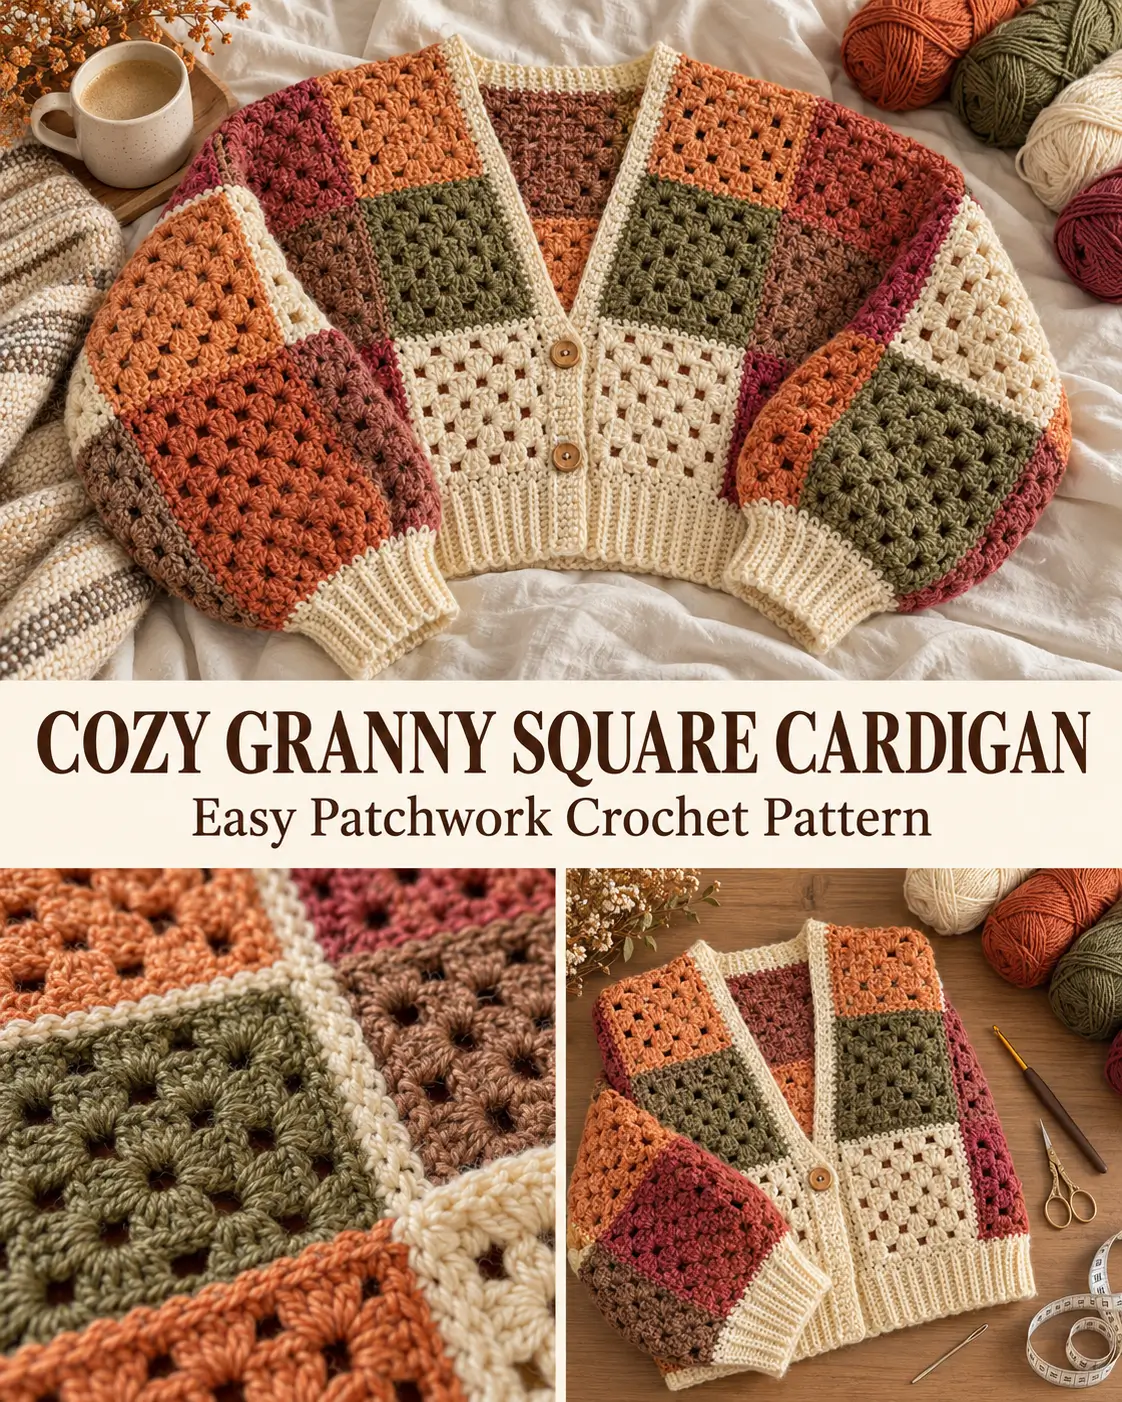
There’s something irresistible about a cozy granny square cardigan, especially when it combines warm autumn colors, soft textured stitches, and comfortable oversized sleeves.
This beautiful patchwork-style cardigan is the kind of crochet project that looks impressive without requiring complicated stitches. Instead of crocheting an entire sweater in one piece, you’ll create individual granny squares, arrange them into panels, and join everything together.
The finished cardigan features a relaxed, boxy silhouette, a flattering cropped length, roomy sleeves, and ribbed edges that give it a polished handmade appearance.
Choose earthy shades of rust, mustard, olive green, burgundy, brown, and cream for a fall-inspired design, or use your favorite colors to make a completely personalized sweater.
Why You’ll Love This Crochet Cardigan
- Made primarily with basic granny squares.
- Easy to personalize with different color combinations.
- Comfortable, relaxed silhouette.
- Beautiful texture without complicated stitch patterns.
- Individual squares make the project easy to work on in short sessions.
- Ribbed cuffs and edging create a finished sweater-like appearance.
- A lovely handmade gift for someone who appreciates cozy clothing.
This is an excellent project for adventurous beginners who already know how to chain, make double crochet stitches, and work in the round.
Crochet Cardigan Pattern Overview
Skill level: Confident beginner to intermediate
Crochet terminology: US terms
Construction: Granny square panels joined with seams
Fit: Relaxed, slightly oversized, cropped cardigan
Sizes: XS/S, M/L, XL/2XL, and 3XL/4XL
Main stitches: Chain, slip stitch, single crochet, double crochet, single crochet through the back loop
Special techniques: Granny square construction, seaming, simple decreases, ribbing, and optional buttonholes
This original version uses 27 body squares and 8 sleeve squares, making 35 granny squares in total.
Materials You’ll Need
- Medium-weight (#4) yarn in your chosen colors
- 5 mm (H/8) crochet hook, or a size that produces your required square measurements
- Yarn needle for seaming and weaving in ends
- Sharp scissors
- Stitch markers
- Measuring tape
- Optional: Two to four buttons
- Optional: Blocking mats and rustproof pins
Choosing Your Yarn Colors
For a cardigan inspired by warm vintage patchwork, try combining:
- Warm ivory or cream
- Terracotta or burnt orange
- Deep rust
- Olive green
- Mustard yellow
- Burgundy or chocolate brown
Use cream or another neutral shade for the cuffs, lower ribbing, and front border to tie all the colors together.
A soft acrylic yarn or washable wool blend works particularly well for a comfortable everyday cardigan.
Yarn planning tip: Because yarn usage varies by size, fiber, gauge, and finishing choices, make one body square and one sleeve square first. Weigh both, multiply their weights by 27 and 8 respectively, and add yarn for ribbing, edging, seams, and a safety margin. This is more dependable than guessing the number of skeins.
Cardigan Measurements and Sizing
This version uses the same arrangement of squares for every size. The square measurements change to create different cardigan dimensions.
| Size | Body square | Sleeve square | Approx. finished chest |
|---|---|---|---|
| XS/S | 4.5 in | 6.5 in | 40.5 in |
| M/L | 5 in | 7.5 in | 45 in |
| XL/2XL | 5.5 in | 8.5 in | 49.5 in |
| 3XL/4XL | 6 in | 9.5 in | 54 in |
The finished chest is an approximate outer circumference before adjustment for seam take-up. The 3XL/4XL label does not guarantee a comfortable fit for every body in that range.
For the best fit, measure your bust and choose a finished circumference that provides your preferred positive ease. You can also change the size of the squares to customize the result.
The body contains three rows of squares vertically, so the body length before ribbing is approximately three times the body-square measurement.
Important: Check both your chest measurement and desired cardigan length before making all the squares. The sizing table is a planning guide for this original pattern, not a standardized garment size chart.
Crochet Abbreviations
- Ch: Chain
- Sc: Single crochet
- Dc: Double crochet
- Sl st: Slip stitch
- St: Stitch
- Sp: Space
- Sc2tog: Single crochet two stitches together
- BLO: Back loop only
- Rep: Repeat
A granny cluster means three double crochet stitches worked into the same space.
The beginning chain 3 counts as one double crochet in the granny square instructions.
Part 1: How to Crochet the Basic Granny Square
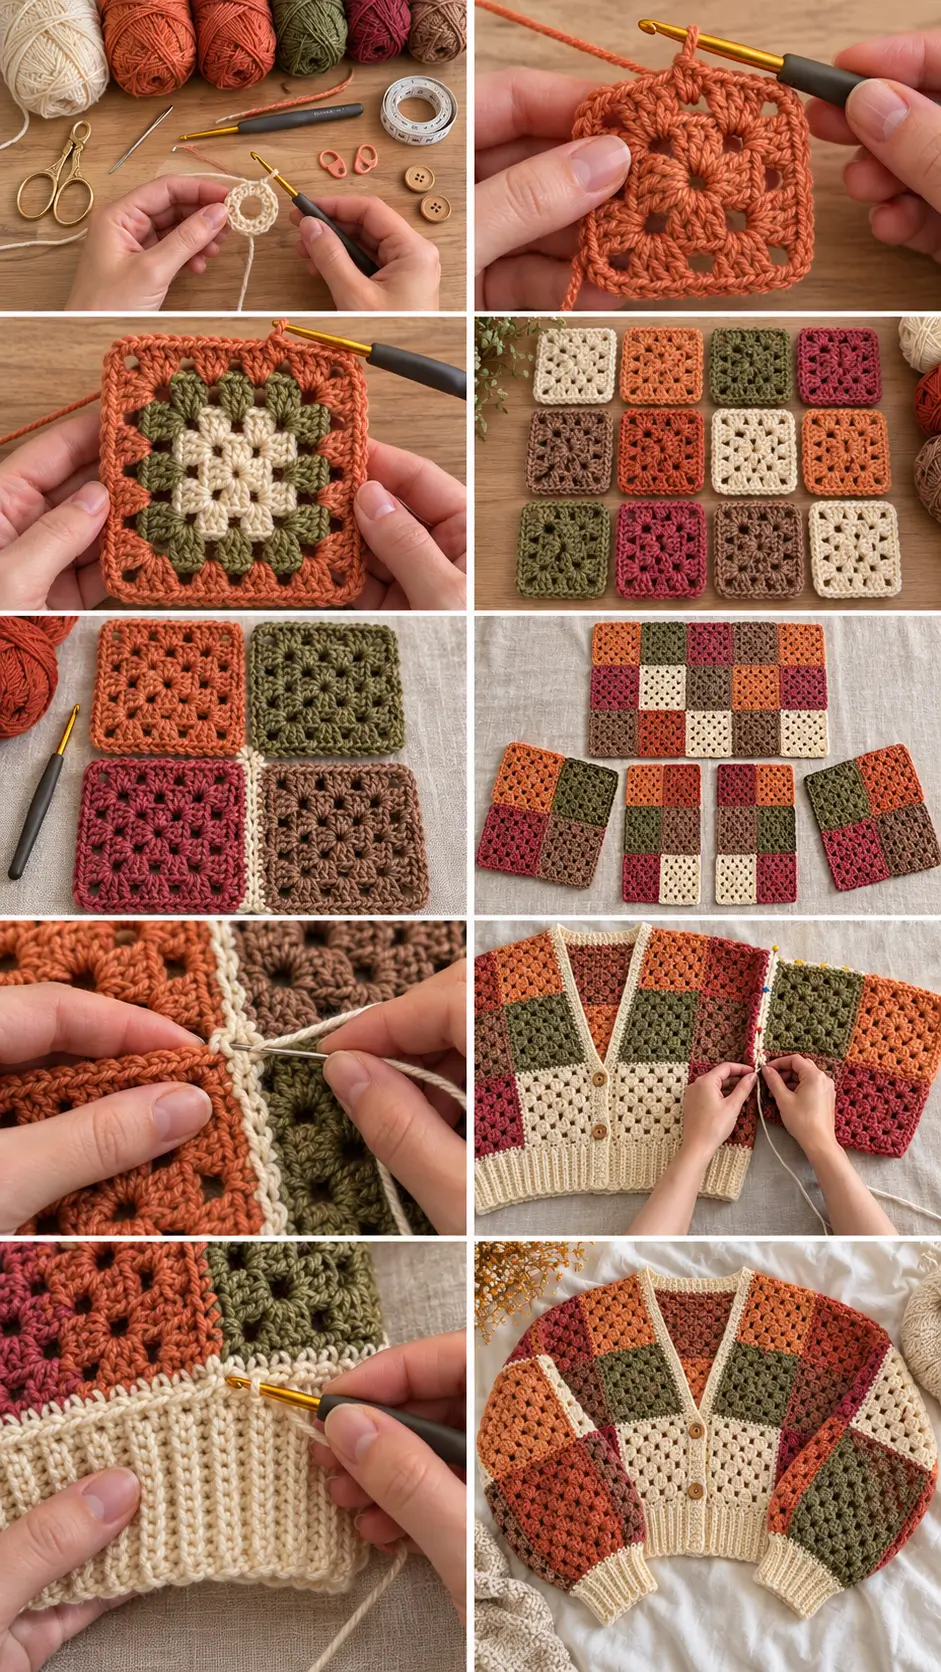
The entire cardigan begins with a traditional granny square.
Each square is worked from the center outward using groups of three double crochet stitches separated by chain spaces.
You’ll make two square sizes: smaller squares for the body and larger squares for the sleeves.
Round 1: Create the Center
- Make a magic ring.
- Chain 3. This counts as your first double crochet.
- Work 2 double crochet stitches into the ring.
- Chain 2.
- Work 3 double crochet stitches into the ring.
- Chain 2.
- Repeat the 3-double-crochet cluster followed by chain 2 twice more.
- Slip stitch into the top of the beginning chain 3.
- Pull the ring closed.
You should have four clusters and four corner spaces.
Round 2: Build the Corners
Slip stitch across to the nearest corner chain-2 space.
- Chain 3 and work 2 double crochet stitches into that corner.
- Chain 2 and work 3 more double crochet stitches into the same corner.
- Chain 1.
- In the next corner, work 3 double crochet, chain 2, and 3 double crochet.
- Chain 1.
- Repeat the corner sequence in the remaining two corners.
- Chain 1 and slip stitch into the beginning chain 3.
You now have four completed corners with two granny clusters at each corner.
Round 3: Expand the Square
Move into the next corner space with slip stitches.
- Chain 3, then make 2 double crochet, chain 2, and 3 double crochet in that corner.
- Chain 1.
- Work 3 double crochet into the next chain-1 space along the side.
- Chain 1.
- Work 3 double crochet, chain 2, and 3 double crochet into the next corner.
- Continue around, placing one granny cluster into each side chain-1 space and two clusters separated by chain 2 into each corner.
- Chain 1 between neighboring clusters.
- Join with a slip stitch.
Your granny square is now growing evenly on all four sides.
Round 4 and Beyond: Continue Growing
Repeat the following pattern on every additional round:
- Work 3 double crochet, chain 2, and 3 double crochet in each corner.
- Work one cluster of 3 double crochet in each chain-1 space along the sides.
- Chain 1 between neighboring clusters.
- Join each round with a slip stitch.
- Slip stitch into a corner space before beginning the next round.
Continue until your square reaches the required measurements.
Fasten off, leaving enough yarn to weave in securely.
Helpful tip: Measure your squares after gently blocking them. All body squares should match one another, and all sleeve squares should match one another. They do not need to have the same number of rounds if you change yarns, but matching dimensions and stitch distribution makes joining easier.
Part 2: Crochet the Body Squares
You need 27 smaller granny squares for the main body.
Arrange them as follows:
| Section | Squares |
|---|---|
| Back panel | 15 |
| Left front panel | 6 |
| Right front panel | 6 |
| Total | 27 |
For the back panel, arrange the squares into five columns and three rows.
For each front panel, arrange six squares into two columns and three rows.
Experiment with color placement before sewing the squares together.
A random patchwork arrangement creates a playful vintage appearance, while repeating rows of coordinated colors produces a more organized design.
Try to distribute your darker and lighter shades evenly throughout the cardigan.
Part 3: Crochet the Sleeve Squares
For the sleeves, make 8 larger granny squares.
Each sleeve uses four squares arranged in a two-by-two rectangle.
The larger squares help create roomy sleeves while reducing the total number of individual pieces.
Work these squares using the same granny square instructions, adding rounds until they reach the sleeve-square measurement for your size.
For each sleeve, arrange the four squares as:
- Two squares across
- Two squares down
When the squares are joined, the rectangle should measure approximately two sleeve-square widths across and two sleeve-square heights long.
Make two matching sleeve rectangles.
Part 4: Block and Arrange Your Squares
Before assembling the cardigan, lay out every square on a flat surface.
Blocking is particularly helpful if some of your squares have slightly uneven edges.
For fibers that tolerate wet blocking, dampen the squares and shape them to the required measurements. For acrylic or sensitive fibers, follow the yarn manufacturer’s blocking and care recommendations.
Allow all squares to dry completely.
Next, arrange your colors until you’re happy with the overall appearance.
Take a photograph of the arrangement before joining. This simple step makes it easier to keep your chosen color order.
Part 5: Join the Granny Squares Into Panels
Use a yarn needle and matching yarn to join the squares.
A mattress stitch creates a neat seam and is a good choice for a cardigan with several color changes.
Joining the Back Panel
- Arrange 15 squares into five columns and three rows.
- Sew neighboring squares together within each row.
- Join the three completed rows.
- Check that the edges remain straight.
You should now have one rectangular back panel.
Joining the Front Panels
Make two separate rectangles, each consisting of two squares across and three squares down.
These form the right and left fronts.
Place the completed panels beside the back panel to check their placement.
Joining the Shoulder Seams
Lay the back panel flat.
Position the front panels on top of the back panel with right sides together and upper edges aligned.
Join the two-square upper edge of the left front to the outer two squares along one side of the back’s upper edge.
Repeat for the other front.
Leave the center back square’s upper edge unjoined to form the back neckline.
The front opening remains between the two front panels.
Joining the Side Seams
Fold the front panels down into their normal positions.
On each side, sew the front and back side edges together, beginning at the lower hem.
Stop below the shoulder to create an armhole.
For this design, leave an opening of approximately one sleeve-square width down each side from the shoulder. Because the opening has a front and back edge, its total circumference should match the width of the flattened sleeve panel.
For example, if your sleeve squares are 6.5 inches wide, the flattened sleeve panel measures approximately 13 inches around. The body armhole should also measure approximately 13 inches around.
Measure and adjust the opening before securing your seam.
Repeat on the other side.
Part 6: Assemble and Attach the Sleeves
Lay one sleeve rectangle flat, with two squares across and two squares down.
Fold it lengthwise so that its two long outer edges meet.
Sew those edges together to create a tube, leaving both circular ends open.
The tube’s length runs from the shoulder toward the wrist.
Repeat for the second sleeve.
Attach the Sleeves to the Body
- Turn the cardigan inside out.
- Keep the sleeves right side out.
- Insert one sleeve into its corresponding armhole.
- Align the sleeve’s inner seam with the underarm side seam.
- Match the rest of the sleeve opening around the armhole.
- Use stitch markers to hold everything evenly.
- Sew around the opening without stretching the fabric excessively.
- Repeat for the other sleeve.
Turn the cardigan right side out and try it on.
Check that both sleeves sit comfortably and the underarm seams feel secure.
Part 7: Add the Ribbed Sleeve Cuffs
The cuffs transform the loose granny square sleeves into a more fitted cardigan silhouette.
Use a contrasting neutral yarn for the ribbing.
Prepare the Wrist Opening
Join yarn at the lower sleeve edge.
Work one round of single crochet, decreasing evenly where needed so the cuff opening fits comfortably over your hand and wrist.
Use sc2tog to reduce excess fullness.
Do not decrease so aggressively that the opening becomes difficult to pull over your hand.
Join the round with a slip stitch.
Crochet the Ribbing
The following method creates ribbing worked sideways and attached as you go.
Row 1: Chain 9. Single crochet in the second chain from the hook and in each remaining chain. You should have 8 single crochet stitches.
Slip stitch into each of the next two available stitches along the sleeve edge. Turn.
Row 2: Skip the two attachment slip stitches. Single crochet in the back loop only of each of the 8 ribbing stitches. Turn.
Row 3: Chain 1. Single crochet through the back loop of all 8 stitches. Slip stitch into the next two unworked stitches along the sleeve edge. Turn.
Repeat Rows 2 and 3 until you’ve worked around the cuff.
If one attachment stitch remains at the end, join into that stitch without forcing an extra full repeat.
Seam the two short ends of the ribbing together.
Fasten off securely.
Repeat for the other sleeve.
You can make your cuffs shorter by starting with fewer chains or longer by starting with more.
Part 8: Crochet the Bottom Ribbing
The bottom ribbing gives your cardigan a clean, slightly structured hem.
Join your ribbing yarn at one lower front corner.
Work a foundation row of single crochet evenly along the entire bottom edge, ending at the other front corner.
Avoid placing too many stitches along the edge, as this can cause the hem to flare.
Work the Hem Ribbing
- At one end of the foundation row, chain 9.
- Single crochet in the second chain from the hook and across, making 8 single crochet stitches.
- Attach to the hem with two slip stitches.
- Turn and skip the attachment slip stitches.
- Work 8 single crochet stitches in the back loops only.
- Turn, chain 1, and work 8 back-loop single crochet stitches.
- Attach to the next two unworked foundation stitches.
- Continue until the ribbing reaches the opposite corner.
Unlike the sleeve cuffs, the bottom ribbing runs along an open edge and does not need to be joined into a circle.
Fasten off and weave in the yarn ends.
Part 9: Add the Front Border
The final front border creates a tidy edge along the cardigan opening and neckline.
Join your border yarn at one lower front corner.
Work single crochet stitches evenly up the first front edge, around the back neckline, and down the opposite front edge.
At corners, add an extra stitch where necessary to keep the border lying flat.
Turn and work another row of single crochet.
Repeat until the border is approximately 0.75–1 inch wide, or reaches your preferred width.
Keep the number of stitches balanced on both front edges.
Optional Buttonholes
If you want a buttoned cardigan, mark your chosen button positions before completing the border.
On the buttonhole side, work single crochet to the first marker, chain 2, skip 2 stitches, and continue crocheting.
Repeat at the remaining buttonhole positions.
On the next row, work two single crochet stitches into each chain-2 space.
Test the holes with your actual buttons before fastening off. Larger buttons may require wider openings.
Sew your buttons securely to the opposite front band, aligning each button with its corresponding hole.
Two wooden-style buttons near the lower front create a charming rustic finish.
Part 10: Finishing Your Cardigan
Once your cardigan is completely assembled, it’s time for the final details.
Weave in all loose ends. Use a yarn needle to weave each tail securely into nearby stitches, changing direction to help prevent unraveling.
Inspect the seams. Make sure the shoulder, underarm, and sleeve seams are secure.
Check the fit. Try on the cardigan and assess the cuffs, hem, and front opening.
Block if necessary. A gentle final blocking can help settle the granny squares and improve the overall drape.
Allow the cardigan to dry fully before wearing or storing it.
Your cozy granny square cardigan is now complete!
Easy Ways to Customize Your Cardigan
Make It Longer
The simplest way to lengthen this design is to add another row of body squares before final assembly.
One extra row adds approximately one body-square height to the cardigan.
You’ll need five additional squares for the back and four for the combined front panels, or nine extra body squares altogether.
Change the Sleeve Length
You can adjust the sleeve-square measurements or add additional sleeve sections, although changing the rectangle dimensions may require recalculating the wrist circumference and armhole connection.
Check sleeve length against a favorite cardigan before committing to a change.
Make a Neutral Cardigan
Try using cream, taupe, oatmeal, tan, and soft brown for a neutral patchwork cardigan.
These colors create a subtle design that works beautifully with jeans, dresses, and casual outfits.
Try a Bright Retro Color Palette
If you love 1970s-inspired crochet fashion, combine mustard, chocolate brown, burnt orange, and avocado green.
For something brighter, mix coral, pink, lavender, sky blue, and sunny yellow.
Make It Without Buttons
Prefer an open-front cardigan?
Simply omit the buttonholes and finish both front borders evenly.
The result is a comfortable layering piece with a relaxed fit.
Tips for a Professional-Looking Granny Square Cardigan
Keep your tension consistent. Granny squares with significantly different measurements can create uneven seams.
Use the same yarn weight throughout. Mixing drastically different yarn thicknesses can affect the shape of your panels.
Plan your colors before sewing. Arrange your finished squares on the floor or a large table to preview the final sweater.
Try on the body before adding sleeves. This is the easiest time to correct shoulder positioning or armhole sizing.
Don’t skip the ribbing. Ribbed finishing makes the cardigan look more like a complete handmade garment.
Choose comfortable seams. Avoid pulling your joining yarn so tightly that the fabric becomes stiff.
Frequently Asked Questions
Is a granny square cardigan good for beginners?
Yes, if you’re comfortable making traditional granny squares and basic crochet stitches. Joining the panels and adding ribbing require a little patience, but the construction is approachable.
How many granny squares do I need for this cardigan?
This pattern uses 35 squares in total: 27 for the body and 8 larger squares for the sleeves.
Can I use leftover yarn?
Absolutely! A patchwork cardigan is a wonderful way to use leftover yarn, provided the yarns have compatible weights, textures, and care requirements.
What yarn is best for a granny square cardigan?
Medium-weight acrylic yarn and washable wool blends are practical choices. Look for yarn that offers comfortable drape without making the cardigan overly heavy.
How do I make the cardigan less oversized?
Choose a smaller finished chest circumference or adjust the body-square dimensions. Keep in mind that reducing square sizes also reduces garment length.
Can I wash my finished cardigan?
Follow the care instructions for your yarn. Many acrylic and washable wool yarns can be gently washed, but the safest care method depends on the specific fiber and construction.
More Crochet Projects to Try Next
If you enjoyed making this cardigan, you might also love:
- Easy crochet granny square tote bags
- Colorful patchwork crochet blankets
- Crochet granny square sweater vests
- Beginner-friendly crochet tops
- Simple crochet scarves with textured stitches
- Vintage-inspired crochet blankets
These projects are great ways to practice granny square construction while experimenting with new color combinations and yarn textures.
Final Thoughts
A cozy granny square cardigan is more than just a warm layering piece. It’s a creative project that lets you turn individual crochet squares into something colorful, comfortable, and completely your own.
From arranging your favorite autumn shades to adding the final ribbed cuffs, every stage gives you an opportunity to personalize your handmade sweater.
Whether you choose earthy fall colors, soft neutrals, or a cheerful rainbow palette, your finished cardigan will have the special charm that makes granny square crochet so timeless.