Introduction
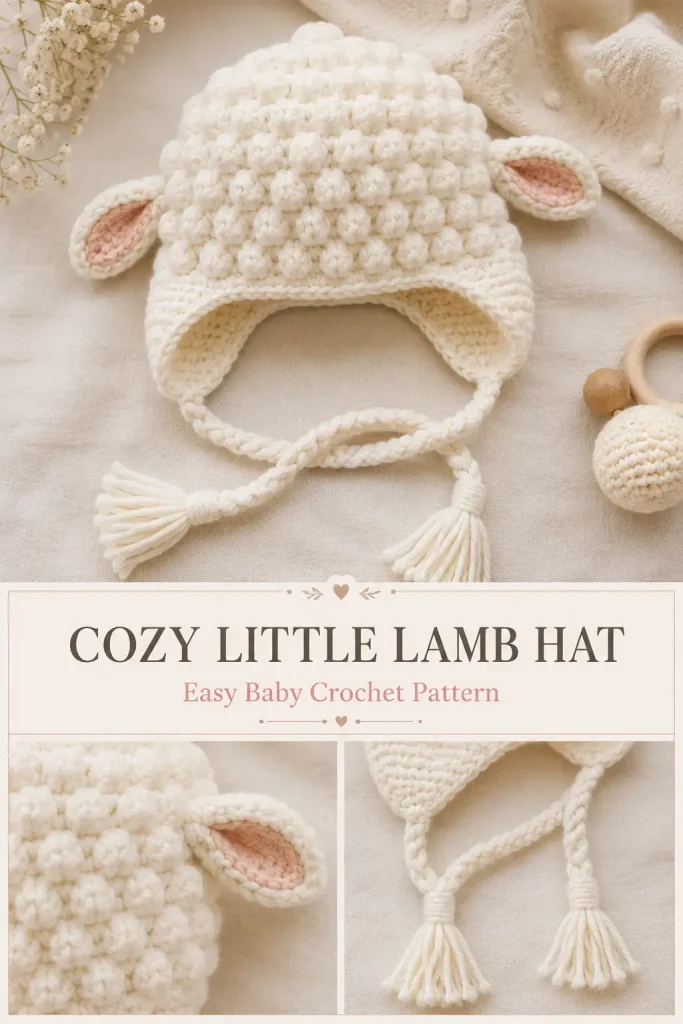
A little lamb hat is one of the sweetest baby crochet projects you can make. The soft white texture, tiny side ears, earflaps, and braided tassel ties give it that cozy handmade look that feels perfect for baby photos, nursery gifts, winter outfits, and handmade keepsakes.
This Cozy Little Lamb Baby Crochet Hat is an original pattern inspired by the lamb-style baby hat idea, but the stitch counts, shaping, ears, ties, and finishing details are created fresh so the design stays unique and buildable.
The main color stays soft white, just like a fluffy lamb, while the inner ears use a tiny touch of blush pink for warmth. The crown uses puff stitches for the lamb fleece texture, and the lower hat uses smoother stitches so it sits comfortably around the baby’s head.
Description
This baby crochet hat has a rounded beanie shape with a textured puff-stitch crown that looks like soft lamb fleece. The lower part of the hat is smoother for comfort, with two earflaps on the sides and long braided ties finished with tassels.
Two small lamb ears are made separately and sewn to the sides of the hat. Each ear has a cream outer layer and a pale blush-pink inner layer, giving the hat a soft nursery-style finish.
This easy baby crochet pattern is best for confident beginners who know basic rounds, half double crochet, puff stitches, decreases, and simple sewing.
Materials
- Worsted weight soft baby yarn in cream or warm white
- Small amount of pale blush-pink yarn for inner ears
- 5 mm crochet hook
- Yarn needle
- Scissors
- Stitch markers
- Measuring tape
Finished Size
This pattern is written for 3–6 months.
Approximate finished measurements:
- Hat circumference: 15–16 inches
- Hat height without ties: about 6 inches
- Tie length: about 8–9 inches
The hat has some stretch. For the best fit, measure the baby’s head if possible.
Gauge
Approximate gauge:
- 13 hdc stitches = 4 inches
- 8 hdc rounds = 4 inches
Gauge matters for baby hats. If your hat is too small, use a larger hook. If it is too large, use a smaller hook.
Abbreviations
- MR: magic ring
- ch: chain
- sc: single crochet
- hdc: half double crochet
- dc: double crochet
- sl st: slip stitch
- st: stitch
- sts: stitches
- inc: increase, 2 stitches in the same stitch
- dec: decrease
- FO: fasten off
Special Stitch
Puff Stitch
Yarn over, insert hook into stitch, yarn over and pull up a loop.
Repeat this 3 more times in the same stitch.
You should have 9 loops on your hook.
Yarn over and pull through all loops.
Ch 1 to close the puff.
Keep puff stitches soft and loose so the hat stays comfortable.
Pattern Notes
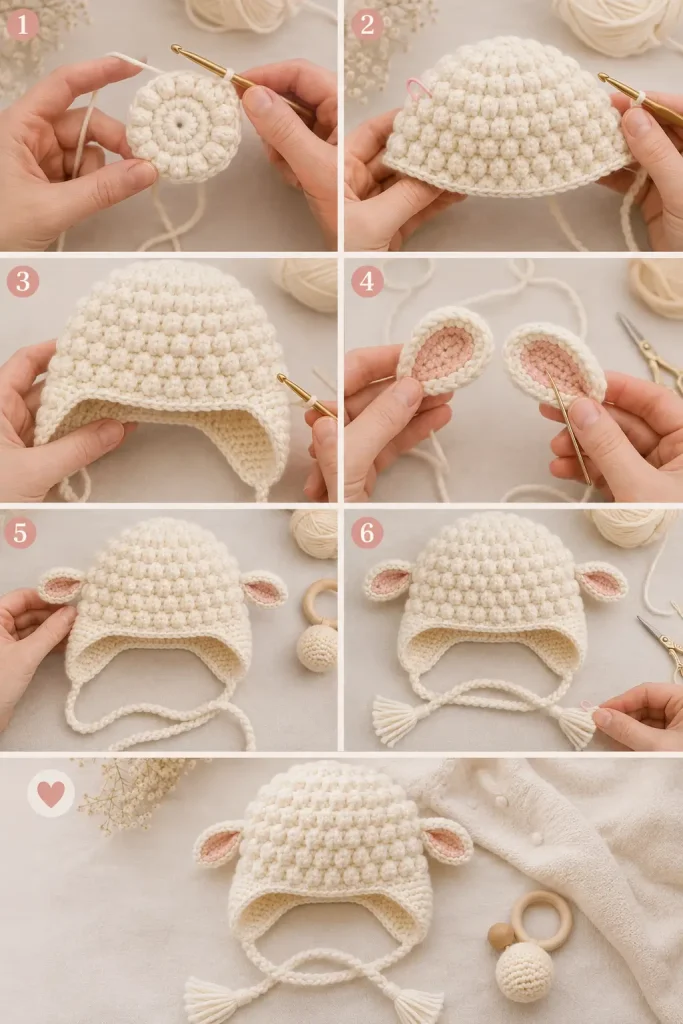
The hat is worked from the top down in joined rounds.
Ch 1 does not count as a stitch.
Join each round with a slip stitch to the first stitch.
Puff stitch rounds create the lamb fleece texture.
The earflaps are worked after the hat body is finished.
The ears are made separately and sewn on.
Braided ties are attached to the bottom of each earflap.
For baby safety, sew all parts securely and keep tassels short and tidy.
Step-by-Step Instructions
Hat Crown
Use cream or warm white yarn.
Round 1
Make a MR.
Ch 1.
Work 10 hdc into the ring.
Pull ring closed.
Join with sl st to first hdc. (10)
Round 2
Ch 1.
Work 2 hdc in each st around.
Join with sl st. (20)
Round 3
Ch 1.
Repeat around: hdc in next st, inc in next st.
Join with sl st. (30)
Round 4
Ch 1.
Repeat around: hdc in next 2 sts, inc in next st.
Join with sl st. (40)
Round 5
Ch 1.
Repeat around: hdc in next 4 sts, inc in next st.
Join with sl st. (48)
The crown should now measure about 5 inches across.
Puff Fleece Body
Round 6
Ch 1.
Repeat around: puff in next st, sc in next st.
Join with sl st. (48)
Round 7
Ch 1.
Hdc in each st around.
Join with sl st. (48)
Round 8
Ch 1.
Sc in first st.
Repeat around: puff in next st, sc in next st.
Join with sl st. (48)
This staggers the puff texture slightly.
Round 9
Ch 1.
Hdc in each st around.
Join with sl st. (48)
Round 10
Ch 1.
Repeat around: puff in next st, sc in next st.
Join with sl st. (48)
Round 11
Ch 1.
Hdc in each st around.
Join with sl st. (48)
Round 12
Ch 1.
Sc in first st.
Repeat around: puff in next st, sc in next st.
Join with sl st. (48)
Round 13
Ch 1.
Hdc in each st around.
Join with sl st. (48)
Smooth Lower Band
The smooth lower band helps the hat feel comfortable around the forehead and gives a clean base for the earflaps.
Round 14
Ch 1.
Hdc in each st around.
Join with sl st. (48)
Round 15
Ch 1.
Hdc in each st around.
Join with sl st. (48)
Do not fasten off if you want to continue directly to the first earflap.
Earflap Placement
Lay the hat flat with the seam at the back.
Mark the center front stitch.
Mark the center back stitch.
Each earflap will be worked on one side of the hat, leaving the front open and the back covered.
For this size, each earflap uses 10 stitches.
Leave about 8 stitches unworked across the front between the two earflaps.
First Earflap
Use cream yarn.
Join yarn at the first marked side position.
Row 1
Ch 1.
Hdc in 10 sts across.
Ch 1, turn. (10)
Row 2
Dec, hdc in next 6 sts, dec.
Ch 1, turn. (8)
Row 3
Hdc in each st across.
Ch 1, turn. (8)
Row 4
Dec, hdc in next 4 sts, dec.
Ch 1, turn. (6)
Row 5
Hdc in each st across.
Ch 1, turn. (6)
Row 6
Dec, hdc in next 2 sts, dec.
Ch 1, turn. (4)
Row 7
Dec twice. (2)
FO and weave in the end.
Second Earflap
Repeat the same earflap instructions on the opposite side of the hat.
Make sure both earflaps are evenly placed.
Hat Edging
Join cream yarn at the back of the hat.
Ch 1.
Sc evenly around the entire bottom edge of the hat, including around both earflaps.
Work 2 sc in the bottom point of each earflap.
Join with sl st to first sc.
FO and weave in ends.
This creates a clean finished edge.
Lamb Ears
Make 2 cream outer ears and 2 blush-pink inner ears.
Outer Ear
Use cream yarn.
Round 1
Ch 7.
Sc in 2nd ch from hook.
Hdc in next ch.
Dc in next 2 ch.
Hdc in next ch.
Work 3 sc in last ch.
Now work along the opposite side of the chain.
Hdc in next ch.
Dc in next 2 ch.
Hdc in next ch.
Sc in last ch.
Join with sl st. (14)
Round 2
Ch 1.
Sc in first st.
Hdc in next 2 sts.
Dc in next 3 sts.
Work 2 dc in each of next 2 sts.
Dc in next 3 sts.
Hdc in next 2 sts.
Sc in last st.
Join with sl st.
FO, leaving a long tail for sewing.
The ear should look like a small soft oval with a gentle point.
Inner Ear
Use pale blush-pink yarn.
Round 1
Ch 6.
Sc in 2nd ch from hook.
Hdc in next ch.
Dc in next 2 ch.
Work 3 sc in last ch.
Now work along the opposite side of the chain.
Dc in next 2 ch.
Hdc in next ch.
Sc in last ch.
Join with sl st.
FO, leaving a long tail for sewing.
Assembling the Ears
Place one blush inner ear on top of one cream outer ear.
Sew the inner ear to the outer ear using the blush yarn tail.
Repeat for the second ear.
Pin the ears to the sides of the hat, slightly above the earflaps.
The ears should sit around Rounds 9–11, angled slightly outward.
Sew the base of each ear securely to the hat.
For a softer lamb look, curve the ear slightly before sewing.
Braided Ties
Cut 6 strands of cream yarn for each earflap.
Each strand should be about 22 inches long.
Fold 6 strands in half.
Insert hook through the bottom point of one earflap.
Pull the folded center through the earflap point.
Pull the loose ends through the loop and tighten gently.
Divide the strands into 3 equal sections.
Braid the tie until it measures about 8–9 inches.
Tie a knot at the end.
Trim the ends evenly to make a tassel.
Repeat for the second earflap.
Tassel Finish
Wrap one extra strand of cream yarn around the top of each tassel about 1 inch above the bottom.
Tie securely.
Weave the wrap ends into the tassel.
Trim the tassel ends evenly.
Keep tassels short and secure for baby use.
Finishing
Weave in all yarn tails.
Check the ears and ties carefully.
Make sure the ears are sewn firmly.
Make sure the braids are tightly attached.
Shape the hat gently with your hands.
Lightly steam-block only if your yarn allows it.
Do not press the puff stitches flat.
Size Adjustments
Newborn Size
Stop crown increases at 40 stitches.
Work Rounds 6–12 for the body.
Work only 1 smooth lower band round.
Use 8 stitches for each earflap.
Make the ears slightly smaller by skipping Round 2 of the outer ear.
6–12 Months Size
Add one extra increase round after Round 5:
Ch 1.
Repeat around: hdc in next 7 sts, inc in next st. (54)
Then continue the body rounds.
Add one extra hdc round before the earflaps.
Use 11 stitches for each earflap.
Tips & Variations
Keep the main hat white or cream for the lamb look.
Use pale blush for the inner ears for a soft baby style.
Use beige inner ears for a more neutral farmhouse look.
Use fluffy yarn only if you are comfortable seeing your stitches.
Use smooth baby yarn if you want cleaner puff texture.
For a warmer winter hat, add one extra smooth lower band round.
For a simpler version, replace puff rounds with regular hdc rounds and add only a few puff rows near the crown.
For a photo prop, make the tassels longer.
For everyday baby wear, keep the tassels short and secure.
FAQ
Is this lamb hat beginner-friendly?
This pattern is best for confident beginners. The hat uses basic rounds, but the puff stitches, earflaps, ears, and braided ties need careful placement.
Is this the exact pattern from the photo?
No. This is a new original lamb baby hat pattern with different stitch counts, ear shape, crown texture, earflap construction, and finishing details.
What yarn works best?
Soft worsted weight baby yarn works best. Choose a yarn that is gentle, washable, and comfortable for baby skin.
Can I make this without puff stitches?
Yes. You can work the body in half double crochet rounds instead, but the hat will look smoother and less like lamb fleece.
Can this be made for newborns?
Yes. Newborn adjustment notes are included above. Always check the finished circumference before gifting.
Conclusion
The Cozy Little Lamb Baby Crochet Hat is soft, sweet, and full of handmade charm. The white puff-stitch crown gives it a fluffy lamb look, while the pink inner ears, earflaps, braided ties, and tassels make it extra cute for baby photos and cozy winter gifts.
Make it in cream, warm white, or ivory for the classic lamb style, and add just a touch of blush in the ears for a gentle nursery finish.




Love !
Love new patterns love to crochet for babies keeps them from having ear infections!