Intro
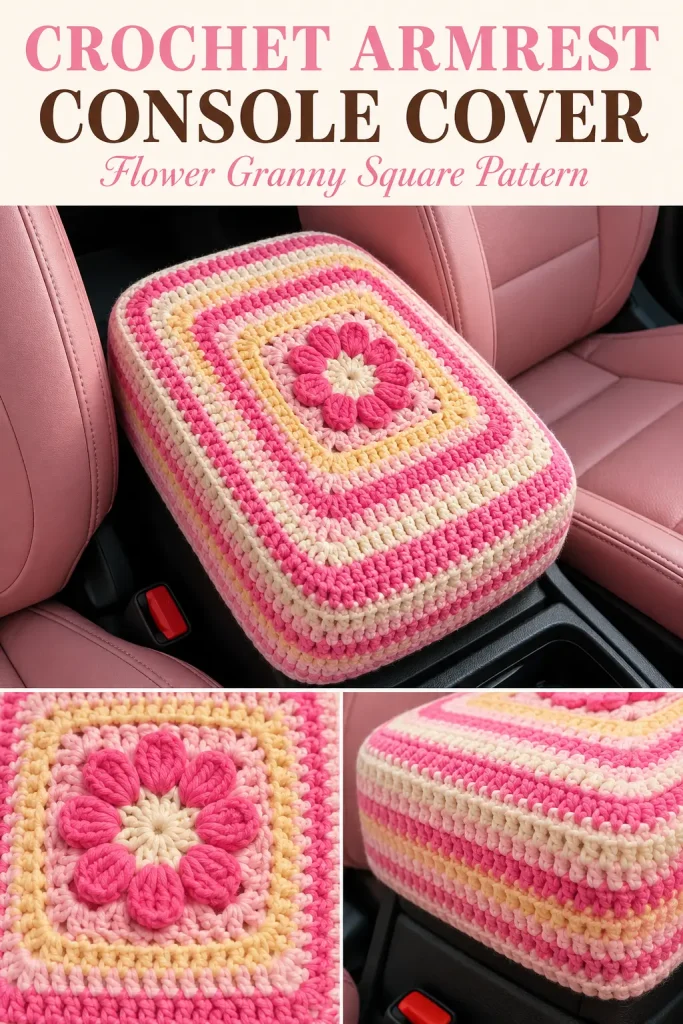
This crochet armrest console cover is such a fun way to add handmade color to a car interior. It turns a plain center console into something soft, cheerful, and personal, while also helping protect the surface from everyday wear.
The design has a pretty flower granny square in the center, soft rounded edges, and striped rows in pink, pale pink, and buttery yellow. It is a practical crochet accessory, but it still feels cute, cozy, and decorative.
Description
This crochet armrest console cover is made as a fitted rectangular sleeve with a decorative flower granny square on top. The center has a cream flower middle surrounded by raised pink petals, then a cream square frame with open corner spaces. The outer section is worked in soft stripes of pink, light pink, and pale yellow until the piece fits the top of the console. The sides are crocheted downward to create a snug cover with rounded edges, giving it a padded, handmade look. The finished cover slips over the armrest console and can be adjusted with an optional underside cord or elastic for a secure fit.
Materials
- Worsted weight yarn in bright pink
- Worsted weight yarn in light pink
- Worsted weight yarn in pale yellow
- Small amount of cream yarn
- 4.5 mm crochet hook
- Yarn needle
- Scissors
- Stitch markers
- Measuring tape
- Optional elastic cord or drawstring cord for the underside
- Optional button or cord lock for tightening
Abbreviations
- ch = chain
- sl st = slip stitch
- sc = single crochet
- hdc = half double crochet
- dc = double crochet
- tr = treble crochet
- puff = puff stitch
- sk = skip
- st = stitch
- sts = stitches
- sp = space
- BLO = back loop only
- rep = repeat
Pattern Notes
- This pattern uses US crochet terms.
- The cover is made from the center outward.
- First, make the flower granny square top.
- Then continue working rounds until the top panel fits your armrest console.
- The side depth is worked downward around the edge.
- Measure your console before starting for the best fit.
- The cover should be slightly snug so it stays in place.
Step-by-Step Instructions
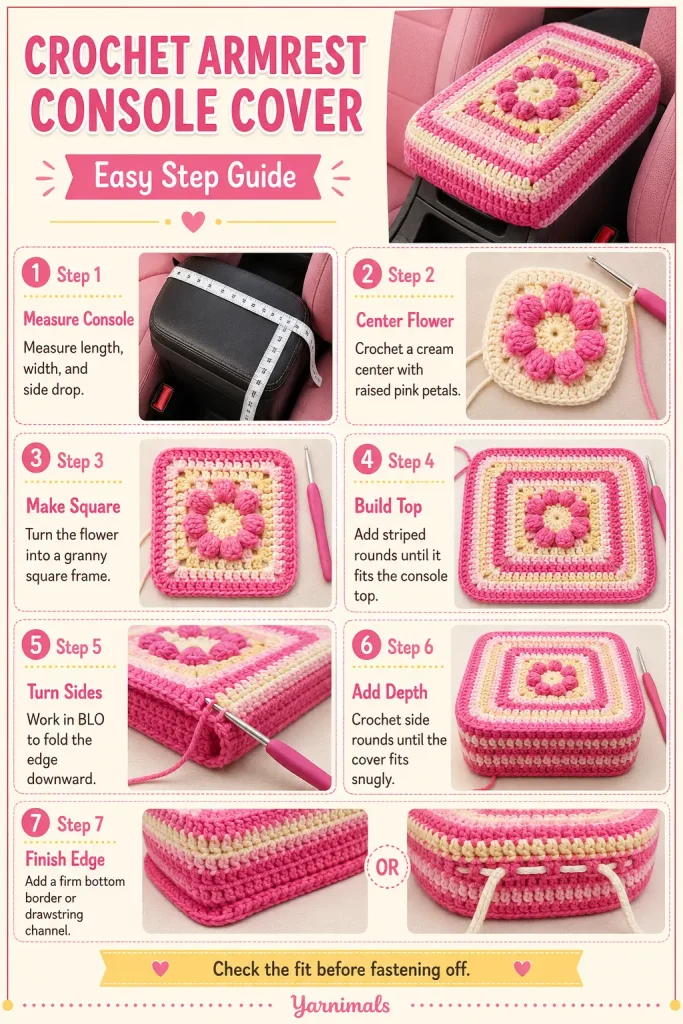
Measure Your Console
Measure the top of your armrest console.
Write down:
- Length from front to back
- Width from side to side
- Side drop from the top edge to where you want the cover to end
The sample style works well for a console around 12–14 inches long, 7–8 inches wide, and 3–4 inches deep.
Center Flower
With cream yarn, make a magic ring.
Round 1: Ch 2, work 12 dc into the ring. Pull tight. Sl st to join.
Change to pink.
Round 2: Ch 3, puff in same st, ch 1, puff in next st, ch 1, rep around. Sl st to join.
You should have 12 puff petals.
Round 3: Ch 1, sc in first ch-1 sp, ch 3, sc in next ch-1 sp, rep around. Sl st to join.
Round 4: Ch 1, work 4 dc in each ch-3 sp around. Sl st to join.
Fasten off pink.
Turn the Flower into a Square
Join light pink in any space between petal groups.
Round 5: Ch 3, 2 dc in same sp, ch 1, 3 dc in next sp, ch 1, 3 dc in next sp, ch 2.
Rep from around, placing ch-2 spaces at four evenly spaced corners. Sl st to join.
Change to cream.
Round 6: Ch 3, dc in each st and ch-1 sp across. In each corner ch-2 sp, work 2 dc, ch 2, 2 dc. Sl st to join.
Change to pale yellow.
Round 7: Ch 1, hdc in each st across. In each corner ch-2 sp, work hdc, ch 2, hdc. Sl st to join.
The center should now look like a flower granny square with a cream and yellow frame.
Build the Rectangular Top Panel
The image shows a rectangular cover, so the top panel needs to become longer than it is wide.
Place stitch markers at the four corners.
Continue working in joined rounds. Work extra stitches on the front and back ends to slowly stretch the square into a rectangle.
Round 8: With pink, ch 1, hdc in each st across. In each corner space, work hdc, ch 2, hdc. Sl st to join.
Round 9: With light pink, ch 1, hdc in each st across. In each corner space, work hdc, ch 2, hdc. Sl st to join.
Round 10: With pale yellow, ch 1, hdc in each st across. In each corner space, work 2 hdc, ch 2, 2 hdc. Sl st to join.
Round 11: With pink, ch 1, hdc in each st across. On the two short ends only, add 2 extra hdc spaced evenly before each corner. In each corner space, work hdc, ch 2, hdc. Sl st to join.
Round 12: With light pink, ch 1, hdc in each st around. On the two short ends only, add 2 extra hdc spaced evenly before each corner. In each corner space, work hdc, ch 2, hdc. Sl st to join.
Round 13: With pale yellow, ch 1, hdc in each st around. In each corner space, work hdc, ch 2, hdc. Sl st to join.
Repeat Rounds 8–13 until the top panel is the same size as the top of your console.
End with a pink or pale yellow round for a soft striped look.
Smooth Outer Top Round
With pink, ch 1.
Work sc in each st around.
At each corner, work 3 sc into the corner space.
Sl st to join.
This creates a clean top edge before the sides begin.
Begin the Side Drop
Now you will work downward to create the fitted sleeve.
Round 1: Ch 1, working in BLO only, hdc in each st around. Sl st to join.
This BLO round helps the side turn down neatly from the top panel.
Round 2: Ch 1, hdc in each st around. Sl st to join.
Round 3: Change to light pink, ch 1, hdc in each st around. Sl st to join.
Round 4: Change to pale yellow, ch 1, hdc in each st around. Sl st to join.
Round 5: Change to pink, ch 1, hdc in each st around. Sl st to join.
Repeat these side rounds until the cover reaches your desired side depth.
For a console cover like the image, make the side drop about 3–4 inches deep.
Rounded Bottom Edge
With pink, ch 1.
Work sc in each st around.
Sl st to join.
Round 2: Ch 1, sc in each st around. Sl st to join.
This makes the bottom edge firmer and helps the cover hold its shape.
Optional Drawstring Underside
If you want the cover to stay more secure, add a simple drawstring channel.
Round 1: Ch 1, sc in first st, ch 1, sk next st, sc in next st, rep around. Sl st to join.
Round 2: Ch 1, sc in each sc and ch-1 sp around. Sl st to join.
Fasten off.
Make a long chain cord or use elastic cord.
Thread the cord through the ch-1 spaces around the bottom edge.
Tighten gently under the console and tie securely.
Optional Tie Cord
To make a crochet cord:
Ch 120 or long enough to go around the underside of your console.
Sl st in the 2nd ch from hook and in each ch across.
Fasten off.
Thread through the bottom channel.
Finishing
Weave in all yarn ends.
Shape the corners with your fingers.
Place the cover over the console.
Adjust the side drop so it sits evenly.
Tighten the underside cord if using one.
Make sure the cover does not interfere with opening, closing, seat belts, cup holders, gear controls, or driving safety.
Tips & Variations
For a look close to the image, use bright pink, baby pink, pale yellow, and cream. A slightly fuzzy acrylic yarn gives the cover a soft padded texture, while cotton gives a cleaner stitch finish.
If your console is wider, add more rounds before starting the side drop. If your console is narrow, stop increasing sooner and check the fit often.
For a thicker cushion feel, use two strands of DK yarn held together or a soft worsted yarn with a slightly smaller hook. For a lighter version, use cotton yarn and keep the side drop shorter.
You can change the center flower colors to match your car interior. Try lavender and cream, black and gray, sage and ivory, or peach and white.
If the cover slides around, add the drawstring channel or sew a soft elastic band inside the bottom edge. Keep it snug but not too tight.
FAQ
Can I make this crochet armrest cover any size?
Yes. Measure your console first, then continue the outer rounds until the top panel matches your console before crocheting the side drop.
What yarn is best for a car console cover?
Worsted weight acrylic or cotton works well. Acrylic feels soft and padded, while cotton is cooler and gives better stitch definition.
Does this cover need a drawstring?
A drawstring is optional, but it helps keep the cover secure, especially if your console has smooth leather or vinyl.
Conclusion
This crochet armrest console cover is a cute and practical way to bring handmade style into your car. The flower granny square center, soft striped border, rounded sides, and fitted sleeve shape make it both decorative and useful. Save this easy crochet pattern and make it in colors that match your favorite cozy car aesthetic.



