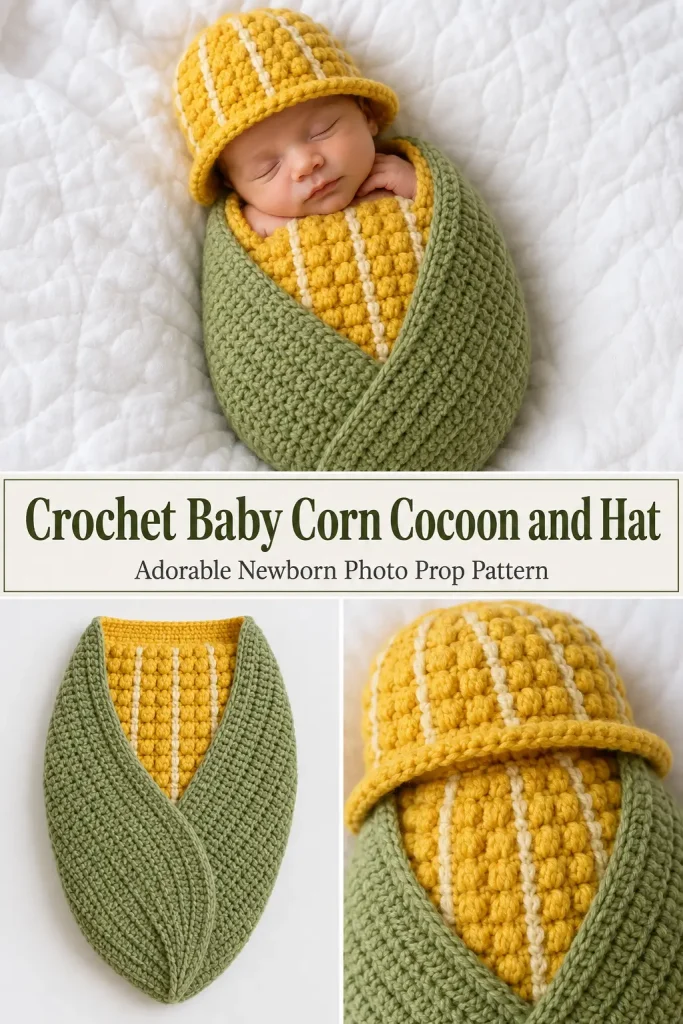
This adorable crochet baby corn cocoon is a playful newborn photo prop inspired by the look of a fresh ear of corn wrapped in green husks. The yellow textured center gives the impression of corn kernels, while the large green outer leaves fold naturally around the baby for a cozy vegetable-inspired design.
A matching yellow crochet hat completes the set. The hat uses the same raised texture as the cocoon body, with subtle cream lines between the yellow textured sections to create even more definition. This is a fun handmade baby gift and an especially cute crochet newborn photo prop.
Description
The finished set includes two coordinated pieces:
- a long green crochet cocoon shaped like overlapping corn husks
- a yellow textured inner panel designed to resemble rows of corn kernels
- two large green leaf-shaped flaps that wrap across the front
- a matching yellow textured baby hat with a softly rolled or slightly flared brim
- narrow cream vertical accent lines within the yellow corn texture
The yellow section uses raised bobble-style stitches arranged in neat vertical rows to create the chunky kernel effect visible in the reference design.
The green husks use a denser crochet texture so they remain soft but structured enough to fold around the body.
Materials
- Worsted or aran-weight soft acrylic or cotton-blend yarn in golden yellow
- Worsted or aran-weight yarn in sage or medium green
- Small amount of warm cream yarn
- 5 mm crochet hook
- 5.5 mm crochet hook if needed for softer drape
- Yarn needle
- Scissors
- Stitch markers
- Flexible measuring tape
For newborn items, choose very soft, washable yarn with no scratchy fibers or loose decorative pieces.
Abbreviations
- ch – chain
- sc – single crochet
- hdc – half double crochet
- dc – double crochet
- sl st – slip stitch
- st – stitch
- sts – stitches
- sp – space
- bobble – bobble stitch
- inc – 2 sts worked into the same stitch
Pattern Notes
US crochet terminology is used.
This pattern is designed as an original crochet construction inspired by the visible corn-cocoon idea.
The set is made from:
- yellow textured corn panel
- green cocoon base
- two large green husk leaves
- matching textured baby hat
Approximate newborn size:
- cocoon length: 18–20 in / 46–51 cm
- cocoon width when flat: 18–20 in / 46–51 cm
- hat circumference: approximately 13–14 in / 33–36 cm
The cocoon should remain comfortably loose. It is intended as a supervised photo prop or decorative baby wrap, not for unsupervised sleep.
Step-by-Step Instructions
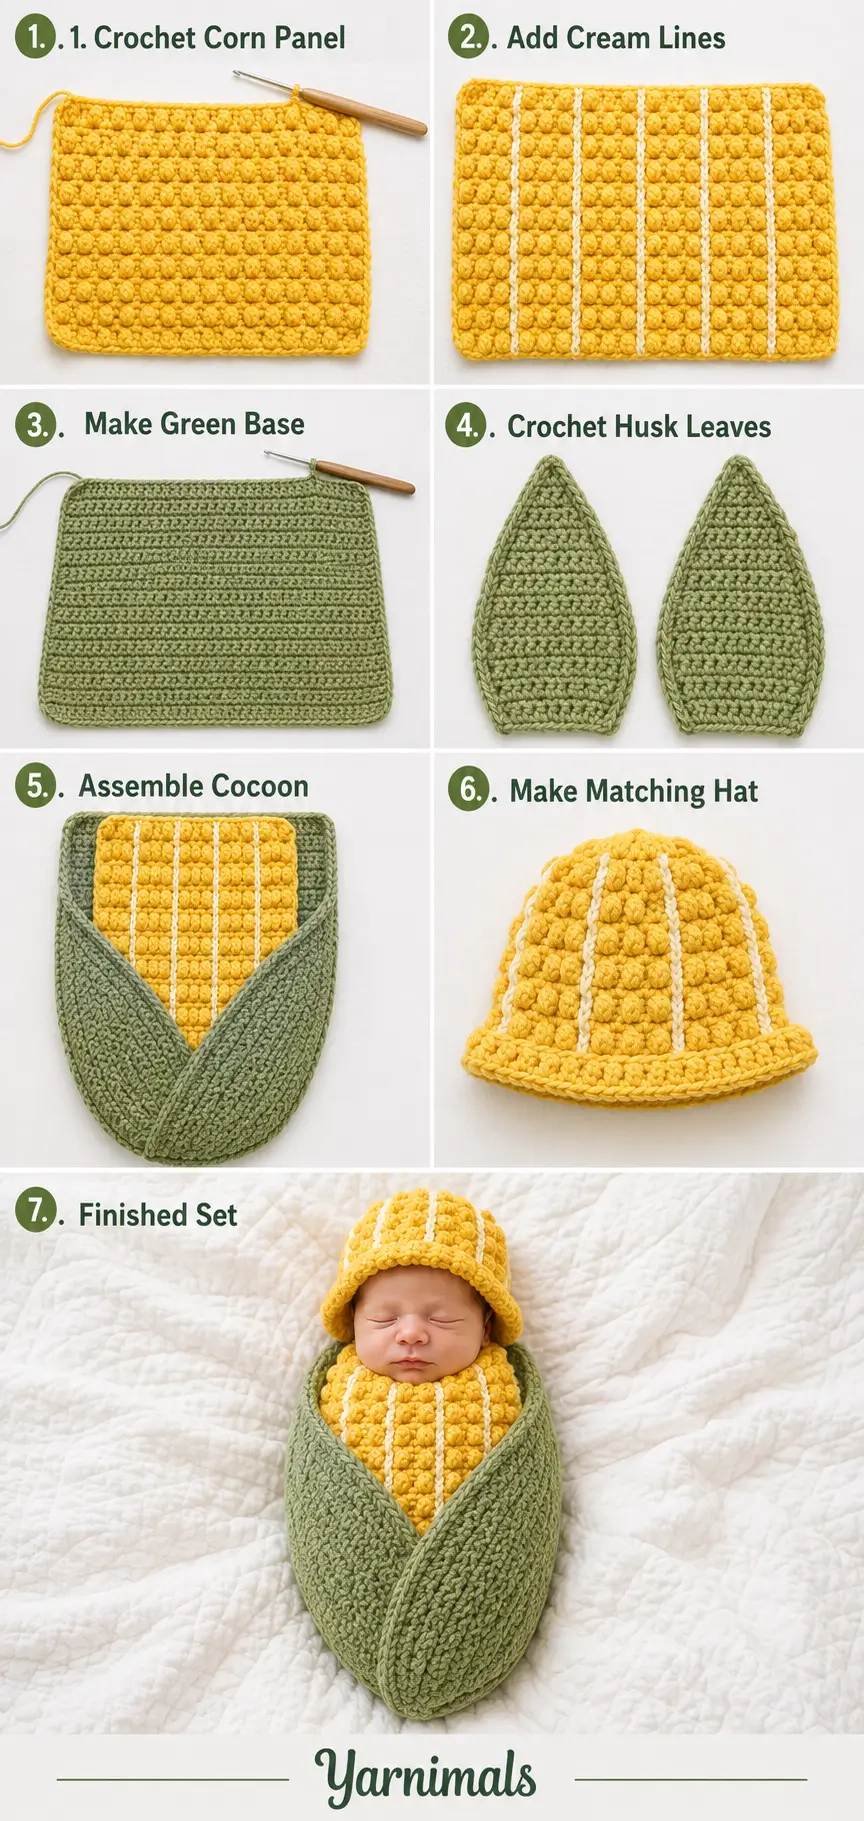
Part 1 – Yellow Corn Panel
Using yellow yarn.
This panel creates the raised corn-kernel texture visible through the center of the green husks.
Foundation
Ch 39.
The exact chain count can be adjusted, but keep the width around 10–12 in / 25–30 cm.
Row 1
Hdc in second ch from hook.
Hdc across.
Ch 1 and turn.
Row 2 – Kernel Row
Sc in first 2 sts.
Work 1 bobble in next st.
Sc in next 2 sts.
Repeat:
bobble in next st, sc in next 2 sts
across.
If needed, finish the row with 1–2 sc.
Ch 1 and turn.
Row 3
Hdc in every st across.
Ch 1 and turn.
Row 4 – Offset Kernel Row
Sc in first st.
Bobble in next st.
Sc in next 2 sts.
Repeat:
bobble in next st, sc in next 2 sts
across.
The bobbles should sit slightly offset from the previous kernel row.
Ch 1 and turn.
Continue the Corn Texture
Repeat Rows 3 and 4 while alternating the position of the bobbles so the raised kernels create even vertical columns.
Continue until the panel measures approximately 17–18 in / 43–46 cm long.
Fasten off.
Bobble Stitch
For each bobble:
Yarn over.
Insert hook into the indicated stitch.
Yarn over and pull up a loop.
Yarn over and pull through 2 loops.
Repeat this partial dc process into the same stitch until you have 5 partial dc sections on the hook.
Yarn over and pull through all remaining loops.
Push the bobble toward the front of the work.
Cream Corn Accent Lines
The reference design includes narrow cream lines running vertically between sections of yellow kernels.
To recreate that effect without changing the main panel construction, surface crochet the lines afterward.
Using cream yarn:
Insert the hook near the lower edge of the yellow panel.
Pull up a loop.
Work loose surface slip stitches vertically between two bobble columns.
Continue to the top.
Fasten off.
Repeat every 2–3 bobble columns.
Keep the cream lines narrow and subtle.
Do not cover the yellow texture.
Part 2 – Green Cocoon Base
Using green yarn.
The cocoon base forms a soft envelope behind the yellow corn panel.
Foundation
Ch until the foundation measures approximately 18–20 in / 46–51 cm.
For worsted yarn, around 60–66 chains may work depending on tension.
Row 1
Hdc in second ch from hook.
Hdc across.
Ch 1 and turn.
Rows 2 onward
Hdc across.
Ch 1 and turn.
Continue until the rectangle measures approximately 18–20 in / 46–51 cm long.
Fasten off.
You now have a large green rectangle.
Shape the Cocoon
Lay the green rectangle flat.
Position the yellow corn panel vertically in the center.
Leave approximately 2–3 in / 5–7.5 cm of green visible on each side.
Sew or crochet the lower half of the yellow panel securely to the green base.
Leave the upper portion slightly freer so the surrounding husk pieces can overlap naturally.
Part 3 – Large Green Husk Leaves
Make 2.
These large pointed pieces create the dramatic overlapping corn-husk shape.
Using green yarn.
Row 1
Ch 5.
Sc in second ch from hook and across.
4 sts.
Ch 1 and turn.
Row 2
Inc in first st.
Sc across to last st.
Inc in last st.
6 sts.
Row 3
Sc across.
Row 4
Inc in first st.
Sc across.
Inc in last st.
8 sts.
Continue alternating:
- one increase row
- one straight row
until the leaf measures approximately 8–10 in / 20–25 cm wide at its widest point.
Leaf Body
Once the desired width is reached, work straight rows of hdc without increasing until the leaf measures approximately 14–16 in / 36–41 cm long.
Shape the Point
Begin decreasing at both edges.
At the beginning of the row:
sl st into first st.
Work across to final 2 sts.
Leave final st unworked.
Turn.
Continue gradually decreasing until only 3–4 sts remain.
Fasten off.
The finished leaf should be long, broad, and tapered at the upper end.
Make the second leaf identically.
Leaf Edging
Using green yarn, work one round of sc evenly around each leaf.
At the pointed tip, work 3 sc into the tip stitch.
Fasten off.
This creates a clean structured edge.
Attach the Husk Leaves
Place one green leaf along each outer side of the cocoon.
Position the wide lower ends near the bottom sides of the cocoon.
The pointed ends should extend upward toward the baby’s shoulders.
Secure the bottom and outer side of each leaf to the green base.
Leave most of the inner edge unattached.
This allows each husk leaf to fold naturally across the yellow center.
When the baby is positioned inside for a supervised photo, one green leaf can cross from the left and the other from the right, creating the layered corn-husk appearance.
Bottom Shaping
To make the lower cocoon feel more enclosed, fold the lower corners slightly inward.
Using green yarn and a yarn needle, secure approximately 2–3 in / 5–7.5 cm along each lower side.
Do not make the cocoon tight.
The bottom should remain roomy and flexible.
Part 4 – Matching Corn Hat
Using yellow yarn.
The hat uses the same raised kernel texture as the yellow cocoon panel.
Work in joined rounds.
Round 1
Make a magic ring.
Ch 2.
Work 10 hdc into ring.
Join.
10 sts.
Round 2
Ch 1.
Work 2 hdc in every st around.
Join.
20 sts.
Round 3
Ch 1.
Repeat:
hdc in next st, 2 hdc in next st
around.
Join.
30 sts.
Round 4
Repeat:
hdc in next 2 sts, 2 hdc in next st
around.
Join.
40 sts.
Check the crown diameter.
For a newborn size, approximately 4–4.5 in / 10–11.5 cm across is usually enough.
Add another increase round only if needed.
Hat Kernel Texture
Round 5
Sc around.
Join.
Round 6
Repeat:
bobble in next st, sc in next 2 sts
around.
Join.
Round 7
Hdc around.
Join.
Round 8
Offset the bobbles:
Sc in first st.
Bobble in next st.
Sc in next 2 sts.
Continue around.
Join.
Repeat the plain and bobble rounds until the hat measures approximately 5–5.5 in / 12.5–14 cm from crown to lower edge.
Cream Hat Accent
Using cream yarn, add several narrow surface crochet lines vertically between the raised bobble columns.
Keep the accent subtle so yellow remains the dominant color.
Hat Brim
Using yellow yarn.
Work 2 rounds of hdc around.
For a slightly flared final edge:
Repeat:
hdc in next 5 sts, 2 hdc in next st
around.
Join.
Fasten off.
The brim should curve softly outward without becoming dramatically ruffled.
Optional Folded Brim
For the thicker appearance visible in the design, make one additional hdc round and gently fold the lower edge outward.
Do not sew it down tightly; allow it to sit softly around the baby’s head.
Assembly Check
Before using the set, confirm:
- yellow corn panel is centered
- bobbles face outward
- cream accent lines run vertically
- both green husks are equal in size
- husk leaves fold across the yellow center without pulling
- bottom remains loose
- hat stretches comfortably
- every yarn end is securely woven in
Design Consistency Lock
To keep the finished project matching the intended corn design, use:
- golden yellow raised kernel section
- narrow warm cream vertical accents
- sage or medium-green husks
- dense textured green crochet
- two very large overlapping husk leaves
- rounded yellow textured hat
- no face
- no eyes
- no arms
- no separate corn cob toy
- no flowers
- no buttons
- no ribbons
The design should immediately read as a soft ear of corn wrapped in crochet husks.
Tips & Variations
Use a slightly larger hook for the green husks if you want them to drape more naturally.
Keep the yellow bobbles soft rather than extremely tight. The kernel texture should remain plush and comfortable.
If the bobbles become too bulky, use 4 partial double crochets instead of 5 when making each bobble.
For the green section, a simple hdc texture works well because it visually separates the smooth husks from the highly textured corn center.
The husk leaves should overlap the yellow center without hiding it completely. Aim to leave approximately one-third to one-half of the yellow corn section visible.
Before permanently attaching the leaves, pin them in place and fold them across the center to confirm their proportions.
For a smaller newborn prop, reduce the overall cocoon dimensions rather than wrapping the finished piece more tightly around the baby.
FAQ
Is this a crochet project?
Yes. The visible design can be recreated convincingly with crochet. The raised yellow sections can be made with bobble stitches, while the green husks can be worked as dense flat crochet pieces.
How do I create the corn-kernel texture?
Use rows of raised bobble stitches separated by plain crochet rows. Offset or align the bobbles carefully so they form repeating rows that resemble corn kernels.
Are the green sections part of the cocoon or separate leaves?
Both are used in this construction. A flat green base supports the yellow panel, while two separate broad tapered green leaves are attached along the sides and allowed to overlap across the front.
Conclusion
This crochet baby corn cocoon turns simple crochet shapes into a playful newborn photo prop. The raised golden bobbles create the look of corn kernels, narrow cream accents add definition, and oversized green husks wrap around the center for the recognizable ear-of-corn shape. The matching textured hat completes the set and makes the entire design feel coordinated, cozy, and handmade.



