Intro
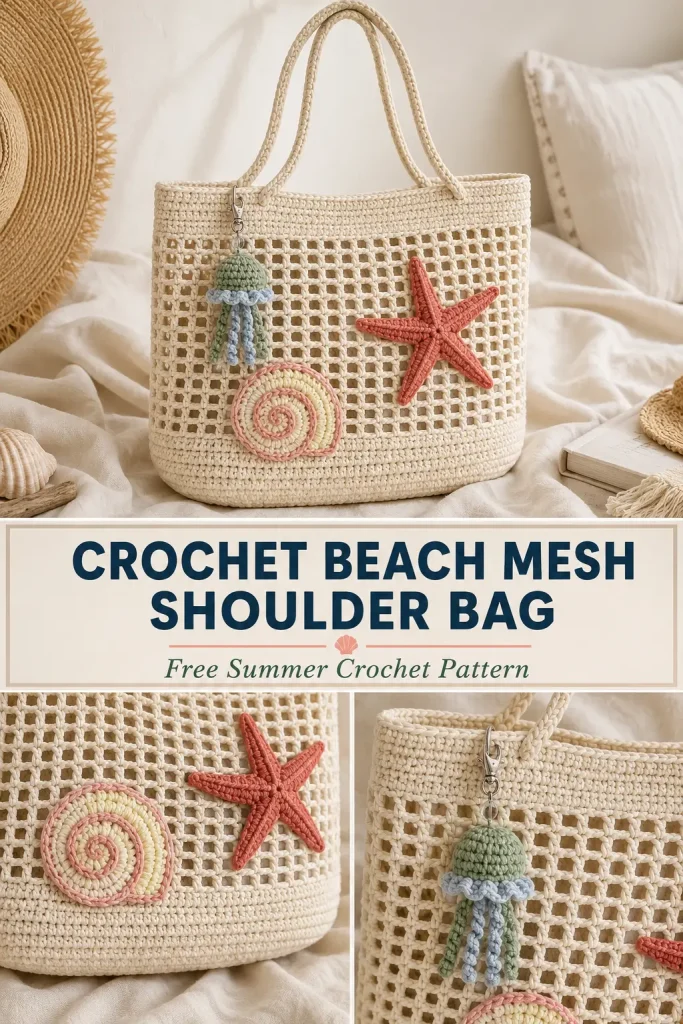
This crochet beach mesh bag has everything that makes a handmade summer accessory special: an airy cream mesh body, long comfortable shoulder handles, a coral starfish, a pastel spiral seashell, and a tiny detachable jellyfish charm hanging from the upper corner.
The bag itself is surprisingly straightforward to crochet. A sturdy oval base supports the contents, solid crochet rounds reinforce the lower edge, and an open mesh stitch keeps the main body light and flexible. The decorative sea-inspired pieces are made separately and added afterward, so you can take your time arranging them exactly where you want them.
This is an original crochet pattern inspired by the visible design, with the construction worked out so the bag, handles, mesh, appliqués, charm, and finishing details all coordinate as one complete project.
Description
The finished bag is a medium-size cream crochet shoulder tote with a softly rounded rectangular silhouette. The bottom and upper edges are made with dense single crochet for strength, while the center uses an open square-style mesh.
Two long narrow cream crochet cords form the shoulder handles. On the front, a coral five-arm starfish appliqué sits toward the right side and a cream, pale yellow, and blush-pink spiral seashell appliqué decorates the lower left.
Near the upper left corner, a small sage and pale blue crochet jellyfish charm hangs from a metal lobster clasp. The jellyfish has a rounded sage dome, a pale blue flared rim, and dangling crochet tentacles. A small clear bead can be added above it to match the delicate charm-like appearance.
Materials
- Worsted weight #4 cotton or cotton-blend yarn in natural cream
- Approximately 250–300 g cream yarn for bag and handles
- Small amount of coral or terracotta yarn for starfish
- Small amount of blush pink yarn for shell
- Small amount of pale buttery yellow yarn for shell
- Small amount of sage green yarn for jellyfish
- Small amount of pale blue-gray yarn for jellyfish rim and tentacle
- 4 mm crochet hook for bag
- 3–3.5 mm crochet hook for appliqués and jellyfish
- Yarn needle
- Scissors
- Stitch markers
- Measuring tape
- 1 small metal lobster clasp
- 1 small split ring or jump ring
- Optional small clear bead for jellyfish charm
- Optional fabric lining
Abbreviations
- MR – magic ring
- ch – chain
- sc – single crochet
- hdc – half double crochet
- dc – double crochet
- tr – treble crochet
- sl st – slip stitch
- inc – 2 sc in the same stitch
- BLO – back loop only
- FLO – front loop only
- sp – space
- st – stitch
- sts – stitches
Pattern Notes
- US crochet terminology is used.
- Difficulty: confident beginner to intermediate.
- The bag is worked from the bottom upward.
- The bottom begins as an oval.
- The body is worked in joined rounds.
- The mesh section uses alternating single crochet stitches and chain spaces.
- The handles are made separately and sewn securely to the solid top band.
- The starfish and seashell are sewn permanently to the front.
- The jellyfish is made as a removable charm.
- Cotton yarn is recommended because it gives the mesh better structure than very stretchy acrylic.
- Use a slightly firm tension on the bag base and top band.
- Finished measurements can vary depending on yarn and gauge.
Approximate Finished Size
- Width laid flat: 28–30 cm
- Height excluding handles: 24–26 cm
- Base depth: approximately 7–8 cm
- Handle length: approximately 65–70 cm each
- Starfish: approximately 8–9 cm across
- Shell: approximately 7–8 cm
- Jellyfish charm: approximately 8–10 cm including tentacles
Step-by-Step Instructions
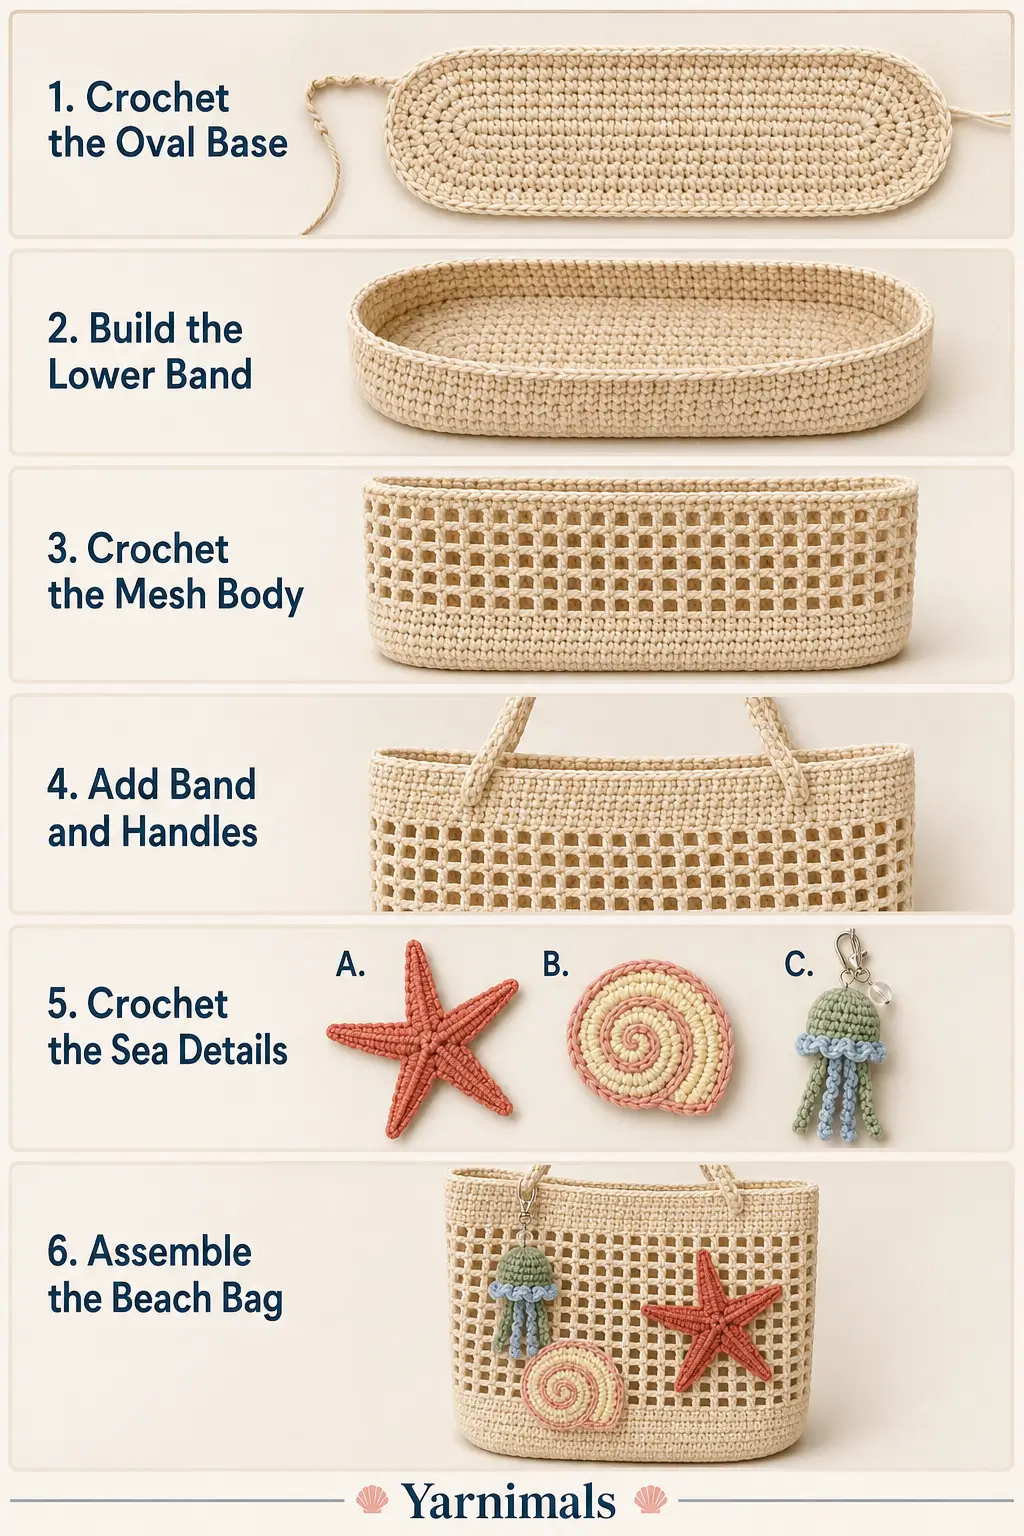
Part 1: Crochet the Oval Bag Base
Using cream yarn and the 4 mm hook:
Ch 39.
Round 1
Work 3 sc in the second ch from the hook.
Sc in each of the next 36 ch.
Work 3 sc in the final ch.
Rotate the foundation chain and work along the unused loops on the opposite side.
Sc in each of the next 36 ch.
Do not turn.
78 sts
Place a marker in the first stitch.
Round 2
Inc in each of the first 3 sts.
Sc in each of the next 36 sts.
Inc in each of the next 3 sts.
Sc in each of the final 36 sts.
84 sts
Round 3
Across the first rounded end:
[sc in next st, inc in next st] × 3
Sc in the next 36 sts.
Across the second rounded end:
[sc in next st, inc in next st] × 3
Sc in the final 36 sts.
90 sts
The base should now form a smooth oval.
Part 2: Turn Up the Bag Sides
Round 4
Working in the BLO only:
Sc in every stitch around.
90 sts
Join with a sl st.
The unused front loops create a subtle ridge around the bottom and help the bag walls turn upward.
Rounds 5–7
Ch 1.
Sc in every stitch around.
Join with sl st.
90 sts
These solid rounds create the reinforced cream band visible along the bottom of the finished bag.
Part 3: Crochet the Mesh Body
Mesh Round 1
Ch 1.
Work:
[sc in next st, ch 1, sk next st] around
You will have 45 sc stitches separated by 45 ch-1 spaces.
Join with sl st to the first sc.
Mesh Round 2
Sl st into the first ch-1 sp.
Ch 1.
Sc in the same ch-1 sp.
Ch 1, sc in next ch-1 sp.
Repeat around.
Ch 1 and join to the first sc.
Mesh Rounds 3–18
Repeat Mesh Round 2.
The mesh section should measure approximately 16–18 cm high.
For a taller bag, continue additional mesh rounds before beginning the top band.
Keep the chain spaces relaxed and consistent so the openings remain evenly sized.
Part 4: Crochet the Solid Top Band
Top Round 1
Ch 1.
Work 1 sc in every sc and 1 sc in every ch-1 space around.
90 sts
Join.
Rounds 2–4
Ch 1.
Sc in every stitch around.
90 sts
Join after each round.
Fasten off after Round 4.
This solid band reinforces the opening and provides strong attachment points for the handles.
Part 5: Make Two Crochet Cord Handles
The handles in the visible design are long, narrow, and cord-like rather than wide flat straps.
A Romanian-cord-style construction gives a similar sturdy braided appearance.
Make 2 identical handles.
Using cream yarn:
Ch 2.
Sc in the second ch from the hook.
Turn the small piece clockwise.
You will see two side loops along the edge.
Insert the hook under both side loops.
Yarn over and pull through, then complete 1 sc.
Turn the work clockwise again.
Find the next pair of side loops.
Work 1 sc through both loops.
Continue repeating:
turn clockwise → insert under the two side loops → work 1 sc
until the cord measures approximately:
65–70 cm
Fasten off, leaving a long sewing tail at both ends.
Make the second handle exactly the same length.
Part 6: Attach the Handles
Lay the bag flat.
Mark the left and right side folds.
On the front of the bag, place each handle end approximately 7–9 cm inward from the side edges.
The two attachment points should be approximately 16–20 cm apart.
Pin the handle ends to the inside of the solid top band.
Using cream yarn and a yarn needle, sew each end through several rows of the top band.
Make repeated horizontal and vertical stitches so the handles cannot pull free.
Repeat with the second handle on the back of the bag.
Make sure:
- both handles are equal in length
- the front and back handle positions match
- the handles are not twisted
- the attachment stitches do not extend into the open mesh
Part 7: Crochet the Coral Starfish Appliqué
Using coral or muted terracotta yarn and the smaller hook:
Center
Make an MR.
Work:
10 sc in MR
Join with sl st.
Do not fasten off.
Starfish Arms
The 10 center stitches allow 2 stitches for each of the 5 arms.
Repeat the following 5 times:
Sl st in next center st.
Ch 8.
Beginning in the second ch from the hook, work:
- sl st in next ch
- sc in next ch
- hdc in next ch
- dc in next ch
- dc in next ch
- tr in next ch
- tr in final ch
Sl st into the next center stitch.
After the fifth arm, fasten off, leaving a long sewing tail.
You should now have exactly:
5 tapered starfish arms
Shape the Starfish
Gently stretch each arm outward.
Rotate the arms so they are evenly spaced around the center.
For extra definition, use the yarn tail to make a few small surface stitches from the center toward each arm.
This creates the slight ridged texture visible on a natural starfish.
Attach the Starfish
Position the starfish on the right front side of the bag.
Place it approximately midway between the top band and lower solid border.
Sew around:
- the center
- the base of every arm
- several points along each arm
Leave the tips very slightly free so the starfish remains dimensional.
Part 8: Crochet the Spiral Seashell Appliqué
The visible shell uses cream, pale yellow, and blush pink.
Shell Center
Using pale buttery yellow:
Make an MR.
Round 1
Work:
8 hdc in MR
Join.
8 sts
Round 2
Work 2 hdc in every stitch.
16 sts
Switch to cream yarn.
Round 3
[hdc in next st, 2 hdc in next st] × 8
24 sts
Round 4
[hdc in next 2 sts, 2 hdc in next st] × 8
32 sts
Fasten off cream.
The shell should be a small flat circular shape.
Pink Shell Border
Join blush pink yarn anywhere around the outside.
Work 1 sc in every stitch around.
Join and fasten off.
Create the Raised Pink Spiral
Join blush pink yarn close to the center of the shell from the back.
Bring the hook through to the front.
Work loose surface slip stitches in a spiral.
Begin near the center and follow the spaces between the crochet rounds.
Continue spiraling outward until you reach the pink border.
Fasten off on the back.
The pink surface crochet should create a clearly raised spiral similar to the visible shell decoration.
Shape the Shell
Pinch one lower edge very slightly if you want a more organic seashell silhouette rather than a perfect circle.
Steam or lightly block if your yarn permits it.
Attach the Shell
Position the shell on the lower left front of the bag.
It should sit above the solid bottom band and below the jellyfish charm.
Sew securely around the back of the shell.
Allow the outer pink border to remain slightly raised.
Part 9: Crochet the Detachable Jellyfish Charm
The upper-left decoration is a small three-dimensional sea-inspired charm with:
- sage dome
- pale blue-gray rim
- dangling tentacles
- metal lobster clasp
- optional clear bead
Jellyfish Dome
Using sage green:
Round 1
MR, 6 sc.
6 sts
Round 2
Inc around.
12 sts
Round 3
[sc, inc] × 6
18 sts
Round 4
[2 sc, inc] × 6
24 sts
Rounds 5–7
Sc around.
24 sts
Do not stuff firmly.
The dome should remain soft but hold a rounded shape.
Switch to pale blue-gray yarn.
Part 10: Crochet the Jellyfish Rim
Rim Round 1
Working in the FLO:
Sc in every stitch around.
24 sts
Rim Round 2
[sc in next st, inc in next st] around
36 sts
Fasten off.
The pale blue-gray edge should flare outward slightly around the bottom of the sage dome.
Part 11: Make the Jellyfish Tentacles
Attach the tentacles beneath the dome.
Straight Tentacle
Using pale blue-gray:
Join yarn beneath the dome.
Ch 25.
Beginning in the second chain from hook, sl st in every chain back toward the dome.
Fasten off.
Curly Tentacle 1
Using sage:
Ch 18.
Beginning in the second ch from the hook:
Work 2 sc in every chain.
The strand will curl naturally.
Attach beneath the dome.
Curly Tentacle 2
Repeat with:
Ch 14
and work 2 sc in each chain.
Attach beside the other strands.
Arrange the three tentacles so they hang at slightly different lengths.
Part 12: Add the Charm Hardware
Thread a small split ring securely through several stitches at the top center of the jellyfish dome.
If using a clear decorative bead, place it between the jellyfish and lobster clasp.
Attach the lobster clasp to the split ring.
Test the connection gently before clipping it to the bag.
Clip the finished jellyfish near the upper left corner, close to one handle attachment.
Because it is removable, you can take it off before washing the bag.
Part 13: Optional Bag Lining
The reference-style bag is attractive unlined because the open mesh is part of the design.
For carrying small objects, however, you can add a simple fabric lining.
Cut two fabric rectangles slightly larger than the bag body.
Sew the sides and bottom together.
Fold the upper raw edge inward.
Place the lining inside the bag.
Hand-sew the lining just below the solid crochet top band.
Do not stitch through the mesh section.
Finishing
Weave in every loose yarn end.
Check the handle attachments carefully.
Shape the oval base with your hands.
Straighten the top band.
Gently stretch the mesh so the holes become uniform.
Arrange the decorations exactly as follows:
- shell on lower left front
- jellyfish charm above the shell near the upper left
- starfish on the right front
Make sure none of the decorations interfere with the handles or bag opening.
Design Consistency Lock
For the finished project to match the visible design, preserve these details.
Bag
- natural cream yarn
- rounded oval bottom
- solid lower border
- open cream mesh body
- solid reinforced top
- two long narrow cream shoulder handles
Starfish
- coral or muted terracotta
- exactly 5 arms
- positioned on the right front
- flat but slightly dimensional
Seashell
- cream and pale yellow body
- blush pink outer border
- raised blush pink spiral
- positioned on the lower left front
Jellyfish Charm
- sage green dome
- pale blue-gray flared rim
- mixed dangling tentacles
- metal lobster clasp
- optional clear bead
- positioned at the upper left
- removable rather than permanently sewn on
Do not add:
- granny squares
- fringe
- tassels
- flowers
- wooden handles
- leather handles
- zipper
- flap
- extra starfish
- extra shells
- multicolored bag stripes
Tips & Variations
For the closest beachy look, use warm natural cream cotton rather than bright optic white. The neutral bag lets the coral, blush, yellow, sage, and pale blue decorations stand out without becoming too colorful.
If you plan to carry heavier items, use mercerized cotton or another low-stretch yarn and reinforce the handle attachment points with additional stitching.
For a wider beach tote, add another increase round to the oval base before beginning the BLO turning round. Keep the total stitch count even so the mesh repeat still works.
For a smaller shoulder bag, begin with a shorter foundation chain and stop the mesh section a few rounds earlier.
You can also make the jellyfish charm separately as a crochet keychain or bag charm.
FAQ
Is this crochet mesh bag suitable for beginners?
The main bag is beginner-friendly if you know single crochet, chains, and working in rounds. The decorative starfish, spiral shell, jellyfish, and Romanian-style handles add a little more detail, making the full project best for a confident beginner.
Will things fall through the mesh?
Small items can slip through the open stitches. Use a removable pouch inside or add a simple fabric lining if you plan to carry keys, cosmetics, or other small objects.
Can I leave off the jellyfish charm?
Yes, but the detachable sage-and-blue jellyfish is one of the distinctive visible details of this design. If you want the closest finished look, include the shell, starfish, and jellyfish together.
Conclusion
This crochet beach mesh shoulder bag combines a practical openwork tote with playful handmade seaside details. The cream mesh keeps the bag light, the solid base and top give it structure, and the coral starfish, pastel spiral shell, and detachable jellyfish charm turn a simple crochet accessory into something much more distinctive.
Save this free crochet bag pattern for a summer project, beach gift, vacation accessory, or everyday shoulder bag, and keep the same construction while experimenting with your favorite soft coastal colors.




Thank you very much for this beautiful pattern. That is very helpful.