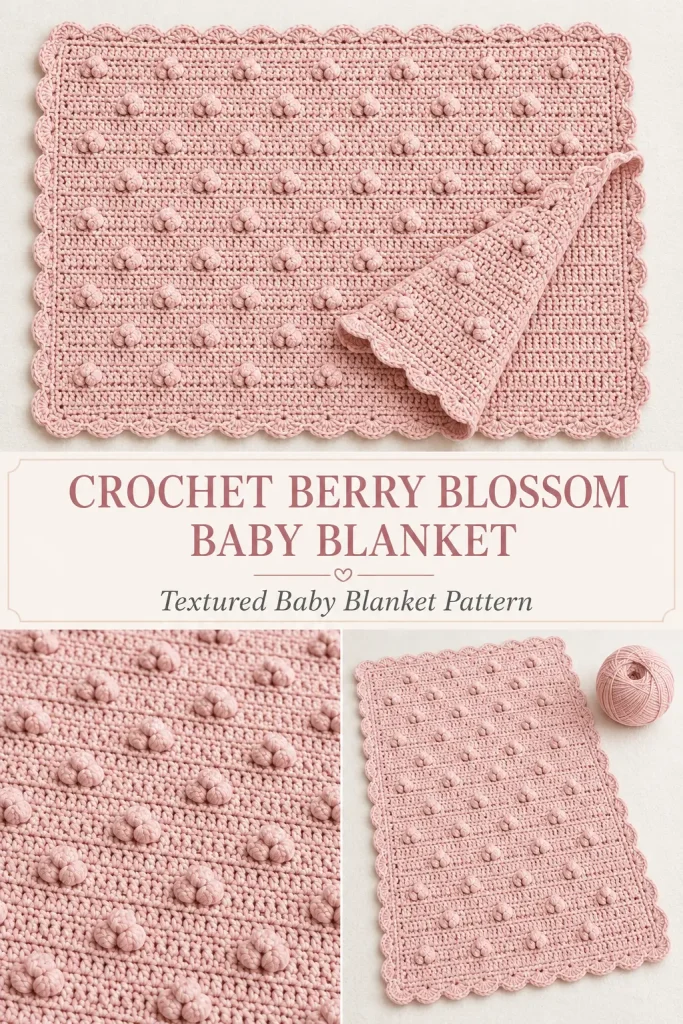
This crochet Berry Blossom Baby Blanket combines a simple repeating stitch pattern with rows of soft raised berries. The textured surface feels cozy without becoming overly heavy, making it a lovely handmade blanket for a new baby, stroller, bassinet, or nursery.
Worked in one gentle plum shade, the blanket has a calm, modern look that lets the stitch texture stand out. A softly scalloped shell border finishes the edges and gives the rectangular blanket a delicate floral feel.
Description
The finished baby blanket measures approximately 26 by 28 inches. Its main body alternates plain single crochet rows with offset Berry Stitch rows, creating a neat field of small raised bobbles across the front. The berries shift position from one textured row to the next instead of forming rigid vertical lines. A single crochet foundation round straightens the perimeter, followed by a rounded five-double-crochet shell border.
Materials
- Four skeins of lightweight cotton-acrylic yarn in soft plum
- 5 mm crochet hook
- Tapestry needle
- Scissors
- Stitch markers, optional
- Blocking mats and rustproof pins, optional
The reference blanket uses Bernat Softee Baby Cotton, a 60% cotton and 40% acrylic blend with approximately 254 yards per skein.
Abbreviations
- ch: chain
- dc: double crochet
- rep: repeat
- sc: single crochet
- sl st: slip stitch
- st: stitch
- sts: stitches
- yo: yarn over
Finished Size
Approximately 26 inches wide by 28 inches long.
Gauge
Approximately 12 stitches and 16 pattern rows measure 4 inches.
Gauge is helpful for matching the sample size, but the blanket can also be customized by beginning with any even number of chains.
Special Stitch
Berry Stitch
Yo and insert the hook into the indicated stitch.
Yo and pull up a loop.
Yo and pull through the first loop on the hook.
Yo again and insert the hook into the same stitch.
Yo and pull up a loop.
Yo and pull through all five loops on the hook.
Push the completed berry toward the front of the blanket if needed.
The Berry Stitch uses one stitch from the previous row and counts as one stitch.
Pattern Notes
- This pattern uses US crochet terminology.
- Ch 1 at the beginning of a row does not count as a stitch.
- Turn after every row.
- The starting chain must contain an even number of chains.
- Beginning with ch 100 creates 99 stitches across the blanket.
- Keep the stitch count at 99 throughout the body.
- Plain single crochet rows separate every Berry Stitch row.
- The berry placement alternates between the two textured rows.
- There is a clear front and back to the finished fabric.
- When working a Berry Stitch row, the raised berries will form on the side facing away from you.
- Check the beginning of each textured row carefully so the berries remain offset.
- End the blanket after a plain single crochet row before adding the border.
Step-by-Step Instructions
Foundation Chain
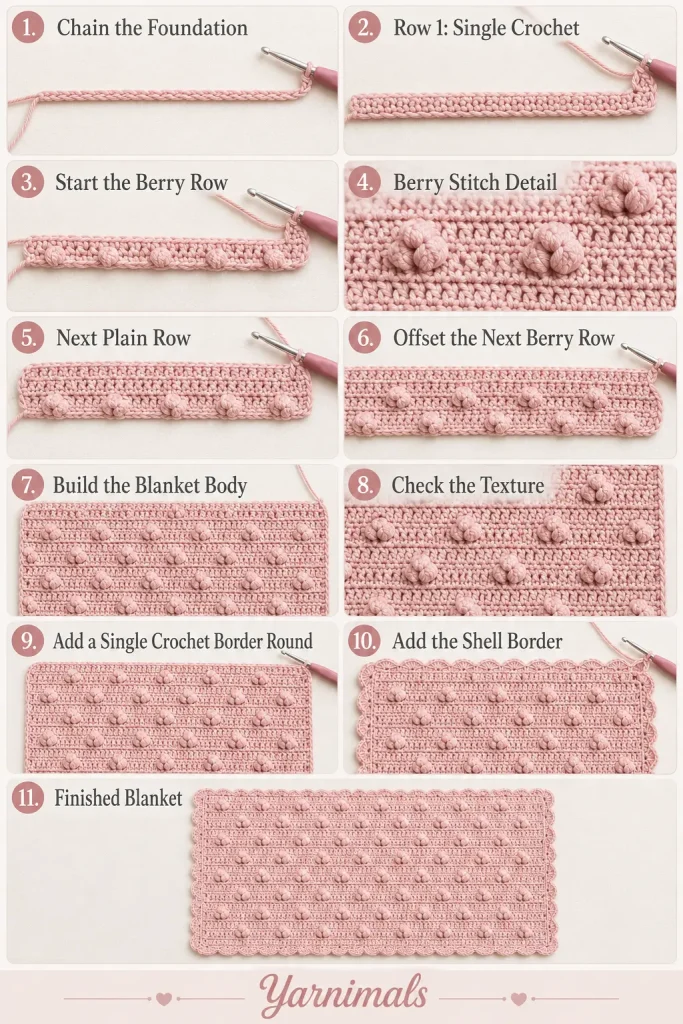
Ch 100.
You may use any even number of chains to change the blanket width.
Row 1
Beginning in the second ch from the hook, work 1 sc in every ch across.
Ch 1 and turn.
99 sts
Row 2: Berry Row A
Work 1 sc in the first st.
Repeat across:
- 1 Berry Stitch in the next st
- 1 sc in the next st
The row should end with 1 sc.
Ch 1 and turn.
99 sts
The berries should face away from you while you work this row.
Row 3
Work 1 sc in every st across.
Ch 1 and turn.
99 sts
The textured side should now face you.
Row 4: Berry Row B
This row offsets the berries from Row 2.
Work 1 sc in each of the first 2 sts.
Repeat across until 1 st remains:
- 1 Berry Stitch in the next st
- 1 sc in the next st
Work 1 sc in the final st.
Ch 1 and turn.
99 sts
This count-checked placement keeps the berries staggered while preserving all 99 stitches.
Row 5
Work 1 sc in every st across.
Ch 1 and turn.
99 sts
Continue the Blanket
Repeat Rows 2–5 until the blanket measures approximately 27–28 inches long or reaches your preferred length.
For matching beginning and ending edges, finish after repeating Rows 2 and 3. This leaves a plain single crochet row at the top before the border begins. The supplied pattern uses this four-row textured repeat throughout the blanket body.
Checking the Berry Placement
Before beginning Row 2, confirm that you have:
- 1 sc before the first berry
- Alternating berries and single crochet stitches
- 1 sc at the end
Before beginning Row 4, confirm that you have:
- 2 sc before the first berry
- Alternating berries and single crochet stitches
- 1 sc at the end
When the rows are positioned correctly, each new berry sits between two berries from the previous textured row.
Crochet the Border
Do not fasten off after the final body row unless you prefer to rejoin the yarn.
Turn the blanket so the textured side faces you.
Border Round 1
Ch 1.
Work single crochet evenly around the entire blanket:
- Work 1 sc in every stitch across the top.
- Work approximately 1 sc around the end of every row along the first side.
- Work 1 sc in every unused foundation loop across the bottom.
- Work approximately 1 sc around the end of every row along the second side.
- Work 3 sc in each corner.
Join with a sl st to the first sc.
Take time to smooth the blanket after this round.
If the sides pull inward, add a few evenly spaced stitches. If the border ripples, remove a few side stitches.
Border Round 2: Scalloped Shell Edge
Continue working in the same direction.
Repeat around:
- Work 5 dc in the next st.
- Work 1 sl st in the following st.
- Skip the next st.
- Work 1 sl st in the following st.
Continue the shell repeat around all four sides and corners.
No separate corner formula is required; keep following the same shell sequence around the perimeter.
When you return to the starting point, join neatly with a sl st.
Fasten off and weave in the remaining yarn tail. The original border uses one single crochet round followed by the repeating five-double-crochet shell sequence.
Weave In the Ends
Thread each yarn tail onto a tapestry needle.
Weave the tail through the back of several nearby stitches.
Change direction and weave through another group of stitches.
Avoid pulling tightly enough to pucker the blanket.
Trim the yarn only after the end feels secure.
Blocking the Blanket
Lay the finished blanket on clean towels or blocking mats.
Lightly dampen it with a spray bottle.
Smooth the body into an even rectangle and gently straighten all four sides.
Arrange the shell border so each scallop opens evenly.
Pin the corners and edges without stretching the blanket beyond its natural measurements.
Allow it to dry completely before removing the pins.
Tips & Variations
Use a smooth cotton-acrylic blend to create visible berries with a light, baby-friendly drape.
A solid color is ideal for highlighting the stitch texture. Soft plum, blush, cream, sage, pale blue, or warm beige would all work beautifully.
Make a wider blanket by adding chains in multiples of two. Keep an odd number of body stitches so both Berry Stitch rows can be staggered correctly.
For a longer stroller blanket, continue repeating Rows 2–5 until the project reaches the desired measurement.
Keep the Berry Stitches firm but not tight. Very loose berries may snag, while overly tight berries can pull the surrounding fabric inward.
Count the stitches after each textured row. Missing the single crochet beside a berry can gradually narrow the blanket.
For a simpler finish, stop after Border Round 1. For a more decorative edge, keep the rounded shell border shown in the finished design.
FAQ
Is the Berry Blossom Baby Blanket suitable for beginners?
The blanket uses basic single crochet plus one textured Berry Stitch. A beginner who is comfortable maintaining stitch counts and repeating short rows should be able to complete it.
How can I make the blanket wider?
Begin with a longer foundation chain containing any even number of chains. Work Row 1 across to create an odd number of body stitches, then follow the same alternating Berry Stitch rows.
Why are my berries appearing on the wrong side?
The berries naturally form away from you while the textured row is being worked. Make sure the raised side faces you when working the following plain single crochet row.
Conclusion
The Crochet Berry Blossom Baby Blanket is a beautiful way to create rich texture with a simple repeating pattern. Its staggered berry stitches, soft plum color, compact stroller size, and scalloped shell border make it a thoughtful handmade crochet gift for a new baby. Save the pattern and make it in a favorite nursery color for a cozy blanket that feels both classic and modern.



